Vengeance-Sound’s Philta XL combines two filters in a single unit, and these can be run unlinked or linked to create notch and band-pass setups with ease.
Each filter has independent controls for resonance amount and width, and an impressive offering of cutoff slopes, ranging from a gentle 12dB up to an ultra-steep 96dB/octave. Also included is a powerful envelope follower, an LFO, and a superb array of effects in the form of ring and frequency modulation, distortion, bit reduction and limiting.
In this walkthrough, we'll get Philta XL’s dual filters moving by taking advantage of its nifty onboard envelope follower.
For more Vengeance-Sound plugin tutorials, get hold of the August edition of Computer Music.

Step 1: Philta XL gives you serious control with its two independent filters and envelope follower. We’ll use the two filters to create a notch filter, before employing the envelope follower and LFO to add a funky wah-wah effect to a Rhodes loop. In a 120bpm project, load Rhodes.wav on a new audio track, then insert Philta XL onto its mixer channel.

Step 2: Notch filtering lets us carve out a specific range of frequencies from a signal. By default, Philta XL is set to band-pass, so change the mode to Notch by flicking the switch in the centre of the interface. Notch mode automatically moves both filters to their extreme settings, so move the Lowpass dial to 350Hz to raise the cutoff and bring some signal back in.

Step 3: Each filter’s cutoff slope can be set between 12 and 96dB/octave. We’ll make the cutoff a bit steeper by changing both to 48dB - just click 48 in each filter section. We can also adjust the resonance width and amount independently for each filter: add bite by changing the Lowpass filter’s Width to 85% and Reso to 50%.

Step 4: It’s a bit dull-sounding at the moment, but we can bring the high end back by lowering the Highpass dial to about 4000Hz. We can also give the high-pass filter a bit of emphasis by adding in a slight peak at the cutoff point. To do this, turn the Highpass Resonance to 40%. Now we’ve set up our notch filtering, we can make each filter move using the envelope follower.

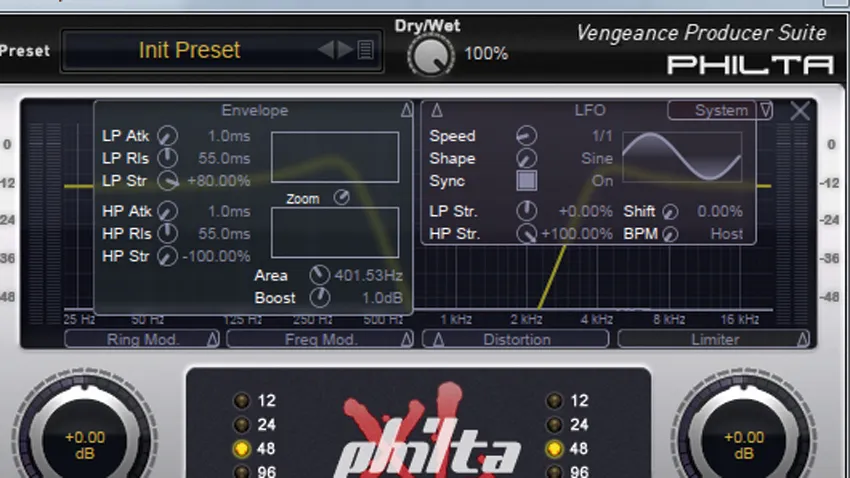
Step 5: Click the Envelope tab to open the envelope follower. This uses the input signal to automate the filter cutoff. The movement of each filter can be set independently, allowing different settings for the body and high-end transients. Turn the LP Str dial up to +80% to get the low-pass filter’s cutoff sweeping upwards whenever a peak is detected.
Step 6: Head to the HP Str dial and pull it down to -100%. This will make the Highpass filter sweep downwards whenever a peak is detected, meeting the Lowpass filter on its rise upwards. For extra movement, click the LFO tab to access the LFO. The HP Str dial controls the amount of LFO sent to the high-pass filter. Turn this up to +100% to make it sweep up and down.
