Packaging essential tone-shaping features into a colourful, user-friendly interface, it’s safe to say that FabFilter’s powerhouse Pro-Q is this generation’s most popular commercial equaliser, having found its way into more producers’ plugin folders than we dare to mention.
The headlining new feature for v3 is its Dynamic EQ mode, whereby any Bell or Shelving EQ band can automatically boost or cut in response to the level of the incoming signal. It’s especially useful for suppressing momentary jumps in a particular frequency range, as the entire signal will only be EQed when those tones are present, leaving other elements unaffected when the offending frequency isn’t there. Conversely, this technique can also be used to dynamically emphasise frequencies that poke above the status quo – that’s dynamic expansion, natch.
It’s worth noting that, unlike many other dynamic EQ plugins, Pro-Q 3 doesn’t allow you to adjust a dynamic band’s attack, release or knee response. Fastidious tweakers may miss these controls on paper, but in practice, the plugin’s program-dependent intelligence and operational simplicity make this often-complex mix technique a lot easier to dial in effectively.
Dynamic EQ isn’t a new concept, of course, but its convenient inclusion in such an all-star plugin will surely open up the potential of this technique to newcomers, which is why we’re going to take you through its operation and uses in the tutorial below.
Don’t worry if you don’t own Pro-Q 3 – simply head over to the FabFilter website and download a 30-day demo. Alternatively, the following techniques can be applied to any dynamic EQ plugin you may already own.

Step 1: Here’s an instance of Pro-Q 3 loaded over a full stereo mix. Harsh vocal sibilance is sporadically jumping out. By hovering the mouse pointer over this range, Pro-Q 3’s Spectrum Grab feature shows us that the sibilance occurs at 2.5-3kHz. We click and drag down to create a new EQ band and notch out the sibilance.
Step 2: This static notch affects other mix elements too much, so we reset Gain to 0dB. Time to get dynamic! Dragging the Gain knob’s outer collar sets the band’s Dynamic Range (ie, ratio) – negative values for attenuation, and positive values for expansion. Put simply, this is the amount of dynamic boost/cut applied.

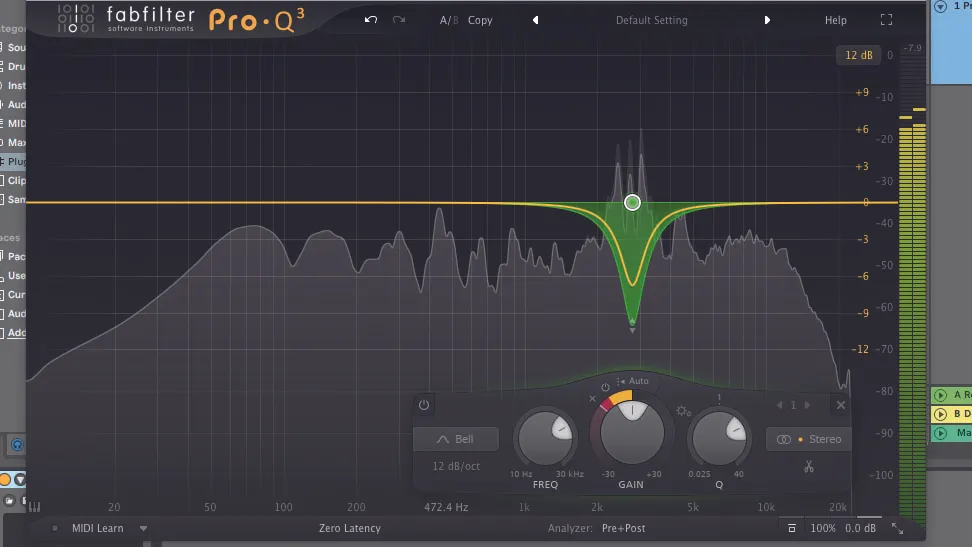
Step 3: The trick here is to set this Dynamic Range value so the EQ notch only attenuates when the sibilance is present, and resets to unity when it isn’t. With careful adjustment, a negative Dynamic Range value of around -5.6dB causes our EQ notch to dip down these frequencies only when the vocal sibilance jumps out.

Step 4: By default, a dynamic EQ band in Pro-Q 3 uses an automatic threshold value, meaning that it’s constantly listening to the volume of the band’s input frequencies and adjusting accordingly. To set a manual threshold amount, we deactivate the Auto button to reveal a Threshold slider, then set this to -26dB.

Step 5: From here, we adjust the band’s Q width just like a regular EQ, precisely lassoing our dynamic EQ notch around the exact area required. Finally, toggling the Bypass Dynamics power button allows us to A/B between the unprocessed signal and EQ-notched version – an essential evaluation technique.
Power tip: Deep ducking
Advanced users will want to explore the possibilities opened up by the plugin’s external sidechain capabilities. Pipe another track into Pro-Q 3’s external input and that signal can be used to dynamically boost or cut a band – for example, if you want to notch out a specific frequency from your bassline only when the kick drum fires.
Note that a dynamic EQ band can be applied to the left or right channel, or to the mono (Mid) or stereo (Side) component of a signal. Oh, and a dynamic EQ band can operate in Linear Phase mode, too.
