RECORDING WEEK 2023: We understand the world of stereo: the audio signal consists of two channels, and then differences in level between one signal appearing in both channels create the impression of the sound appearing from somewhere between the two speakers. Those levels can be changed and adapted, and a sonic object can be made to appear in any place along the line, or indeed move around it.
Dolby Atmos and Spatial Audio take this further. The concept is simple enough: instead of having just two speakers as in a stereo setup, or five speakers and a sub as in a 5.1 surround sound system, Dolby Atmos allows you to play back over whatever system you do have, and will decode the same signal differently, but with compatibility, which means that you can play a full-range Dolby Atmos mix both over a theatre setup or simply by using those two speakers in a home stereo formulation.
A Dolby Atmos setup is denoted by three numbers. While a classic surround setup may be called, say, “7.1”, standing for seven speakers and a subwoofer, one example of a DA setup could be “7.1.2”, allowing for two speakers placed as a stereo pair above the listener. So how does compatibility work with the system? And what’s going on behind it?
Article continues belowHow it works
Because Dolby Atmos will play back based on whatever speaker formulation the listener is using, the way it’s handled by a mixing engineer must be all-encompassing, allowing room for translation. The way it’s done is by mixing in a 360º ‘dome’ around the listener.
As shown in the tutorial below, panning can be done using the Dolby Atmos Music Panner plugin, which allows sounds to be placed anywhere in a 360º circle, and to allow for their elevation as well. With the Panner plugin finished with over a full project, the positional values of each instance can be encoded, and then on playback an opposite system will decode these into audio signals that meaningfully convey the position on whatever the listener’s system is using.
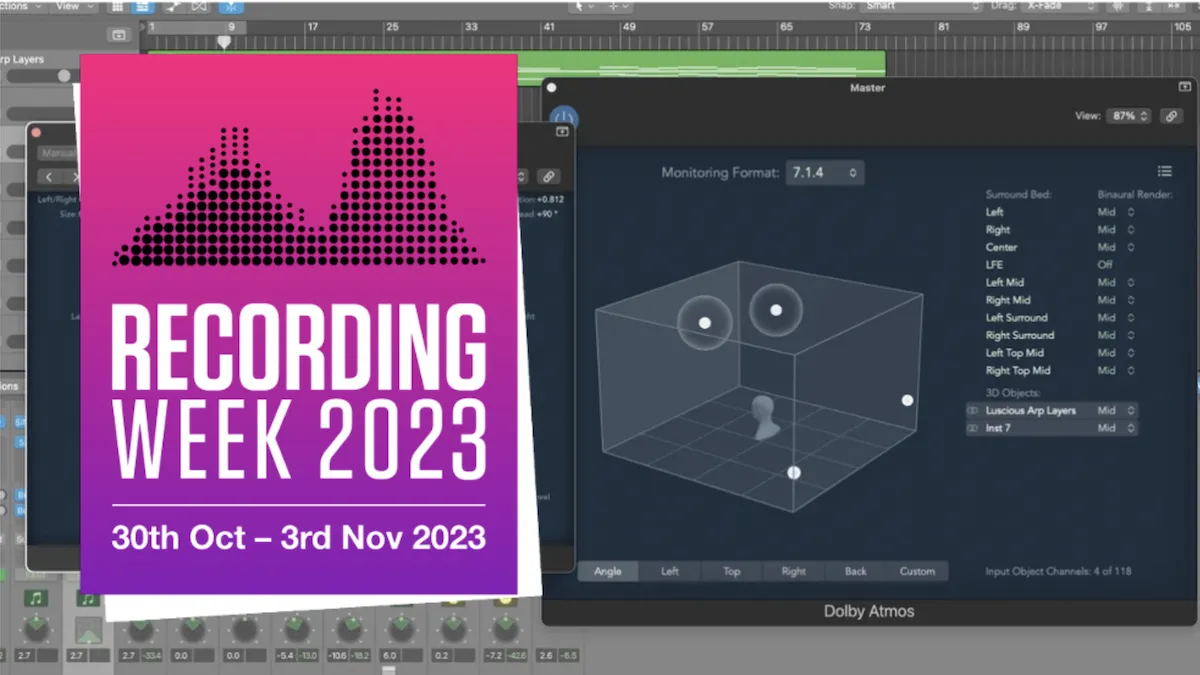
One of the main benefits of Dolby Atmos is its ability to decode these 128 channels and deliver an Atmos mix through everything from a more typical 7.1.4 speaker setup
As for the console (or, more likely, the virtual-console) workflow, a typical Dolby Atmos project will have 64 channels, although 128 are possible. A ‘Bed’ is an output channel that corresponds to a single speaker in a particular Dolby Atmos system that the engineer is using to play the project back. In our tutorial project, these Beds take up ten channels: seven for the head-level speakers, one LFE channel, and two top-front speakers above the engineer.
The remaining 54 channels are taken up by ‘Objects’. Each of these Objects is a pair of channels that can be given its own positional information. Using the Dolby Atmos Music Panner plugin, you can choose positional locations (or movements) for each of these different Objects, and their signals should, when encoded, then reach the Beds in the correct amounts.
Mixing Spatial Audio in Logic
It's over a decade since Dolby Atmos first appeared in cinemas – the premiere of Brave in LA being its first outing in 2012. The technology uses a 128-channel system to deliver a totally immersive experience through multiple speaker arrays at an increasing number of your local Odeons.
One of the main benefits of Dolby Atmos is its ability to decode these 128 channels and deliver an Atmos mix through everything from a more typical 7.1.4 speaker setup – seven speakers around you at ear level, one sub and four speakers above you to give you an impression of height – through to a set of headphones.
This flexibility means that the world of music production is waking up big time to Dolby Atmos and an increasing number of recording studios, including London’s Dean Street, now have Dolby Atmos rooms. But it looks like Apple will be the ones credited for bringing Atmos to the masses. You can enjoy Dolby Atmos through Apple Music where songs mixed in it can now, as Apple say, “feel as though they’re happening all around and above you”.
Artists including The Beatles (Lucy In The Sky With Diamonds) and Billy Eilish (Ocean Eyes) have some of the best examples so it’s certainly being adopted by the big guns.
Now, though, with the release of Logic 10.7, the world of Dolby Atmos is very much open to producers of all levels, and as our tutorial proves, anyone can mix in Dolby Atmos…

Step 1: Say what you like about Apple but they do make tech easy to get your head around, or immerse yourself in. And Dolby Atmos mixing in Logic is straightforward. Take any mix you like, save it as another Dolby Atmos project and convert it via the Mix menu and the new Dolby Atmos option.

Step 2: You then select Dolby Atmos from the dropdown Spatial Audio menu, again new to this version. You’ll then be asked to confirm that you’re cool with the project being converted to a 7.1.2 format. As you have saved it out as a new one, you’re good to go so click ‘OK’.

Step 3: After a visual ‘blink’ several things have now occurred, the main ones being that an all-new Atmos plugin has been added to your master output and all of the regular stereo pan icons have been replaced with surround ones. The Surround Panner has been with Logic for a while…

Step 4: …but it’s the all-new 3D Object Panner that we’re interested in here because, as well as the surround capabilities, it offers that y-axis vertical listening experience. Click on the Surround Output icon for a dropdown menu and select 3D Object Panner. Here’s where the fun starts.

Step 5: You can move your original left/right points around you and also, with the Size option, increase their presence in the 3D field. Raise the height up/down to place your sound above you and, best of all, enjoy all of this on any headphones, though the results differ depending on your cans.

Step 6: Finally, the Atmos plugin. This shows the whole mix around a 3D head, with our two song tracks panned below/behind and above/to the front. As you move the 3D Object Panner on each track, the balls move in Atmos. Export your mix as an ADM-BWF file and all the Dolby Atmos data saves with it.
Working with Dolby Atmos Music Panner in any DAW

Step 1: Let’s have a look at how Dolby Atmos can be encoded in a DAW using the Dolby Atmos Music Panner plugin. The plugin is available in Audio Units, VST3 and AAX versions, and comes for free from Dolby’s website. At the same time, you can install various template projects for a few of the major DAWs.

Step 2: Here in Ableton Live, the template project loads up with ten mono tracks and 27 stereo ones (ie, 54 mono pairs). A copy of the Dolby Atmos Music Panner (VST) is loaded onto each of them, routed and ready to go.

Step 3: The idea is that the ten mono tracks (the Beds) represent your system’s outputs, while the remaining dual-channel pairs (the Objects) are where the setup work happens. You should adjust the Beds setup based on your playback system, and output each of its channels to the correct place.

Step 4: Now for the Panner plugin. We add one mix element onto one of the Object channels, 19-20. Opening the plugin on that pair, we start moving the ‘19’ and ‘20’ pucks around the virtual listener’s head mid-square. With a renderer connected, this will translate the positional information into the correct strength of signals.

Step 5: Because this pair is in Mirror X linking mode, moving one puck will move the other in an equal and opposite direction. In other words, the two are mirrored as if there’s a vertical line in the centre of the square. The pucks also show green and yellow in order to provide a form of metering for the audio coming in.

Step 6: Alternatively, setting Linking to Mirror Y does the same thing as if a mirror is placed horizontally in the centre of the square (as pictured). Mirror XY mode does both, allowing the two members of the pair to be at opposing diagonals, front and back, or left and right… or anything in between.

Step 7: We can alter an object’s Z position using the knob below, bringing it higher up in the playback environment. This only works on a system with top speakers, of course. The Size control aims to make the virtual source appear larger, bringing on more speakers but still prioritising the selected direction.

Step 9: At the bottom, the Sequencer can be activated to make impressive, moving effects. By clicking Edit, you can prime the interface to program movement shapes using the tools provided below. There’s a lot to do here, although it may be more for movie sound than tasteful mixing practices!

Step 9: At the bottom, the Sequencer can be activated to make impressive, moving effects. By clicking Edit, you can prime the interface to program movement shapes using the tools provided below. There’s a lot to do here, although it may be more for movie sound than tasteful mixing practices!
