While we're huge fans of the endless torrent of amazing sampled loops pouring forth from the creative wellsprings of Loopmasters, Zero-G, Noiiz, Sample Magic and the many other great soundware houses, we rarely use such material 'as is'.
No, we always like to tweak our prefab samples at least a little - and often a lot! - in order to disguise their identities and make them our own. Here are some of the ways in which we do it…
1. Chop ’n’ grab
Drum hits baked into full loops are often already processed and layered with other sounds, making them a bit more flavoursome than naked one-shot samples. If you like a particularly nice-sounding drum hit within a loop, make sure you chop it out, isolate the single hit, ditch the rest of the loop, and save the hit to your sample library for later use.
2. Tops tip
‘Top loops’ found in sample packs are just that: sparkling hi-hat and percussion grooves tilted towards the upper end of the frequency spectrum. Instead of using one as-is, layer two similar top loops playing the same pattern, then pan them in opposite directions to add a wide stereo image to your mix that won’t suffer from phase issues when collapsed to mono. You might need to tweak the timing of one (or both) of the loops to ensure the collective groove fits your track.

3. Stretch yourself
Get creative - and destructive! - with your DAW's timestretching. Use a ‘Repitch’ mode to simultaneously pitch and stretch a drum loop beyond recognition for otherworldly textures and oddball grooves. This approach is also excellent for creating rhythmic incidentals: take a fast-paced percussion loop, then shrink it to half or quarter of its original length for fast-paced trills and rolls.
4. Transient tools
Transient shapers are powerful tools when working with audio loops. Use one to tame harsh attacks, or reduce sustain to make hits snappier. Alternatively, crank up a loop’s sustain and pull away its punch to turn a spiky beat into a washy background layer.
Noise gates are also useful for turning a sustained loop into something more staccato - for example, gating out unwanted reverb or splash from a drum loop. And then you’ve got multiband transient shaping plugins like iZotope’s Neutron 2 Transient Shaper, which let you manipulate discrete attack and sustain values within multiple frequency bands.

5. Pattern surfing
Use premade pattern templates for inspiration, then quickly customise them to suit a different context. Be it Ultrabeat presets in Logic Pro, or a Maschine Expansion pack, you can always load up a pattern you like, then swap out the hits for completely different drum sounds. Or, take a drum synth’s preset pattern, but swap out the hits for your own synthesised hits or samples. The great thing about this approach is that it enables you to easily create unique patterns without anyone recognising the original preset.

6. Chain gang
Create and save your own loop-mangling effects chains to your DAW’s library, then load them up over other audio loops when you’re in need of inspiration. Refer to your DAWs manual if you’re not sure how to do this - in Logic Pro, for example, it’s the Save Channel Strip Setting As option, whereas Ableton Live has its Audio Effect Rack system.
7. Processing information
Your DAW’s audio processing tools are invaluable for chopping up sample-pack loops. When you're cutting up and rearranging segments, get into the habit of reversing individual sections on the fly to disrupt the groove’s steady flow. Try fading audio edges in and out for volume variation, or switch up processing effects or warp modes for individual slices.
8. Background noise
Take a short looped section of a drum or percussion loop - say, a quarter- or half-note section - then repeat it under your whole groove, machine-gun-style. From here, use sidechain compression or volume shaping to help it groove and interact around the other elements, and process it with all manner of creative effects. The idea is to create a subtle ‘wash’ of sound that moves and grooves in the background of your track.
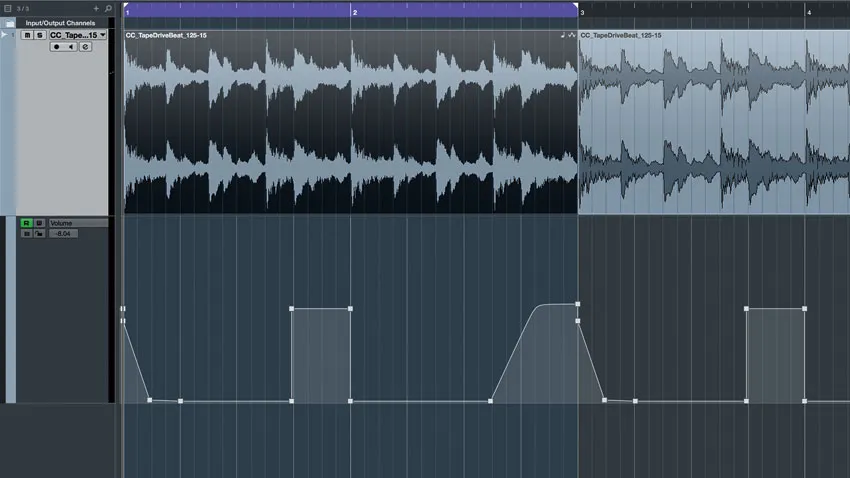
9. Mute mode
Once you’ve got your sample-pack drum loop running in your project, try punching the channel’s mute button on and off to experiment with short bursts of the loop. Once you come up with a more stripped-back pattern you like, you can either automate this mute-toggling in your DAW, call up a volume-ducking plugin such as Xfer Records LFOTool and draw in your rhythmic silencing, or just chop up the loop and delete the unwanted bits.
