Arm yourself with these tried and tested editing and processing techniques - most of them DAW-specific - and your remixing day will go that much smoother.
Get more remixing advice in the October 2017 edition of Computer Music.
1. Ableton Live 9: Audio To MIDI
Live 9’s excellent Audio To MIDI function lets you quickly and effortlessly convert musical samples - whether they’re bass, piano or guitar - into MIDI information that you can then use to layer virtual instruments over the original sounds in order to add your own flavour. You can extract monophonic information
- ideal for simple bass or lead lines - or polyphonic multiple notes from chord samples.
Audio To MIDI often gives slightly incorrect results, especially when working with complex polyphonic material, so you’ll probably need to make a few adjustments to the resulting MIDI clip. It’s still a massive timesaver compared to working out the notes or chords from scratch, though, particularly if you don’t have the music theory chops necessary to pull it off by ear.
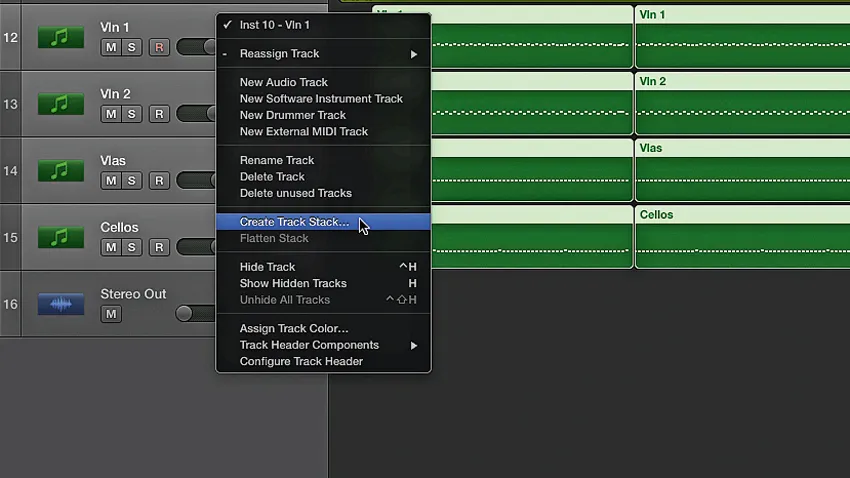
2. Logic Pro X: Track Stacks
If you’re working on a large multitrack session in your DAW, it’s really easy for things to become disorganised, leaving you looking through heaps of channels just to find that pesky hi-hat you want to turn down. Apple’s solution to this problem is Logic Pro X’s excellent Track Stacks feature, enabling you to organise associated tracks into an easy-to-manage, single subgroup.
There are two flavours of Track Stack: Folder Stacks store your selected tracks in a collapsible folder, which is great for keeping things organised; and Summing Stacks go one step further, routing the audio output from each channel into a single bus that can be processed with effects - just like any other bus in Logic! Admittedly, though, Apple’s flagship DAW is late to the party on this one - other DAWs have offered the same functionality for years!
3. Instant bounce in place
Bouncing an audio part in place with processing applied is a simple-but-effective timesaver that’s offered in one form or another by most DAWs. Not only is it a great way of quickly freeing up some CPU power in an overloaded project, but it also works well for printing short effect edits onto a stem, or creating differently processed variations - all without leaving the comfort of your arrange page.
Many DAWs even let you use plugins directly on a single region of audio as well as the actual channel, which is great for quickly trying out effects without wasting time copying chunks of audio onto a separate track.
4. Cubase Pro: Chord Pads
Introduced with Cubase Pro 8, Chord Pads are an incredibly easy and useful system for instantly trying out fresh chord progressions over existing parts. You can assign different chords to each pad, with the Chord Picker and Chord Assistant helping those with less music theory knowledge pick additional chords that fit musically with the ones already chosen.
Once you’ve chosen your chord combo, lay them down onto a MIDI/instrument track by hitting record in Cubase and jamming away to your heart’s content. You can also assign the Chord Pads to a MIDI controller, including control modifiers such as transposition and voicing, making it a doddle to switch the playing pad to a minor or seventh chord and add an extra layer of musicality to your progression.
Introduced with Cubase Pro 8, Chord Pads are an incredibly easy and useful system for instantly trying out fresh chord progressions over existing parts.
5. Ableton Live 9: Chain Selector
If you’re looking for a quick and easy way to deal with your remix parts in Live, add individual chunks of said clips into a Sampler, then bundle the Sampler into an Instrument Rack. Once you’ve done that, you can assign Sampler’s Chain Selector to a macro knob, twisting it to scan through the various sounds in a flash. You can even assign control of the macro to an encoder on your MIDI controller, facilitating rapid switching between the individual instruments, and making it easier and faster to find the sample that works in context.
This is not only great for quickly switching between different sounds in the studio, and avoiding tedious browser auditioning, but is also a great hack if you’re using Live for any kind of live performance.
6. Bitwig Studio 2: In-DAW modulation
One of Bitwig Studio’s most powerful features is its unified modulation system. Every single control in both Bitwig’s own devices and third-party VST plugins can be modulated using the built-in LFOs and envelopes, and MIDI data such as velocity or mod wheel. This means, for example, that you can use a single modulator to modulate the filter on a synth and the plugin effects processing it.
Bitwig’s modulation chops don’t end there, though - you can even use any audio or MIDI signal as a modulation source, which is ideal for taking the shape of that cool bass you like from your remix parts and imposing it on any other sound in your remix.
7. Strip silence
If you’ve just taken delivery of a full set of remix stems, it can be both laborious and time-consuming removing the gaps in between sounds manually. Luckily, the majority of DAWs offer a nifty function to strip the silence out of audio files in one painless move - check your host’s manual to see how it’s done in yours.
If your stems are from live recordings, you can adjust the threshold so that any sound under a certain volume level (-30dB, say) will be discarded - ideal for removing headphone spill from vocal takes or background amplifier noise from guitar parts without losing any of the material you want to keep.
8. Transient trickery
Most DAWs feature some sort of transient detection and slicing workflow. In Logic Pro X, for example, you can easily trim the start of an audio file to the first transient using the Trim Region Start to Next Transient function, while Pro Tools offers a useful Tab To Transient mode that makes chopping up transient-heavy material a breeze. Meanwhile, Cubase Pro 9 shows faint grey lines throughout audio clips to denote transients, with some handy keyboard shortcuts provided to allow quick navigation between them.
9. Logic Pro X: Audio to sampler
One of Logic’s less obvious features is its ability to import any audio files from your arrange page into the EXS24 sampler, simply by selecting the region and hitting Convert To New Sampler Track from the Audio menu. You even have the option to slice your sound up into zones, using the transients as markers - ideal for quickly and painlessly chopping up drum breaks, bass guitar loops or other transient-heavy material and mapping the slices to the keyboard. Meanwhile, if you’re a Cubase Pro user, the brand new Sampler Track offers the exact same function via the Audio menu.
