Music production is undoubtedly one of the most fun and creative things to do with your spare time. However, it does come with a certain amount of leg-work in the form of studio decluttering and project organisation. There are tasks which even the keenest producer dreads.
Fear not, though, for we have ten suggestions for increasing productivity and saving time so that you can concentrate on the enjoyable parts of music creation. Don't try and put these tips into practice when you're raring to go on a new track - instead, save this advice for when you're having some studio down time and you're in the mood for a spot of housekeeping.
1. Organise your samples
Although it may seem like a daunting and time-consuming task, cataloguing your samples is rewarding in the long run. You've probably collected millions of samples over the years and forgotten half of what you have. Take the time to restructure your sample folders on your hard drives so that, whenever you need a particular sample, you know where to find it. This will also help when auditioning sounds, as you won't have to browse through multiple folders.
How you categorise your samples is up to you: BPM / root key / genre / instrument type / source are just some possible methods. But, whichever method you choose, consistency is key.
A final tip: save your samples with your project, as this streamlines the process of loading projects in the future, even if you've since moved your sample collection.
2. Use templates
There will be certain processes and instruments that you'll inevitably use for most, if not all, of your productions. Set up and save some of your most common channel setups and bus routings as templates which you can call upon when you begin a new project.
For example, reverb and delay send channels can be set up in advance. Sidechain routing can also be standardised, where you can tweak the release and ratio, depending on your track's tempo and feel. Your most common master bus settings should be saved with your template, including filtering and limiting plugins. If you use a mastering plugin like iZotope Ozone, you should also save your own presets within the plugin for later recall.
There will be certain processes and instruments that you'll inevitably use for most, if not all, of your productions.
3. Back up everything
Anyone who's suffered a hard drive malfunction or system crash will know the pain of not backing up their data. There are so many options on the market that there's no excuse not to archive your projects.
Apple users have it easy with Time Machine and iCloud solutions built into the OS. On PC, use a completely separate HDD as your physical backup and an additional cloud option. Automatic software which monitors files and updates them to the cloud means that you don't have to remember to manually backup. Gobbler has been developed especially for audio projects. There's also Backblaze, which even backs up your connected external drives.
4. Spring clean your studio
Your studio should be inspirational but also functional, so give your workspace a health-check.
Music production can be a pretty sedentary occupation. You'll spend hours on end sitting down, so it makes sense to get a quality adjustable studio chair which will support your back and promote a good posture.
Set up your chair, monitor and keyboard at the correct heights and angles to prevent RSI and other injuries. Refer to the government's Health & Safety information for specifics.
Lighting in your studio is important to prevent eye strain. There should be no glare on your VDU and lighting should ideally be natural.

5. Sort out your acoustics
Studio acoustics are important. A boxy room with hard surfaces will create all sorts of audio reflection problems. Even if you mix primarily on headphones, you'll still need to check your mixes in the real world.
Forget about the old method of glueing egg cartons to the walls and opt for equally cheap methods like hanging heavy drapes and covering the floor with a thick rug. If you have a bit more cash to splash, purchase acoustic foam for your walls and bass-traps for the corners.
Room analysis packages such as IK Multimedia's ARC System 2 (pictured above) can help pinpoint problems and adjust your DAW's output to compensate.
Your studio should be inspirational but also functional, so give your workspace a health-check.
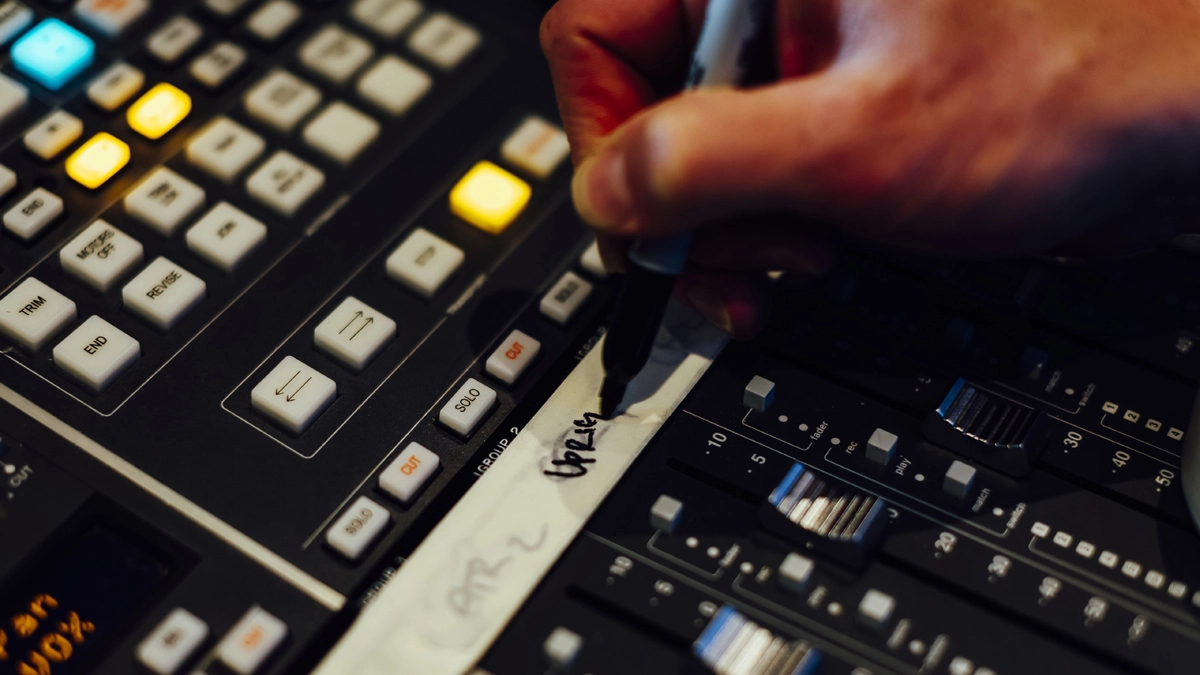
6. Label your hardware
Although a lot of music production is now done 'inside the box', there are still some hardware tweaks which will make your life easier: dedicated hardware transport controls will have you whizzing through your arrangement window with ease.
Customising your keyboard so that the major shortcuts are visible is also useful. Editors Keys produces keyboards and overlays for most DAWs (see below). A cheaper solution is adhesive stickers from Shortcut Stickers.
If you use an external mixer than you can't beat the old-school method of labelling faders with tape and a Sharpie. Don't forget to also label patch-bays and cabling.

7. Standardise track names and colours
If you find yourself working on lots of projects simultaneously, you should stick to naming and colour conventions for all similar projects. This method is especially useful when it comes to bouncing stems, as you can easily find groups of tracks to export by colour.
For example, if all rhythm tracks are titled to begin "DRUMS..." and coloured blue, then they will be easy to identify every single time, no matter how old the project or how many tracks it has.
8. Archive track elements
Once you've finished a track, it can be tempting to do a final high quality mixdown and leave it at that.
You're certainly missing a trick here. Take half an hour to export all of your track elements separately or as stems of instrument groups. Then, name them according to your preferred categories and save them to your sample collection. You'll soon have a wealth of ready-to-go track starters for when inspiration is running low.
If you find yourself working on lots of projects simultaneously, you should stick to naming and colour conventions for all similar projects.
9 Shortcuts and Macros
If you're not using keyboard shortcuts already, you're wasting a ton of time. Read your DAW's manual and learn the shortcuts for the commands you most commonly use. You'll soon find that these become second nature.
Going one step further, some systems and DAWs will allow you to record macros (sequences of commands), which you can recall whenever you need them. A simple macro set to open your DAW and load up a template will save you seconds, whereas a more complex one which is setup to automatically export various combinations of stems could save you hours.
10. Manage your time
Lastly, a few words about productivity. In the 'always-on' digital age, it's very easy to become distracted by email and social media. This is bad news for studio productivity. Unplug the internet to focus. If your willpower is weak, use internet blocker software such as Freedom or Anti-Social to force you to work.
Set specific goals for your studio session, such as completing a track or creating a set number of presets in a certain timeframe. This will help you prevent procrastination and just get on with the job at hand. Don't forget that no track is ever 'finished' and there will come a point where diminishing returns take effect, meaning that your time is better spent putting one track aside and starting work on another.