MIXING WEEK: Loudness in music is a controversial topic. Dynamics in music are important, but a certain perception of loudness and energy is now integral to many modern genres. Some musical styles are light and dynamic, others are dense and full of energy, and it’s up to you to decide where you stand on the loudness spectrum, then execute your vision skilfully. With that said, let's make your music louder!
The first thing to understand is that achieving loudness is not about mastering - it’s about the mix. Yes, one part of mastering is making things louder, but a good, balanced mix has the potential to be made loud at the mastering stage without the music suffering from it too much, while a poor mix doesn’t. You have to have with this in mind when you begin your mix. Mixing for loudness is a process. Have a reference in mind before you even begin. Shoot for a certain predetermined balance and density. Get there by applying a number of small steps in different stages along the way. Avoid overprocessing - do a little bit here and a little bit there.
As these small tweaks accumulate across the entire mix, you’ll get ever closer to a balanced and loud track that can be taken further when the time comes for mastering.

Step 1: In this tutorial, we’ll explore various techniques that you can use to make your music louder. To begin with, we have a simple mix with several flaws. The volume levels aren’t balanced, the sounds haven’t been cleaned up and the dynamics are all over the place. The crest factor is too high and the mix is very quiet.

Step 2: First, we’ll achieve the right mix balance by simply adjusting the channel volume faders. The biggest problem in our example mix is that the sub bass is too loud. This is a very common issue in many home setups as it’s difficult to gauge the true level of sub bass. A spectrum analyser can help you see what’s going on.

Step 3: Sub bass takes up a lot of energy in the mix. As soon as the excessive sub is brought down, we get several dB more headroom on the master fader, allowing us to make everything else louder. This is not a ‘set and forget’ type of adjustment - you’ll need to keep an eye on the balance and fine-tune as the mix progresses.

Step 4: With the initial balance set, now’s the time to make EQ adjustments. The aim at this point is to remove everything that isn’t needed. We're using the free TDR Nova plugin to remove unnecessary low end from the Bass Stab, Conga, Atmo and Vox tracks. I’m also making other small adjustments, removing boominess and excessive brightness where necessary.

Step 5: By removing everything that’s not essential, we’re not only making the mix sound more clean and defined, but are also freeing up yet more headroom on the master fader, making it possible to push the individual channel levels up a little bit more. In essence, the idea is to remove poorly spent energy from the mix.

Step 6: Now that we have the basic levels and EQ sorted, it’s time to start working on the density. Saturation is a great tool for this. We’re using Sonimus Satson CM to slightly saturate the Drum Break, Conga and Bass Stab channels. We’re only looking for small gains in density, not full-blown distortion.

Step 7: Satson CM doesn’t have output level adjustment, so we compensate for the added volume by bringing down the channel faders. There are massive differences between saturation types. Experiment with different plugins and source materials to learn them - good plugins for this include Satson CM, WaveShaper CM and Valve Filter CM.

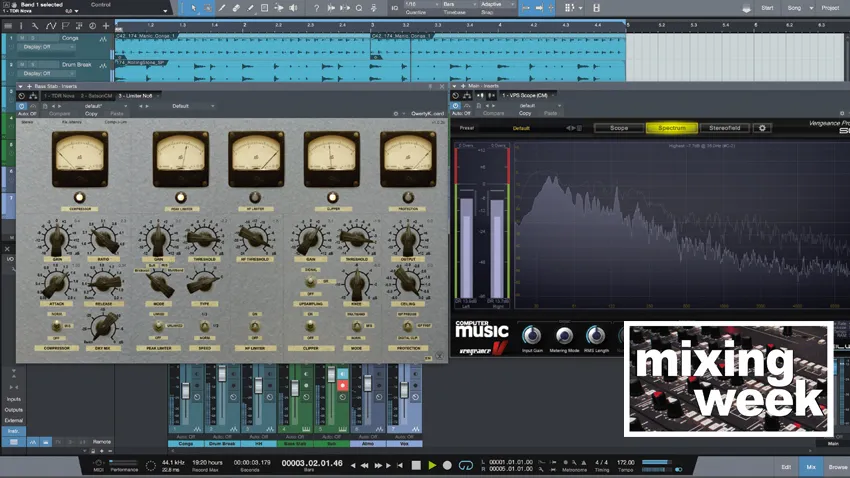
Step 8: Now we turn our attention to eliminating excessive peaks. This allows us to push yet more RMS energy into the master fader without clipping it. We want to bring our crest factor under steady control, which can be done with all manner of plugins, including the free Limiter no6, which has sections for compression, limiting and clipping.

Step 9: Depending on the material, you’ll want to apply different methods to restrict the dynamics and shave off excessive transient spikes. We don’t want to go overboard with the processing - it’s all about 0.5dB here, 2dB there. Once you start doing this across the entire mix, you’ll quickly notice how these small changes start to add up.

Step 10: This is a very destructive technique with the potential to screw up your music completely if done wrong, so listen carefully and use the bypass buttons to A/B as you work. Pay attention to the dynamics of the source material. Snip off excess peaks without affecting the tonal character and punch too much - and nothing more.

Step 11: So far, we’ve only been working on the individual tracks. Now let’s expand the concept by creating three submix buses (Bus Drums, Bus Bass and Bus Other) and routing the tracks through them. This gives us an extra stage of processing to apply the aforementioned techniques. We’ll also place some compression (but no limiting or clipping) on the mix bus.

Step 12: We now have three discrete stages to work with: the individual tracks, the submix buses and the mix bus. We’ve balanced levels, removed unneeded frequencies and done a little bit of dynamics work in each stage, and the end result is a mix that has more clarity and is way louder, denser and more energetic but still packs the desired punch.
MusicRadar's Mixing week is brought to you in association with Softube. Check out the Mixing week hub page for more mixing tutorials and tips.
