Recordings of noise or ambience from the real world often contain interesting textures and harmonics - the sounds around you can be ideal sources for some creative FX design.
Here, we're going to show you how a simple recording can be turned into something else entirely using a variety of processing techniques.
For a complete guide to creative sound design check out Future Music issue 281, which is on sale now.

Step 1: We've taken our trusty field recorder out into the real world and captured a recording of a waterfall, giving us a characterful noise bed to begin with. Although you can use traditional white noise from a synth for this kind of effect, a field recording often provides more interesting results.

Step 2: Instead of processing this sound as an audio file directly on the timeline, we import our recording into our DAW's sampler instrument, allowing us to manipulate the sound using advanced synthesis functions. Field recordings will often contain muddy low content, so the sampler's high-pass filter is engaged to remove any rumbling sub frequencies that can easily clog up the bottom end of a mix and clash with other low track elements.

Step 3: We can now turn our waterfall recording into more of a mechanical evolving rise by making use of the sampler's loop points. By cycling around a smaller portion of the recording, and then automating the Loop Length parameter, we can shorten our loop length over time to create a robotic stutter-like effect as the sound progresses. It's quite subtle at this stage, but we can amplify this effect with some further manipulation.

Step 4: To transform our noisy bed of sound into an uplifting riser, we initially automate the MIDI region's pitch bend to increase by an octave as the sound opens out. This doesn't provide enough of an extreme effect, so we also automate the sampler's Transpose parameter to make the recording's pitch rise over four octaves or so. Although we've automated the sampler and MIDI parameters to affect pitch here, you could use a dedicated real-time pitch-shifting plugin.

Step 5: Once you have a frequency-rich sound that you're happy with, you can creatively filter those frequencies for progression and movement over time. Here we apply UAD's Moog Filter to low-pass our rising noise, opening out the Cutoff to reveal our 'whoosh' effect. Cranking up the plugin's Drive dial gives us more dirt and dynamic levelling, but you can use a separate saturation plugin placed before the filter if your plugin is missing a drive stage.

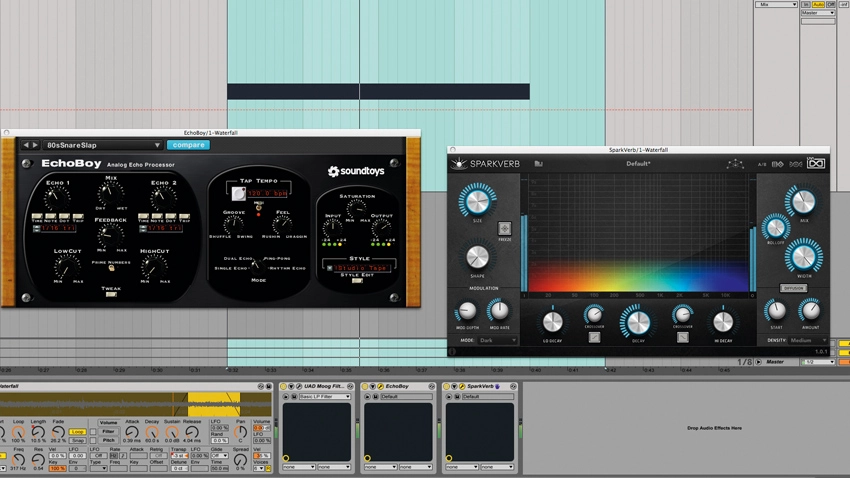
Step 6: Now the core effect is complete, it's time to have fun and experiment with creative modulation and spatial effects. We've kept things simple, only adding delay and reverb in the form of SoundToys' EchoBoy and UVI's Sparkverb, but you can really go all out and tweak different plugin combinations. Some subtle bitcrushing or distortion can add more bite, or a modulation plugin like a flanger or chorus can provide some interesting width and movement.
