Plugin developer Sugar Bytes is known above all else for its range of amazing creative multieffects devices, including Turnado, Effectrix and the rhythmically inspiring Looperator.
With a riot of filters and effects onboard, brought to life using an intuitive but powerful sequencing and modulation engine, Looperator is ideal for creating the sorts of glitches and micro-edits so enduringly popular in IDM and electronic music of all kinds. Download the demo and follow our walkthrough here to get started, and for many more creative effects processing tutorials, pick up the December edition of Computer Music (cm237).
Click here to download the tutorial files referenced in the tutorial.

Step 1: You might be familiar with Sugar Bytes' Effectrix, but for an even more effortless route to sliced loops and glitchy edits, check out the company's other effects sequencer, the super-efficient Looperator. In your DAW, load the WAV files beginning 'Garage…" onto separate tracks in a 135bpm project, and put a limiter on the master bus.

Step 2: Load Looperator on the master bus, placed before the limiter. Even with the Default preset, we get an instant rearrangement of our groove. Click where it says Default to browse the categorised presets and get an idea of what this wild and colourful plugin can do to even the most basic of beats. When you're done, select the User > Default preset, then Init > Init All to call up a blank slate.

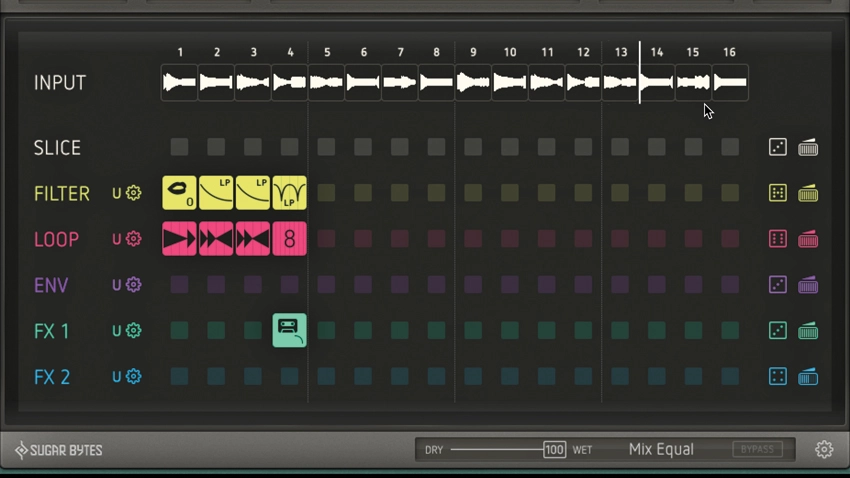
Step 3: Let's design our own effects sequence. Looperator's sequencer runs from left to right, each cell representing a quarter-note by default. The vertical "tracks" are for six different effects that can be active at any one time. Try the Filter row first: click step 1 to reveal a pop-up menu full of ready-made filter movements. Click the upper-left one to add a closing low-pass filter to the first beat.

Step 4: Drag this step across to steps 2, 3 and 4 to copy the effect. Next, use the Loop row to add the Loop 1/4 - 1/4 - 2/4 Rev effect to step 1, then copy it to steps 2, 3 and 4 in the same way. Drag where it says Filter to move that track above the Loop one, changing the processing order - the sound is now filtered before being looped, giving a totally different result.

Step 5: This has given us a pretty tasteful IDM-style edit, but we can fine-tune it further. On the Filter lane, set step 1 to the O option for a vowel filter, adding a vocal-like timbre to the sound. Set step 4 to Lowpass Wobble (upper-right in the menu). In the Loop lane, set steps 1 and 4 to Loop 3/4 - 1/4.

Step 6: On step 4, add FX 1's Tapestop Slow, then change Loop to 8 for a descending snare rush. Resample the output to a new track, for easier arrangement. Finally, try putting individual sounds through Looperator to create variations and remix elements, and pile on even more effects to create insane effects sequences that bear no resemblance to the original input!
