Want to take your effects pedal collection into battle onstage? Or refresh your existing setup into something more efficient? Read on as we break down the essential components, tips and buying options for a great pedalboard.
Choosing a pedalboard
It can be difficult to visualise what size of pedalboard you need to accommodate all your gear. Here's a good tip: grab a large sheet of paper or cardboard and neatly arrange your pedals on it. Make sure you leave enough space between the pedals to attach and disconnect your patch leads, and for your power supply and cables. Include a few empty spaces in case you add to your stompbox arsenal later on - it'll save you having to upsize your 'board in the near future.
Now draw a box around the whole ensemble and measure it (taking into account the height of your wah and volume pedals).
Buying advice: types of pedalboard
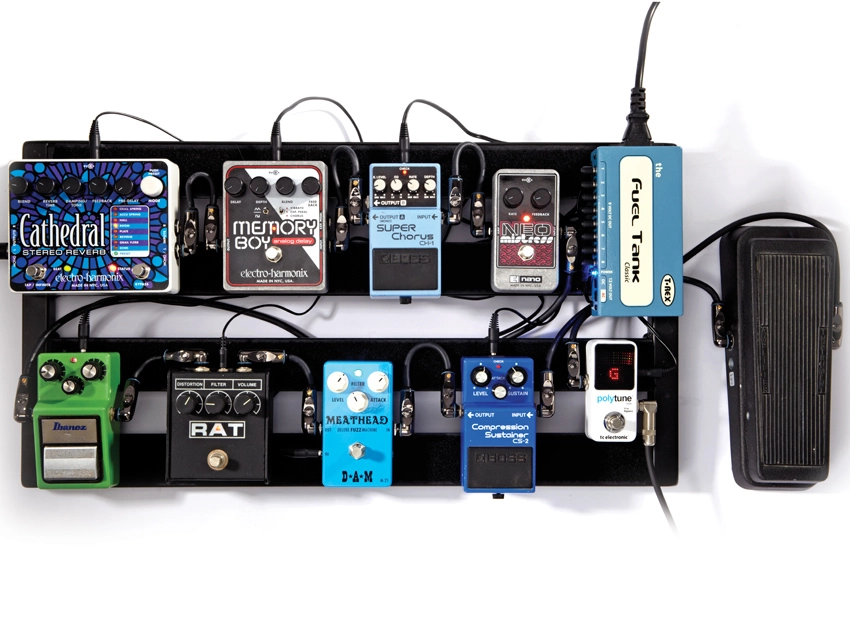
Brand specific: If, say, all your pedals are made by Boss, consider the brand's sturdily built BCB-60 pedalboard and carry case for £99. It accommodates up to six standard Boss pedals.
Pre-made: There are a number of companies offering pre-assembled 'boards. Pedaltrain has a range of metal-built options, starting with the diddy 14 x 5-inch Nano (£49). We used the PT-2- SC for ours (£119 with softcase).
Custom: Once you've got your measurements you can have a custom-sized 'board made to road-tough flight-case spec.
Securing your pedals
Some people like using cable ties, but in our opinion Velcro is the Rolls-Royce of stompbox-to-pedalboard adhesion. Simply cut the Velcro to size, remove the protective paper and stick one side to the pedal and the other to the pedalboard (two strips are enough to secure any pedal in place). Its simple 'loop and hook' design creates a strong bond yet still allows you to yank a pedal from its position on the 'board if you need to.
If you have pedals with rubber 'feet', you might have to remove them to allow the two sides of the Velcro to make contact when the pedal is on the 'board.
Buying advice: securing your pedals
Velcro: Buy Velcro in rolls or square-pad formats from any hardware or fabric shop. Expect to pay around a fiver per pack.
Cable ties: While these little plastic strips are easy to fit, you'll have to snip them off if you want to remove a pedal from the 'board. You'll get 100 for less than £3 at most hardware shops.
Blu-Tack: Yes, we've seen people attach pedals to 'boards with great blobs of the stuff. Don't do it. It's great for posters but not strong enough to hold pedals securely
Powering your pedals
If you need to run a bank of pedals, a multi-output mains supply makes better sense than using batteries. First, assess what you need from your power supply. Regardless of whether you're going to pick a budget supply or splash out on something a bit more serious, check that the voltage, amperage and polarity are compatible with your pedals.
Cheaper supplies will power up to 10 pedals but they will only supply 100mA (milliamps) to each unit. If you have a pedal that requires more juice than that you'll need to look elsewhere. Less expensive supplies can generate a lot of hum, too.
Buying advice: powering your pedals
Batteries: Tone fiends love them for vintage and analogue pedals but digital ones eat batteries for breakfast. Only use batteries if you have to.
Budget power: Many music shops offer a budget Powerbank DC9X (£29.95) that powers up to 10 pedals.
Pro-standard power: We used the T-Rex Fuel Tank Classic (£155) that handles up to eight stompboxes requiring the most common 9V power requirement, plus two 12V. The Junior model (£105) can power up to five 9V pedals.
NEXT: patch cables, unsung stompbox heroes, and pedal ordering
Patch cables
There are two golden rules with pedalboard patch leads: use the shortest possible cable you can and buy the very best you can afford. Unnecessarily long and poor-quality cables can zap the top end from your signal chain. They look messy, too, and might get in your way when you're stomping a pedal on or off.
Measure the distance between a pedal's jack socket and its neighbour's socket. If you have two banks of pedals, you'll also need a custom-length cable to connect the top and bottom tiers. When you know the number and length of cables you need, source them pre-made, have them custom spec'd, or buy a length of cable and some angled jack plugs and make your own if your soldering skills are up to scratch. It's easier still to buy a solderless cable kit.
However you roll, when it comes to sourcing patch leads heed ye this advice: always carry spares.
Buying advice: patch cables
Quality cables: Don't buy those plastic-moulded £1 jobs you see in music shops. Look for quality brands like Planet Waves and Klotz. Expect to pay upwards of £5 per cable.
Build your own: Single-core dual-screened cable suitable for making guitar leads costs around £1.80 per metre from electrical suppliers like Maplin. Pro-quality, quarter-inch mono jack plugs cost around £4 each.
Cable kits: The Planet Waves PW-GPKIT-10 Pedalboard Cable Kit we used (£54) comes with 10ft of cable, 10 right-angled screw-in jacks and a cable cutter. Best of all, you don't need to solder.
The unsung heroes
Noise gates, compressors and EQ pedals might not be the most glamorous stompboxes in the world, but they are crucial to the integrity of your signal chain. A noise gate cuts the hideous background hum that occurs when you run a bunch of stompboxes together - particularly high-gain distortion pedals and modulation effects like phase and flange - and it shuts off the signal and the nasty hum when your guitar's output falls beneath a pre-determined level. It's literally like a gate shutting. Only a consistently strong signal from your guitar can metaphorically kick the gate open again.
While an EQ allows you to meticulously tailor your tonal spectrum, a compressor squeezes your guitar's signal to regulate its output and add sustain. The compressor makes sure that each whack on the strings has consistent volume and attack. You can also use a compressor to simulate the natural compression of a valve amplifier.
Pedal order
You won't damage your pedals if you put them in the wrong order. In fact, some of the greatest guitar sounds of all time came about thanks to some accidental experimentation. That said, for this guide we've chosen a standard setup:
Tuner > wah > compressor > distortion/overdrive > modulation effects (eg, chorus/flange) > time-based effects (eg, reverb/delay)