
Imagine you had an instrument that could change its size, shape, and material while you play it: that’s the goal of physical modelling synthesis.
Various kinds of synthesis can mimic acoustic instruments, but while subtractive synthesis might use resonant filters to create something akin to a piano or violin, the results are unlikely to fool even a casual listener. Physical modelling goes much further.
This kind of synthesis pushes the mathematical side of things to the max, using complex algorithms to emulate not just the sound of an acoustic instrument, but the way they’re physically played as well. The results are uncannily realistic.
But why, you might wonder, would we use synthesisers to simulate real instruments when you could just use a sampler? The answer is versatility. Physical modelling can be used to create realistic versions of existing instruments, or it can be used to make new hybrid instruments that couldn’t possibly exist in real life. It’s a powerful combo that has attracted legions of fans among sound designers and musicians alike.
In this article, we’re going to survey three of the most powerful physical modelling synths by taking a look at the basic concepts, terminology, and workflow of these instruments. Once you have a hang of the fundamentals, and put in a little work, physical modelling synths can become one of the most useful tools in your arsenal.
Getting real
Physical modelling synths build off the same principles as other synths you might have used, and when you first open one up, you’ll probably see recognisable elements inside, such as filters, envelopes, and LFOs.
What’s different about these instruments is the way they generate sound. To get a sense of what’s going on, just think about how an acoustic instrument operates; we might have a string to vibrate and produce sound waves, a guitar pick to start the vibration in motion, and the body of the guitar to provide extra resonance.
Physical modelling employs algorithms to simulate each step in this process, creating a virtual version of the acoustic instrument. Of course, each modelling synth is different: some might focus entirely on strings, some on percussion, or others on woodwind instruments.
However, there are some common terms you’re likely to see no matter which instrument you’re using. There will probably be a selection of ‘Resonators’ which model the vibration of various materials such as wood, metal sheets or strings.
There will also be an input section where you can choose how you want to activate the vibration (mallet, bow, impulse, square wave etc). There may also be a section that lets you filter your sound through resonant bodies of different shapes and sizes.
With just these three sections, you can produce scintillating tones and textures – but of course, that’s just the start. Most synths let you control density, object stiffness and many other variables as well, making it possible to sculpt every aspect of the virtual instrument.
Three of the best physical modelling synths...
Madrona Labs Kaivo

Madrona Labs’ outside-the-box thinking has made Kaivo a fan-favourite among physical modelling aficionados. Proudly independent and with a do-it-yourself ethos, the instrument walks a fine line between realism and sonic experimentation.
When modelling acoustic sounds, the synth offers fine-grain control and modularity, letting users customise the signal path to create the kind of variation and nuance that makes a string instrument realistic.
And if you’re looking to get weird, Kaivo has plenty of potential to push the envelope. The LFO 2D outputs two signals instead of one, and with independent control over the X axis and Y axis output, users can modulate with traditional shapes like sine waves or with more esoteric sources, such as a gaussian bell-curve.
Similarly, the granular input source opens up a near infinite variety of possible sound combinations as fragmented audio files are used to hit or pluck the resonator string.
- Buy: Madrona Labs Kaivo
Making an acoustic bass with Kaivo

Step 1: Kaivo uses a modular patching system to allow you to easily connect different parts of the synthesiser together. To begin with, simply click and drag from the pitch outlet in the ‘Key’ module and link it to the left pitch inlet on the Resonator module.

Step 2: Kaivo has a pretty large selection of Resonators to choose from, including various string types and even metal springs. As we’re putting together an acoustic bass sound, load in a Gut String Resonator.

Step 3: The sound of an acoustic bass depends not only on the strings but on having a large resonating body to colour the sound. Try adding a Large Wooden Box in the Body module and listen to how it filters the string sound.

Step 4: Now it’s all about the details. On the Resonator module, spend a little bit of time with the Sustain and Brightness controls – you’ll want the sound to have a nice, percussive attack and a lot of warmth.
Expanding the possibilities with Kaivo

Step 1: In comparison to a real instrument, Kaivo’s Body module lets you dynamically move the contact point for each voice’s resonator. To try this out, begin by loading the Bright Bells preset and add a Metal Plate body.

Step 2: Using the Body module’s XY pad, it’s possible to shift the Resonator’s contact points before or during playback – try moving the position to hear how it changes the resonance and timbre.

Step 3: You could do this by hand, but Kaivo also has a powerful LFO section. Try connecting the LFO’s XY output to the Body modules input section to give the bells a constantly evolving tone.
Applied Acoustics Chromaphone 3
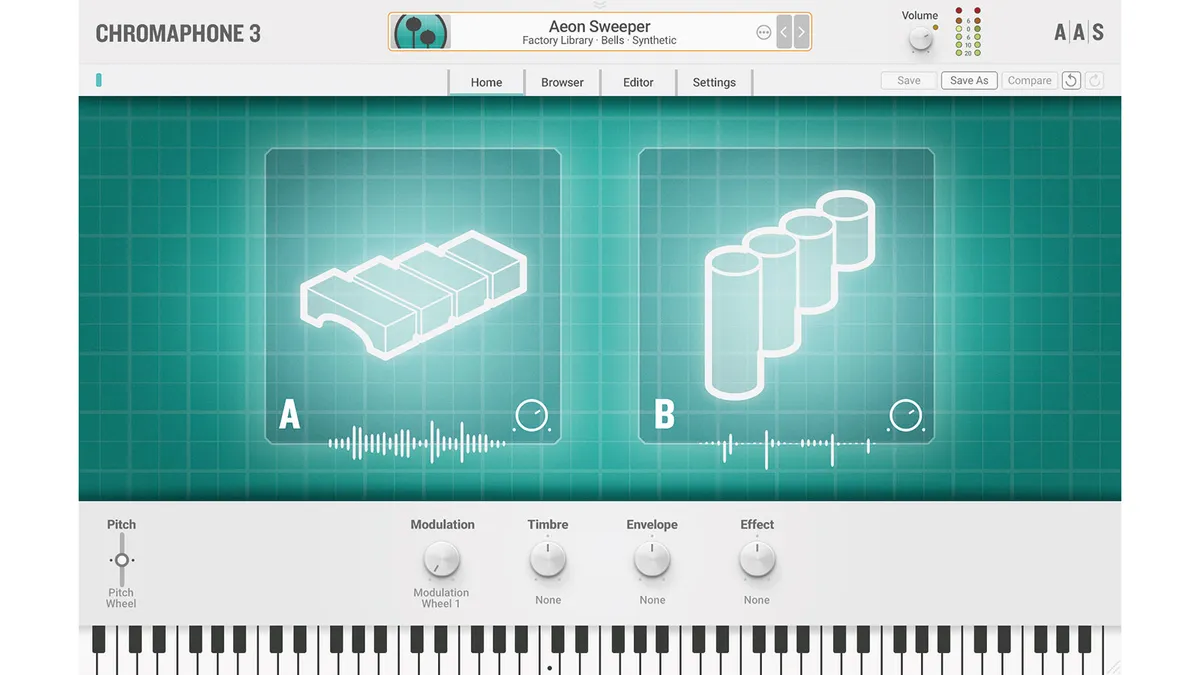
One of the friendliest physical modelers, Chromaphone keeps your head clear from distractions but still lets you get stuck into making the exact sound you’re after. With version 3’s new two-layers-of-layers system, Chromaphone is double the power.
Chromaphone 3’s Couple feature adds more nuance by processing the two Resonators in parallel or sequence. When coupling is off, the two resonators are activated independently, and the Balance slider controls the volume mix of the two sources. This is closer to how physical modelling synths have worked in the past.
However, when the two Resonators are coupled, they work more like a real instrument – the energy used to activate A feeds into B. Some of B’s energy is then reflected back into A and you get a complex, interactive feedback loop between Resonators. In the coupled configuration, the Balance slide controls how much energy transfer occurs between the two resonators.
Using Chromaphone to create pitched percussion

Step 1: Let’s make some pitched percussion using AAS’s Chromaphone 3 physical modelling synth. You’ll see two independent layers of sound (A and B) on the Home tab. For now, we’re concentrating on A. Head straight over to the Editor tab to get started.

Step 2: On layer A, click on the Synth page to see all the essential parameters. We’re going to start by choosing our own Resonators. Try selecting Marimba for Resonator A and Open Tube for Resonator B.

Step 3: Next, fine tune the Decay parameter for Resonator A to give the marimba a shorter, more percussive sound. It’s also important to experiment with the Balance parameter to make sure Resonator B isn’t too loud.

Step 4: The marimba on Resonator A has a Material parameter which lets you shift the marimba sound from soft wood, all the way to a bell-like tone, similar to a vibraphone.

Step 5: The next step is to fine-tune the stiffness of the mallets that are setting are activating our resonators. Chromaphone lets you morph from hard impacts to soft brushes.

Step 6: Finally, we want to play around with where the mallets are hitting our resonators. A real player can play at the very edge and produce a thinner sound, or right in the middle to produce the maximum resonance. So can we!
Modelling a snare drum with Chromaphone

Step 1: Let’s start on Layer A’s Synth page. We’ll use a membrane for Resonator A, pitched down half a semitone. For Resonator B, select an open tube and bring it down a minor sixth. Make sure the two resonators are Coupled.

Step 2: Turn on the Noise input and give it a HP and an LP filter. Adding noise alongside the Mallet will give our snare sound a bit more ‘rattle’. Take some time to tune the cutoff frequency of the filter so you have a nice bright sound.

Step 3: Move over to Layer B’s Synth page. We want to add some extra sizzle in the top end of our sound, so we’re going to have two membranes for Resonators – one pitched up a fifth and one up a major seventh.

Step 4: For layer B, we don’t want our Resonators to be coupled, so deselect this. Next, use Mode Density to control the higher partials of our snare. The difference can be subtle, but listen for brightness when you change between Low and Full.
Rhizomatic Plasmonic

While physical modelling synthesis started out as a way to realistically simulate acoustic instruments, there’s no reason why the same principles can’t be used to make wholly unrealistic, out-of-this-world noises.
Combining physical modelling with other methods of synthesis, like subtractive, vocal, and granular, means that even when it sounds impossible, it still sounds physical and tangible in a way that many other digital instruments don’t.
Forward-thinking synth designers tend to use innovative input sources like noise, granulated samples, or digital waveforms in combination with customisable resonators and extensive modulation options. Not only can these instruments produce sounds which are impossible to make on a real instrument, they can make sounds that couldn’t be created using any other type of synthesis – don’t even try.
An example of this is Rhizomatic’s Plasmonic. Dreamed up by the developer who brought us the excellent Absynth, it combines physical modelling with subtractive synthesis to bypass cliché synth sounds and instead offer hybrid instrumental textures that excite and delight.
Sure, you can produce accurate-sounding acoustic basses or keys, but really this is just the starting point. The synth takes a proudly digital approach and offers tons of synthetic waveforms and impulses that can be used to excite the resonator. Coupled with a decidedly idiosyncratic user interface that eschews most physical modelling conventions, it’s easy to see why this synth has become such a favourite.
- Buy: Rhizomatic Plasmonic
Moving on to Plasmonic

Step 1: Initialising Plasmonic gives you a simple Pluck Impulse to activate the Resonator module. Start by changing the Impulse type to ‘Piano:Brushed’.

Step 2: Our Attack speed is a bit fast for our Impulse type, so adjust the ADSR to give the sound a smooth onset and medium length decay.

Step 3: Plasmonic’s Resonator can support multiple input sources at once. Try adding a noise source via the input buttons at the top of the Resonance module. Take some time to tweak the frequency and resonance values on the Noise module.

Step 4: In addition to a simple note trigger, you can create echoes or rhythms by triggering the Impulse using divisions of beats or time. Click on the T button and pick Pulse B as the trigger.

Step 5: Next, head to the ‘Trigger’ page on the right and activate Pulse B. By default it’s set to re-trigger every 0.25 seconds – but we want variation here. Right-click to bring up the modulation menu and add a Random percentage to the trigger.

Step 6: Finally, we want to add a bit of space to our sound – but why settle for a regular old reverb? Plasmonic’s FDN Formant reverb lets you colour the instrument with subtle vowel sounds, creating an ethereal human-harpsichord hybrid.
