Songwriting basics: how to create smoother chord progressions using voice leading
Try applying this music theory technique to your synth pad parts
Defined as ‘the linear progression of individual melodic lines, voices or parts and their interaction with one another to create harmonies’, voice leading is a music theory technique rooted in choral and orchestral arrangements.
In a nutshell, it involves breaking chordal parts down into individual voices, then making each voice flow from chord to chord in a logical way.
In, say, a string quartet, each player has their own part that, blended, make a continuously evolving harmony. Voice leading needn’t be limited to backing vocals and string arrangements, though - it can also make a big difference when making piano-based chord progressions and pad parts sound smoother.
Being largely keyboard or guitar-based, a lot of modern pop songs don’t have to worry about how the individual notes in the chords they’re playing are moving. Using a MIDI keyboard to play synthesised strings, for example, it’d be easy to play the first chord with three notes, the second with four, the third with six and the fourth with three.
However a real string section would need players jumping in and out from chord to chord to accommodate those extra voices, which would sound uneven.
The first step in using voice leading to smooth out your pad parts then, is to make each chord contain the same number of notes, corresponding to the number of players in your virtual ensemble. As we go from chord to chord, think of each note as belonging to one voice throughout.
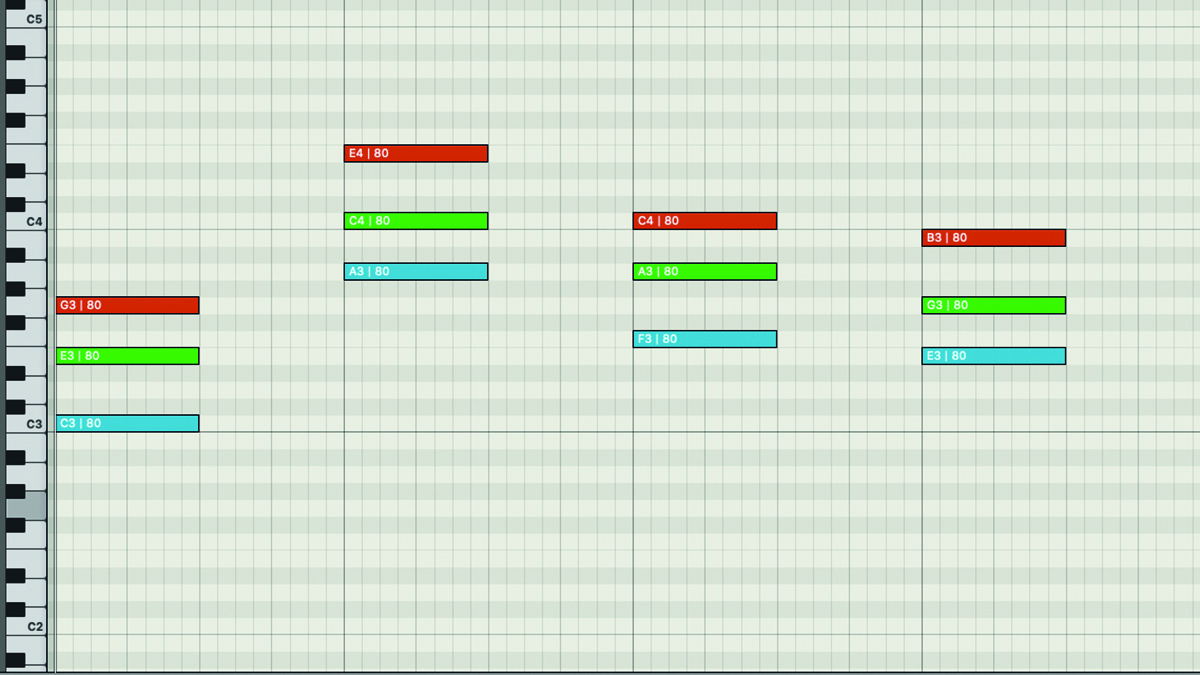
Step 1: Here’s a MIDI part playing a four-chord progression - C, Am, F, Em, with all chords played in root position. This means that the root note of each chord is at the bottom of the stack - ie, the lowest pitched note. This gives a disjointed sound, as we jump about the keyboard following the root note of each new chord and stacking chord tones up from there.
Want all the hottest music and gear news, reviews, deals, features and more, direct to your inbox? Sign up here.

Step 2: Starting with the C major chord, we have four voices to use to build this chord. However, each triad only contains three distinct notes, so we can use the fourth lowest voice to play the root note of each chord in the bass register. What we have here - C-E-G-C - is known as a closed voicing, since all notes fit inside one octave with no space in between them.
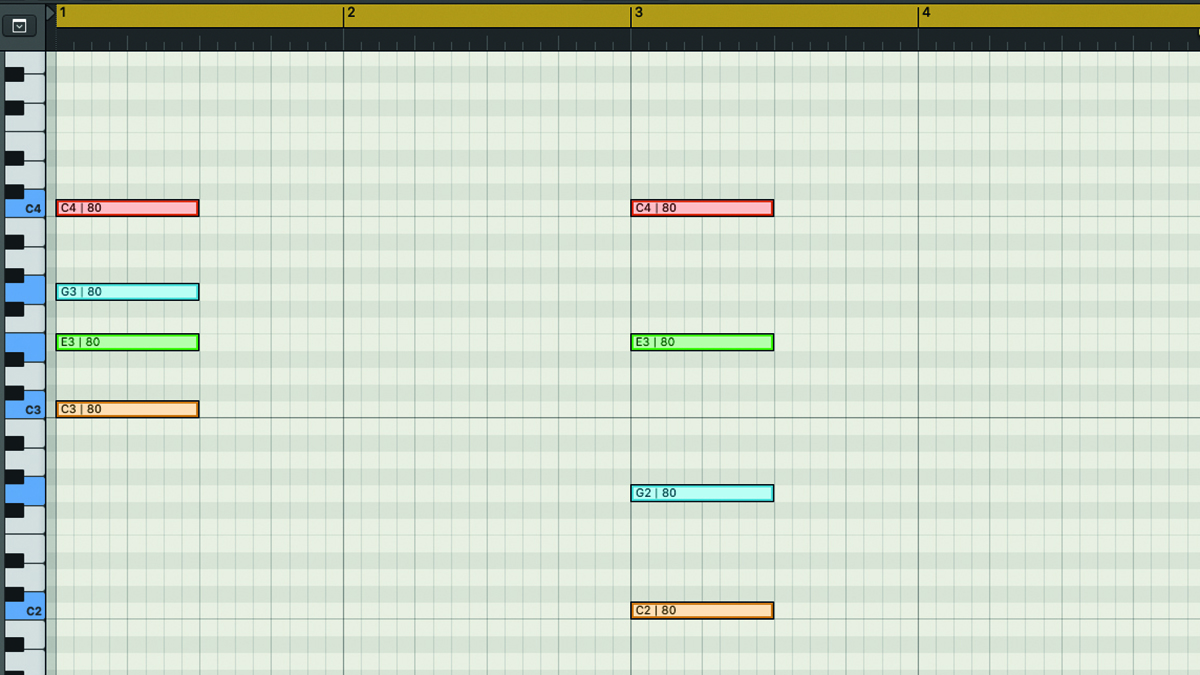
Step 3: Triads like this nearly always sound better played with open voicings, with notes spread over more than one octave, and decent space between. Let’s use what’s called a ‘drop 2-4’ voicing. Taking our closed voicing, number the notes down from the top 1,2,3 and 4. Then take notes 2 and 4 and drop them an octave. This takes us from C-E-G-C to C-G-E-C.

Step 4: So where next? This is where voice leading comes in. Good voice leading practice usually looks for the smallest movement possible pitch-wise between the voices within the chords. So if each note in our first chord is thought of as an individual player, what note could they each move to in the next bar to generate Am, the second chord in our progression?
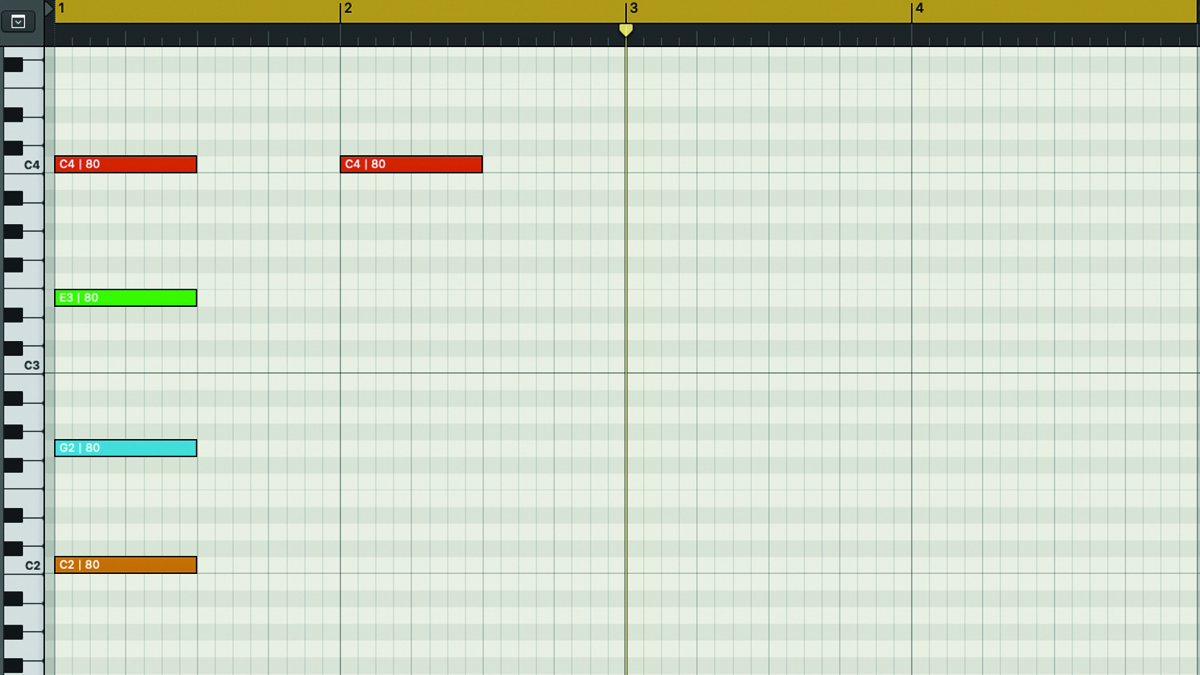
Step 5: The chord tones of Am are A, C and E, so our current top note of C has a few possible choices here. It could go from C up two whole tones to E, down three semitones to A, or it could stay where it is on C to provide the third of the Am chord. This works well if we’re looking for as little movement between notes in each chord as possible, so we’ll keep it at C.
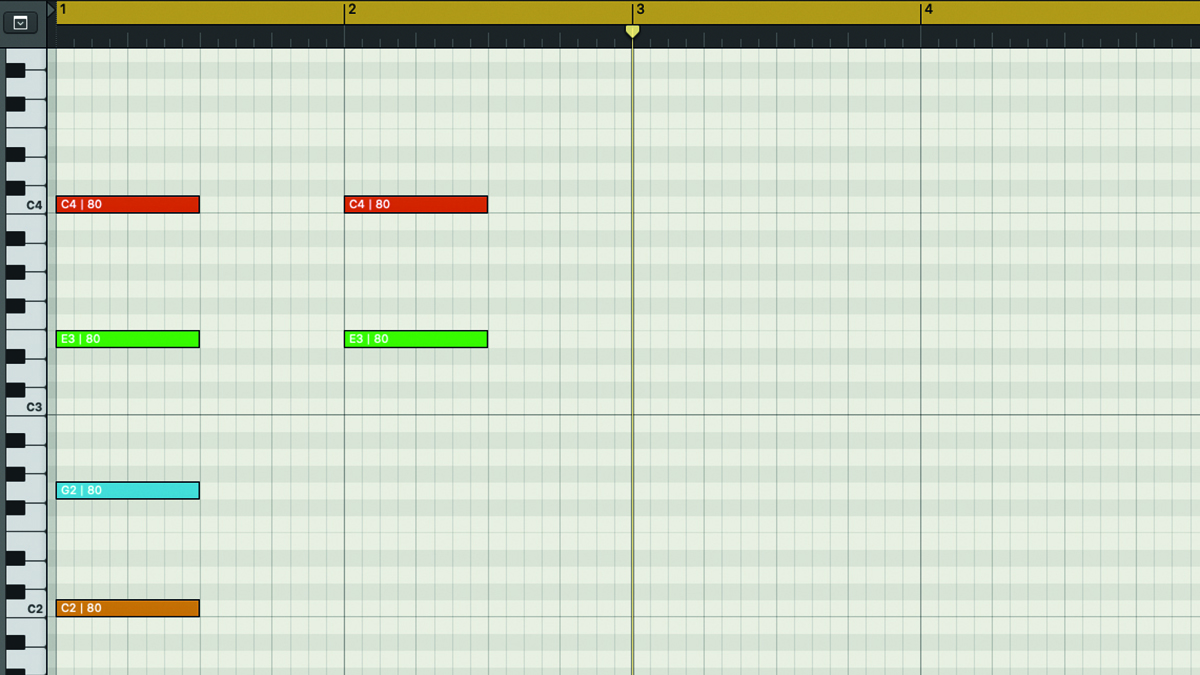
Step 6: The next note down in our C major open voicing is E. We could shift this to A, but that’s a huge upward jump of five semitones - not ideal! There’s also the option of dropping it down four semitones to C, but since E is also already in the chord of Am, this note can stay put as well, to make up the fifth of our Am chord.

Step 7: The next note down, G, could either go up a tone to A or down three semitones to E. We’ll send it to A, as it’s not only a smaller movement, it’s also the root note of the chord. We already have the third (C) and the fifth (E), so the addition of this A as the root note means that our triad is now complete.

Step 8: Our lowest note, the bass C note, can shift down three semitones to the root of the chord, A. This works fine because we’re using the lowest of our four voices to reinforce the root note of each chord, acting as a kind of built-in bass part.
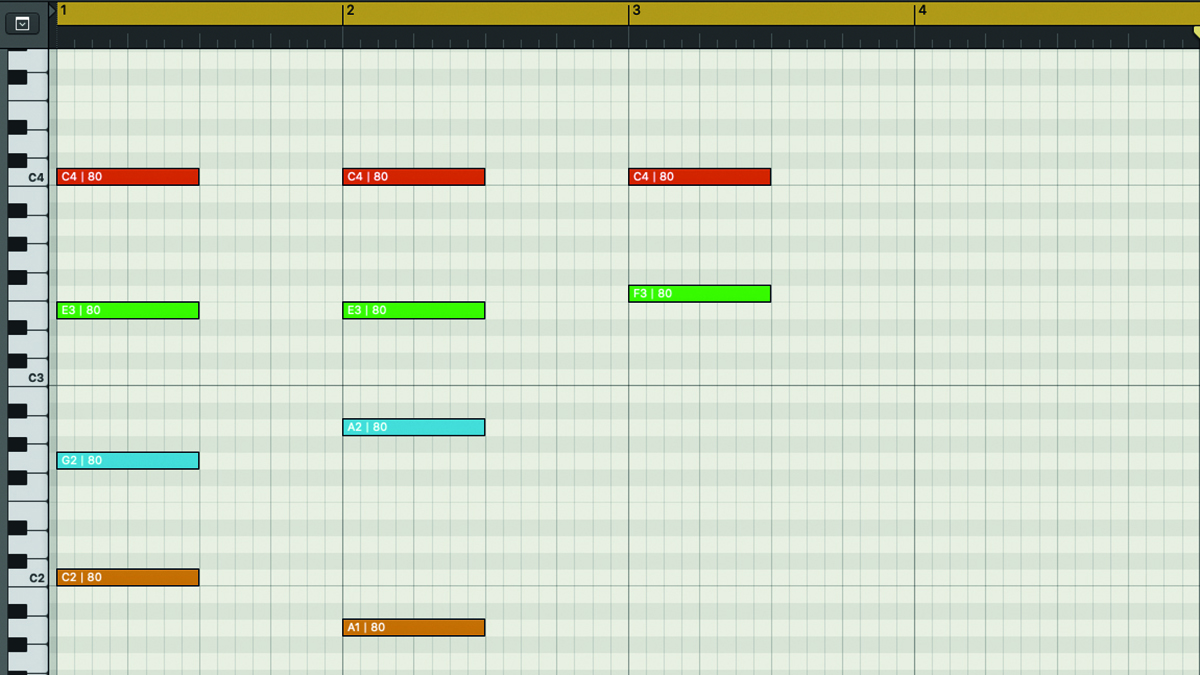
Step 9: We move onto chord three - the F major chord. The chord tones of an F major triad are F, A and C. So going from the top down once more, our top C can stay where it is to provide the fifth of the F major triad, while the next note down, E, can shift a smooth single semitone up to the root note of the chord, F.
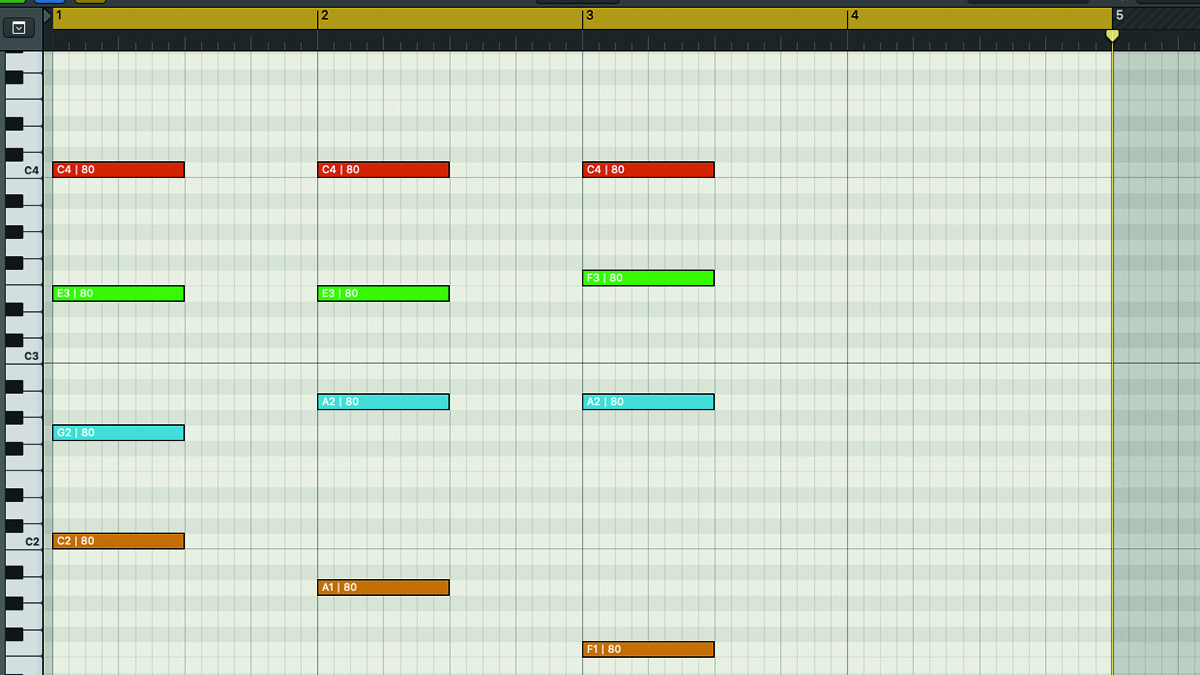
Step 10: The third note down from the top, A, can stay put, since it counts as the third of the F major chord, while the lowest note, being the bass note, has our permission to move the greatest distance pitch-wise, down a whopping four semitones from A to the root note of F.
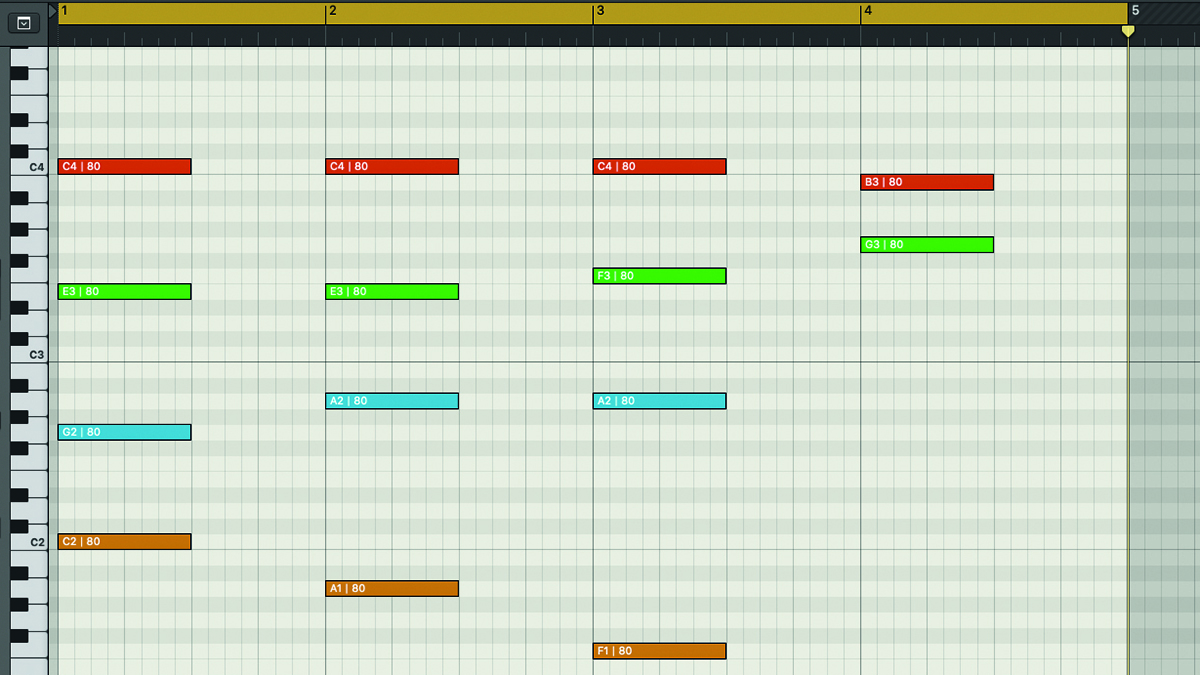
Step 11: For the final Em chord (the chord tones of which are E, G and B), we could just drop everything down a semitone, but for a less obvious alternative, let’s revoice our chord slightly. Our top note, C, can drop a semitone to B, while the second note down from the top, F, can move up a whole tone to G to form the third of the Em chord.
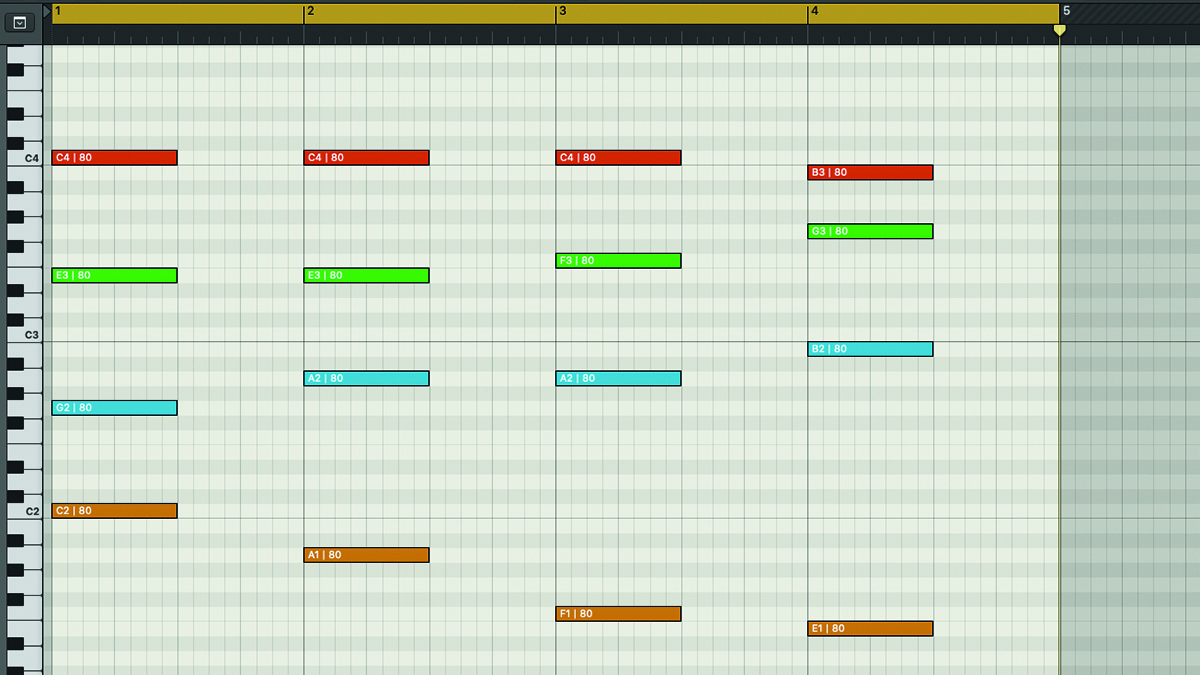
Step 12: The third note down can go up a whole tone from A to B, while the bass note can follow the example of the top note and drop down a semitone from F to E. With all four chords now voiced, we can use the colours to visually trace the individual melodic lines taken by each voice in the part, revealing perfect, smooth voice leading.
Pro tip
If you treat every note in a piece as if it’s an individual voice like this, you can think of things in two dimensions, both vertical and horizontal. For instance, if you take a vertical slice out of a piece of music and view all the notes played at any given moment, you can see how all those notes combine to create the sound of the music in that single moment. This is what we mean by a chord voicing. However, if you track horizontally how each individual voice moves across time as you play through the piece, you’ll see that each voice creates a sort of melody line all of its own. This is what we mean by voice leading – the movement of each individual note from chord to chord.
Computer Music magazine is the world’s best selling publication dedicated solely to making great music with your Mac or PC computer. Each issue it brings its lucky readers the best in cutting-edge tutorials, need-to-know, expert software reviews and even all the tools you actually need to make great music today, courtesy of our legendary CM Plugin Suite.
