
Compression is the most complex of all audio effects or processes available to the modern audio engineer, even more so than EQ, reverb, or delay.
The choices available when designing a compressor (the topology, signal flow, gain computer, etc.) provide near-infinite permutations, which is why every compressor behaves and sounds distinctive from one to another, and why specific compressors have become time-tested favorites for their unique controls and desirable sonic characteristics.
There is a common misconception that compressors are automatic volume faders. This notion is entirely wrong. Compressors change the frequency content of an audio signal due to the fundamental parameters at the heart of a compressor’s circuit (e.g., ratio, attack, release, etc.) In short: compressors alter the sound. Faders do not change the sound, just the volume.
I’ve had the pleasure (and pain) of listening to (and applying) compression in a wide variety of recording studios and concert venues. After decades of dialling, I can attest there is no single, definitive way to approach compression. In this article, I’ll share some concepts that you can use as a starting point for exploring the world of compression for yourself.
If you'd like to find out more, I’ve published a book called Audio Dynamics: Compression Techniques for Modern Mixing and Mastering, that explains in detail the art, science and history of compression, and shares time-tested settings for mixing drums, vocals, instruments, stereo groups, and mastering.

What is compression?
Dynamic range compression is achieved by reducing the volume of loud sounds, or increasing the volume of quiet sounds, thereby “compressing” the dynamic range of an audio signal. The process of compression has many applications in audio recording, mixing, and mastering. Audio compression is accomplished by utilizing hardware or software signal processors. The hardware or software designed for compressing audio signals is called a compressor.
Essentially, compression adjusts the volume of audio relative to a threshold level set by a control on the compressor. Audio signals louder than the threshold are attenuated, while sounds below the threshold level are unaffected.
Compressors can improve an audio signal’s perceived quality by taming irregular volumes and improving vocal intelligibility. Harmonics and tone can also be enhanced. When audio is compressed correctly, the result should be free from noticeable fluctuations and sound “clearer” with more depth and dimension. If compression is not applied correctly (or at all), the listener might be distracted by variations in volume and need to adjust the loudness of their playback system.
Compared to other audio effects (such as reverb), it can be challenging to set up compressors effectively, especially for beginners, because the impact of the compressor’s settings is not apparent to the untrained ear. A wrongly configured compressor will introduce numerous unpleasant artifacts to an audio signal.
Parameters you need to know
A compressor has four primary settings.
Threshold determines at what volume level the compression circuit becomes active and ultimately controls the gain reduction applied to the audio signal. The threshold is one of the most important settings on a compressor as it determines the audio signal level when the compression process activates. The threshold of a compressor is set in decibels (dB) and usually relative to 0 decibels Full Scale (dBFS). If a low threshold is set (e.g., -30 dBFS), then a large portion of the signal undergoes compression as compared to a higher threshold (e.g., -10 dBFS).
Ratio controls the amount of compression applied once the audio signal reaches the threshold, ranging from 1:1 (no compression) to infinity:1 (maximum compression). The amount of compression applied to an audio signal is expressed as a ratio. For example, if the ratio is set to 4:1, an input of 4 dB above the threshold will result in an output of 1 dB above the threshold. This translates into a 3 dB reduction in volume level.

Higher compression ratios such as 10:1 and 20:1 are known as limiting. Here the compression amount is noticeably higher, dramatically reducing the audio signal’s dynamic range. Limiters are a subset of compressors. The highest compression ratio possible is infinity:1 (or ∞:1), also known as brickwall limiting, which attenuates the audio signal to an exact threshold level (see Fig. 7).
Attack determines the time it takes for the compressor to react once audio exceeds the threshold. Release is the time it takes for the compressor to bring the level back to normal once the signal is below the threshold. Compression is applied gradually instead of instantaneously, and there are controls for attack and release times— also known as the time constants of a compressor. When a compressor is described as “fast” or “slow” it’s in reference to the fastest attack times possible.
With most compressors, the attack and release times can be adjusted and are typically set in milliseconds. However, in some designs, especially older compressors, the attack and release times are determined automatically. For example, with an optical compressor such as the popular LA-2A, the input signal sets both time constants automatically, making the at- tack and release program-dependent.
Additional, optional compressor parameters include make-up gain, knee, sensing algorithm, and stereo linking.
A compressor allows a user to manually add gain to the output to compensate for the level reduction caused by compression. This is called make-up gain. Some modern compressors have auto make-up gain.
The knee setting refers to how a compressor transitions between non-compressed and compressed states, with soft or hard as the usual settings. A soft knee setting allows for more gradual compression than a hard knee (i.e., the harder the knee, the more quickly the compression will occur). Many tube and optical compressors do not offer a knee setting, as most are soft knee only by design.
Some compressors respond to instantaneous levels of an input signal, also known as peak-sensing. Although they offer better peak control, peak-sensing compressors can cause rapid variations in gain reduction. Most compressors utilize RMS-sensing (root mean square), an averaging function, before the input signal is compared with the threshold.
A compressor can apply equal amounts of gain reduction to both the left and right channels of a stereo signal if set to operate in stereo-linked mode. For many stereo compressors, this is the default setting (as opposed to dual-mono mode) and is calculated by combining (or averaging) the gain of the left and right channels. Stereo linking helps to avoid image shifting in stereo mixes with wide stereo content (e.g., dense reverb, ping pong delays, or hard panning).
Types of compressor
Tube
Vacuum tube compressors are the oldest type, with slower attack and release times than their more modern descendants. Consequently, tube compressors offer a distinctly “vintage” sound. Their slower time constants and feedback topology are most suitable for quieter sources.
While tube compressors often produce soft, round, and euphonious-sounding compression, a tube compressor’s ratio will increase as the gain reduction increases (i.e., the sharper a transient is, the more it will be compressed), resulting in non-linear transfer curves. This may or may not be ideal, depending on the source content and intended result. Tube compressor examples include the Fairchild 670 and Manley Variable Mu.
Optical
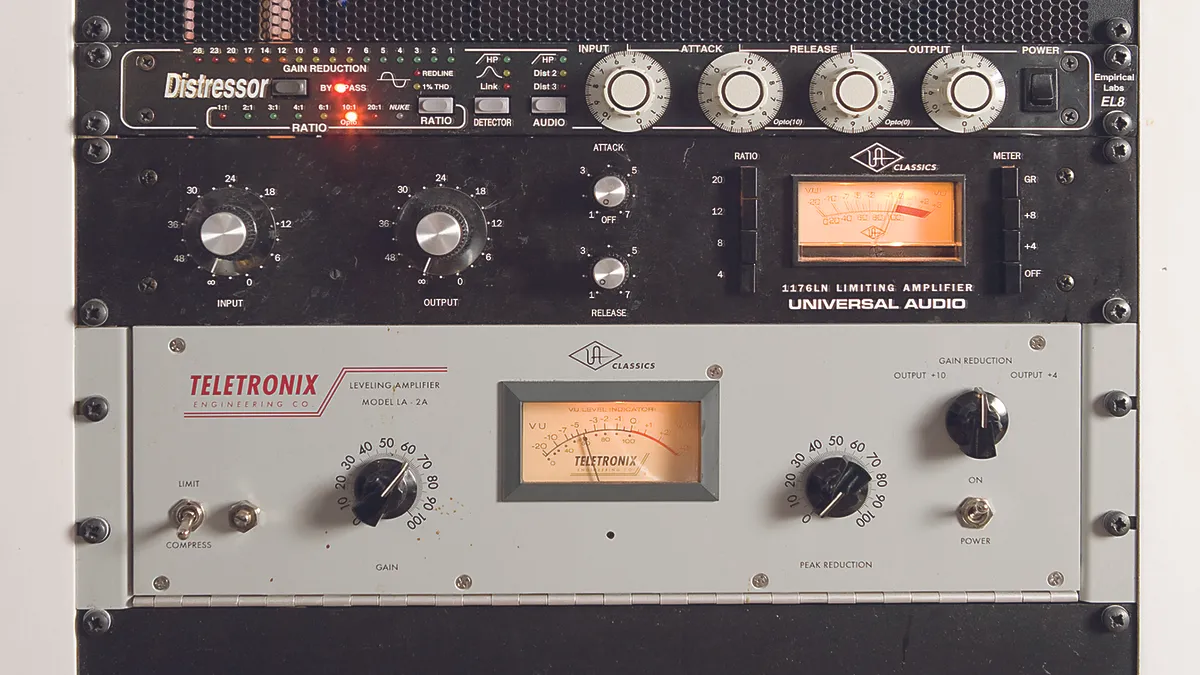
Optical compressors utilize a photocell arrangement (i.e., a light source and a light detector) to generate a CV. An increase in the amplitude of an audio signal causes the light source to increase in brightness. This increase in detectable light triggers the compressor to attenuate the audio signal.
The photocell arrangement typically involves an LED or electroluminescent panel for the light source and a light-dependent resistor (LDR) for detection. The light source acts as a transducer, converting electrical energy (i.e., the audio signal) into electromagnetic energy (i.e., visible light).
In addition to volume, the audio signal’s frequency will also affect how the light source reacts. This contributes to an optical compressor’s non-linear attack and release times. Optical compressor examples include the Teletronix LA-2A and Tube-Tech CL 1B.
Field-Effect Transistor (FET)

A field-effect transistor (FET) uses an electric field instead of thermal energy to switch the current through the channel. Applying a voltage across the gate changes the conductivity of the channel, allowing current to move through the channel.
FET compressors are clean, fast, and designed to emulate a tube sound with transistors. FET compressors are loved for their aggressiveness and tendency to add harmonic distortion to the sound source when driven hard. FET compressor examples include the Universal Audio 1176 and API 527.
Diode Bridge
In a diode bridge compressor, the amplitude of the audio signal causes detectable changes in the amount of current flowing through a diode bridge. The CV changes as the audio signal moves the diodes away from their bias points.
Since the circuit’s gain depends on both of the bias currents (determined by the sidechain control voltage) and the audio signal, there is an inherent amount of total harmonic distortion (THD) in a diode bridge circuit that can “soften” audio in a flattering way. Diode bridge compressors also allow for very fast attack settings. Diode bridge compressor examples include the Neve 2254 and 33609.
Voltage Controlled Amplifier
VCA compressors utilize integrated or solid-state circuits for compression. Most software plug-ins are VCA designs. Compared to optical or tube compressors, VCA compressors are cheaper to manufacture. Distortion artifacts from VCAs are also less than tube or optical compressors. VCA compressors attenuate the input signal under the control of an external CV (i.e., sidechain input). VCA compressor examples include the SSL bus comp.
Getting started
It’s essential to choose the right compressor type for the specific task at hand. Select tube and optical compressors with slower attack and release characteristics for quieter sources such as vocals or synth pads. FET, VCA, and diode bridge models work best on loud signals, such as drums and guitars.
When starting to use a compressor, set the threshold to its highest setting; set a low-medium ratio (2:1 to 4:1); a medium attack (50-100 ms); and a medium release (100-300 ms). Then adjust the threshold until gain reduction begins.
85 dB SPL (C-weight) is the ideal (i.e., flattest) volume level for observing and assessing audio
As you lower the threshold, start with a relatively small gain reduction, say 1 dB at the loudest peaks, and listen to how it’s affecting the audio signal. How do the more audible elements sound compared to the softer ones? Lower the threshold again until the gain reduction averages 4 dB at the loudest parts, and assess again. The difference should be noticeable.
Next, try adjusting the ratio to a higher setting, say 6:1 or 8:1, and observe how the compressor reacts differently at the same threshold. Adjust the threshold again so the gain reduction averages 1 dB and assess. Same at 4 dB average.
Listen carefully. You should have experienced four (very) different compression sounds in the exercise above. Is one better than the others? Only your ears can tell you.
Speaking of your ears, equal-loudness contours indicate that 85 dB SPL (C-weight) is the ideal (i.e., flattest) volume level for observing and assessing audio. However, if you work in a smaller studio space, then 75 dB SPL is suggested.
Always exercise care when applying compression on your entire mix. Focus on individual channels and mix groups before exploring more complex techniques like parallel, multi-band, and multibus compression.
Advanced techniques
Serial compression
Compression and painting have one major similarity: applying everything all at once produces a gloppy mess, while applying one layer after another yields superior results. One of the keys to perfect-sounding compression is applying the process in layers until you achieve the desired balance. The advanced technique of serial compression entails using two (or more) compressors in a series. Serial compression can produce sounds you cannot achieve with any single compressor.
Adding compression in small increments at various stages of the record production process can produce a wondrous end result. For example: applying a modicum of compression during recording; adding more compression on the channel during mixdown; then additional compression on the group bus; and finally, even more compression on the stereo bus.
Serial compression can be optimized with different settings for each stage (e.g., lower ratios for recording and higher ratios for mixing and mastering). Contrasting attack and release settings can also be employed (e.g., a fast attack followed by a slow attack). Serial compression can be a transparent operation or an intentionally-obvious distortion of a sound beyond recognition. On its best days, serial compression helps to refine and reshape recordings.
Parallel compression
Parallel compression—also known as “exciter” or “New York” compression—is an advanced compression technique used in recording, mixing, and mastering. Parallel compression is an upward compression method accomplished by mixing an unprocessed, dry audio signal with a duplicate, compressed version of the same audio signal.
Parallel compression reduces an audio signal’s dynamic range by raising the softest sounds instead of reducing peaks. Parallel compression enhances audible details and has potential application with individual tracks (e.g., vocals, electric bass, drums), mix groups, and mastering.
The human ear is very sensitive to loud sounds which suddenly decrease in volume, compared to soft sounds which increase in volume. Parallel compression takes advantage of this phenomenon. Unlike traditional dynamic compression, parallel retains fast transients to preserve the sonic detail of the original audio signal and sounds especially good on vocals and drum sounds.
A careful touch is needed when parallel compression is used during the mixing process. If the attack and release times are properly set, this approach will “beef up” or “fatten” a mix. The signal can be made to “pump” or “breathe” in sync with the song by adjusting the time constants. Some mix engineers have achieved extreme implementations of this method. For example, engineer Michael Brauer uses five compressors in parallel to achieve his polished vocal sound.
Multiband compression
Multiband compression involves dividing the audio signal into multiple bands of frequencies (e.g., high, mid, low), with each band receiving different compression settings. This allows, for example, the low-frequency band of a recording (e.g., kick drum, synth bass) to have a longer attack time while compressing the higher-frequency bands (e.g., vocals, guitars) with a shorter attack time. Often, multiband compression can create mixes with more precision and transparency.
Traditional compressors process audio with a single gain-control element, also known as full-band compression. When gain reduction is applied, the entire signal level is affected. Applying full-band compression to final mixes can sometimes be problematic. For example, a loud snare drum causes the gain of the whole signal to be reduced, even for qui- et sounds that don’t necessarily need gain reduction.
The situation is worse if a mix is compressed primarily from low-frequency sounds. In specific genres (e.g., EDM, rap), it is typical for the bass line and kick drum to be mixed loudly and to ultimately be the primary cause of the gain reduction. Multiband compression offers a solution to dial compression settings with more specificity.
Compressor settings
Here's a selection of typical compressor settings for a variety of applications, including guitar, vocals, synthesizer and drums.
Acoustic guitar
Attack: Slow, 100-200 ms
Release: Slow, 300-400 ms
Ratio: 2:1 to 6:1
Gain Reduction: Medium, 1 to 4 dB
Acoustic guitar often sounds best with light-medium compression. A medium ratio with slower attack and release settings will likely optimize the harmonics of the acoustic guitar sound.
Electric guitar
Attack: Fast, 20-30 ms
Release: Medium, 200-300 ms
Ratio: 1.5:1 to 3:1
Gain Reduction: Light, 0 to 2 dB
The recorded sound of the amplified electric guitar is compressed already, so tread lightly. Additional compression during tracking is rarely needed. If applying compression while mixing, try parallel.
Lead synthesizer
Attack: Medium, 50-100 ms
Release: Medium, 100-150 ms
Ratio: 2:1 to 8:1
Gain Reduction: Heavy, 2 to 5 dB
While some lead synthesizer sounds don’t need compression at all, a majority will benefit from a properly-dialled compressor with a healthy dose of gain reduction, especially software-based synths.
Kick drum
Attack: Fast, 20-50 ms
Release: Medium, 100-200 ms
Ratio: 3:1 to 4:1
Gain Reduction: Light, 0 to 2 dB
The kick drum responds quite well to most compressors during tracking. The settings help to enhance the output while taming the boom. Lower the ratio for more subharmonic bass on the kick.
Snare
Attack: Fast, 8-15 ms
Release: Fast, 50-100 ms
Ratio: 2:1 to 3:1
Gain Reduction: Medium, 1 to 3 dB
Enhance the audibility of ghost notes by raising the compression ratio on the snare drum. Ringing overtones produced by the snare can be increased by setting slower release times.
Hi-hat
Attack: Fast, 5-10 ms
Release: Fast, 50-100 ms
Ratio: 2:1 to 6:1
Gain Reduction: Medium, 1 to 5 dB
Compression can help solve sibilance problems with the hi-hat drum sound, eliminating the need for equalization. In some rare instances, zero compression is needed for the hi-hat.
Lead vocals (pop)
Attack: Fast, 10-20 ms
Release: Medium, 150-250 ms
Ratio: 2:1 to 8:1
Gain Reduction: Heavy, 2 to 5 dB
A good place to start with pop vocals is a 5:1 ratio. Try a higher ratio for more controlled sound, or a lower ratio for a more natural sound. Gain reduction is usually heavy for a properly treated pop vocal.
Audio Dynamics: Compression Techniques for Modern Mixing and Mastering is available now on Amazon.
