Fantastic (free) synths and how to use them: Magical 8bit
Discover the magic of 8-bit sounds, chiptune and video game soundtracks with this free synth plugin
PLUGIN WEEK 2023: The early days of the video game industry were a perilous time of boom and bust. After a few years of intense popularity and profits, the industry crashed, hard! The crash became known as the Atari Shock, and in 1983, it looked like video games were going to be fast forgotten in the west.
Thankfully however, Japanese video game and toy company Nintendo were having great success domestically with their 8-bit video game console, the Famicom. Two years later in 1985, rebranded as The Nintendo Entertainment System (or NES for short) this new video game console would take western markets by storm, single-handedly reviving an industry that never looked back and went from strength to strength, becoming the single biggest entertainment industry in the world, eclipsing films, TV and music by the turn of the century.
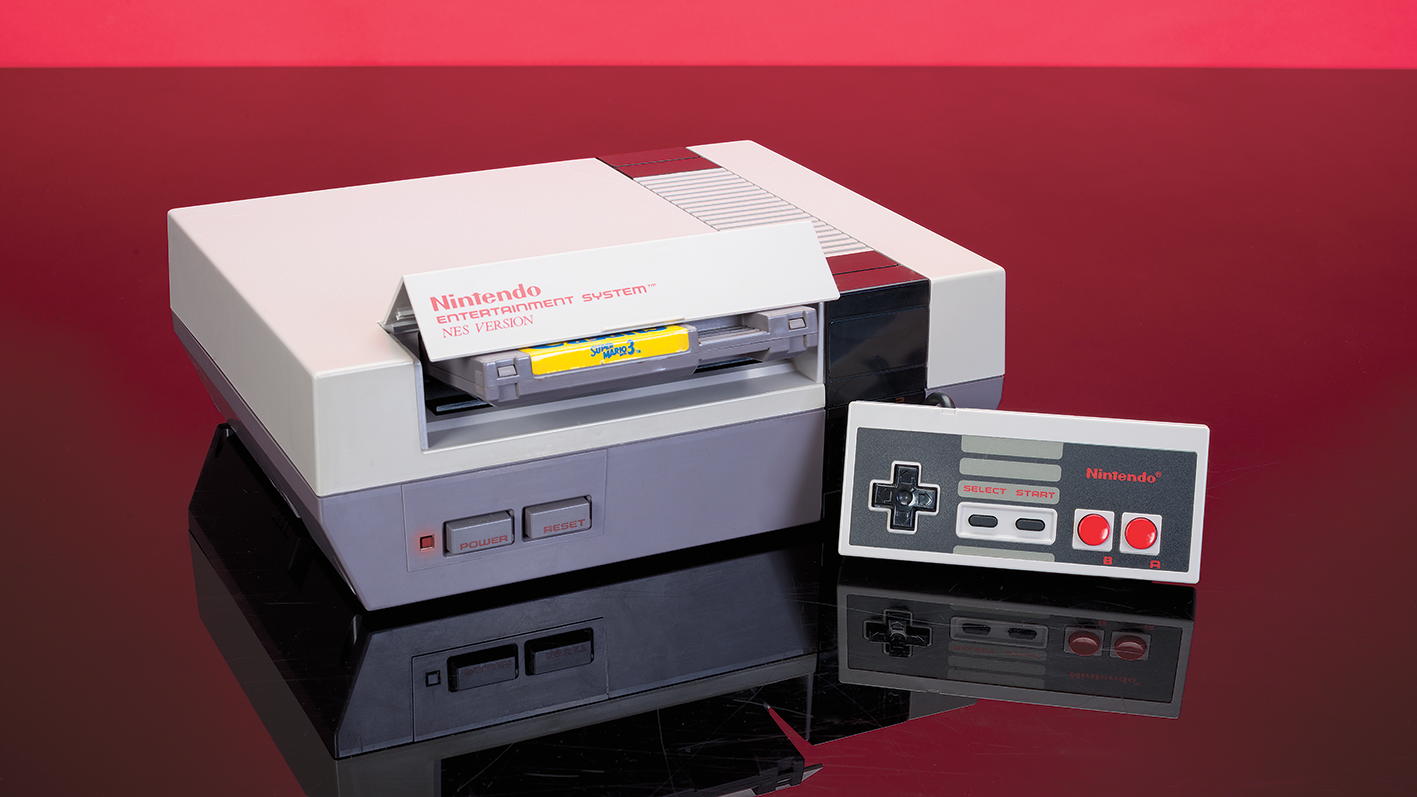
What’s this got to do with software synthesisers…? Well, the 8-bit NES sold over 61 million units worldwide, meaning they were in an awful lot of households. Furthermore, by the late 1980s there were other, rival manufacturers making successes of their 8-bit offerings. What resulted was a 1980s and early 1990s that was simply awash with the sights and sounds of 8-bit entertainment. 8-bit sound synthesis therefore, inadvertently became the soundtrack to a generation’s childhood.
Whilst the technical capabilities of 8-bit consoles were very crude by modern standards, their sound capabilities had a very specific and distinctive charm that to this day evokes a strong sense of nostalgia. You can hear 8-bit sounds in various subgenres of electronic music, most notably chiptune, which is made entirely using the tonalities and techniques of old video-games.
But why do 8-bit video game consoles sound the way they do?
It's all about resolution
Consider what we know about waveforms from our previous tutorials. The common waveforms utilised by synthesisers of the 8-bit era are sine-wave, saw-tooth, triangle and pulse. Quite simply, if we aim to recreate these shapes, in a very low, digital resolution, they look something like this:
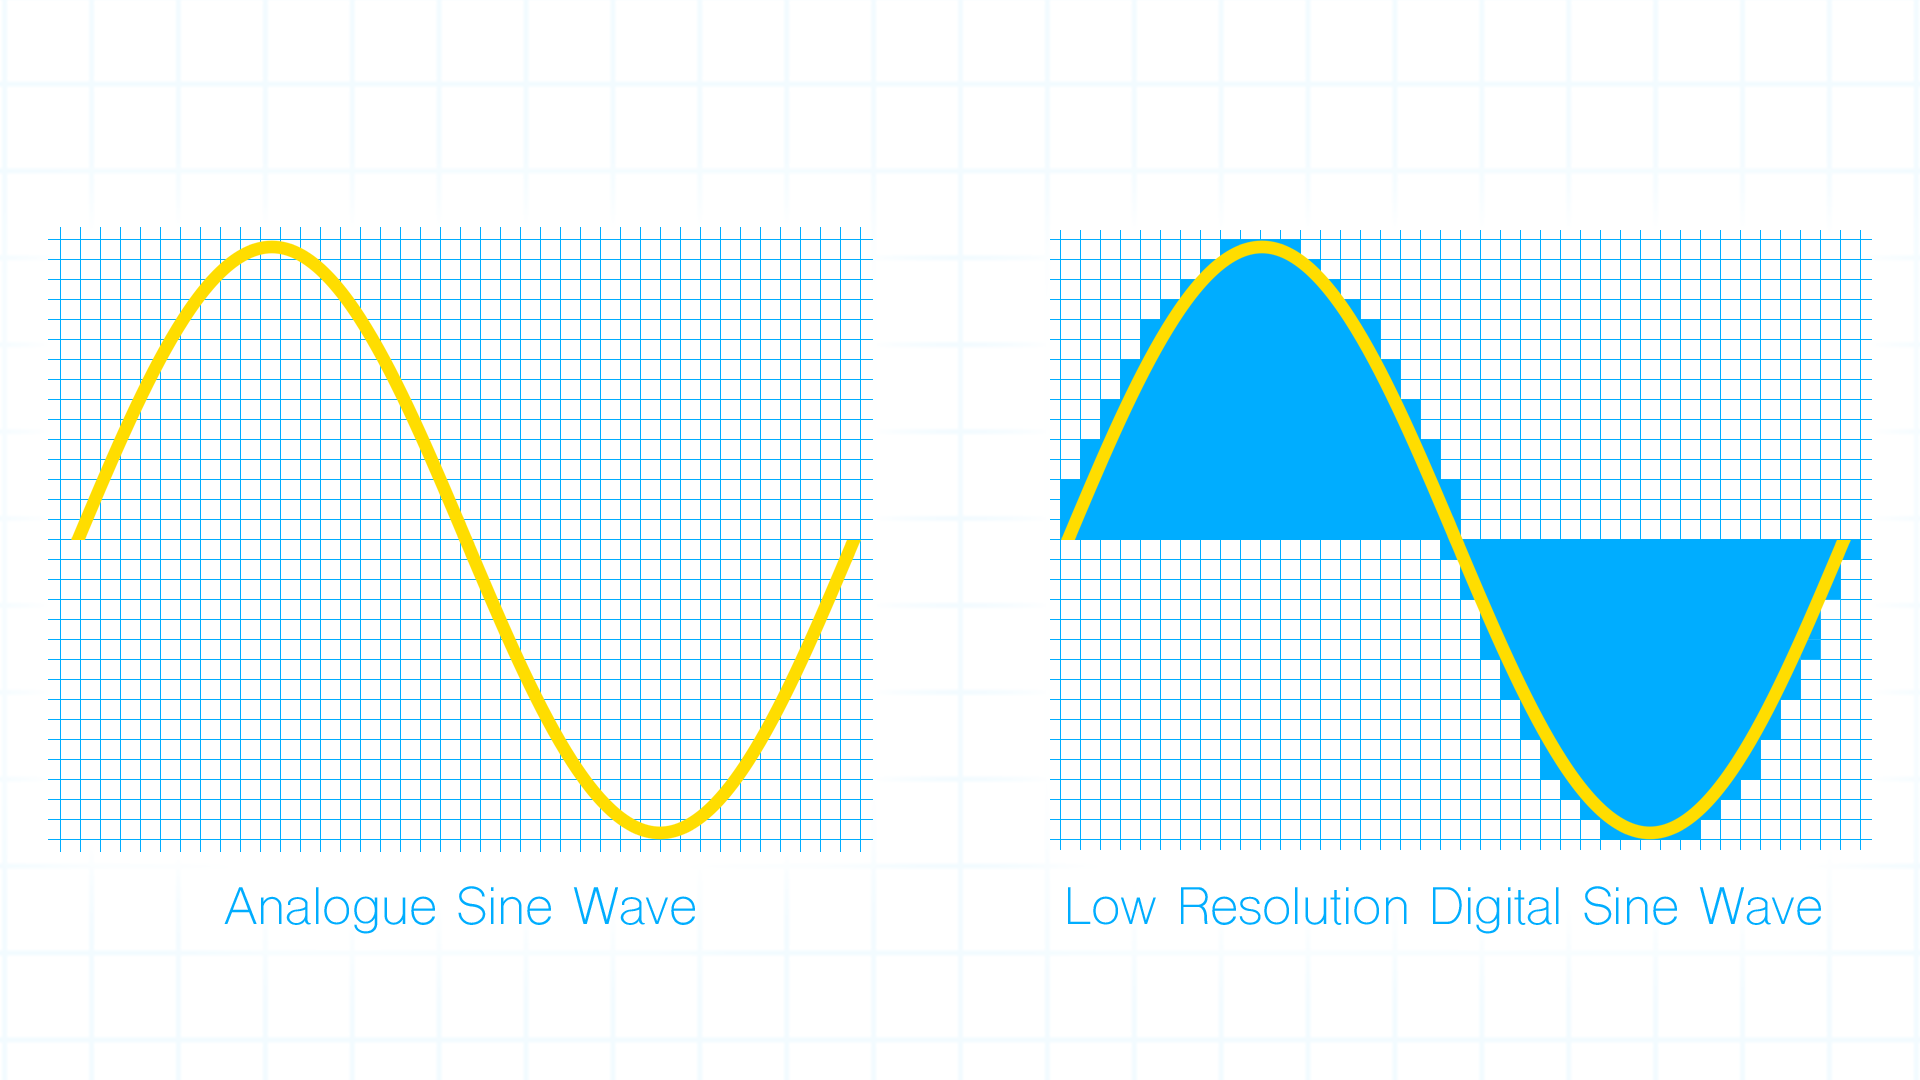
Analogue synthesisers create smooth wave-forms. Early digital synthesisers utilised all of their microchip’s processing power to create high-resolution wave-forms which, once further smoothed out by their digital to analogue circuits, sounded smooth (similar to an analogue synthesiser).
Want all the hottest music and gear news, reviews, deals, features and more, direct to your inbox? Sign up here.
8-bit video-game consoles, however, had to divide their processing power between graphics, character movement, collision detection computations, sound creation and more. The amount of processing power that could be given over to sound creation was therefore greatly limited, resulting in extremely low resolution wave-forms (even after the analogue conversion circuit).
Magical 8bit
Japanese electronic-music band YMCK are well known within the chiptune community, not only for releasing several successful, genre-leading albums, but also for developing a free software synthesiser that has enabled many aspiring chiptune artists to get started in the genre.
The synthesiser is called Magical 8bit. There are two versions: Version 1 is the original, and Version 2 is a newer, updated version that features more variables and parameters. This article will focus on Version 2, however most of the principles discussed will apply to Version 1.
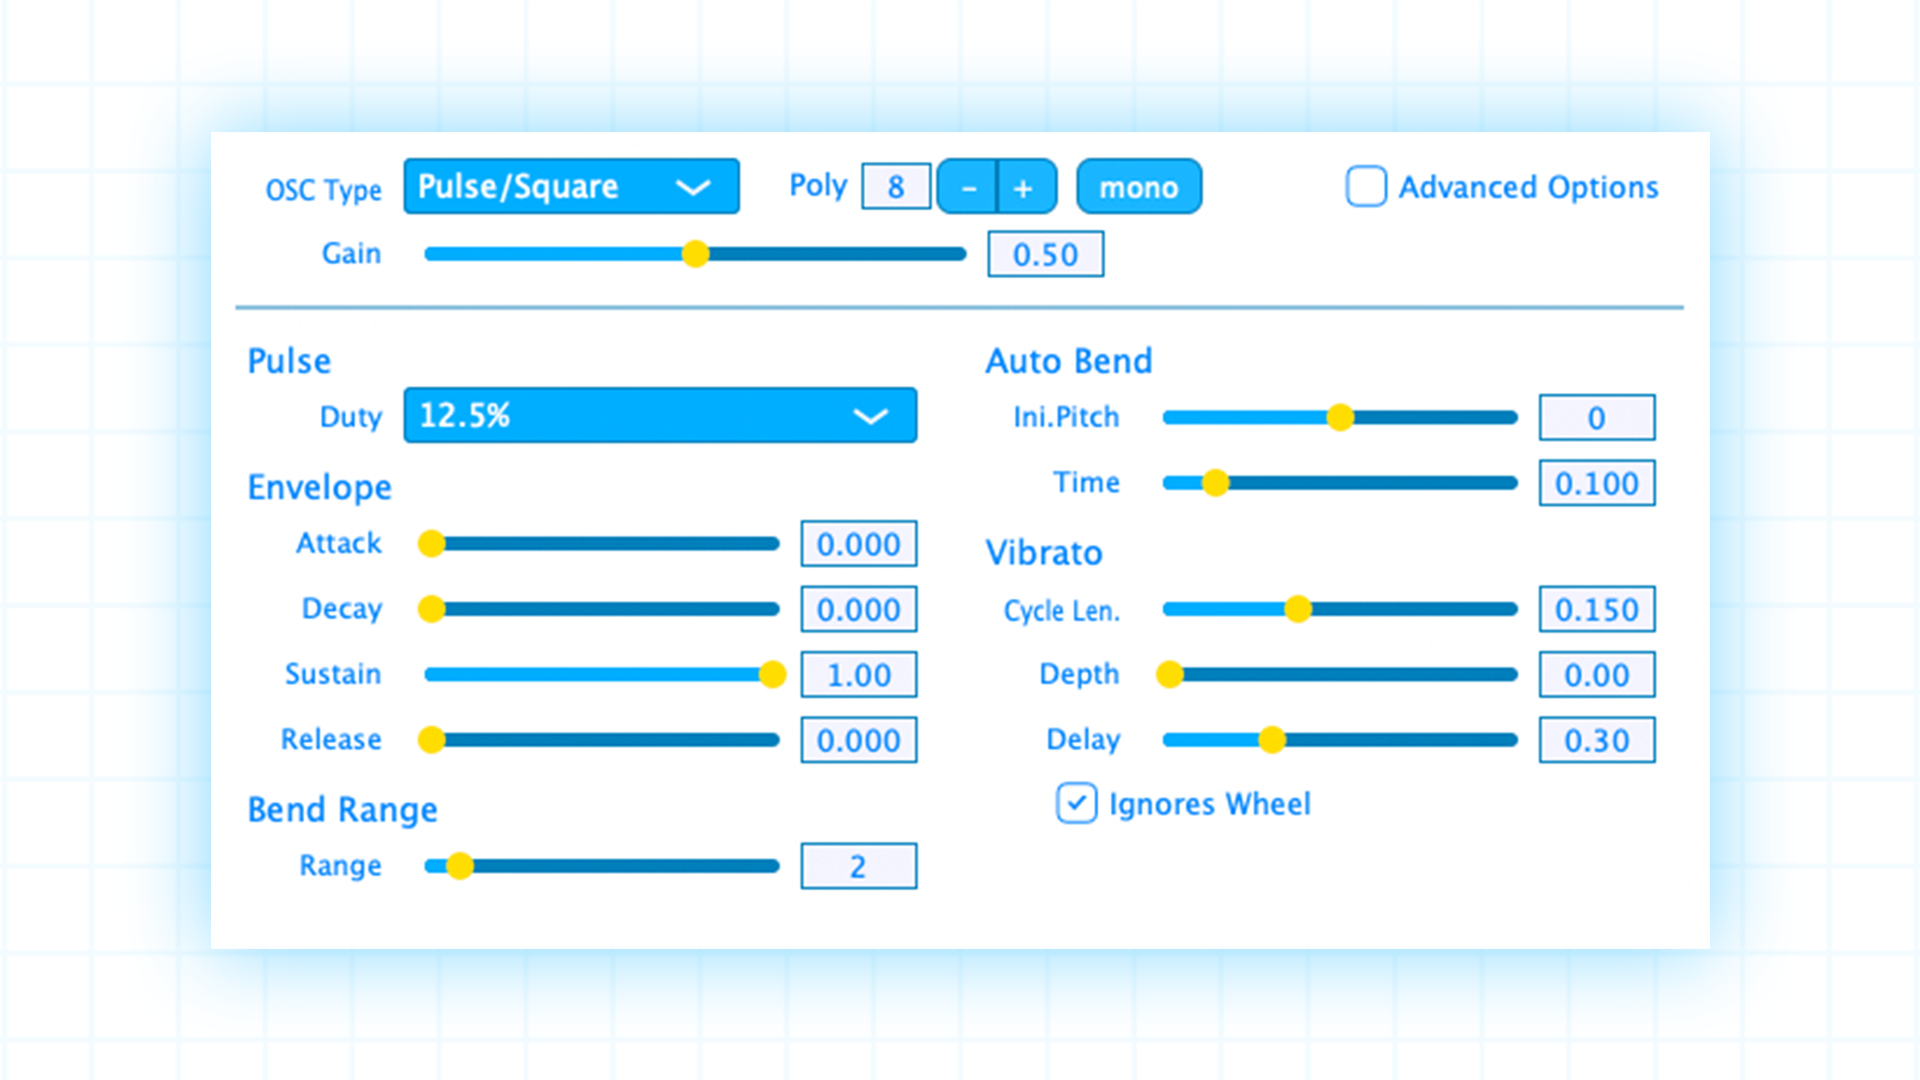
At first glance, this synth looks very simple and somewhat underwhelming, but don’t let its lack of flashy interface put you off, as it sonically packs a punch! Let’s look at the core features.
Top section
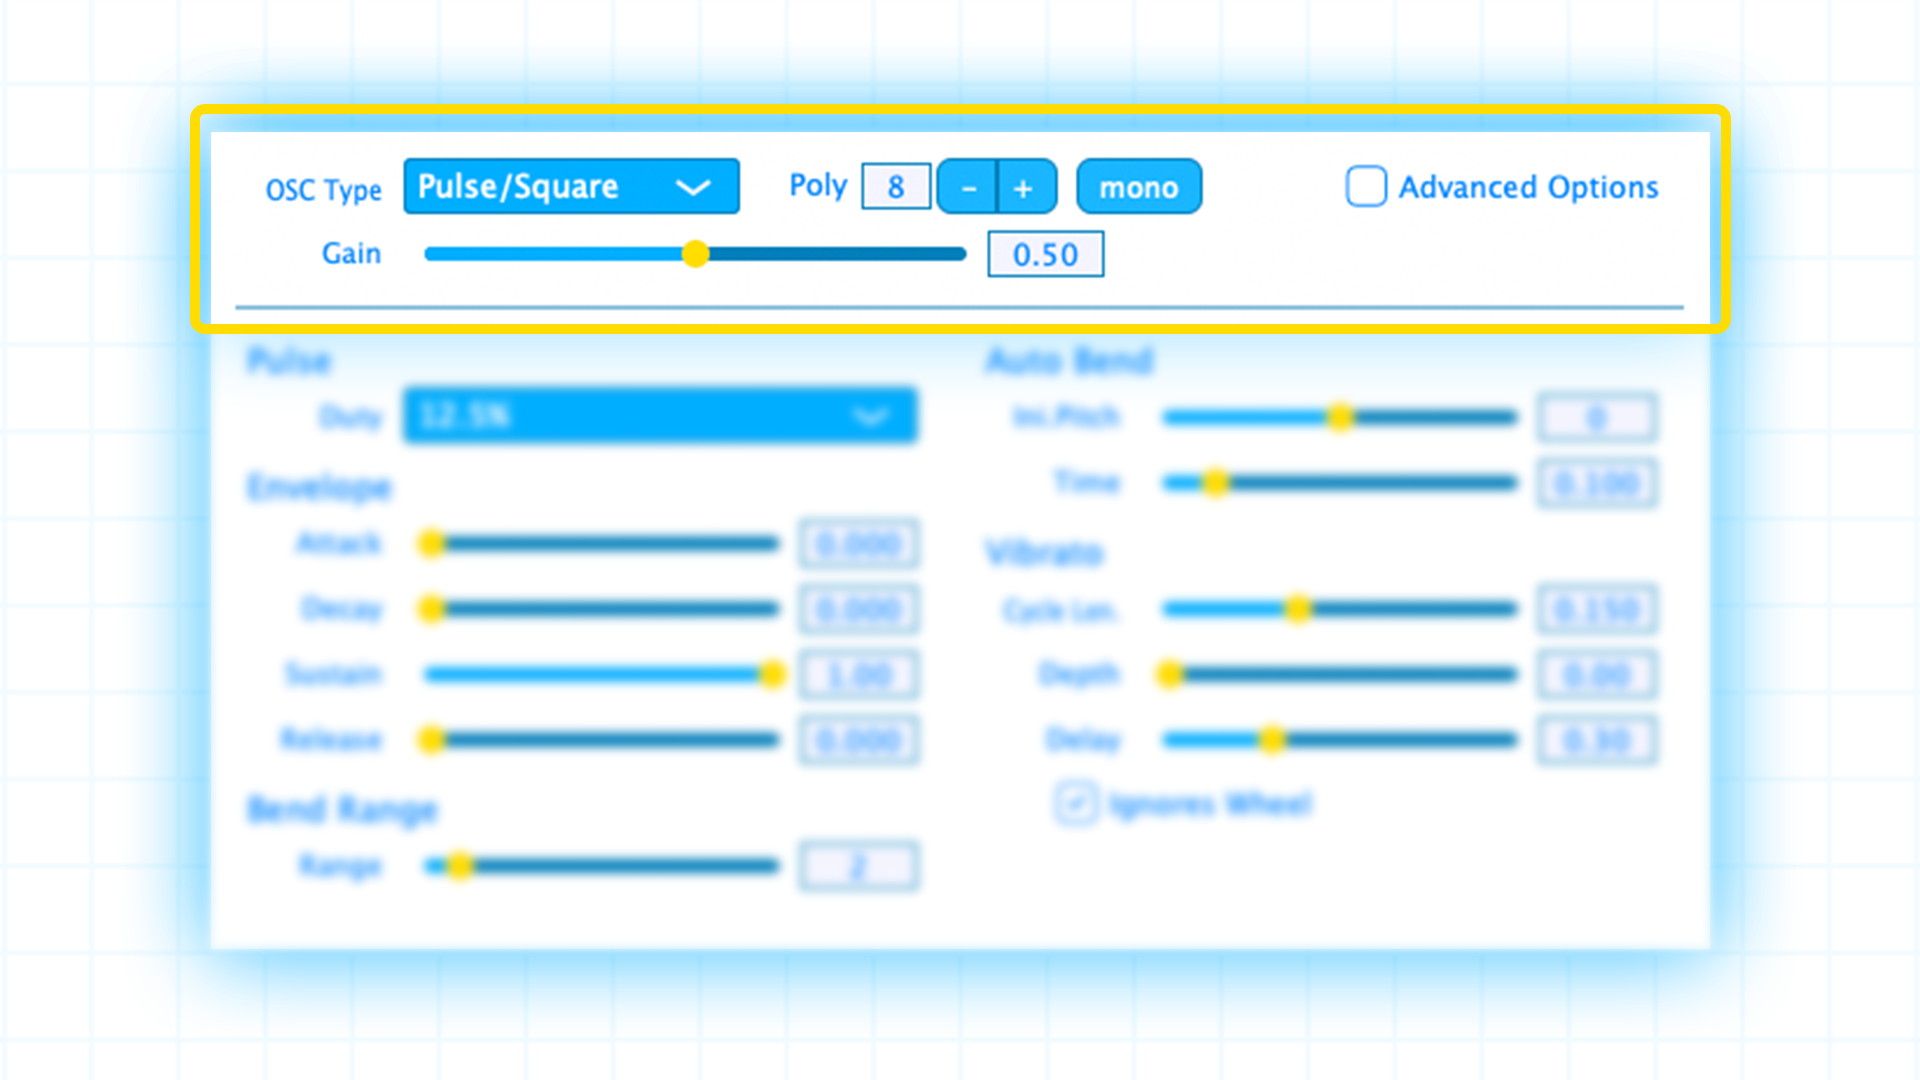
Here we have one OSC which can generate either Pulse/Square, Triangle or Noise. There is also a Gain (volume) control, and a Mono/Poly selector, which allows for up to 64-voice polyphony. There is also an Advanced Options tickbox (which is de-selected by default) - we’ll return to this later.
Monophonic options
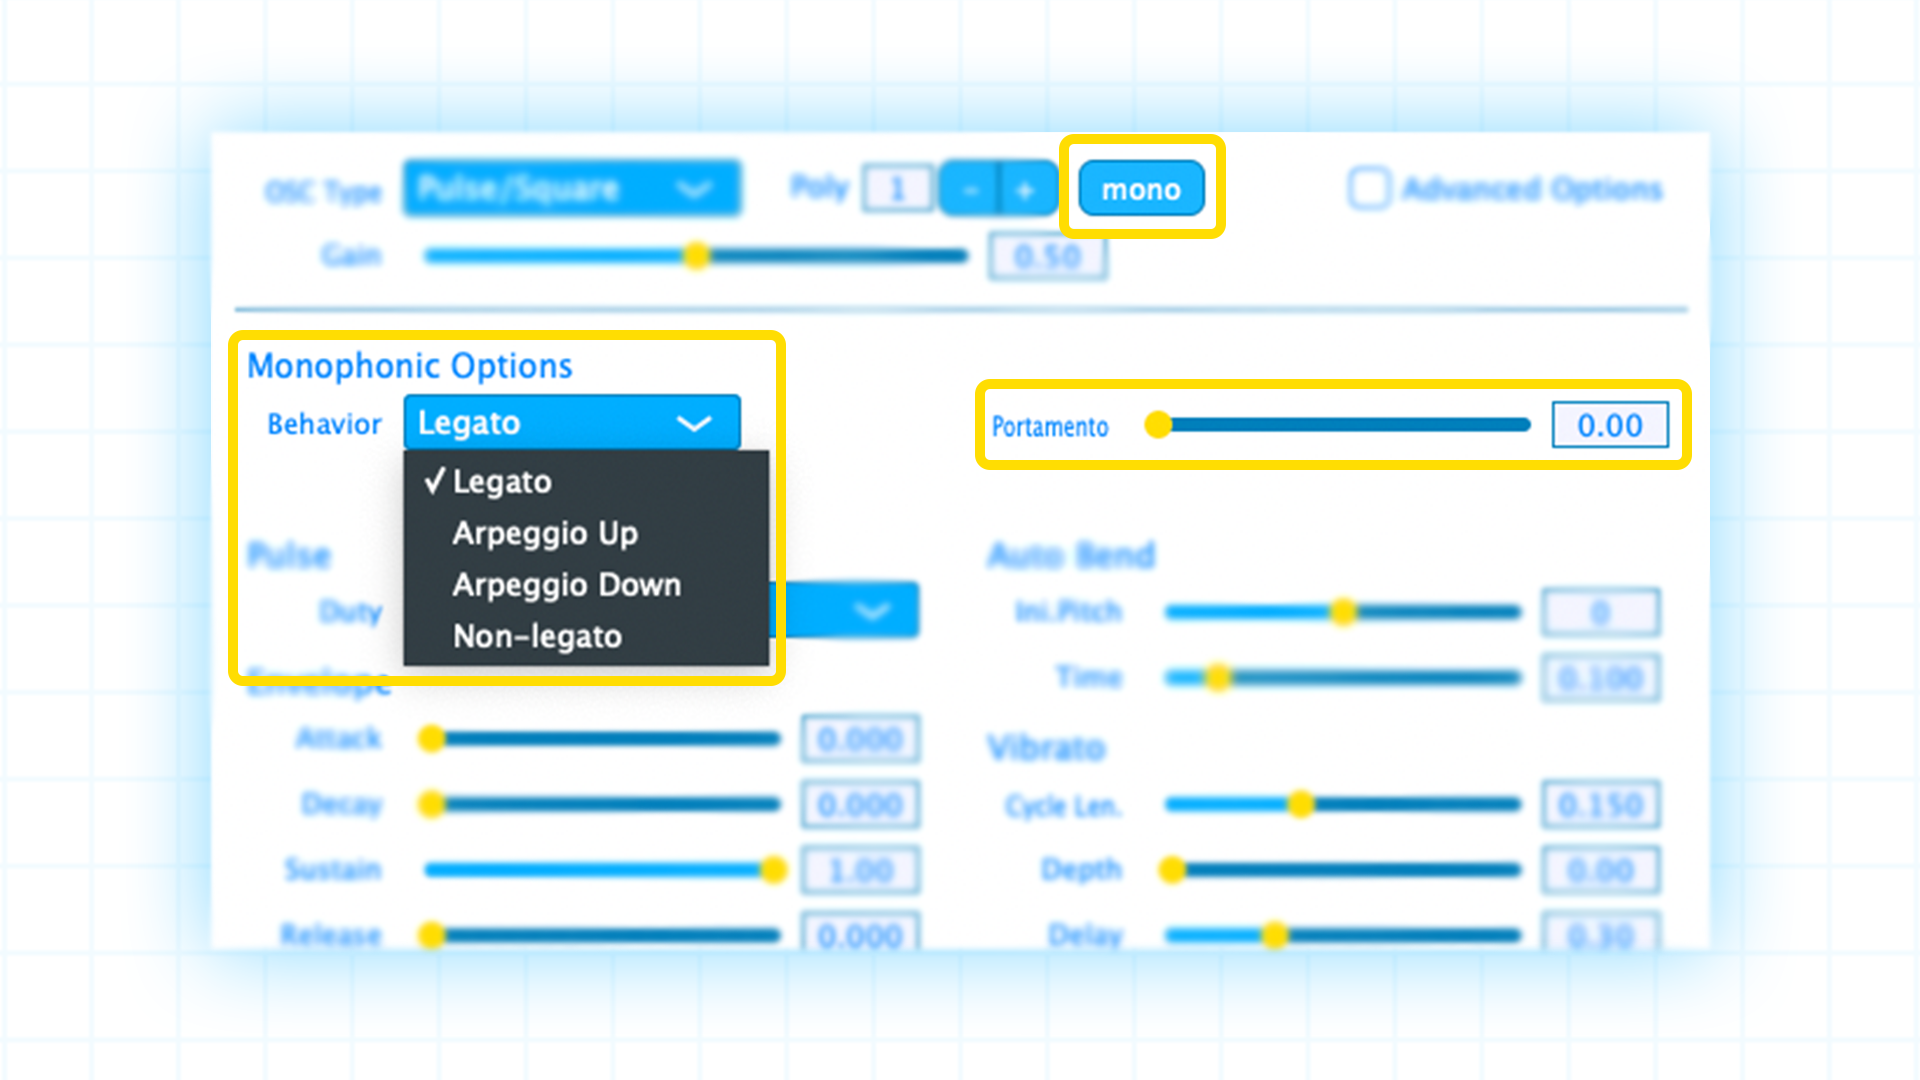
If you select the Mono button, an additional drop-down menu and slider appear for monophonic-specific parameters. This is not only where we can set portamento/glide time, but also where we get our first glimpse into some very fun 8-bit tonalities.
If you select Legato from the dropdown menu, the slider serves as the Portamento (glide) time setting; the longer the time, the slower it takes to glide between two notes. Straightforward stuff that you can expect to find on most synthesisers.
However, if you select Arpeggio Up or Arpeggio Down, the slider disappears and is replaced by another dropdown box which allows you to select the resolution of your arpeggio.
But why the jump to arpeggios in the monophonic section?
A fundamental characteristic of early 8-bit video games was that they often only had four channels of monophonic audio. Therefore, if they wanted to play a three-note chord, they’d need to use three of their four channels, leaving only one spare channel for melody, rhythm and sound effects. This is obviously a problematic limitation.
To get around this, innovative composers and programmers used impossibly fast arpeggios (too fast to a humanly play) to cycle through the notes of a chord. Much like how still images flashing before us at a rate of 24 frames per second looks like a moving image, monophonic notes played in sequences fast enough, begin to sound like chords.
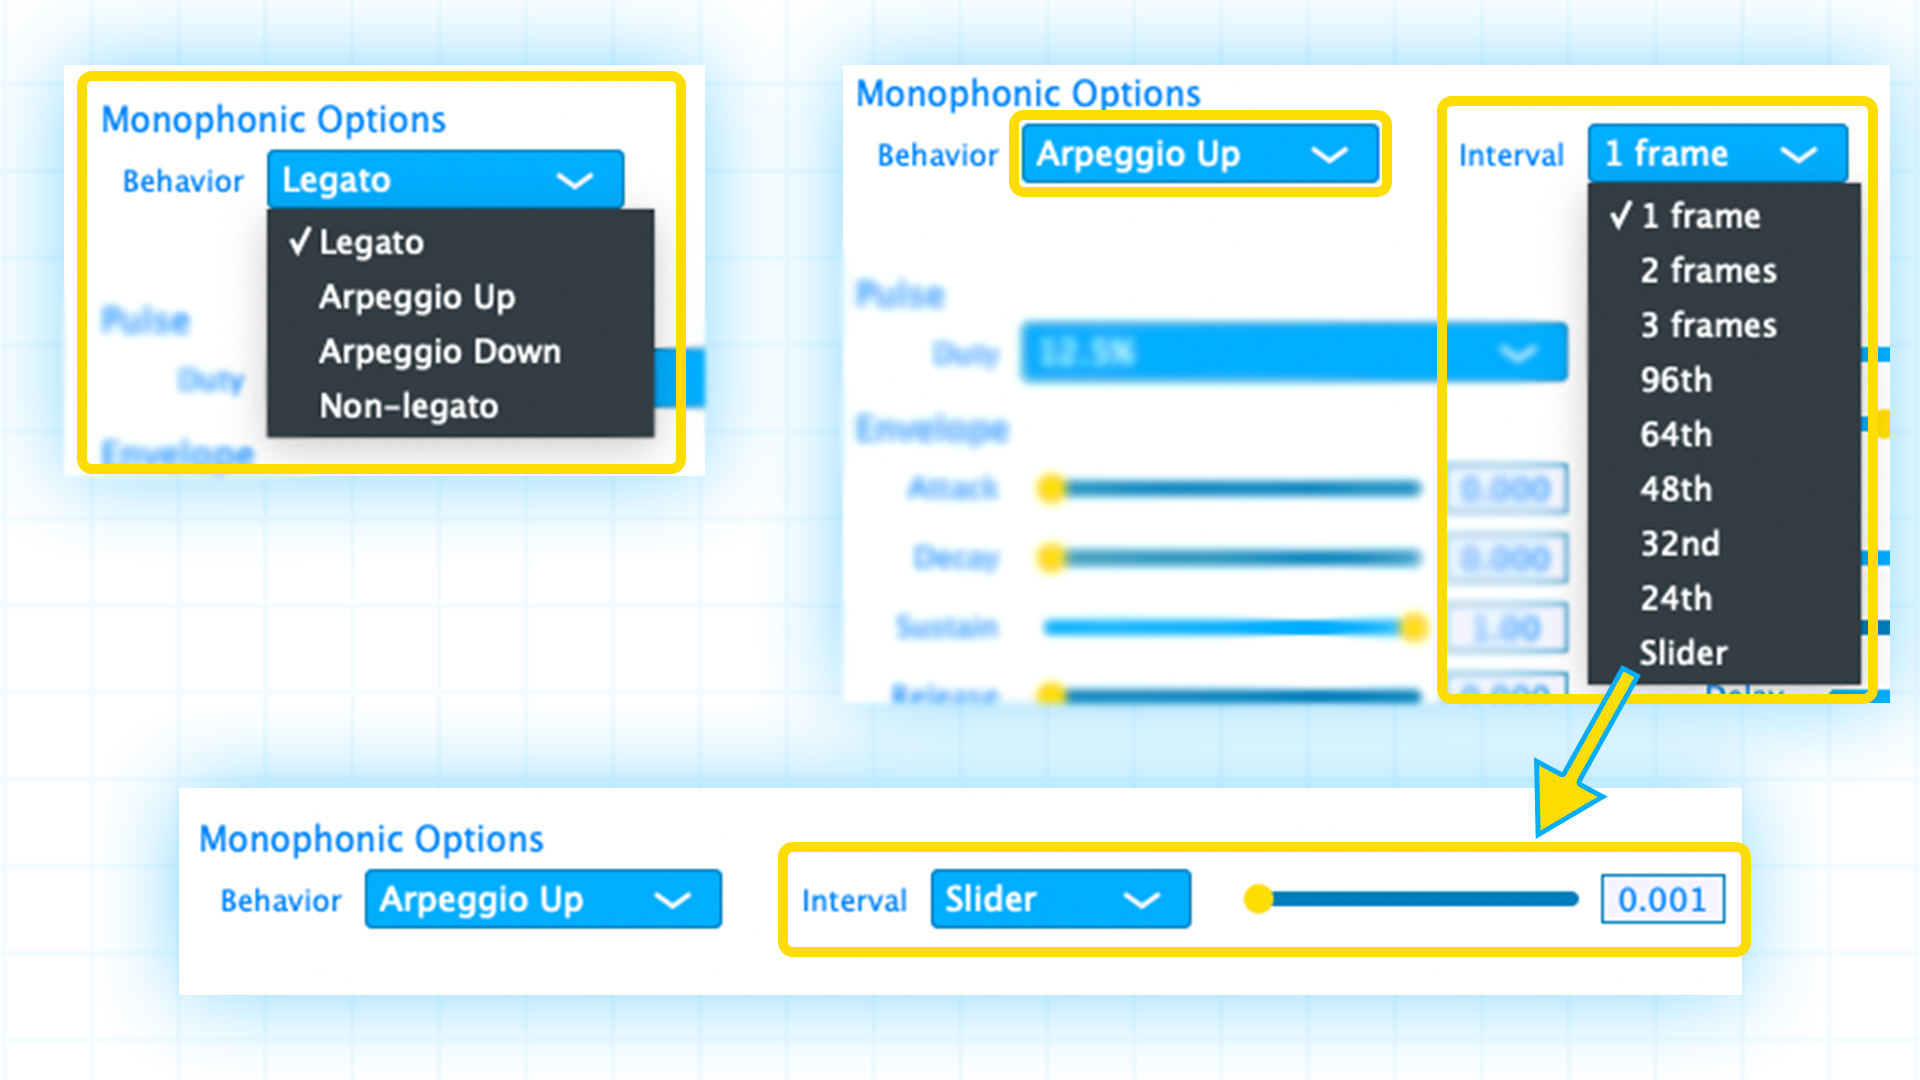
The Behaviour and Interval settings allow us to recreate this effect in Magical 8bit. Furthermore, if you wish to further customise your arpeggio, you can do so with the Slider option in the dropdown menu, which presents a slider that enables you to set your arpeggio speed to whatever you desire.
Try out some different arpeggio settings and play some chords. You should already get a sense of that retro, video-game vibe, and we haven’t even begun to explore our oscillator and envelope options.
Oscillator
If you select either Pulse/Square or Noise, you’ll see a dropdown menu appear to select your pulse-width; 12.5%, 25% and 50%.
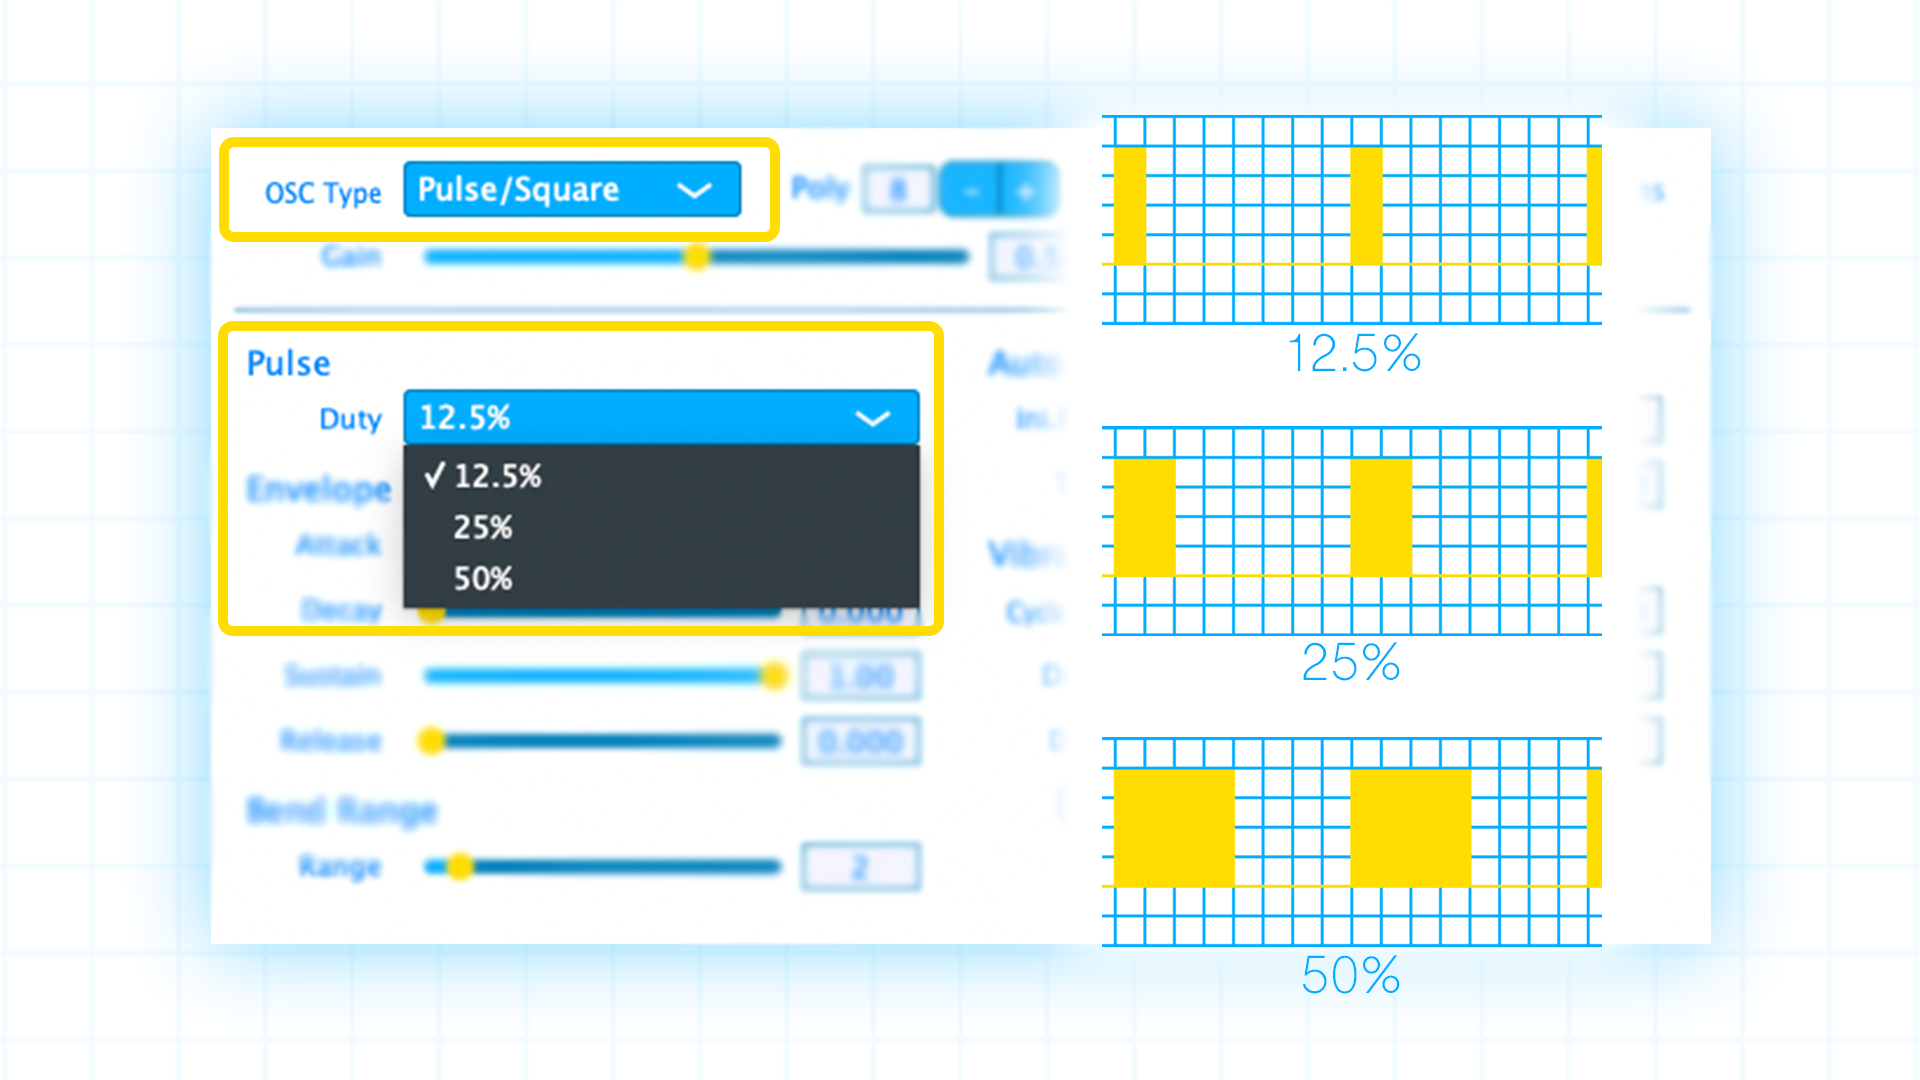
The lower the percentage the thinner, or more nasal the tone. The 50% pulse-width sounds deliciously thick and retro-gamey!
With Noise, the variables are 4bit Pure Random, 1bit Long Cycle and 1bit Short Cycle. The 4bit offering is the closest thing to a conventional noise oscillator that you’re probably familiar with.
The 1bit cycles however, as their name suggests, are a much lower resolution of noise and you can clearly hear digital artefacts within the noise, so much so on the short cycle that there is a discernible pitch.
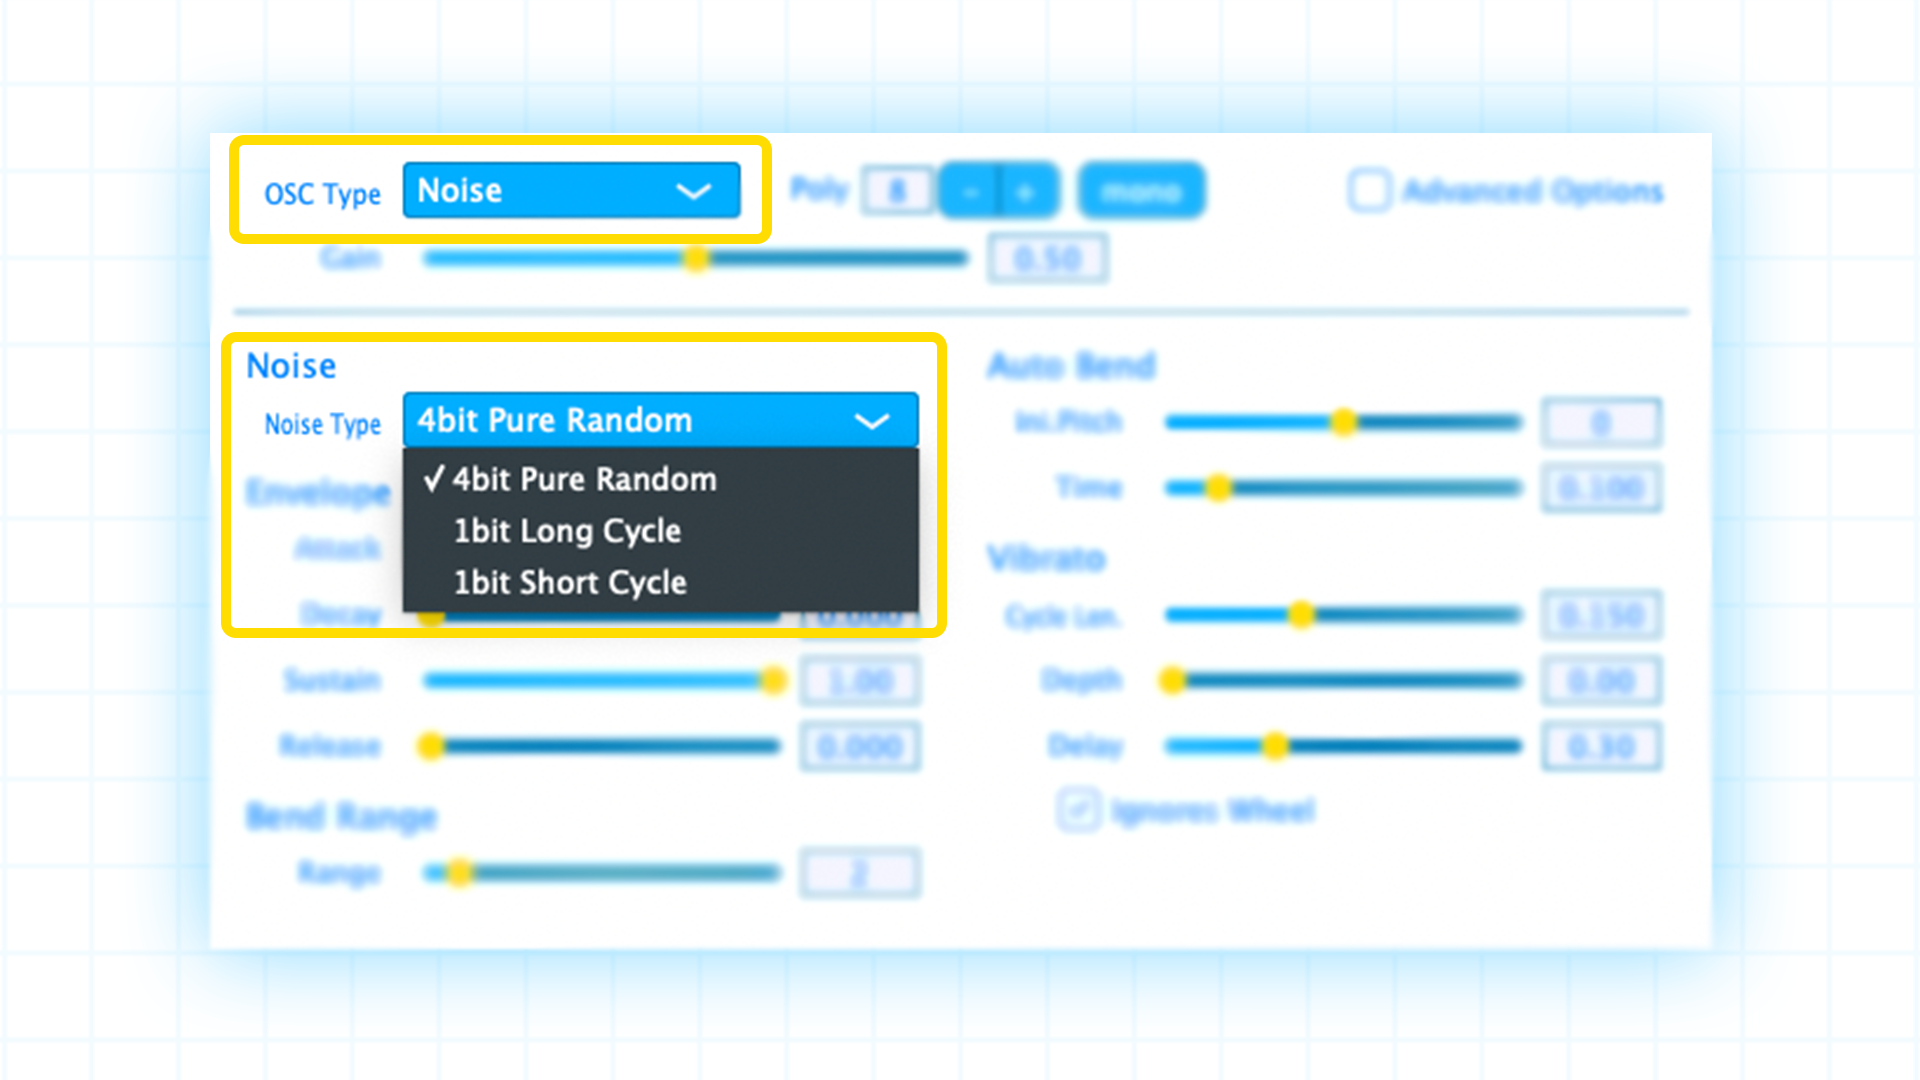
At risk of showing my age, the 1bit Long Cycle is very reminiscent of the tank noise on the Atari 2600/VCS game Combat. This is a good oscillator choice for fun and interesting drum and percussion sounds.
Other parameters
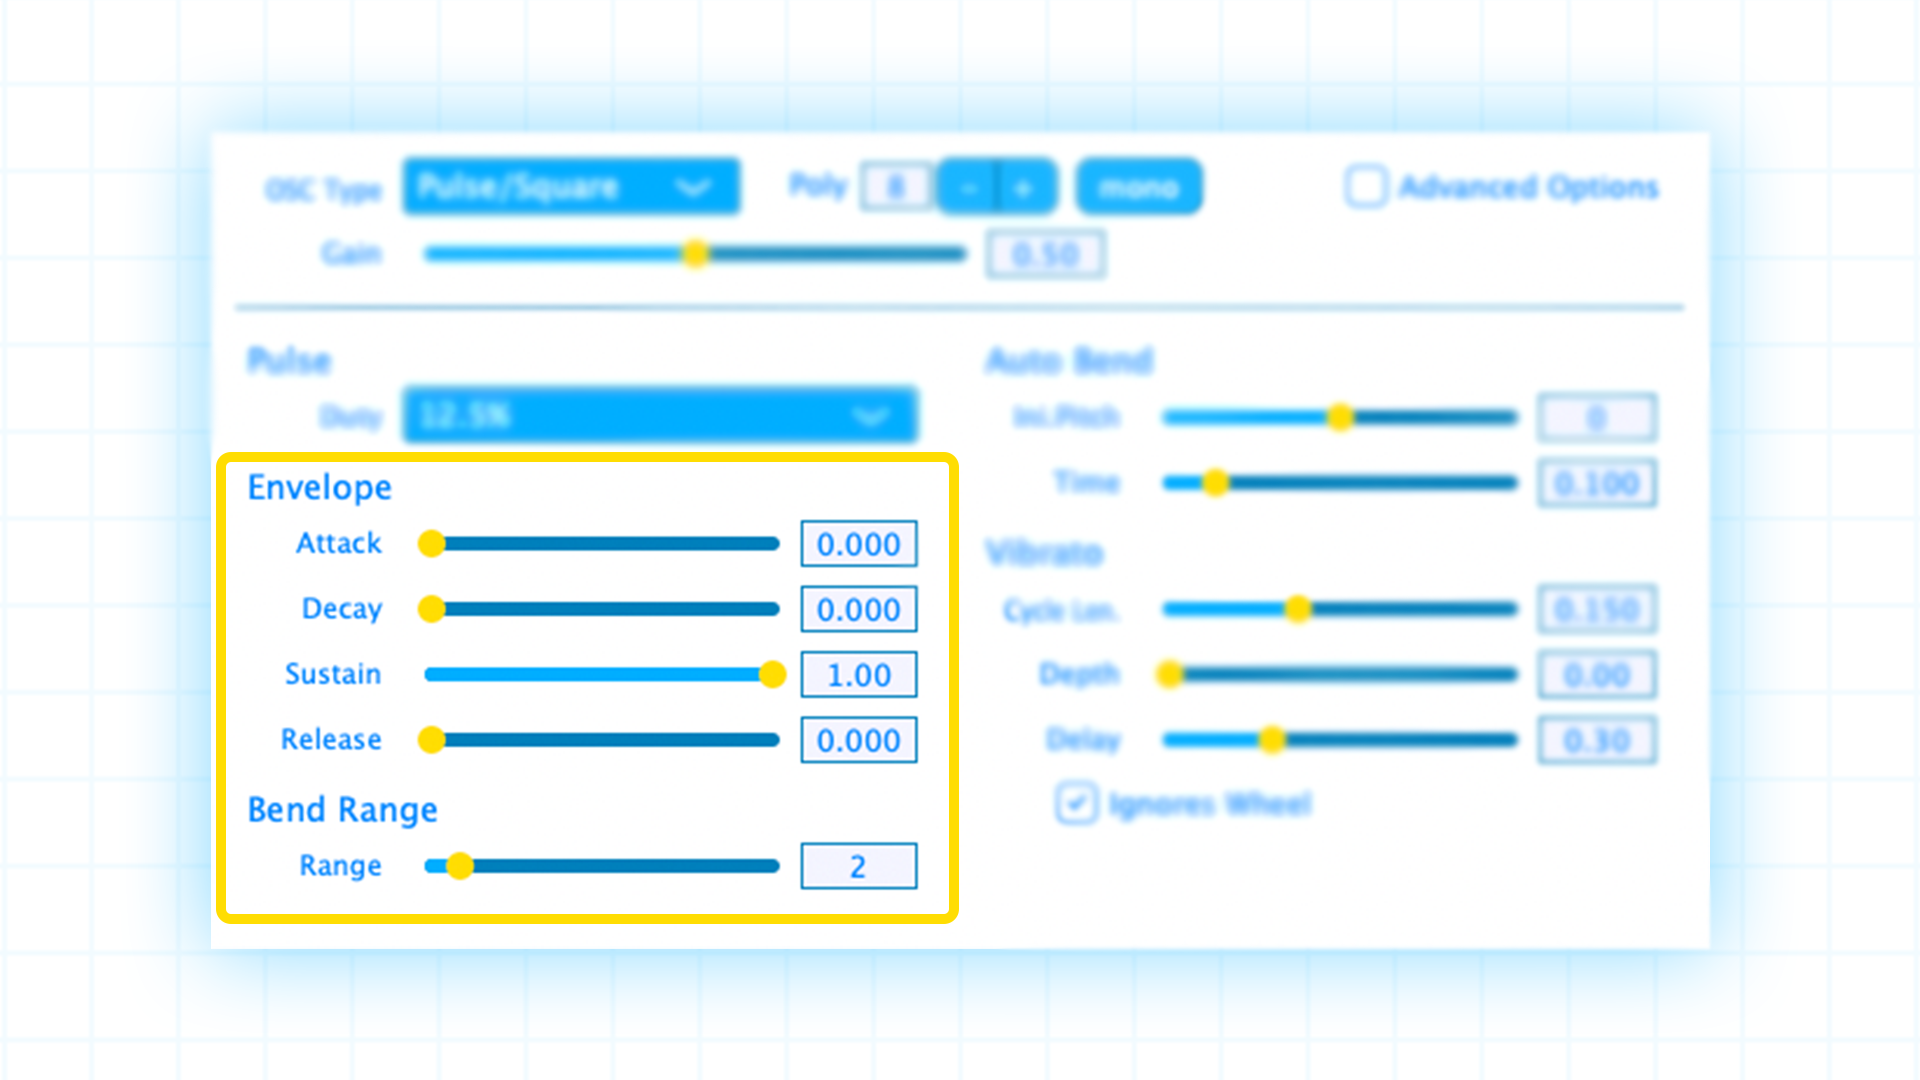
Beneath the oscillator parameter menu are the Envelope and Bend Range options. If you're not sure what these are, take a look at our previous free synth tutorials.
Moving over to the right hand side of the plug-in we have a fun feature called Auto Bend, which allows for the pitch to always bend up or down to the note(s) you’re playing. You can set the size and time of the bend here. This effect can enhance expression when used with a very short bend-time, as it will add a distinctive character to the start of notes. Alternatively, you can do some very dramatic falls or rises with long bend-times.
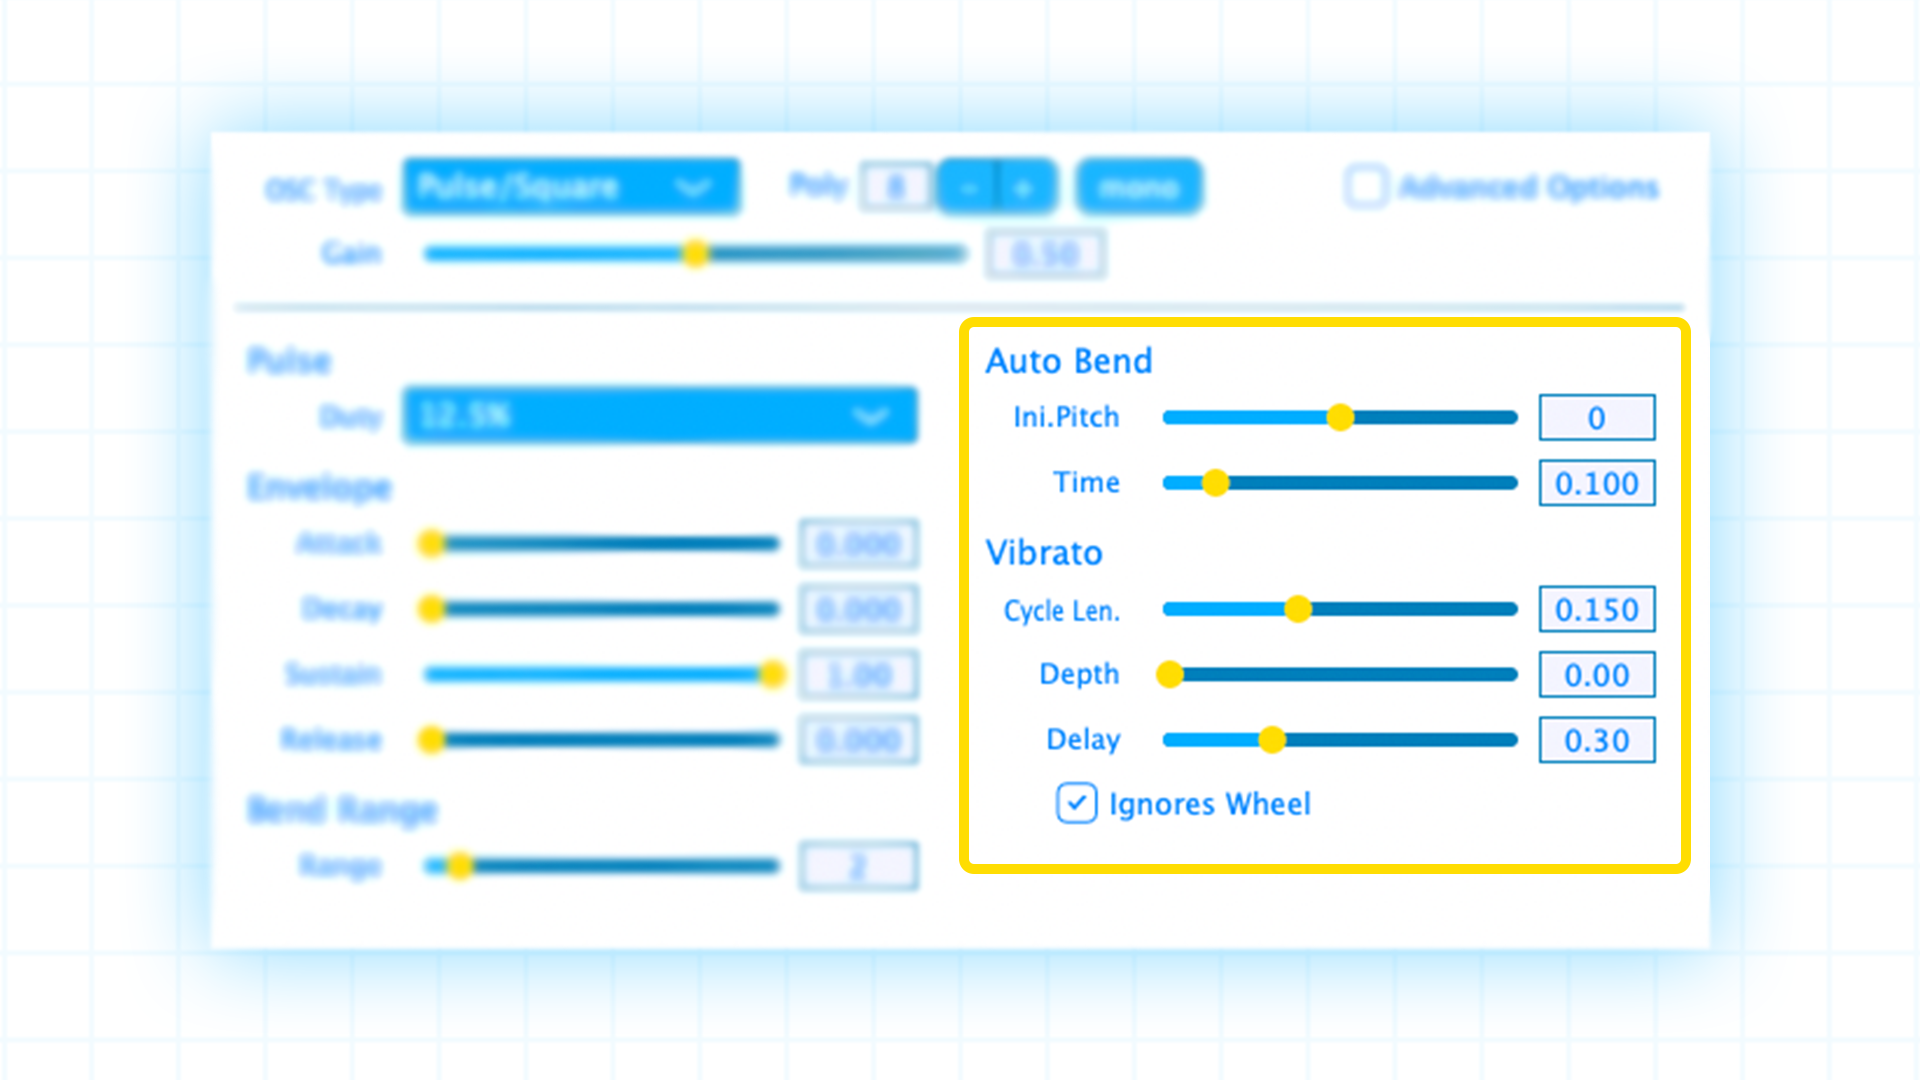
The Vibrato section assigns sine-wave LFO modulation to the pitch. The Cycle Len. (cycle length) is the speed of the LFO and the Depth is how much modulation is applied.
The Delay is a nice feature that allows you to set how long it takes (after a note is played) before the modulation starts. For example, the note can begin unmodulated and gradually become modulated.
By ticking the Ignore Wheel box the vibrato is constant, however de-selecting the Ignore Wheel box means the modulation wheel of your MIDI controller will determine the depth of the modulation.
Advanced options
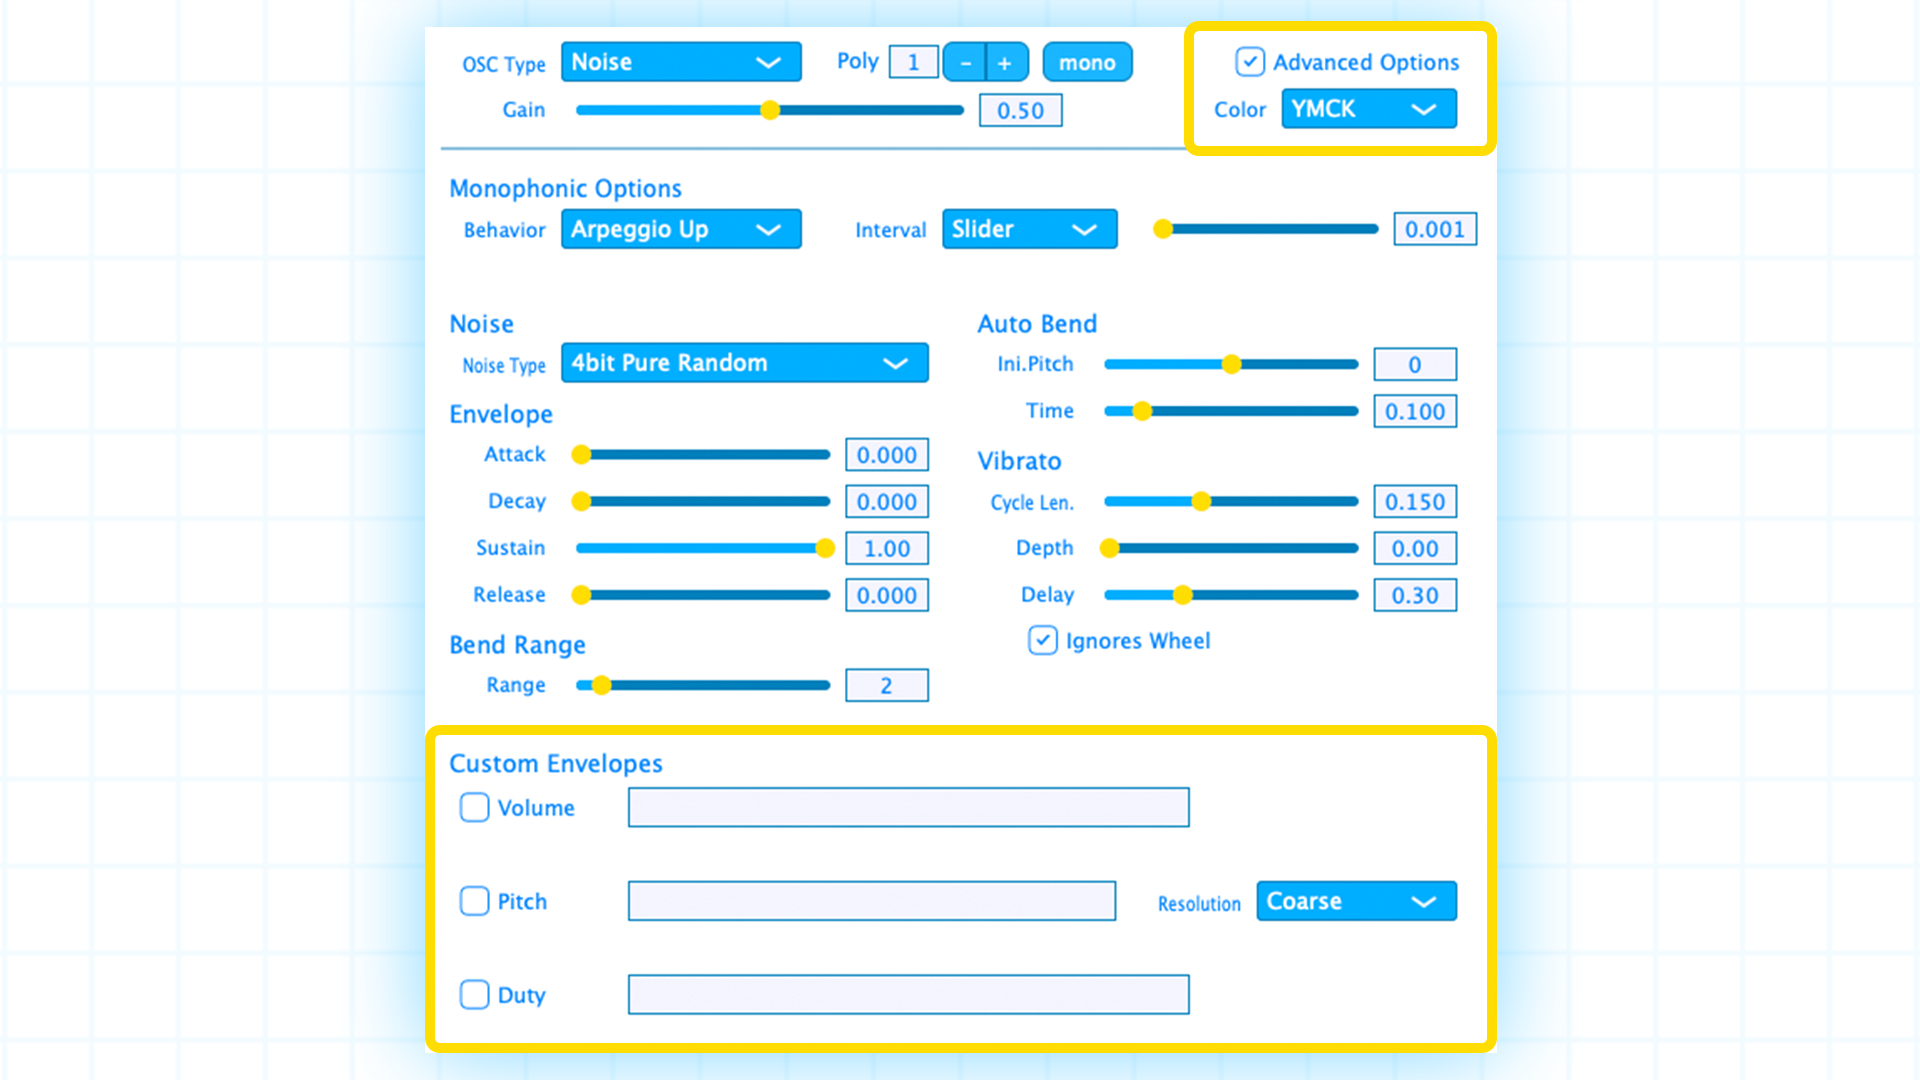
With the basic operations covered, let’s now delve into the Advanced Options, as this is where this synth goes from a fun, toy-like synth into something capable of very detailed expression.
Firstly, in purely cosmetic terms, there is now the option to change the colour palette of the plug-in. Personally, we opt for the Japan setting, which has a Nintendo Famicom theme of cream, off-white and dark-red tones.
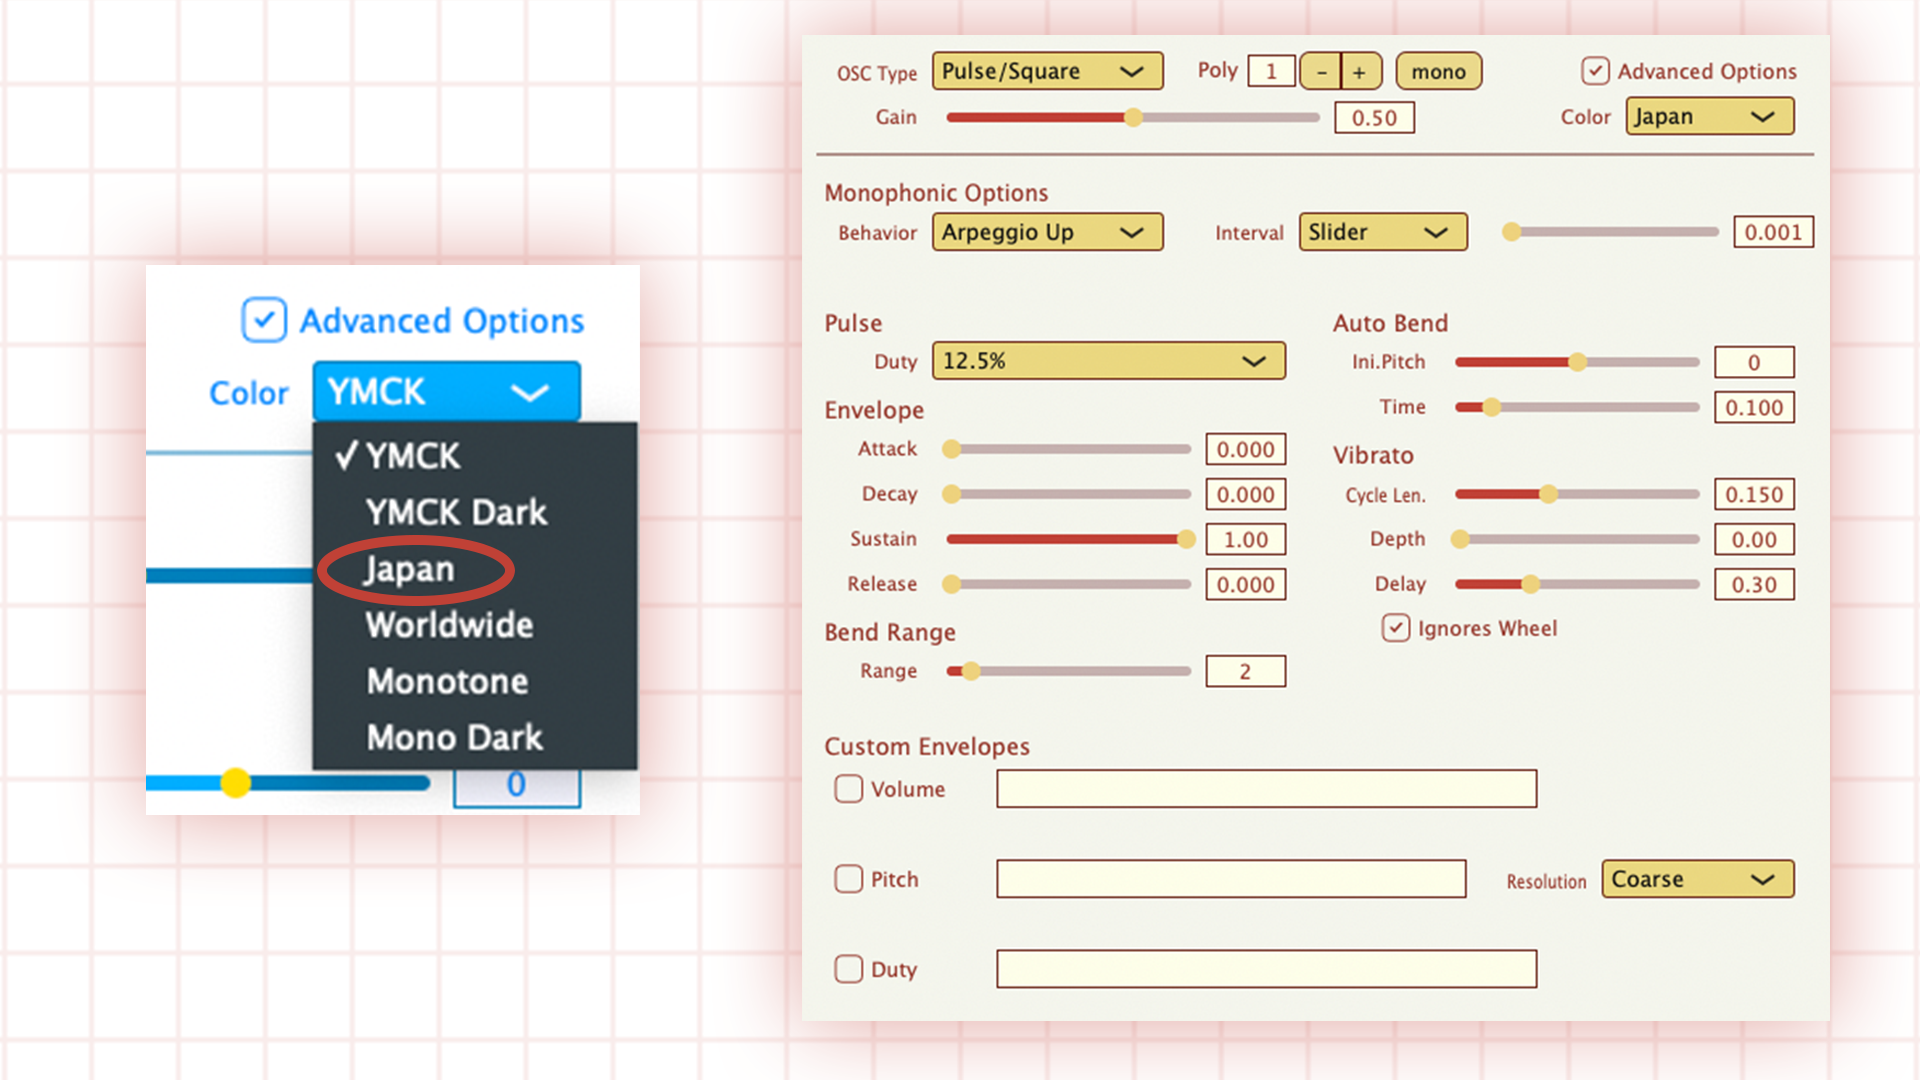
More importantly, we now have the option to input Custom Envelopes for Volume, Pitch, and Duty (duty cycle is only applicable to the Pulse/Square oscillator selection). This enables you to input detailed and customised envelope curves of your choosing. However, when we say input, in true, 8-bit coding fashion, we literally mean inputting code! But don’t worry, we’ve got you covered.
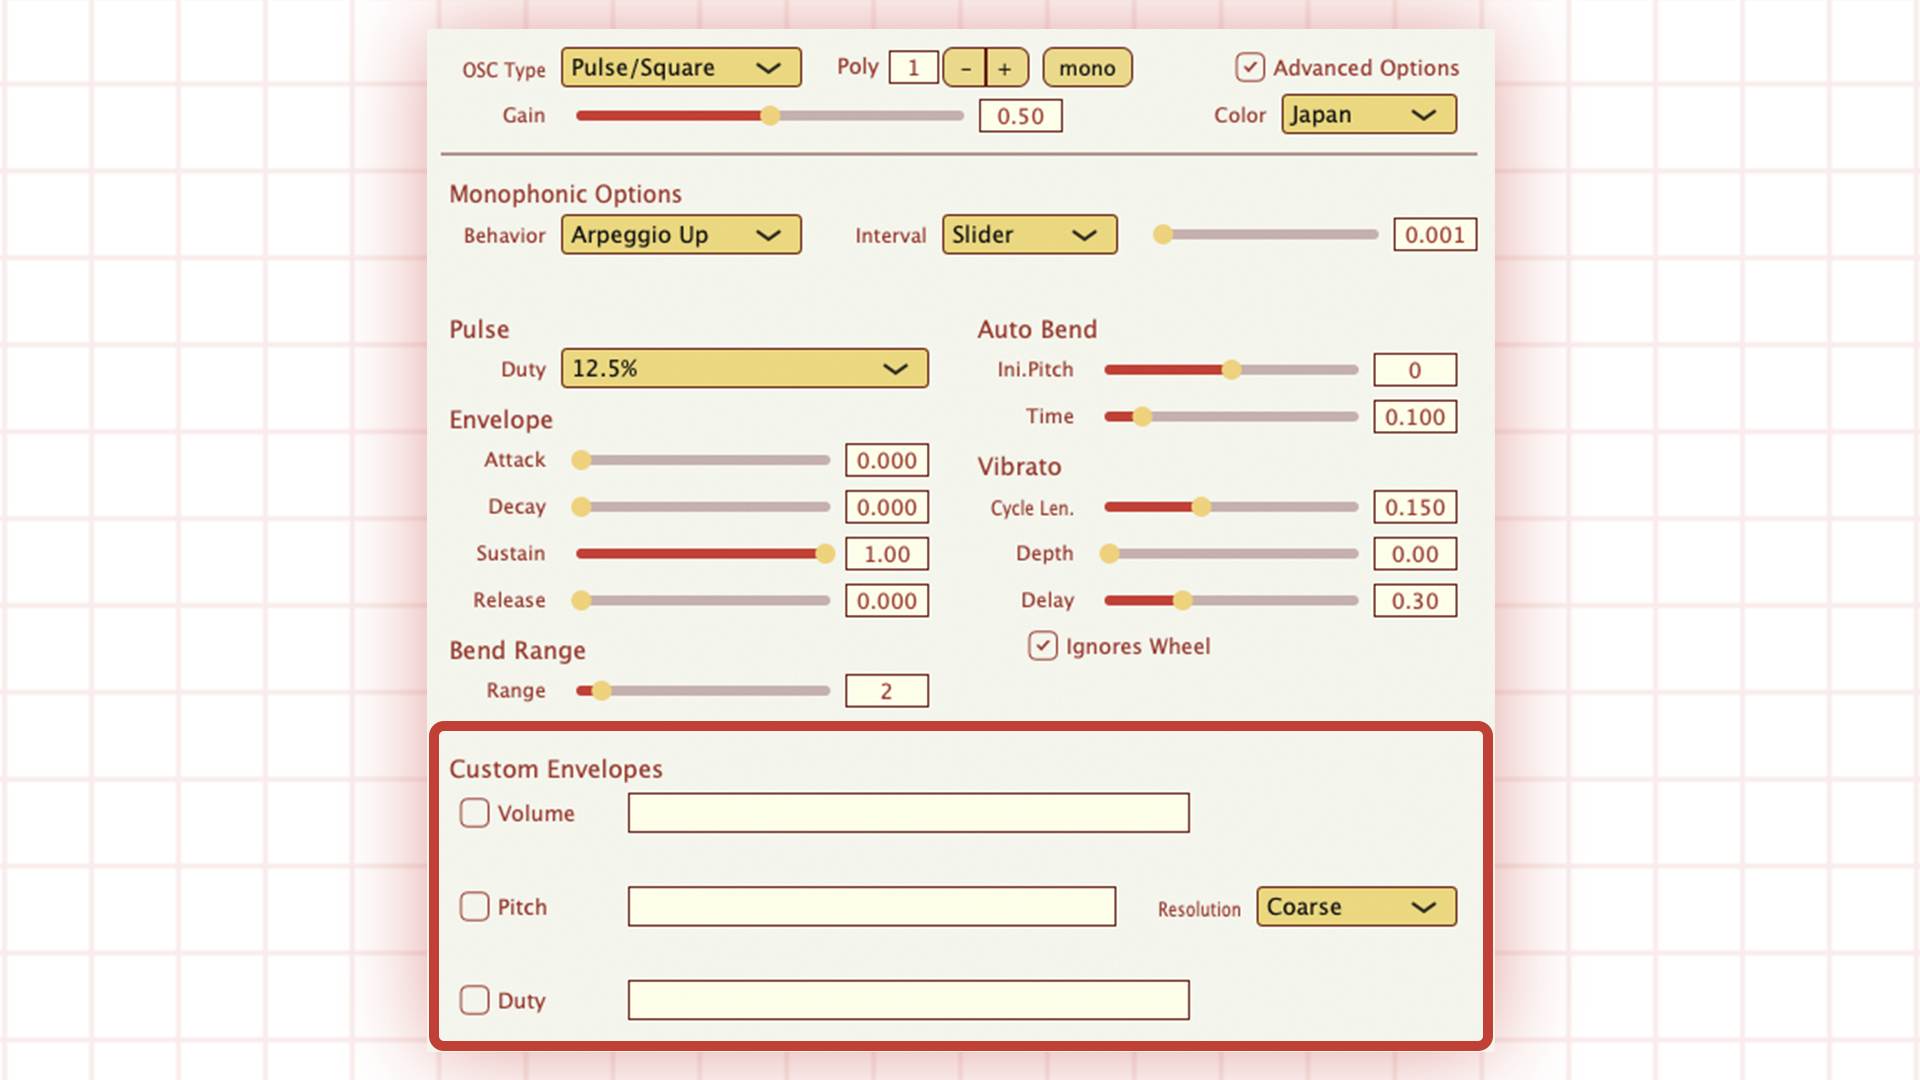
The coding system is very simple and there are prompts to remind you of minimum and maximum parameters, as well as which words you need to use (so that you don’t input incorrect or out-of-bounds parameters). The timing is predetermined at 1/60th of a second per value/frame. Note that each parameter value change constitutes a single frame of time.
We know this may be starting to sound confusing, but rest assured, it’s quite straightforward once you get to grips with it. We’ll walk you through each section individually, along with some examples to help with your understanding.
Volume range: 0~15 (0 = minimum/silence and 15 = maximum)
Here we can input a sequence of numbers to determine the amplitude characteristic of our tone. Let’s say we want our tone to fade-in over the course of one second. Rather than type 60 numerical values that gradually increase from 0 to 15, we type:
0 to 15 in 60f
The “f” means frames, and remember that one frame is equal to 1/60th of a second, so “60f ” equals one second.
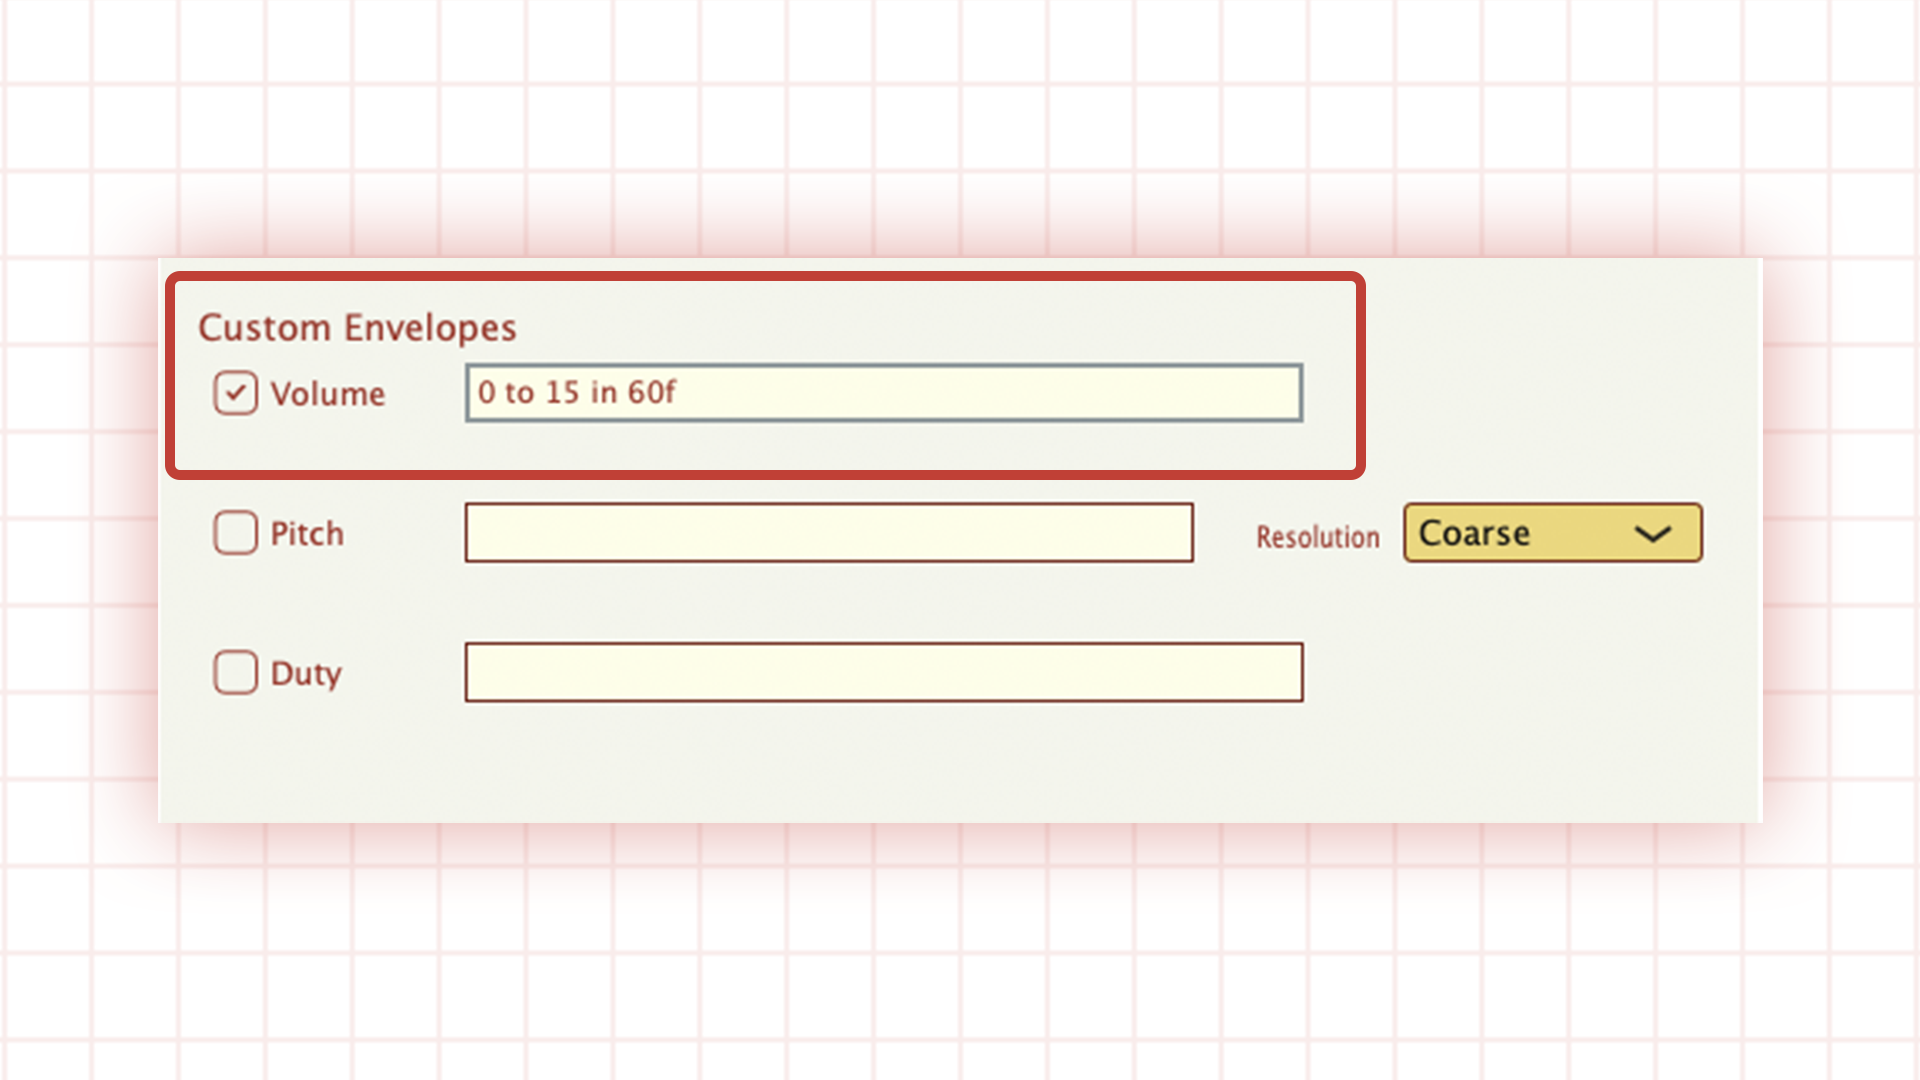
Try this out, and you’ll see what we mean. Now let’s add more commands, separated by commas to create a more complex envelope shape.
In the example below, the amplitude goes through four stages: 0 to 15, 15 to 3, 3 back up to 15, and then 15 down to 0. Note that the first three parts of the sequence are set to take place over 60 frames (one second), whereas the final part of the sequence, where the tone fades away, lasts for 120 frames (two seconds).
0 to 15 in 60f, 15 to 3 in 60f, 3 to 15 in 60f, 15 to 0 in 120f
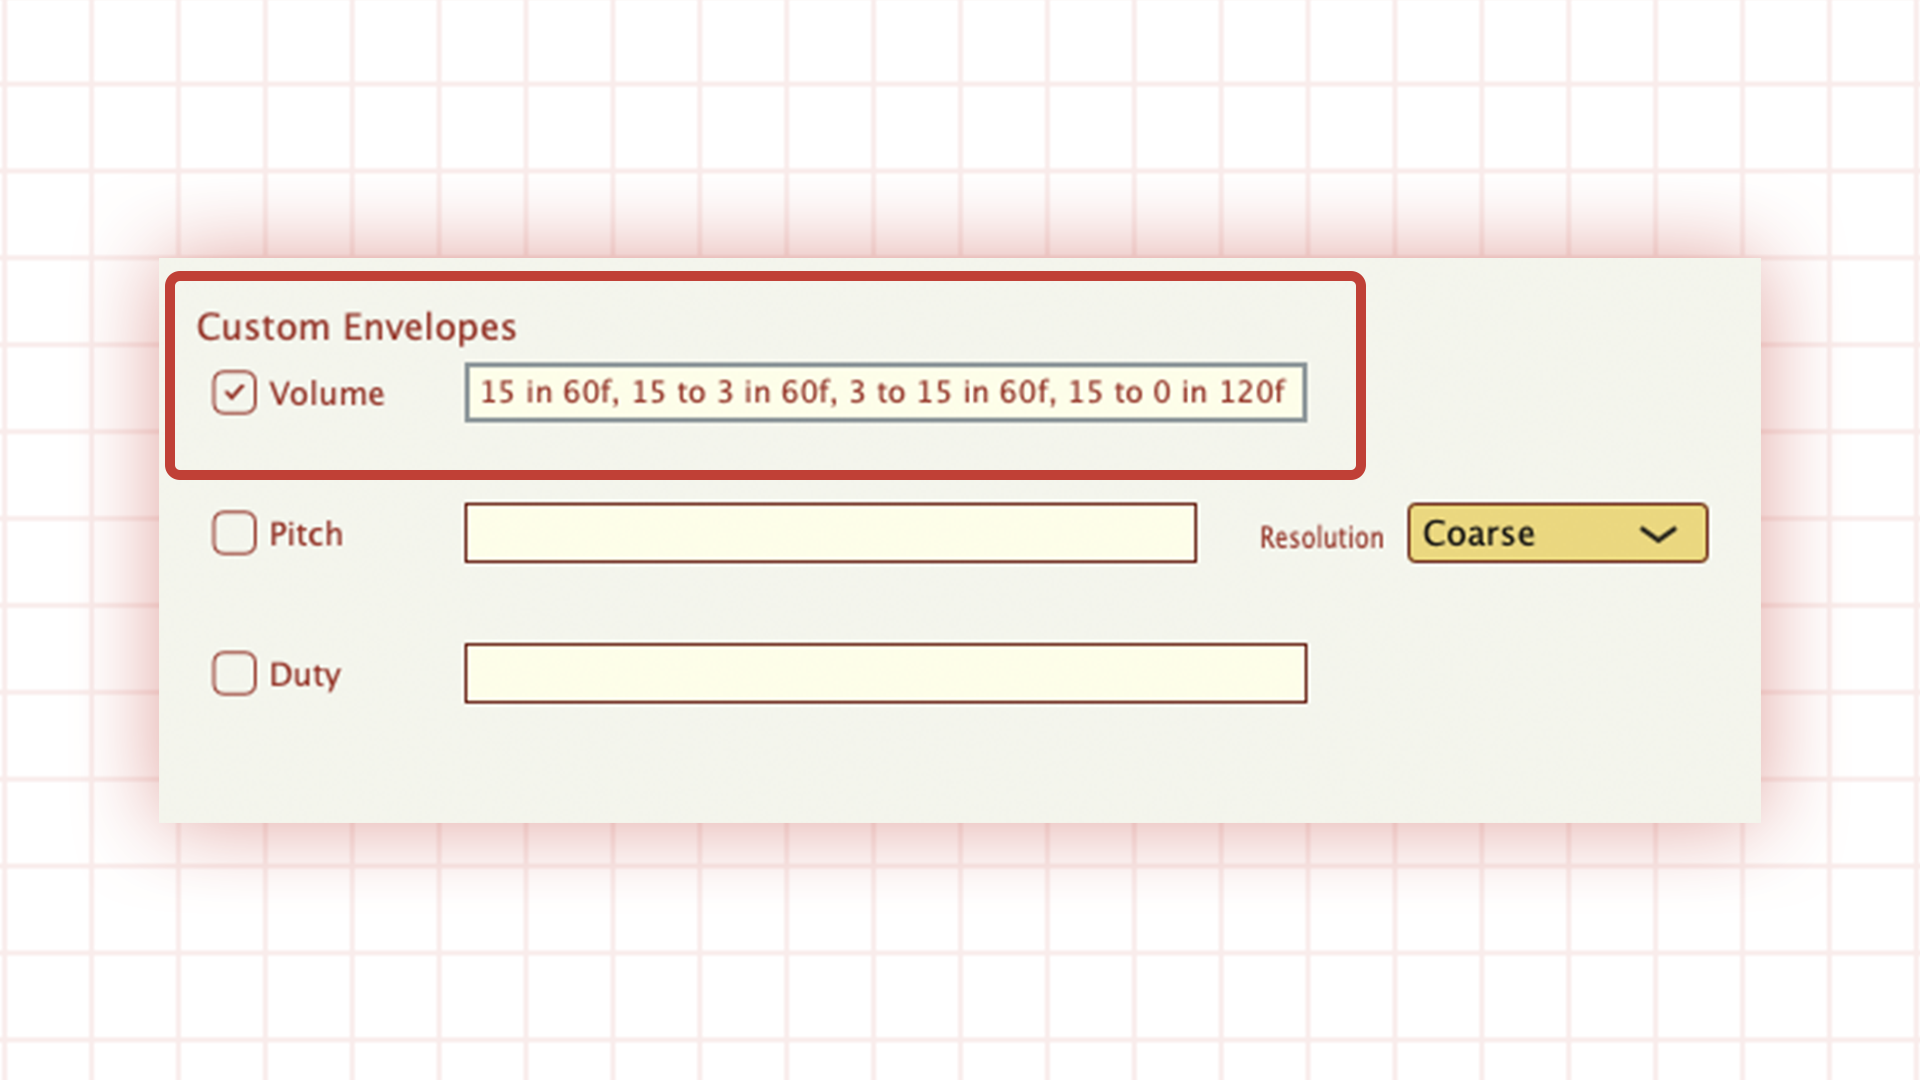
It’s not the most interesting envelope shape, but it’s more complex than what’s achievable with a basic ADSR envelope, and hopefully helps explain things a little better.
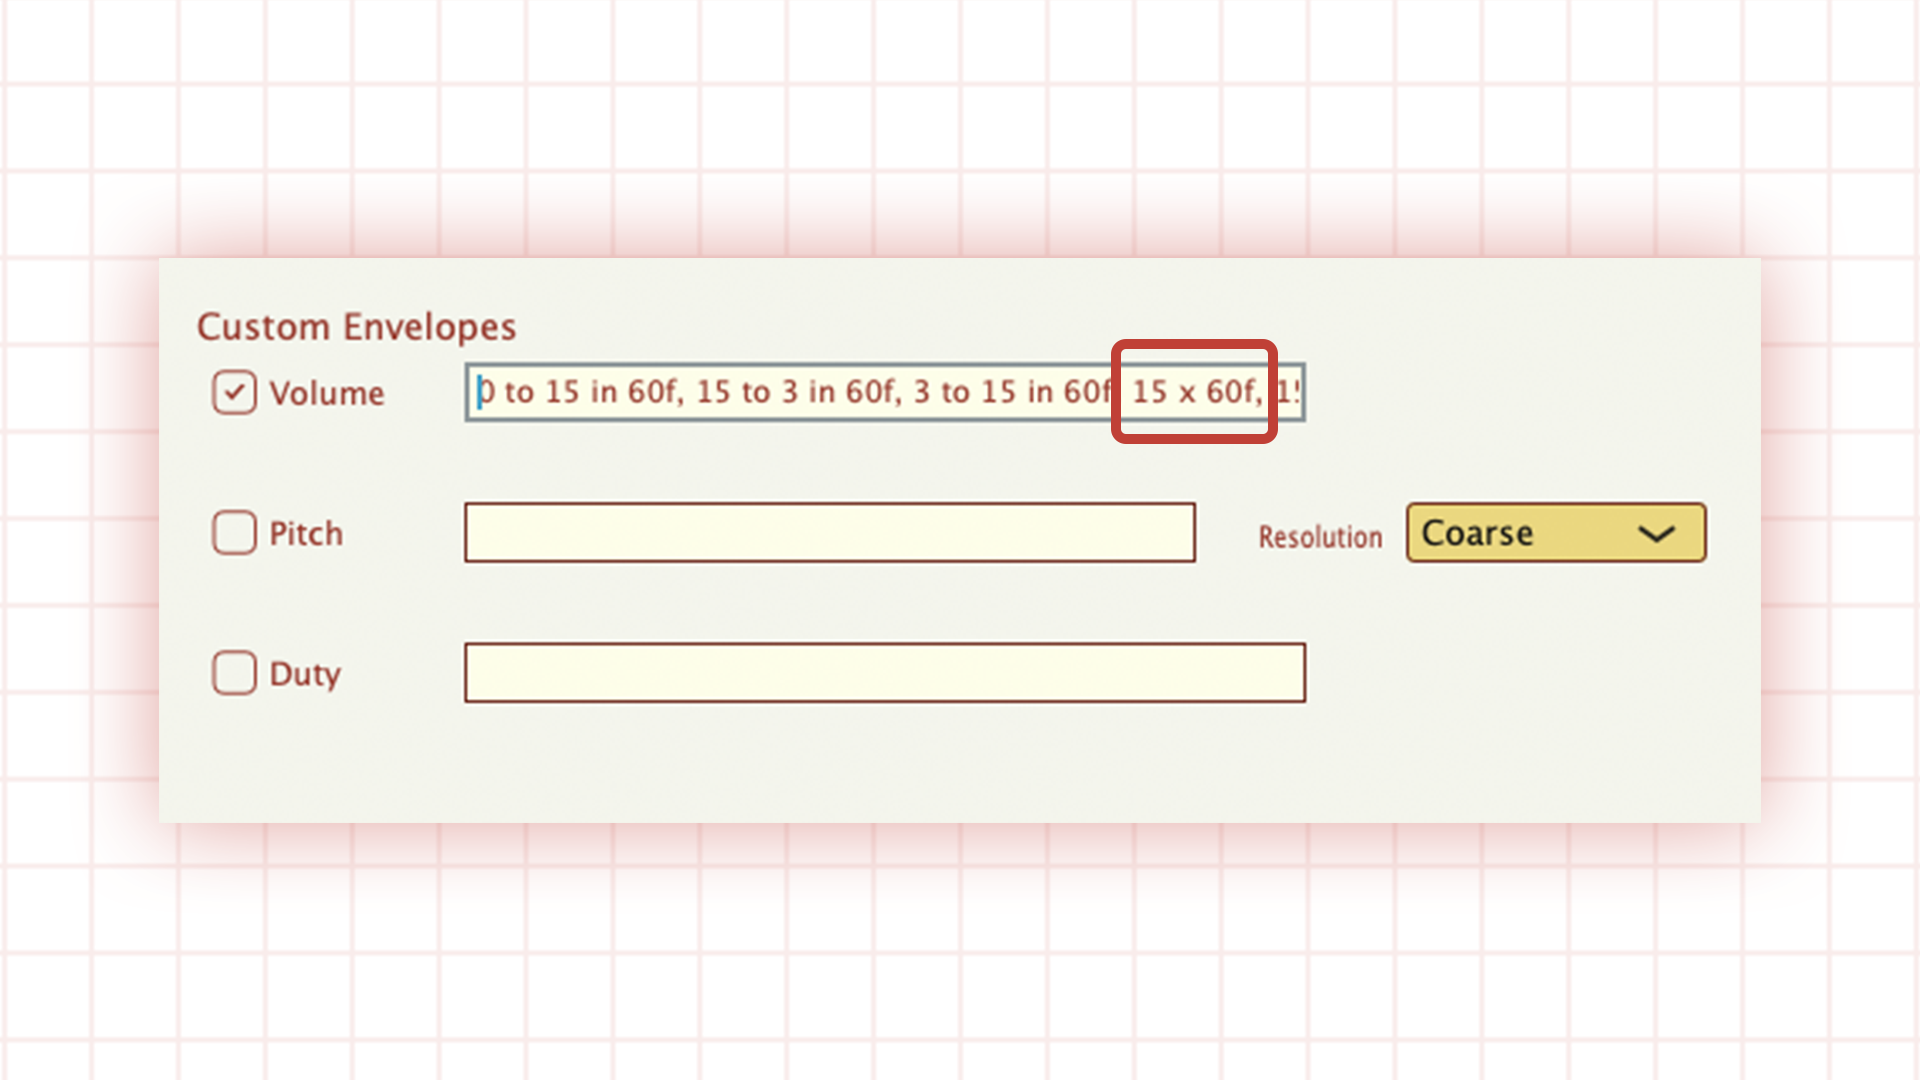
If you wish to hold the amplitude at the same value for a period of time, you input “x” and the number of frames you wish to hold that value for, for example “x60”. Let’s take the above example, but add 60 frames of 15 amplitude before the fade out.
0 to 15 in 60f, 15 to 3 in 60f, 3 to 15 in 60f, 15 x 60f, 15 to 0 in 120f
Pitch range: -64~63
The same rules apply to pitch, however because pitch has both positive and negative values, 0 equals the pitch, as played, negative values step down in pitch and positive values step up in pitch. The same rule of frames applies, so in this example, the pitch will rise, fall, stay there for 60 frames, and then rise back to its original value.
0 to 63 in 60f, 63 to -64 in 120f, -64 x 60f, 64 to 0 in 60f
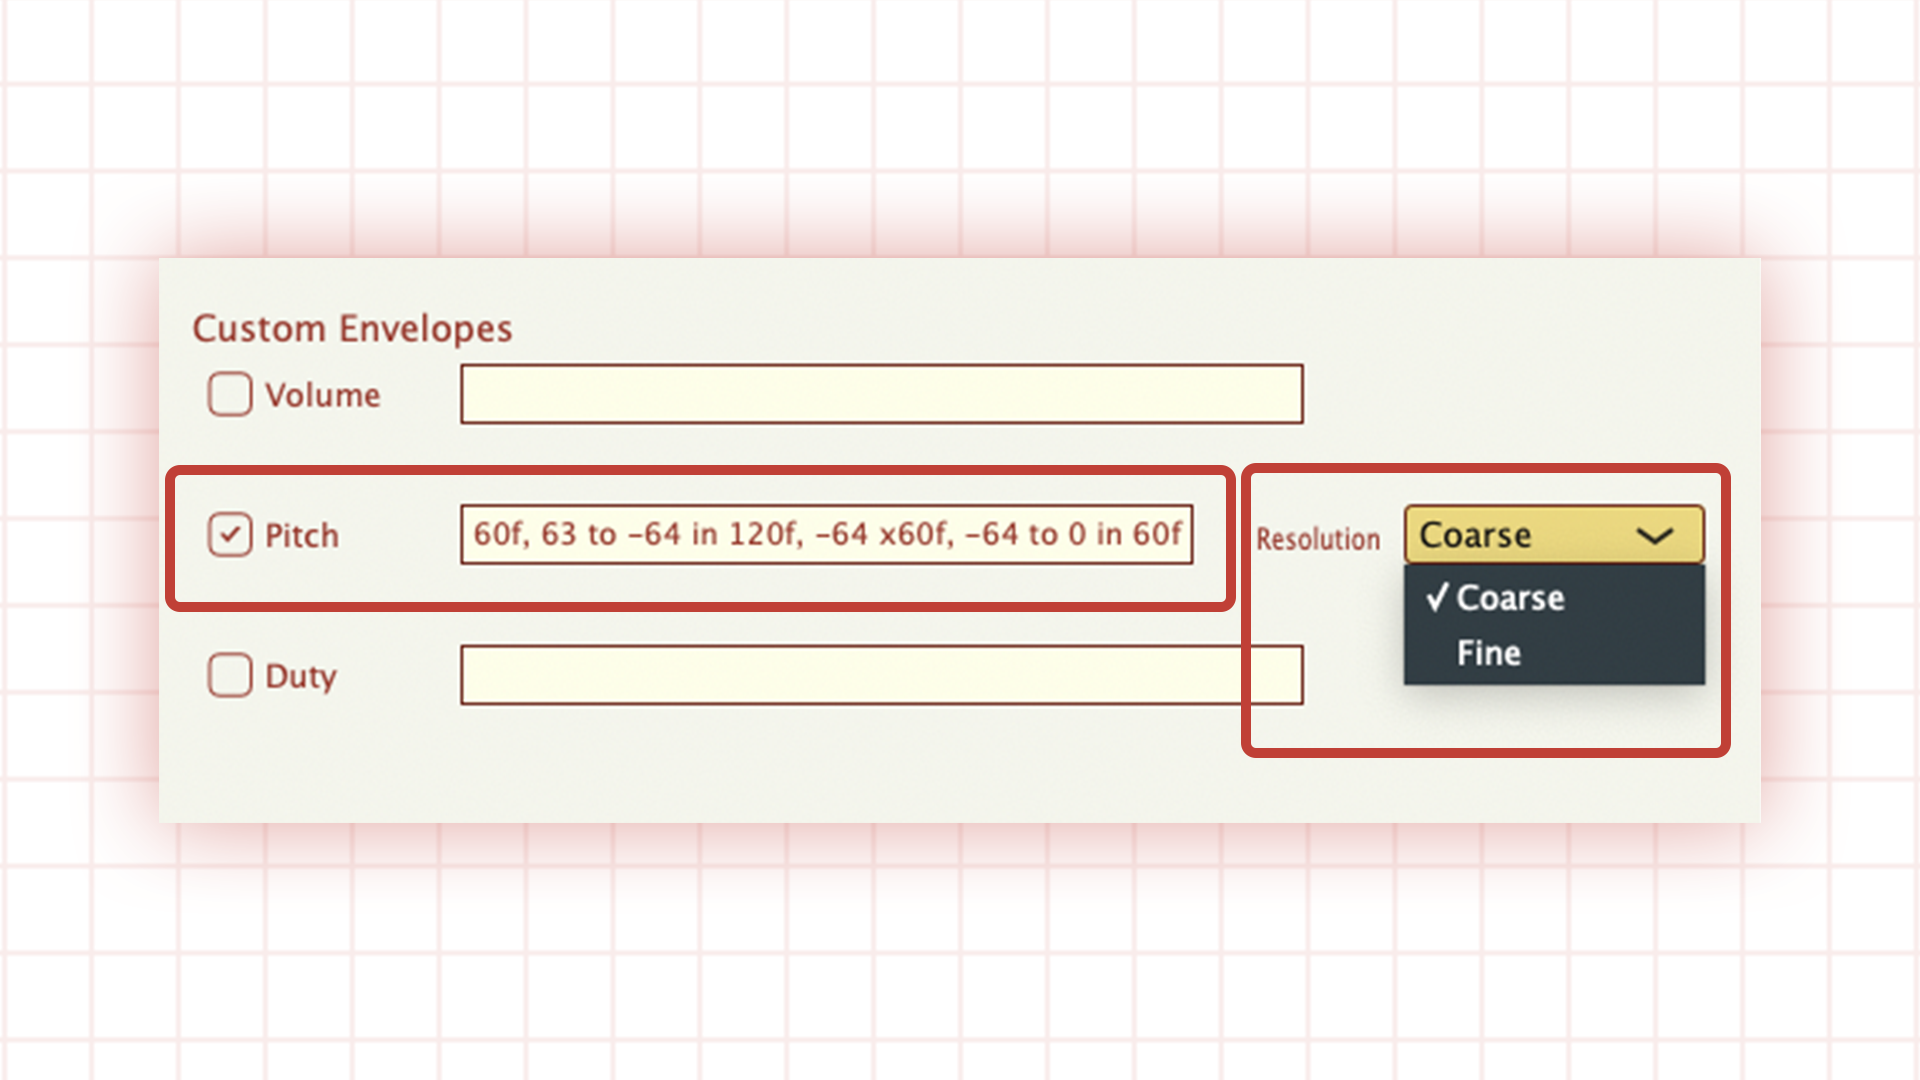
There is also a dropdown menu to select between Coarse and Fine tuning. In coarse tuning, each value is a half-tone/semitone. In fine tuning a half-tone/semitone is divided into eight intervals: i.e every increase/decrease of 8 will correspond to a half-tone/semitone.
Duty range: 0~2 (0 = 12.5% Pulse, 1 = 25% Pulse and 2 = 50% Pulse)
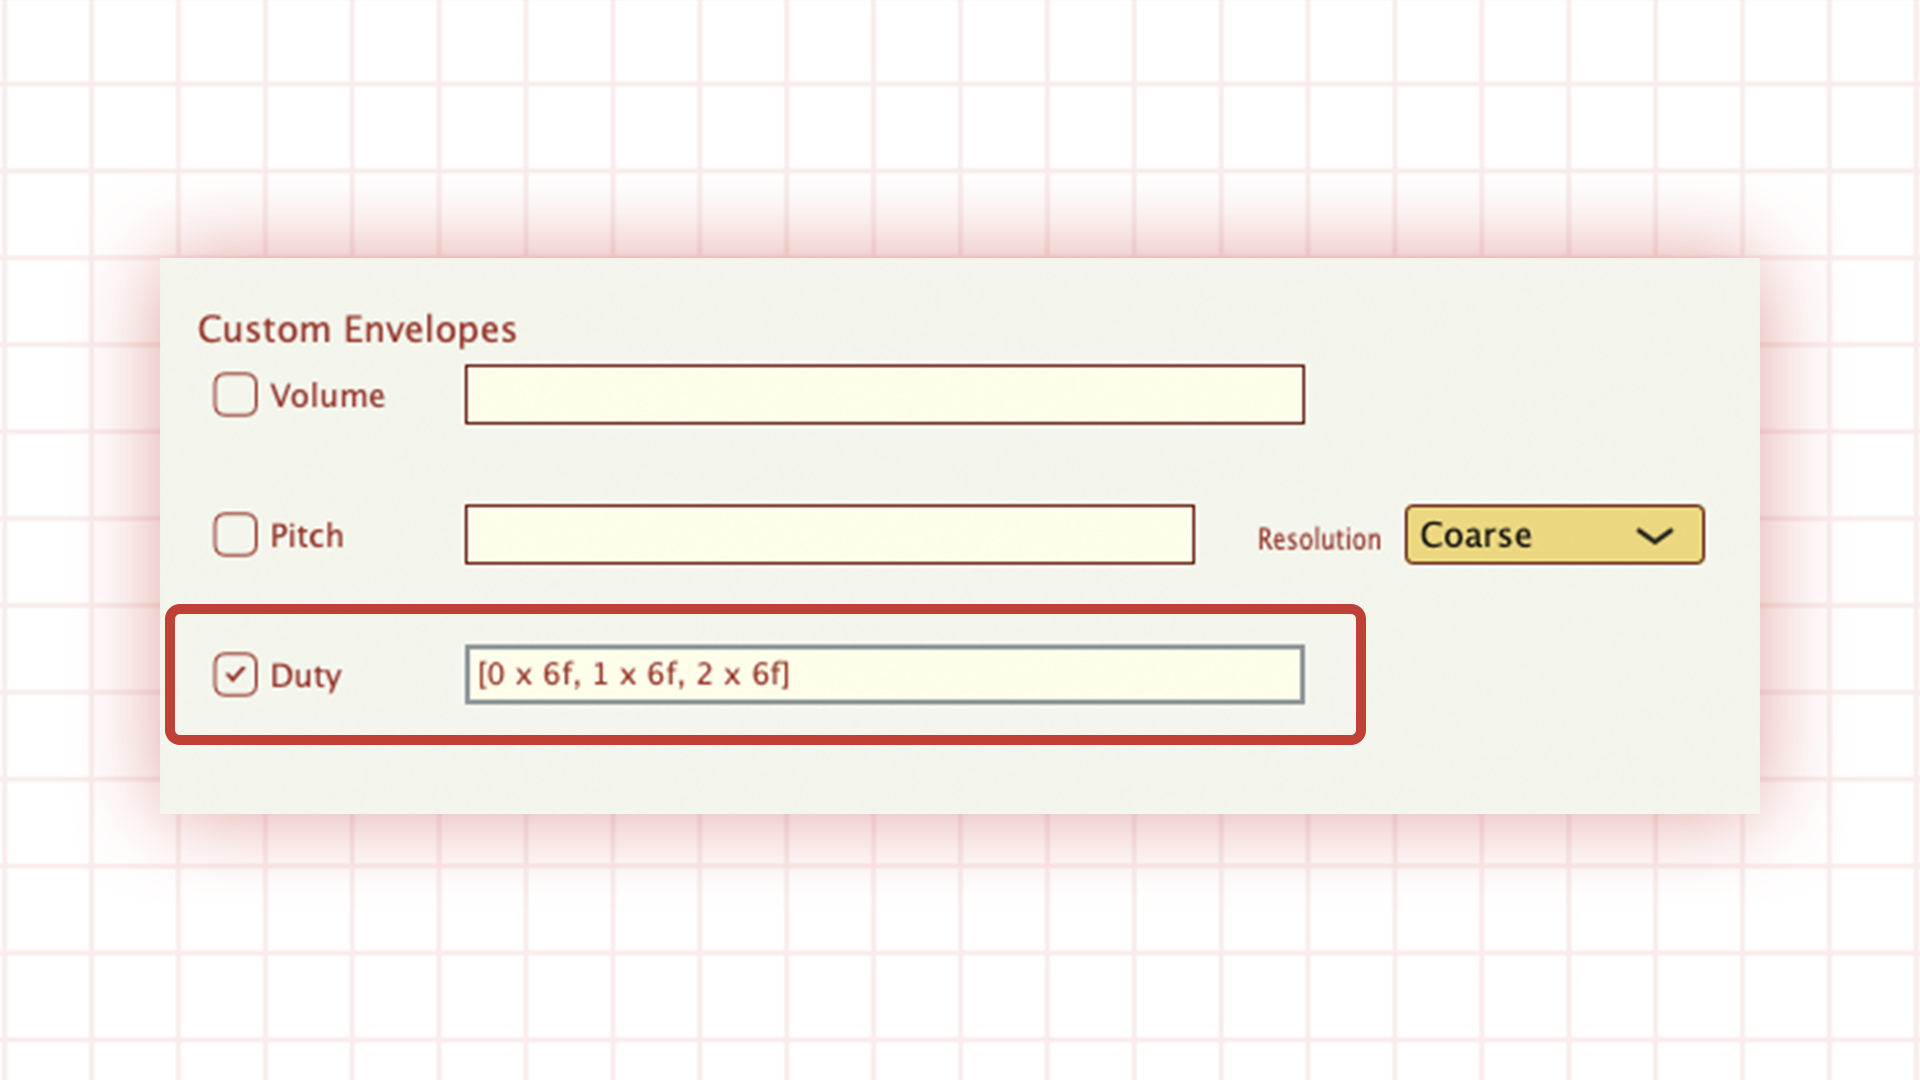
This is only applicable to the Pulse/Square oscillator selection, and is somewhat simpler, as there are only three numerical values to contend with. You use this option to change the pulse-width mid-tone, for example, we could start on 12.5%, switch to 25%, and then switch to 50%.
0 x 6f, 1 x 6f, 2 x 6f
This isn’t particularly interesting or useful in itself, however, if we loop this pattern by enclosing the code in “ [ ] ” then it becomes a very interesting and much more usable texture, like so:
[ 0 x 6f, 1 x 6f, 2 x 6f ]
Note that the cycle loop “ [ ] ” can be used on the other envelopes too, it’s not exclusive to Duty.
If you wish to synchronise the tempo of your DAW to the advanced envelope features of Magical 8bit, you’ll need to do so the old-fashioned way, by manually calculating the relationship between your BPM and the number of frames with which you wish to command/cycle your envelopes.
This code-input approach to parameter control probably won’t feel very intuitive at first, but it’s worth keeping in mind that this was the sort of thing that early video-game composers and sound-designers had to do. It’s also probably a very natural and intuitive approach for chiptune veterans YMCK, who made this plugin.
There is a user guide included in the plugin download which contains a detailed explanation and examples of how to input codes for this section, and honestly, if we can figure it out, anyone can.
Presets
In previous editions of this tutorial series, this is the point at which we’d delve into a few custom presets to better explore features, however this synth doesn’t support any preset features independently of DAW patch saves. Furthermore, coding aside, this synth is relatively simple and intuitive, and hopefully you can start dialling in tones to your liking quickly after spending a little time with it.
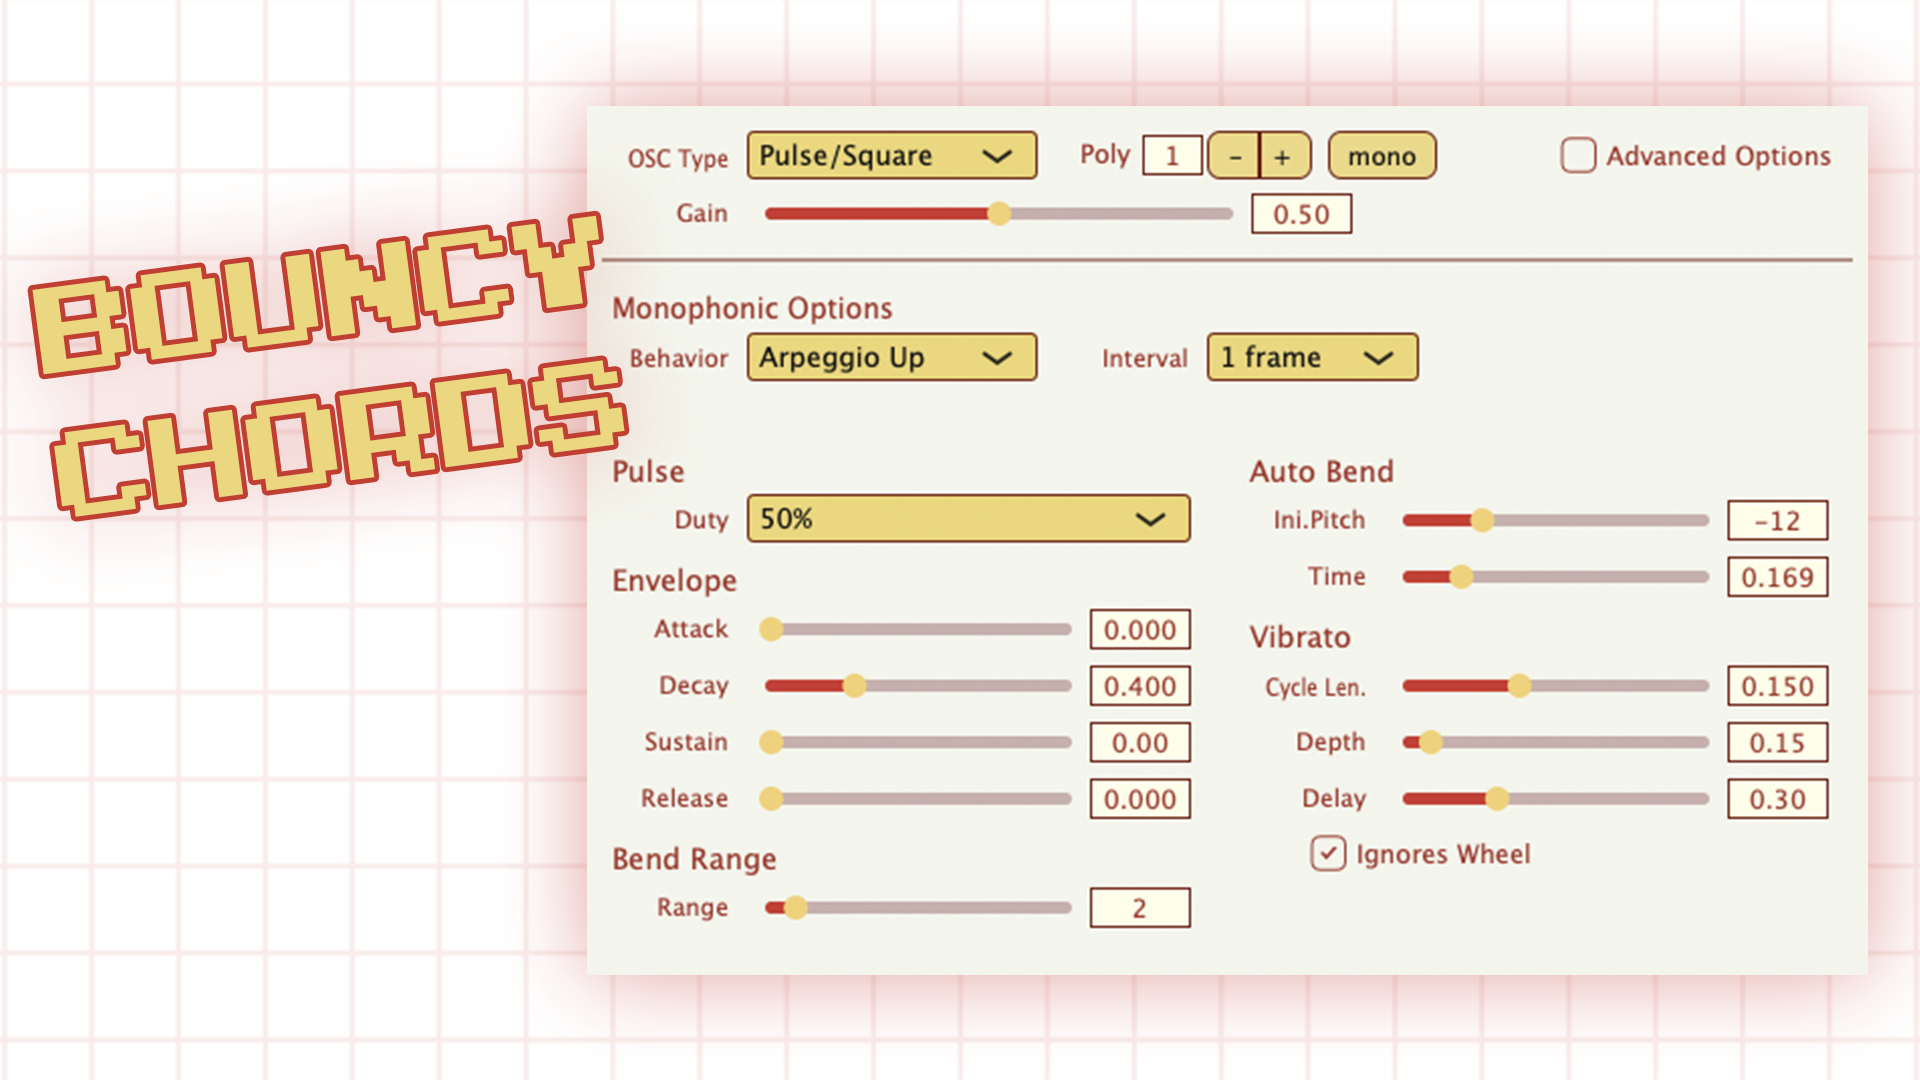
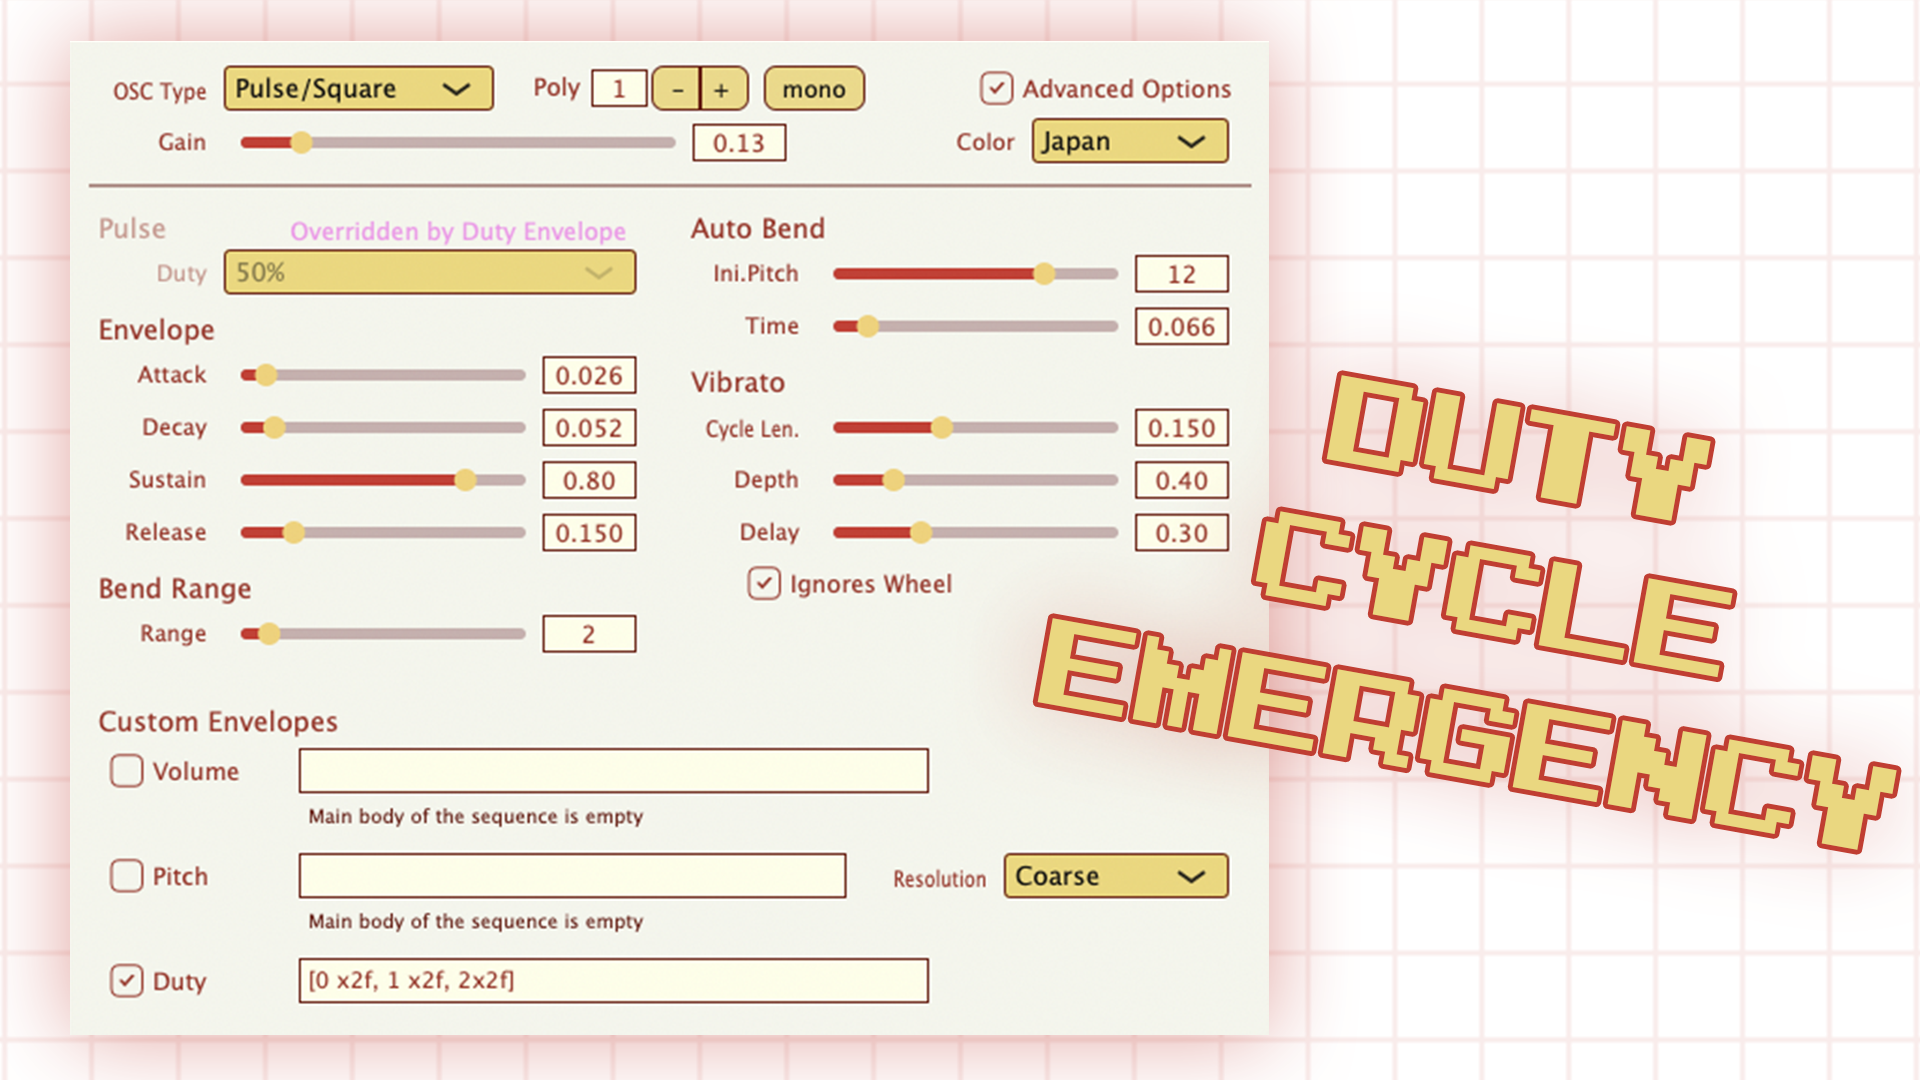
Nevertheless, here are some screenshots of some fun patches we've made, to show off some of the charm and character present in this plugin.
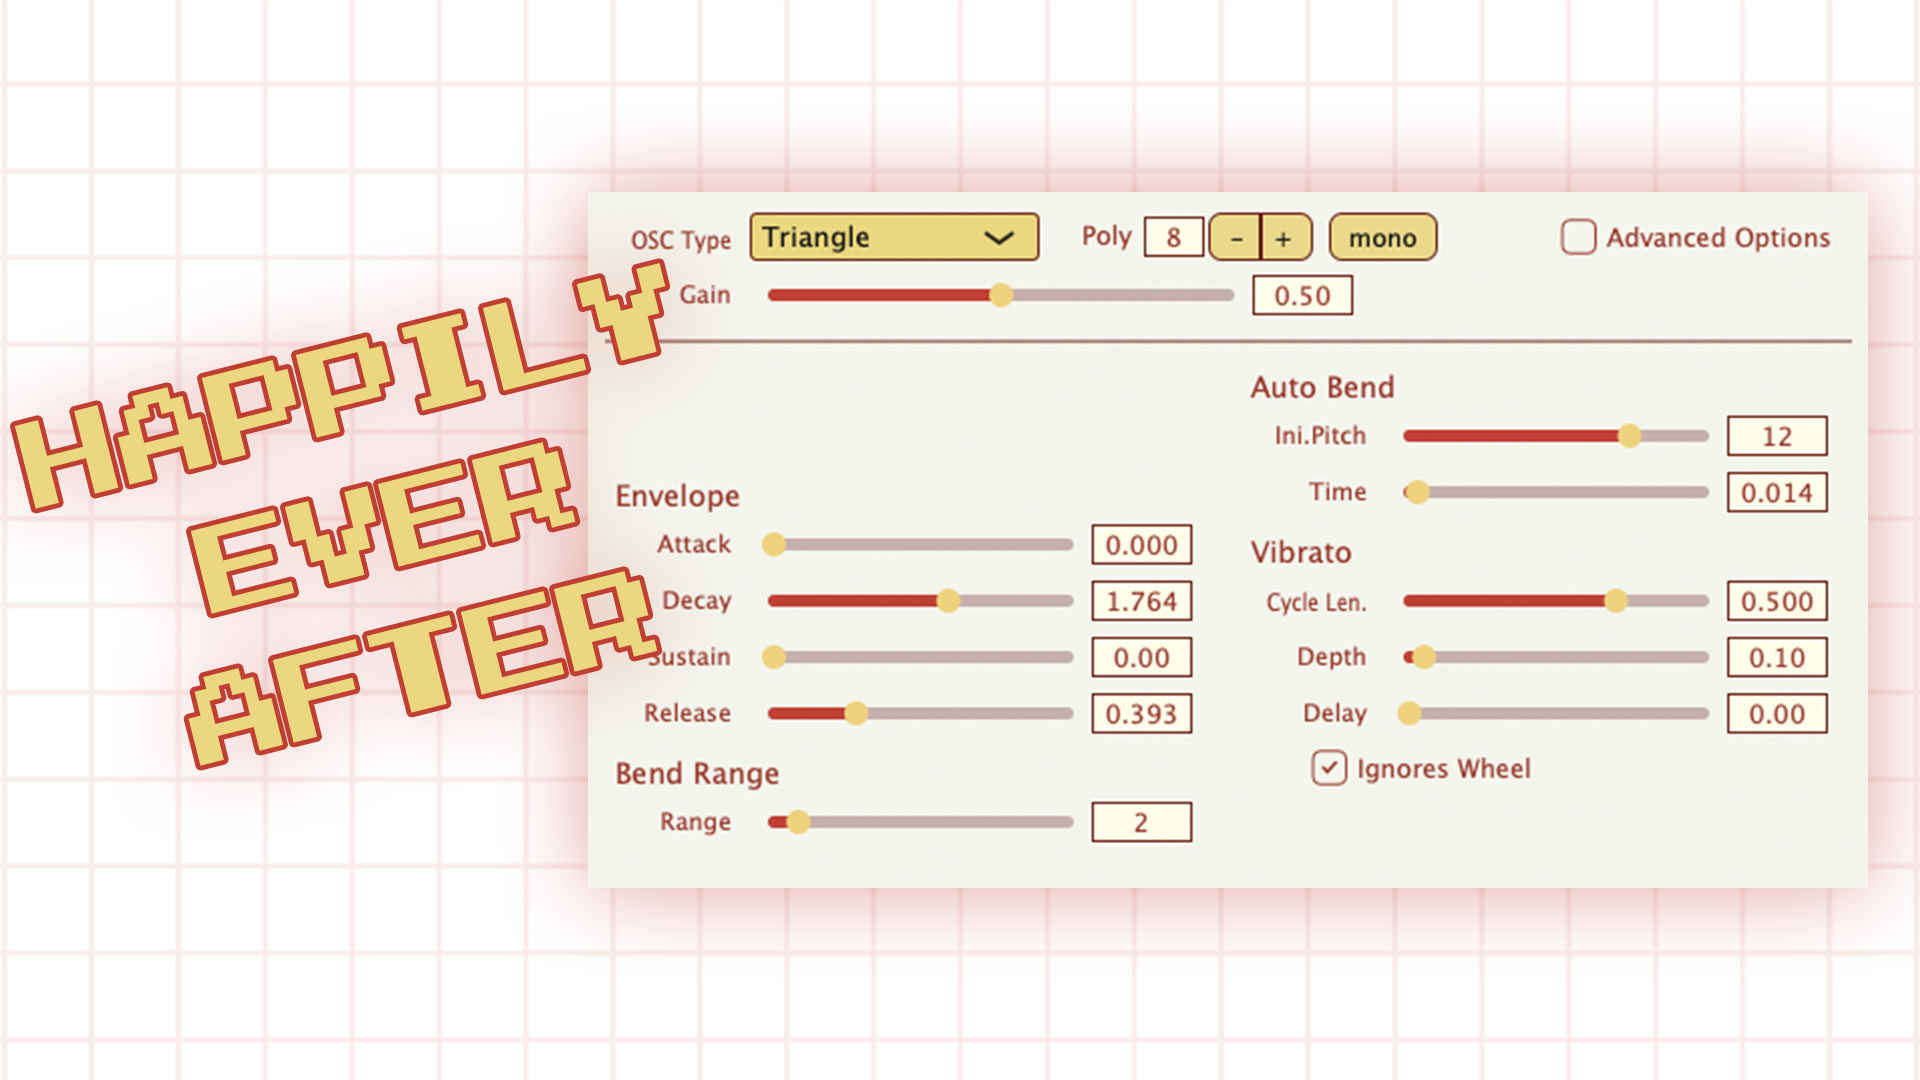
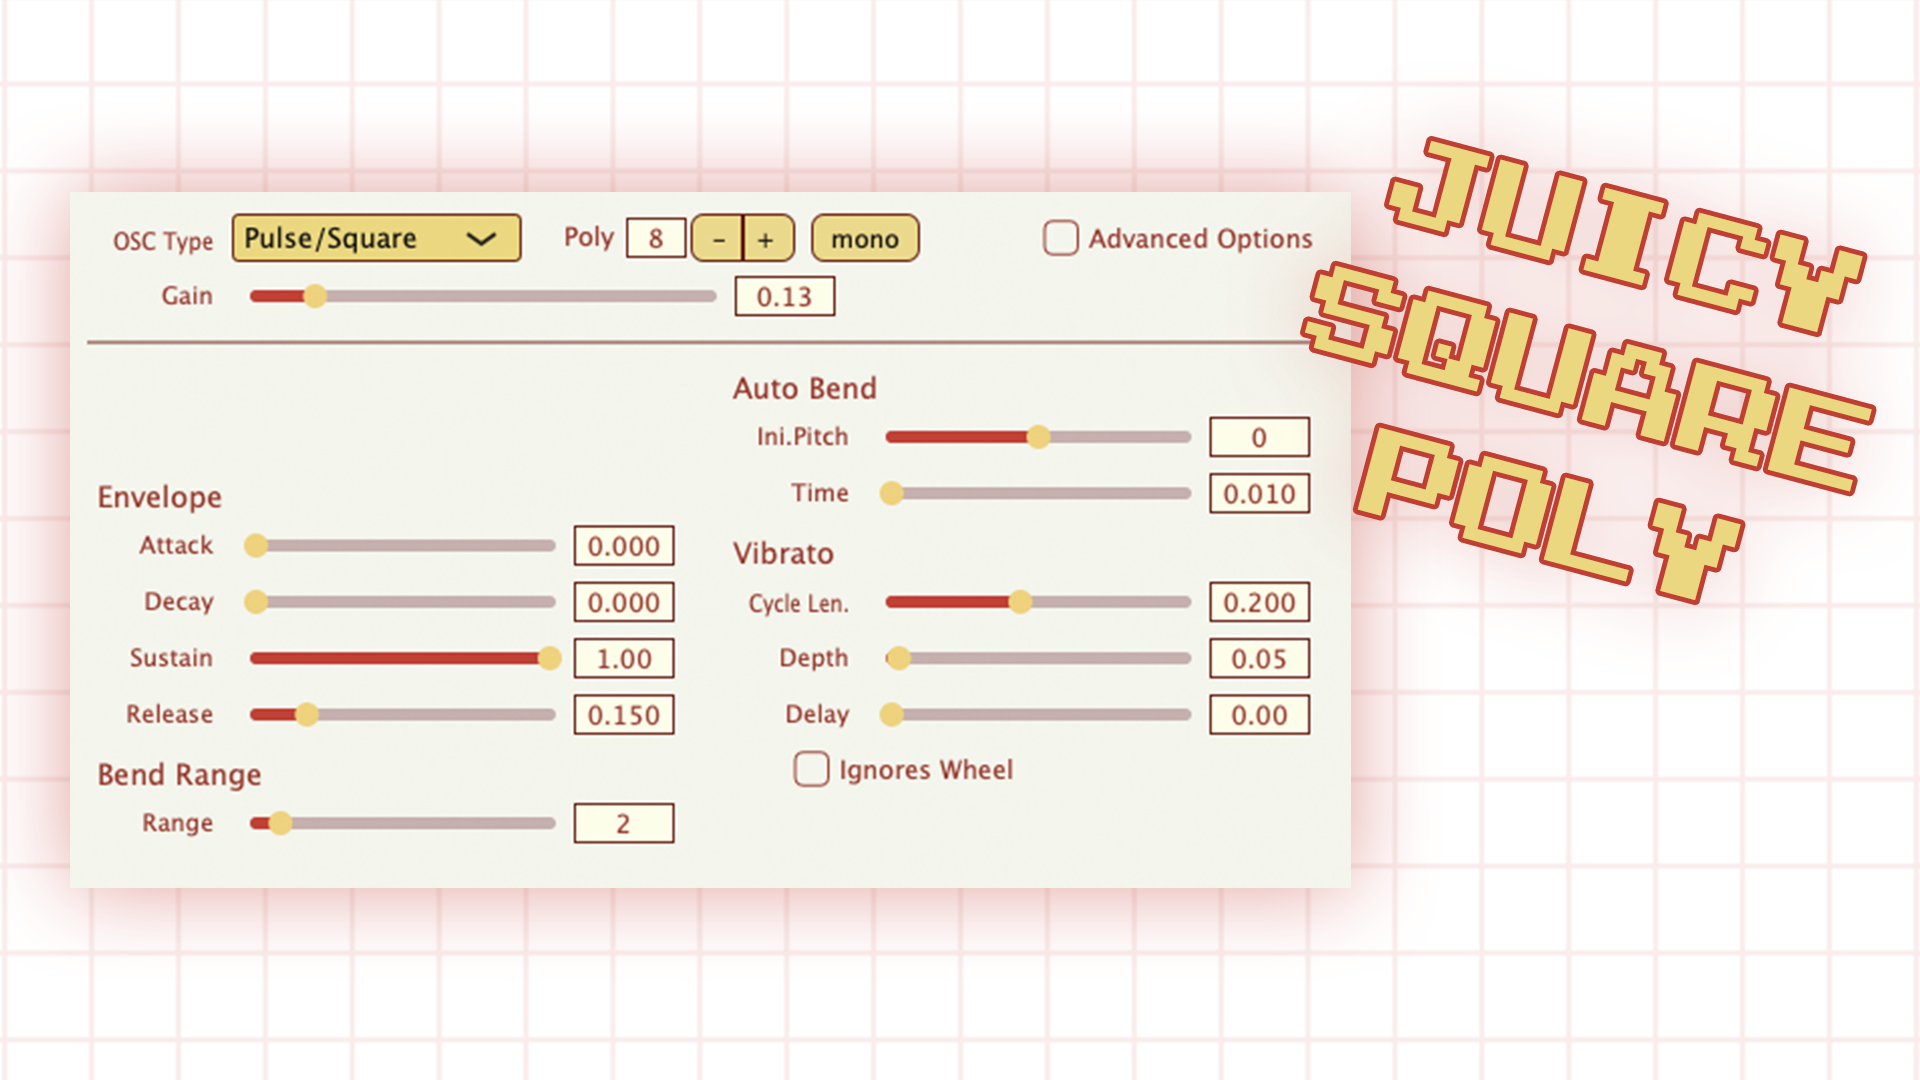
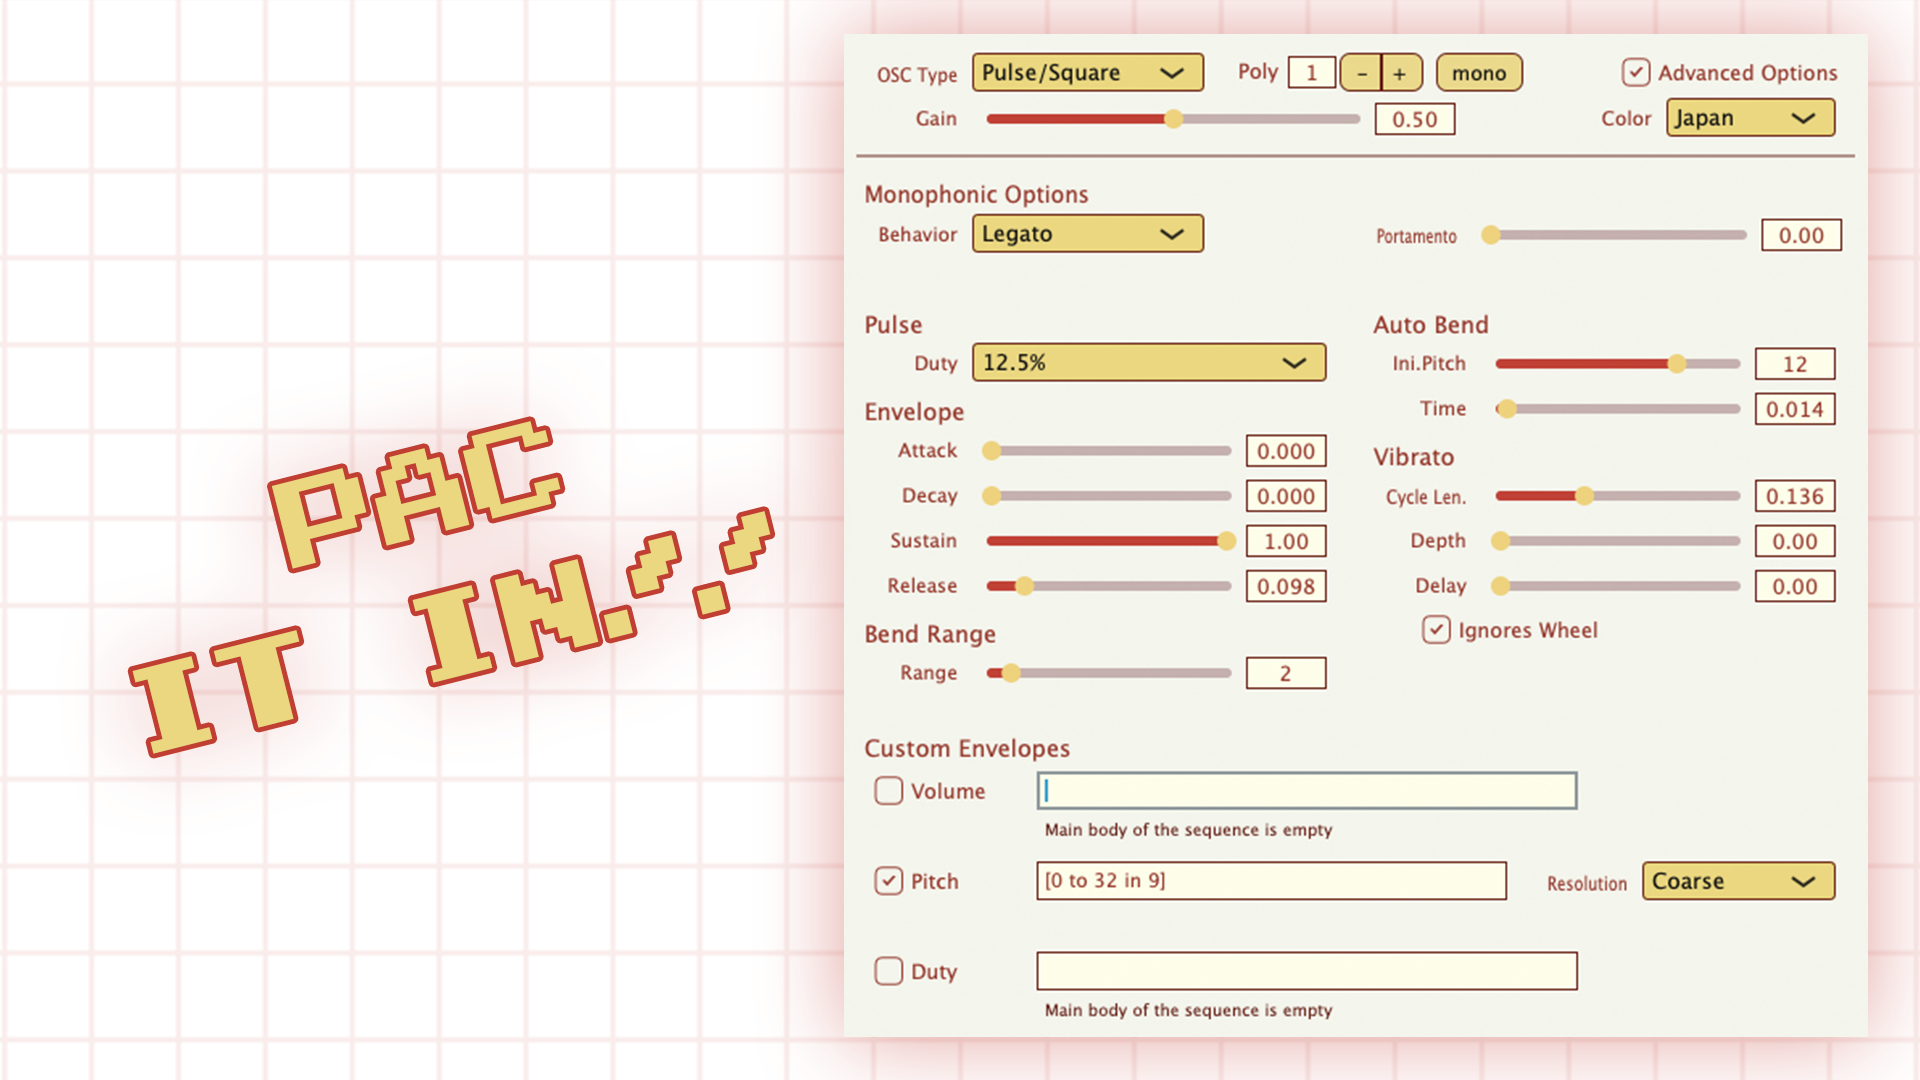
The Japanese word natsukashii doesn’t have a literal English translation, however it can be described as the warm (albeit sometimes tinged with melancholy), sense of nostalgia one experiences when they are reminded of something from their youth, like unexpectedly hearing an old song from your childhood.
Moreover, natsukashii can be felt about something you’ve never had direct or literal exposure to; an imagined memory or imagined past, if you will. It’s an emotional state that contributes to the cyclical revival of older artforms; such as the recent resurgence of young people taking an interest in the pop culture of the 1980s.
Whether or not you’re old enough to remember the 8-bit video-game era, there’s something quite powerful to be found in this humble, little software-synthesiser. Much like the simplistic 8-bit video-game consoles that inspired it, it’s small, but mighty, with a near limitless potential for creativity and fun.
It condenses the nostalgic soundtrack of many people's childhoods into 9 megabytes of free software synthesiser, and we urge you to download it and give it a go. We're confident you’ll enjoy playing with it, and you might even get a dose of natsukashii in the process.


“OSC” Steve is a composer, producer and educator with a background in piano, synthesisers and sound-engineering. He is an established, independent artist in the Synthwave and Retrowave music scenes, and has composed for several independent video-games including Nintendo Switch™ titles.
