10 things you didn't know Logic Pro could do
Apple's flagship DAW is more powerful than you think. Here's 10 useful features you might not have discovered yet
Want all the hottest music and gear news, reviews, deals, features and more, direct to your inbox? Sign up here.
You are now subscribed
Your newsletter sign-up was successful
Logic Pro is a hugely powerful DAW. Offering us a multitude of ways to achieve almost anything, it's so densely laden with features that even Logic pros can be forgiven for lacking a complete understanding of its many features and capabilities.
With that in mind, let’s take a look at ten things you probably didn't know Logic Pro could do, in the hopes of switching up your workflow and sparking new creative ideas.
1. Colour coordination
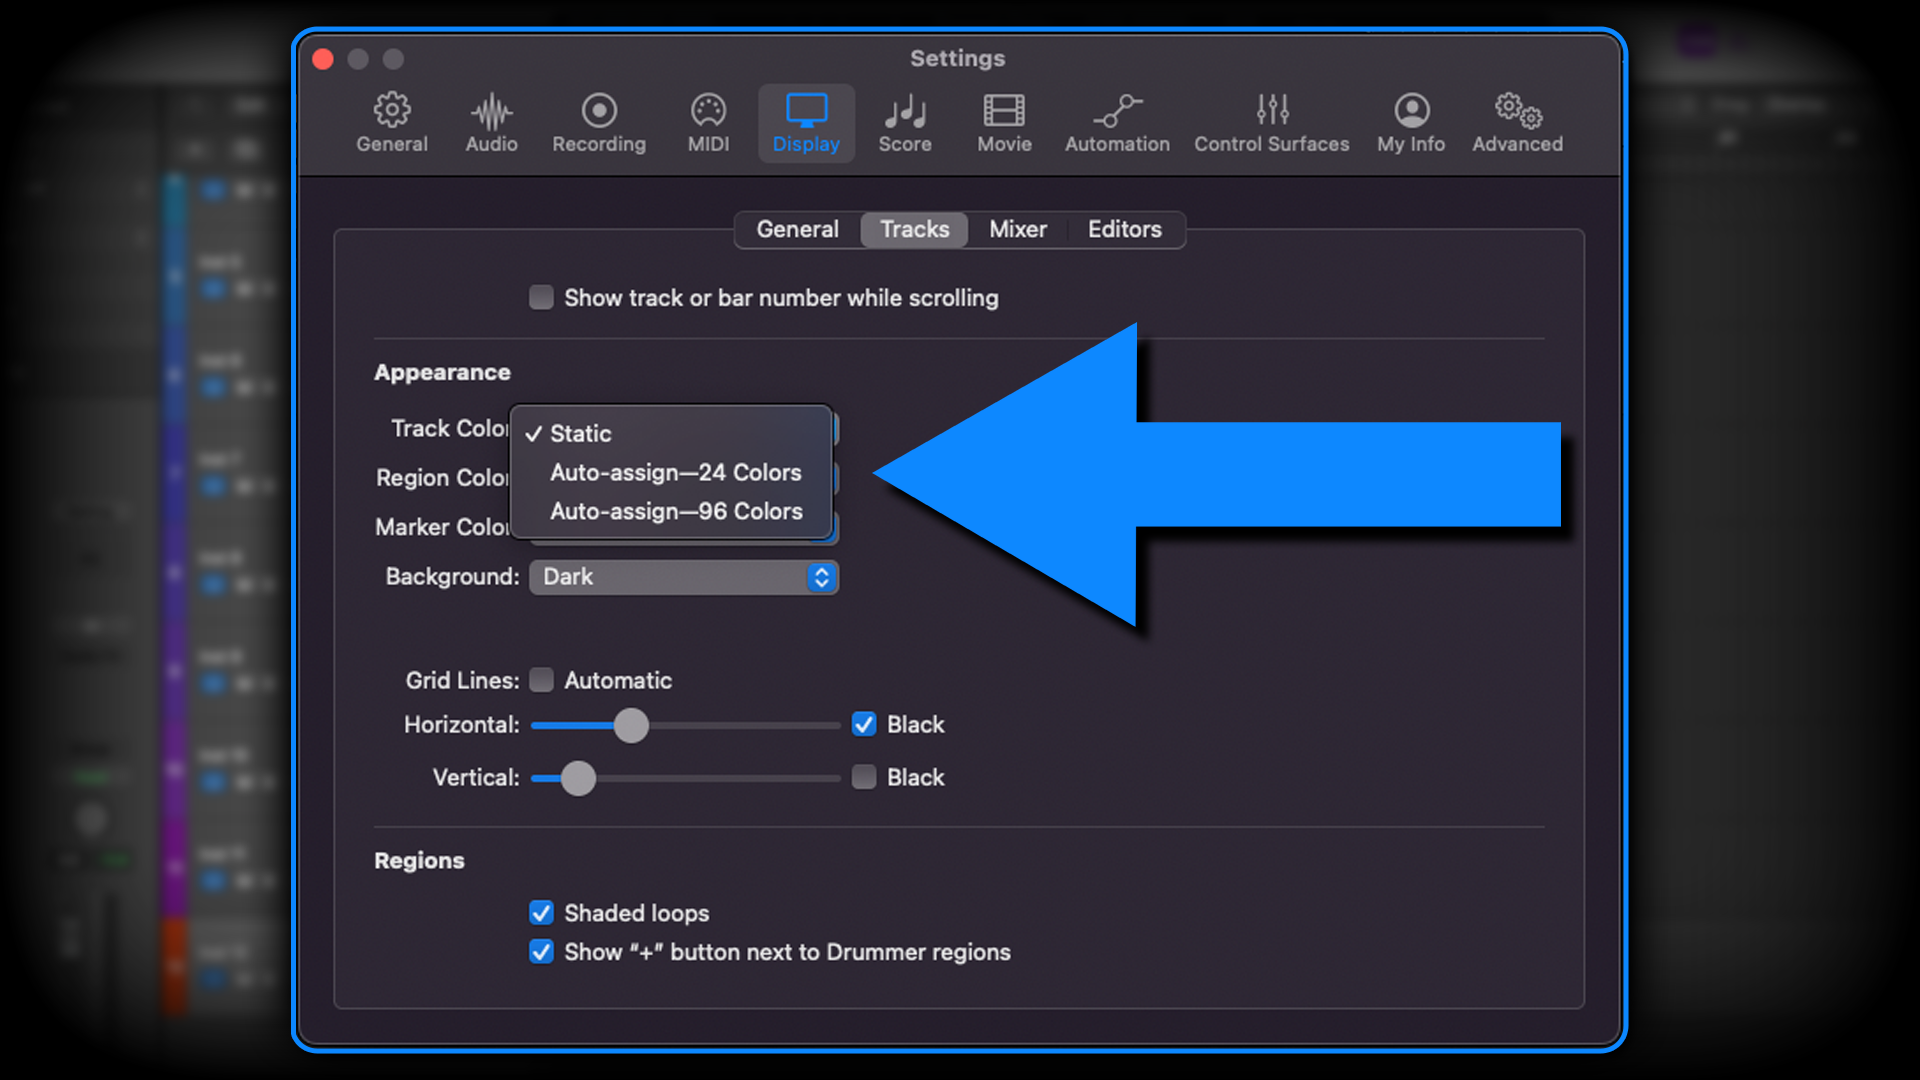
Avoid the arguably drab default colour scheme and auto-assign different colours to every track. Not only can this look more inviting, but it can be of great help with visual cues, navigation and differentiation, especially as projects grow in size. Go to Settings > Display > Track Color > Auto-Assign.
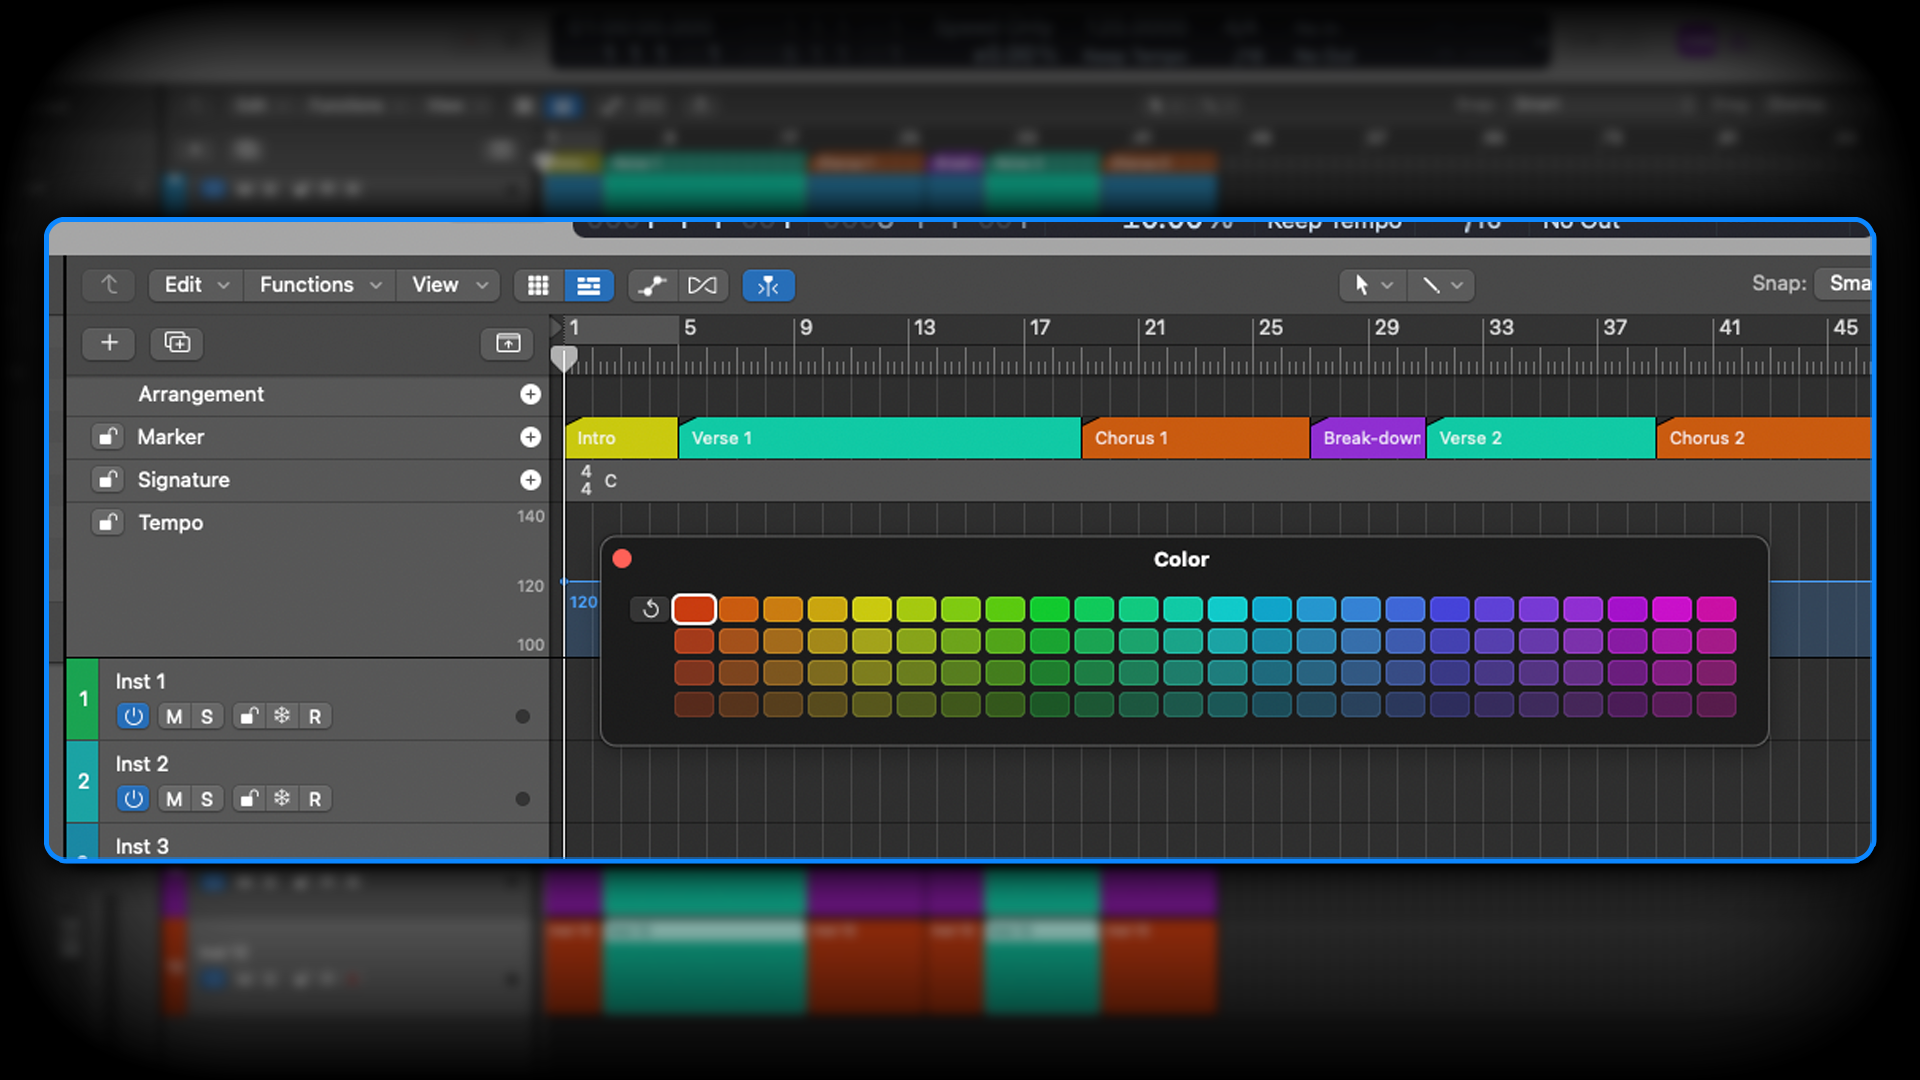
Further to this, whilst you probably know that you can customise the colours of regions (Alt+C), did you know that you can also colourise markers? Display Global Tracks (G), select your desired marker and choose a colour from the colour window (Alt+C). This can be helpful when navigating large projects with multiple sections.
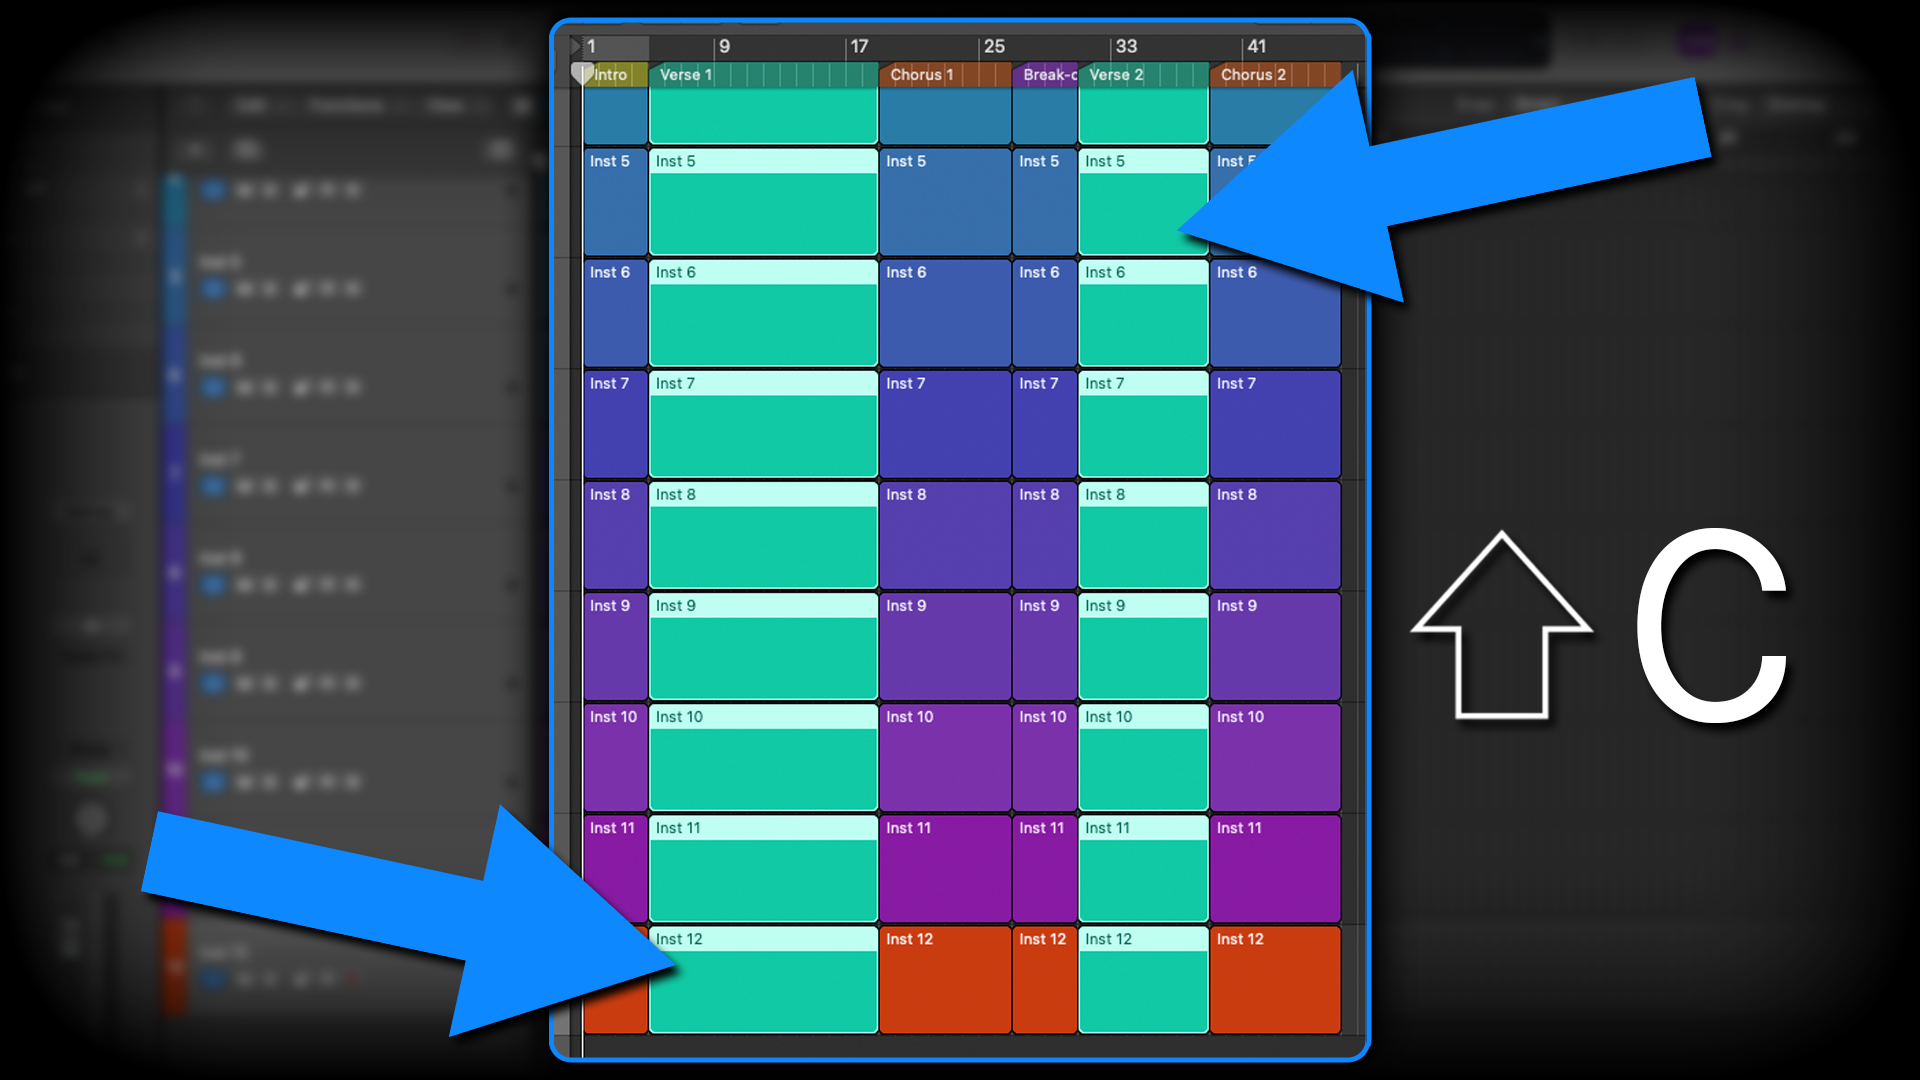
The fun doesn’t stop there! If you’ve taken advantage of colourising your regions, you can use colours to mass-select regions. Highlight a region and press Shift+C to highlight every other region of the same colour. This is most effective if you colour-code different sections of the songs, or particular instrument groups, for quick selection and editing.
2. Speed and tempo shenanigans
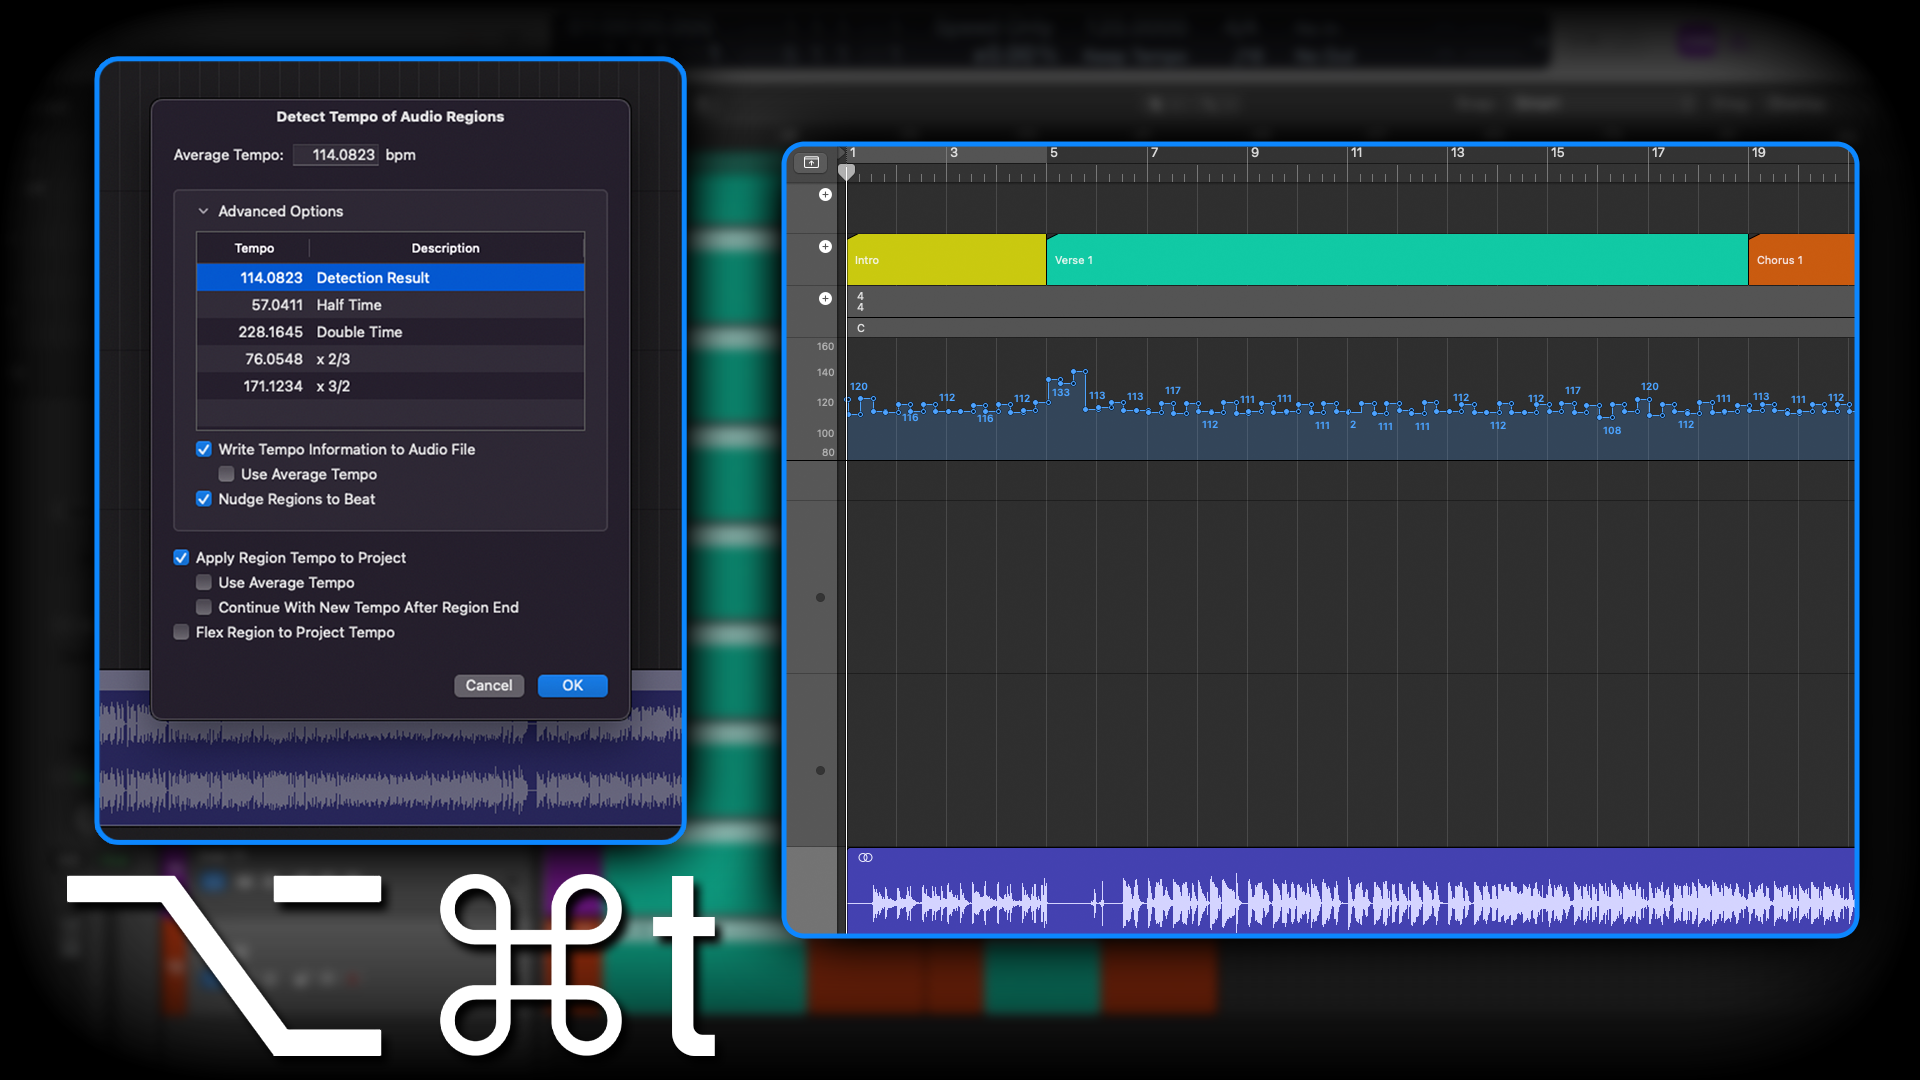
Have you ever dropped a piece of audio (like a loop or rhythmic sample) into Logic and spent a while trying to figure out its exact tempo? Logic actually has an auto-detect tempo function. Select your desired region and hit Option+Command+T to run tempo analysis. From here you can determine the tempo and even make an adaptive tempo map for your project.
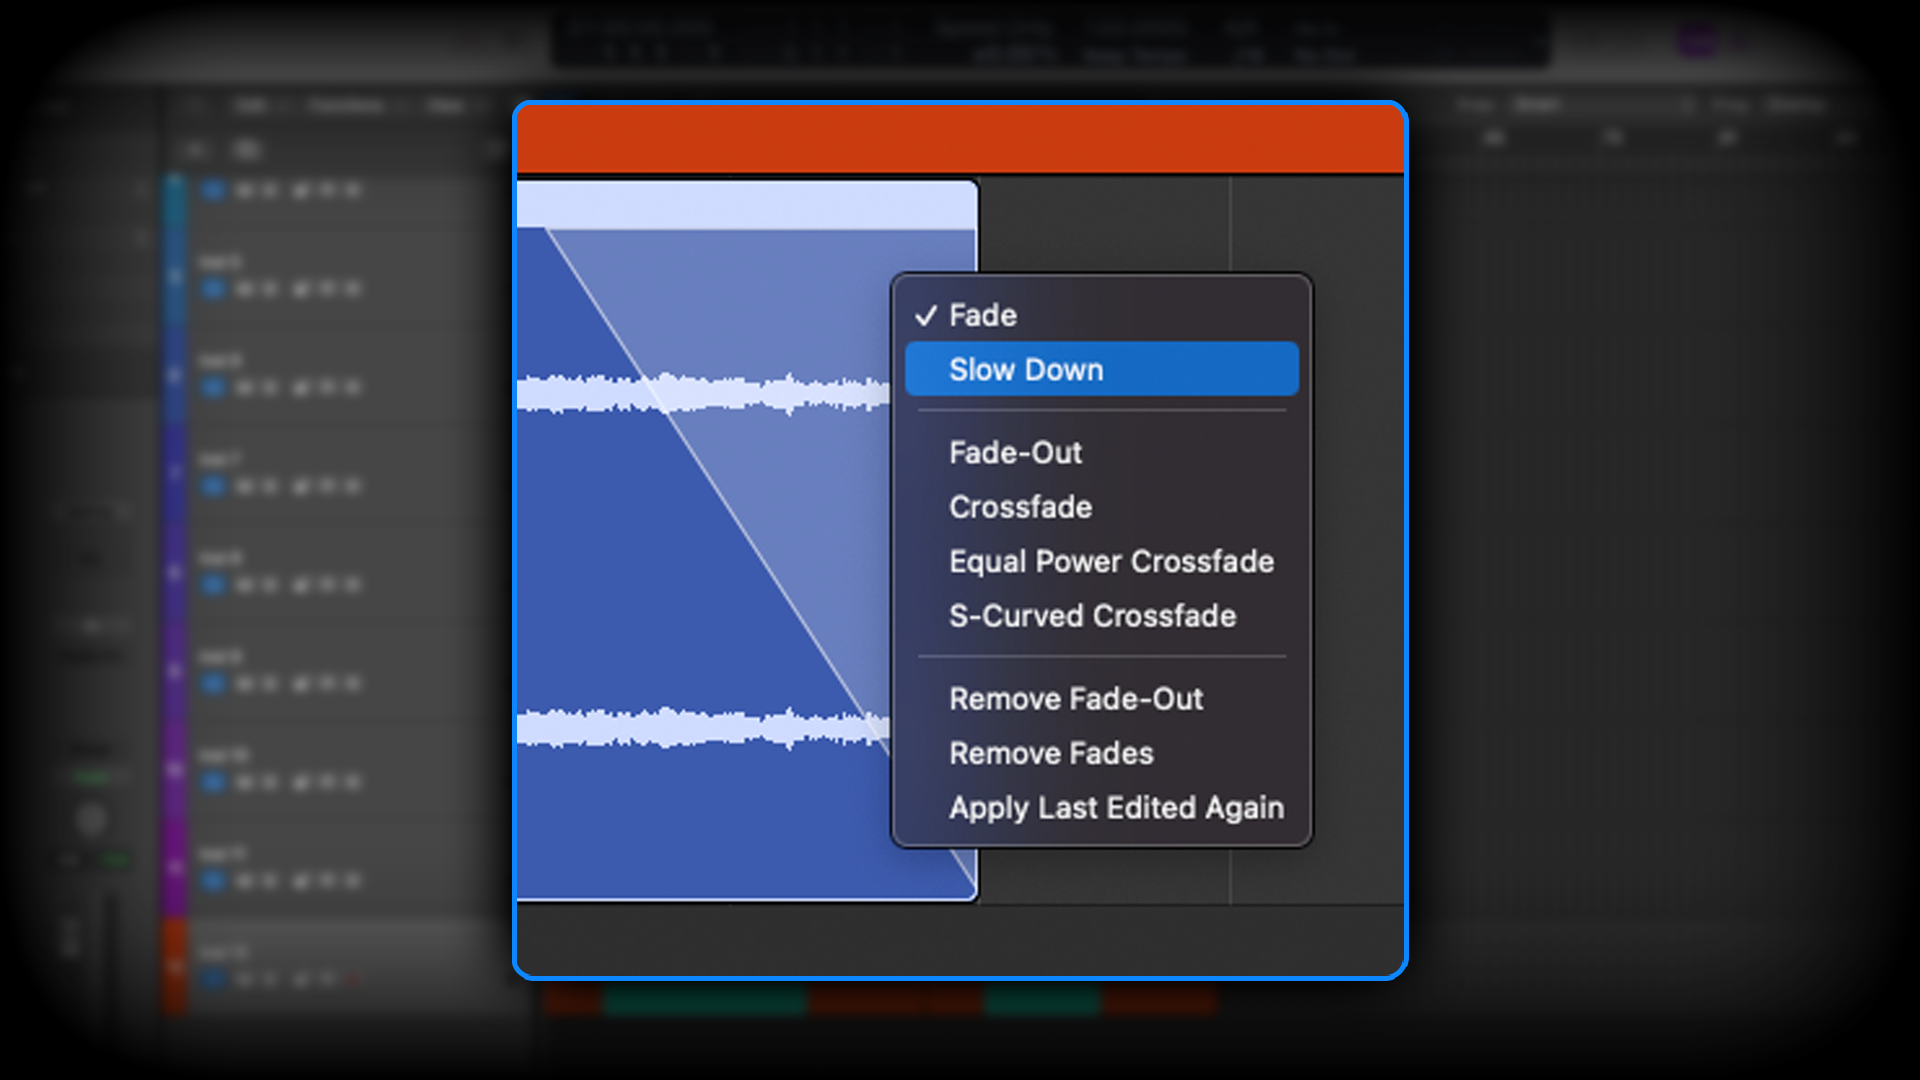
You’re most likely familiar with the Fade tool, but did you know that if you Ctrl+Click (right-click) on the fade, you can change it from a volume fade to a speed fade. This is good for speed-up and slow-down effects in electronic music, as well as creating bass and guitar slides, amongst other things.
Want all the hottest music and gear news, reviews, deals, features and more, direct to your inbox? Sign up here.
Old, analogue tape recorders often had a feature called varispeed for speeding and slowing the tape speed, which in turn altered the speed and pitch of the song. Often used to raise or reduce the energy of a song, it was a feature that was utilised a lot more than one might think. Logic Pro includes its own varispeed which is capable of operating in several different ways.
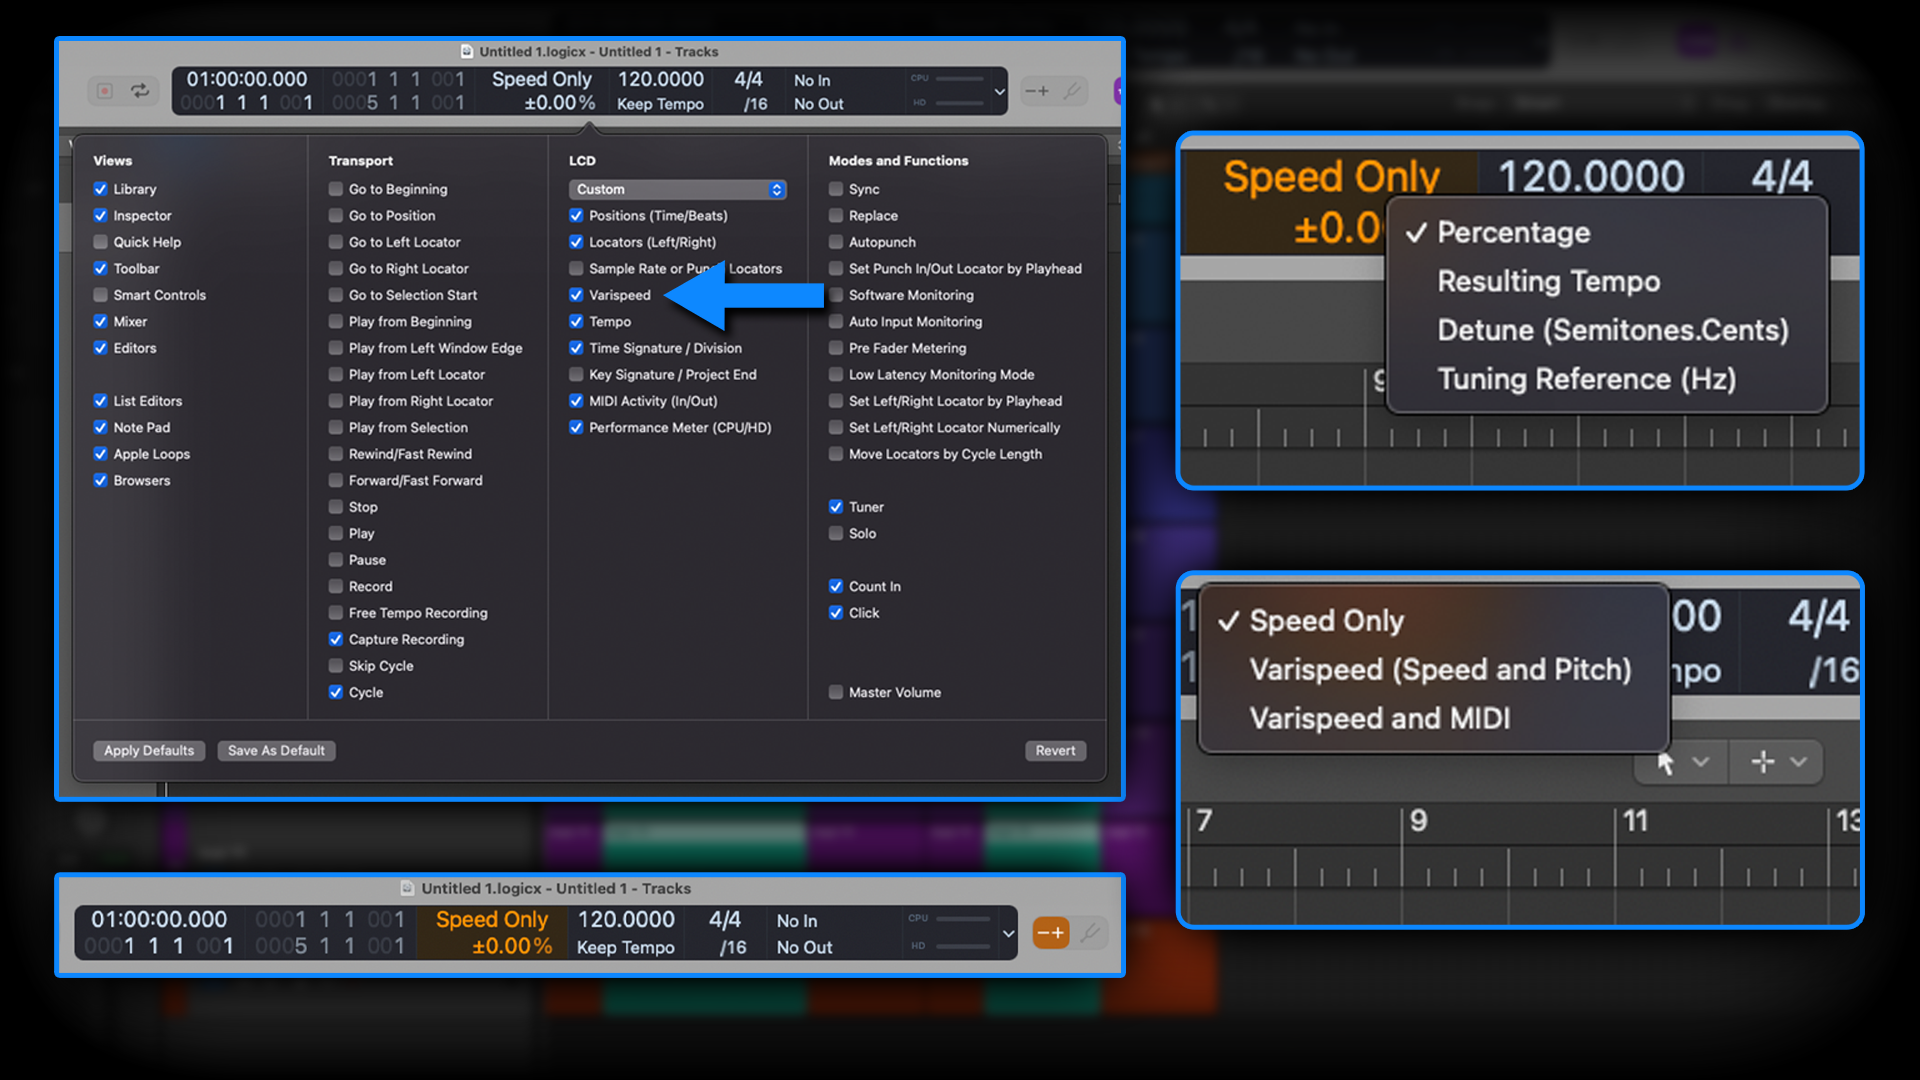
To enable varispeed, ensure the option is visible in the Control Bar by navigating to Logic Pro > Settings > Advanced and ticking the Enable Complete Features checkbox. Then you'll see a - + button in the Control Bar, hit this to enable varispeed. You’ll notice part of the LCD display turn orange. You can now select whether to adjust:
- Speed Only - this can induce artefacts as it resamples/re-interpolates the audio to keep the pitch the same in the new speed/tempo
- Varispeed (Speed and Pitch) - this maintains the best audio quality as tempo and pitch are moved together, respectively
- Varispeed and MIDI - necessary if you’re using MIDI, as it will transpose the MIDI respectively to the pitch changes (it’s probably safest to use this mode most of the time)
Side note: varispeed and MIDI applies pitch changes to MIDI post-sequencing, and therefore the MIDI events will still appear as normal in the piano roll; not pitch-adjusted. E.g. if your song is in the key of C, but you varispeed down by one semitone, what you hear will be in the key of B, but your MIDI will still appear (visually) as being in the key of C.
You can also determine the display-values of the tempo-change (percentage, resulting tempo, semitones, tuning).
With all that set, press play and bask in how cool and different your music sounds at its new speed. You can Bounce/Export with varispeed on, so it’s a very simple and effective tool.
Pro tip: coupling varispeed with a tape simulation plugin can be a great way to invoke old cassette player aesthetics.
3. Capture recording
Have you ever jammed along to your project on your MIDI controller and thought to yourself afterwards “That was awesome… what I did I just play?”, only to then spend ages trying to figure out what you did, only to never fully recapture the magic?
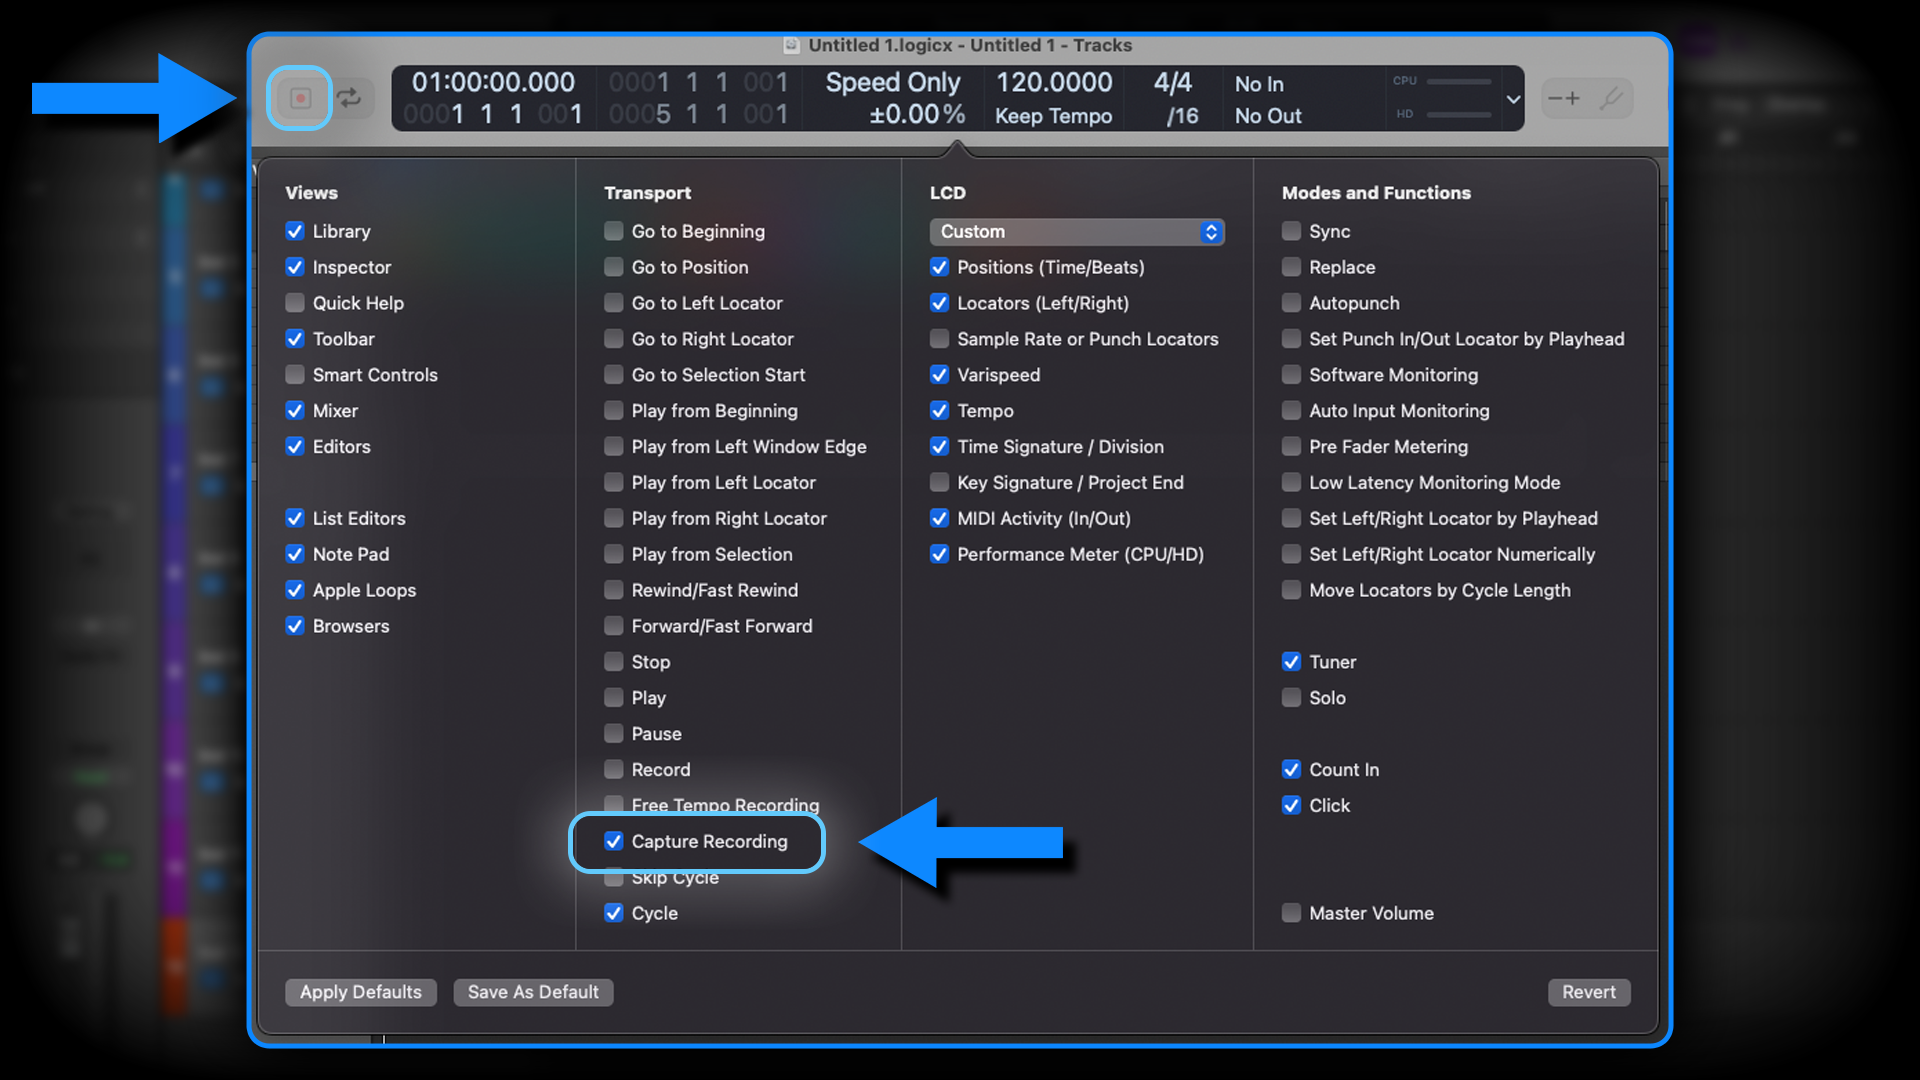
Thankfully Logic Pro is always listening to (and caching) MIDI input data. The Capture Recording feature takes the last piece of MIDI input and adds it to the Arrange Page.
You can shortcut this feature with Shift+R and/or make it a button on your control panel. I have the Capture Recording button as one of my default buttons on my project template, as I’m forever utilising it. It’s an absolute life-saver!
4. Voice memo integration
You can drag and drop directly from the Voice Memo app onto Logic’s arrange page. So, if you were struck by a melodic idea whilst away from your computer, and you sang into your phone, or you happened to record (on your phone) a weird and interesting noise to use in your music, it’s super quick and easy to add it to your production.
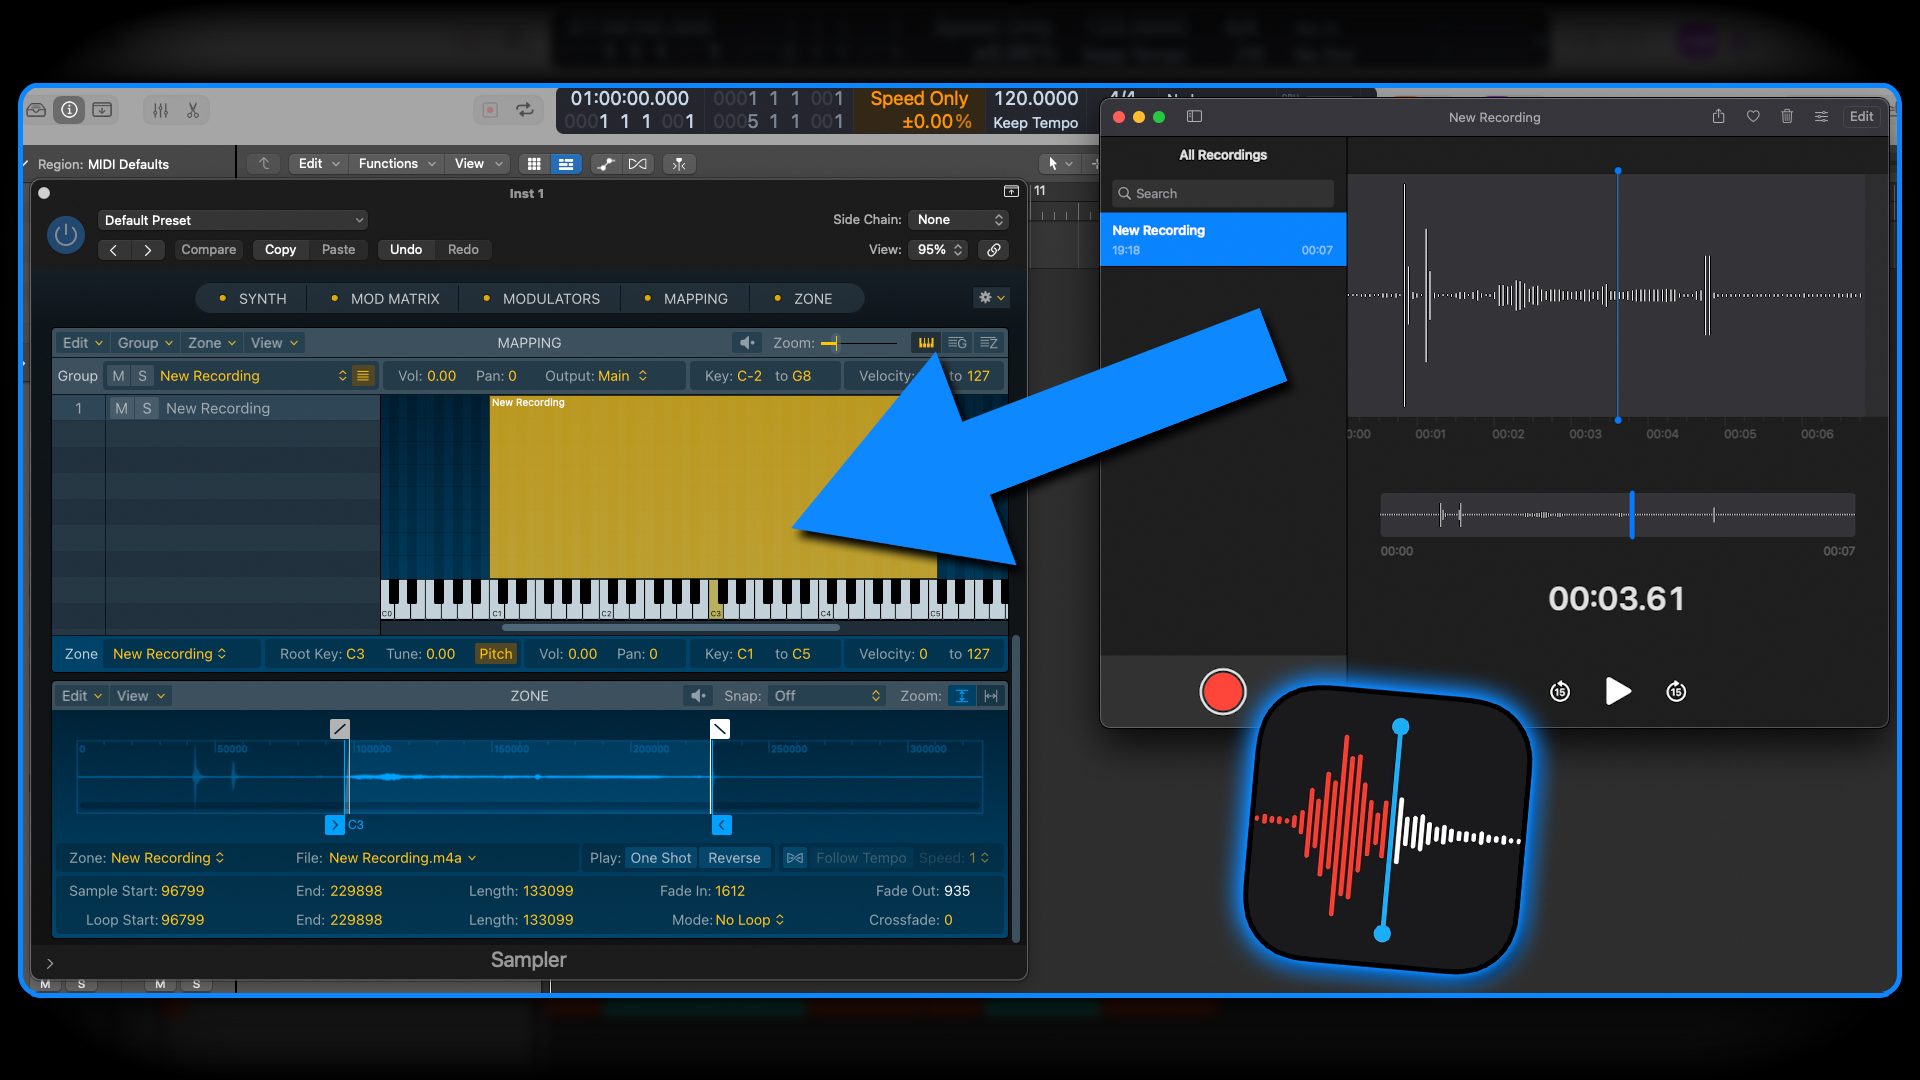
Perhaps more interestingly, the drag and drop feature of Voice Memo works with Logic’s Sampler. Therefore, within seconds you can take whatever you recorded on your phone and turn it into a wacky, cool, and interesting software instrument.
5. Navigation shortcuts
If you spend hours grafting in Logic Pro, you’ll likely want to take advantage of any and all available navigation shortcuts. With that in mind, here are a few nifty ways to accurately move the playhead.
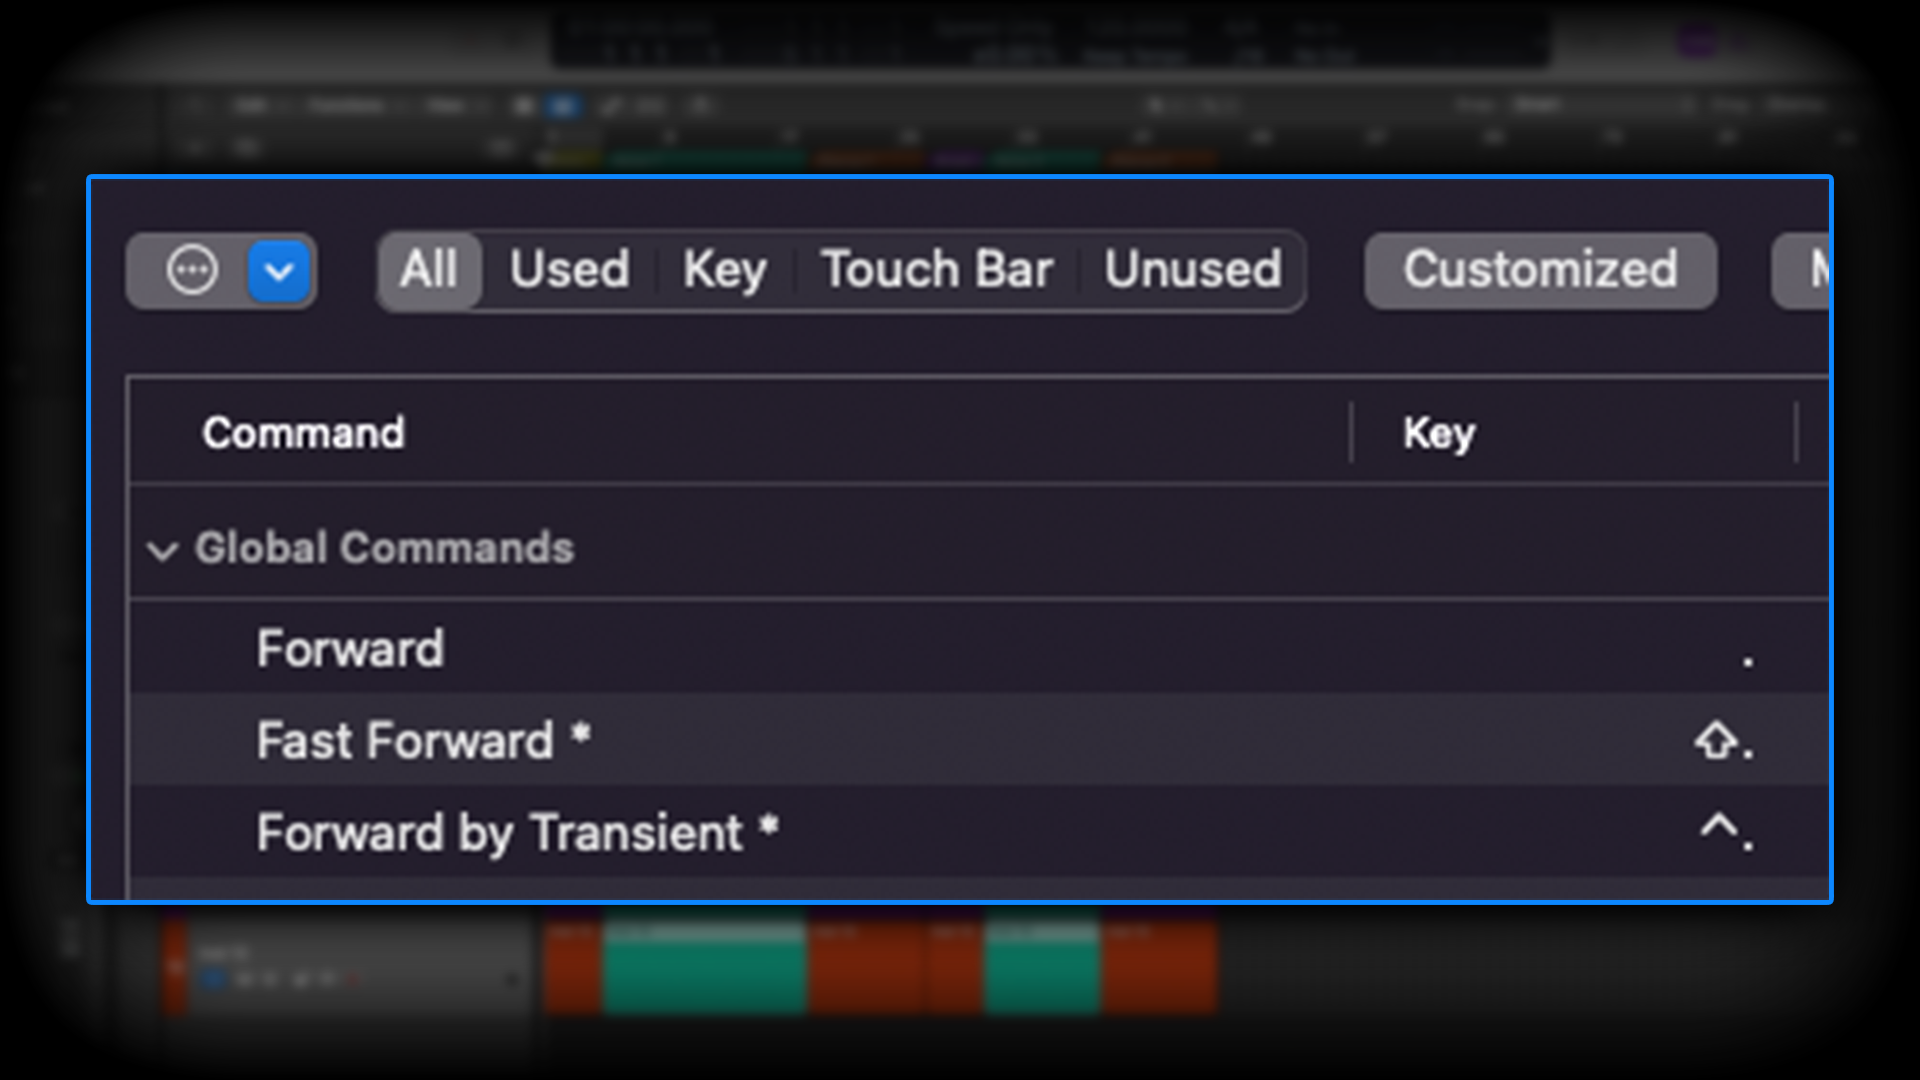
To make the playhead nudge backward or forward by one-bar, use , and . respectively. With an audio track selected, hold Ctrl+, or Ctrl+. to have the playhead nudge backward and forward according to transient peaks. This is super helpful when editing audio such as drums.
Lastly, if you want to move a region to the playhead, simply select the region and press ; to have the region snap to wherever the playhead is. This a fast and efficient way to make fiddly edits.
6. Sends on faders
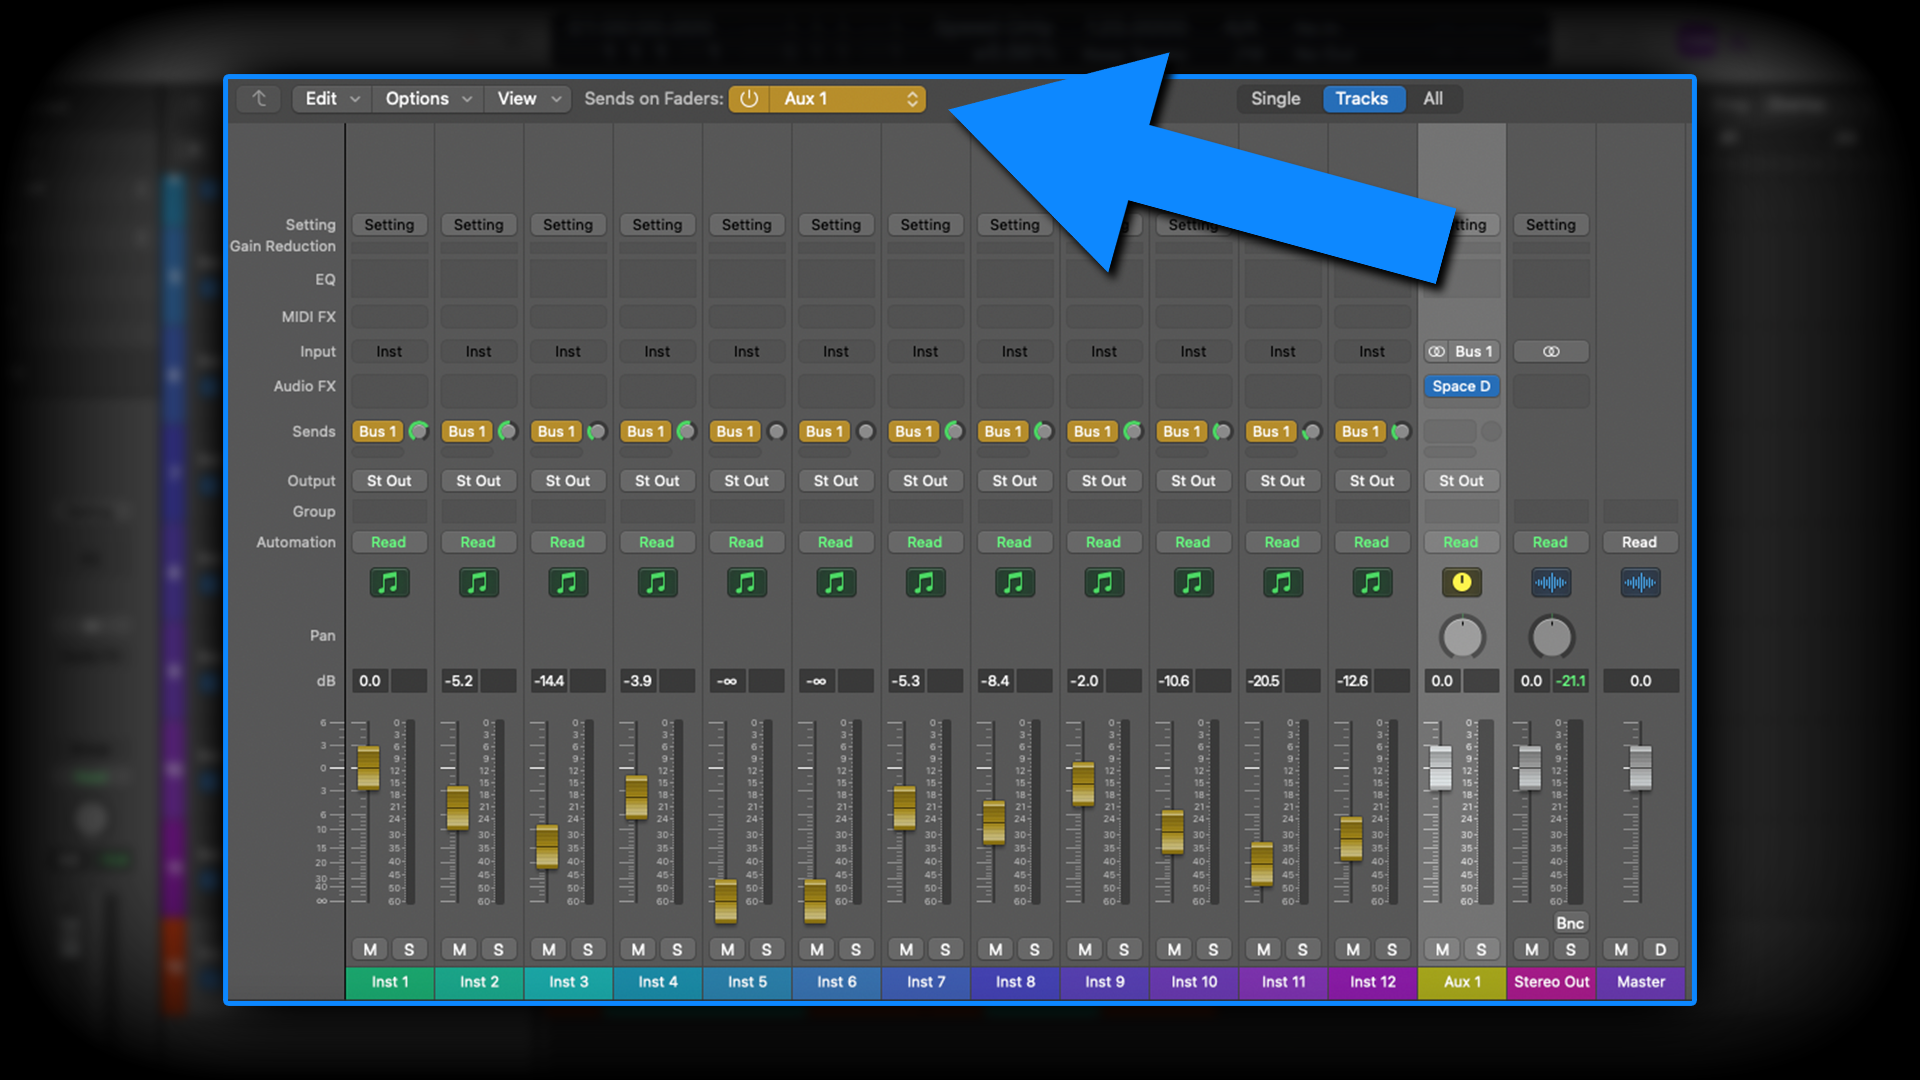
A relatively new feature that was only added in a recent update (but was long overdue) is the option to place Sends on Faders. Sends are a vital aspect of signal routing in music production, but the send dials on Logic Pro can be a tad little and fiddly. By enabling Sends on Faders in the Mixer window the faders of every channel turn gold and show their respective send-levels.
7. Piano Roll hacks
If you press play whilst the playhead is partway through a MIDI event, it doesn’t trigger the sound. This is frustrating and means you typically find yourself winding back a bit to ensure the note you need to hear gets triggered. Over time, this ends up being something of a major time-drain! To get around this, go to: Project Settings > MIDI > Chase and select Notes.
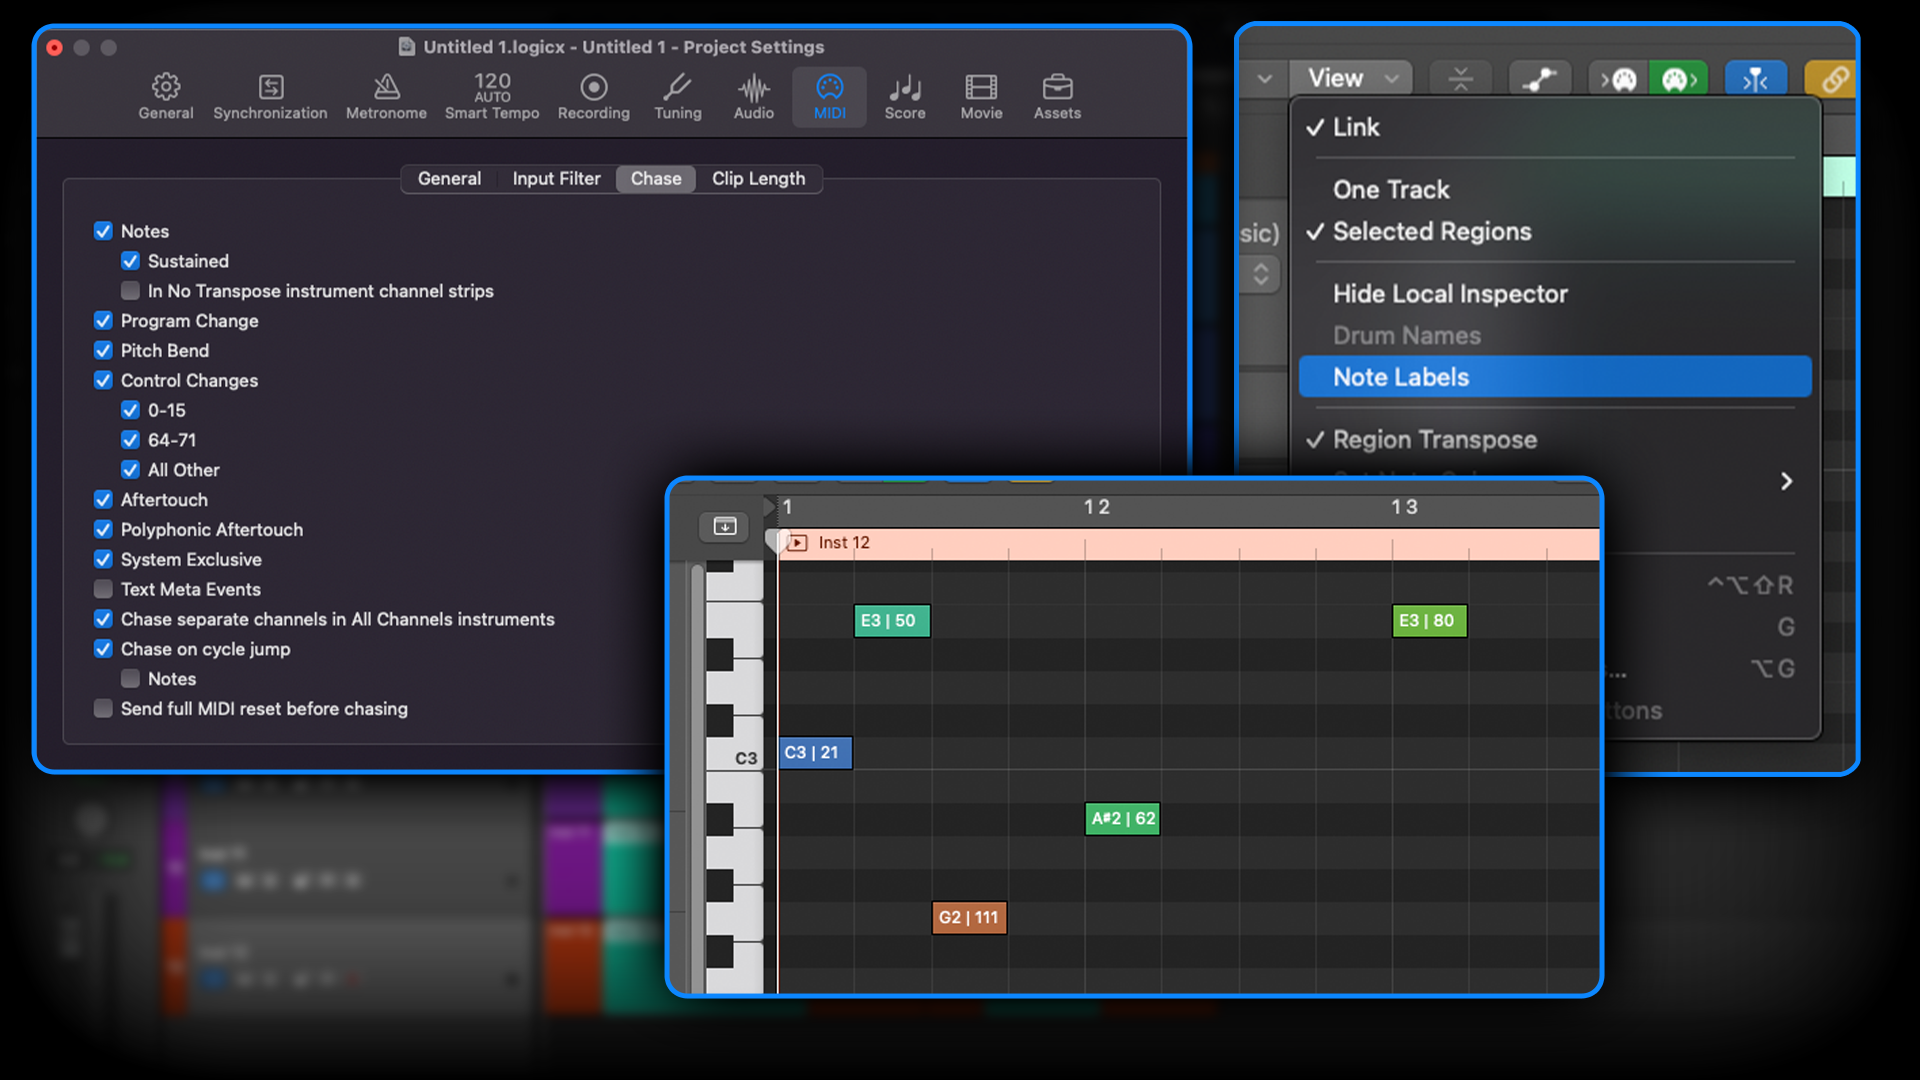
This is a project-specific setting, as opposed to a global setting. Therefore, if you want this to always be the case, I’d recommend setting it this way in your project templates, so that all future projects have this enabled by default.
Another very helpful feature of the Piano Roll can be found under View > Note Labels. This displays the note value and velocity value of every note.
8. Beef up (replace) your drums
Sometimes, the tones you get from a recording session just aren’t cutting it, and there’s no time to re-record things. That’s where Replace or Double comes in handy!
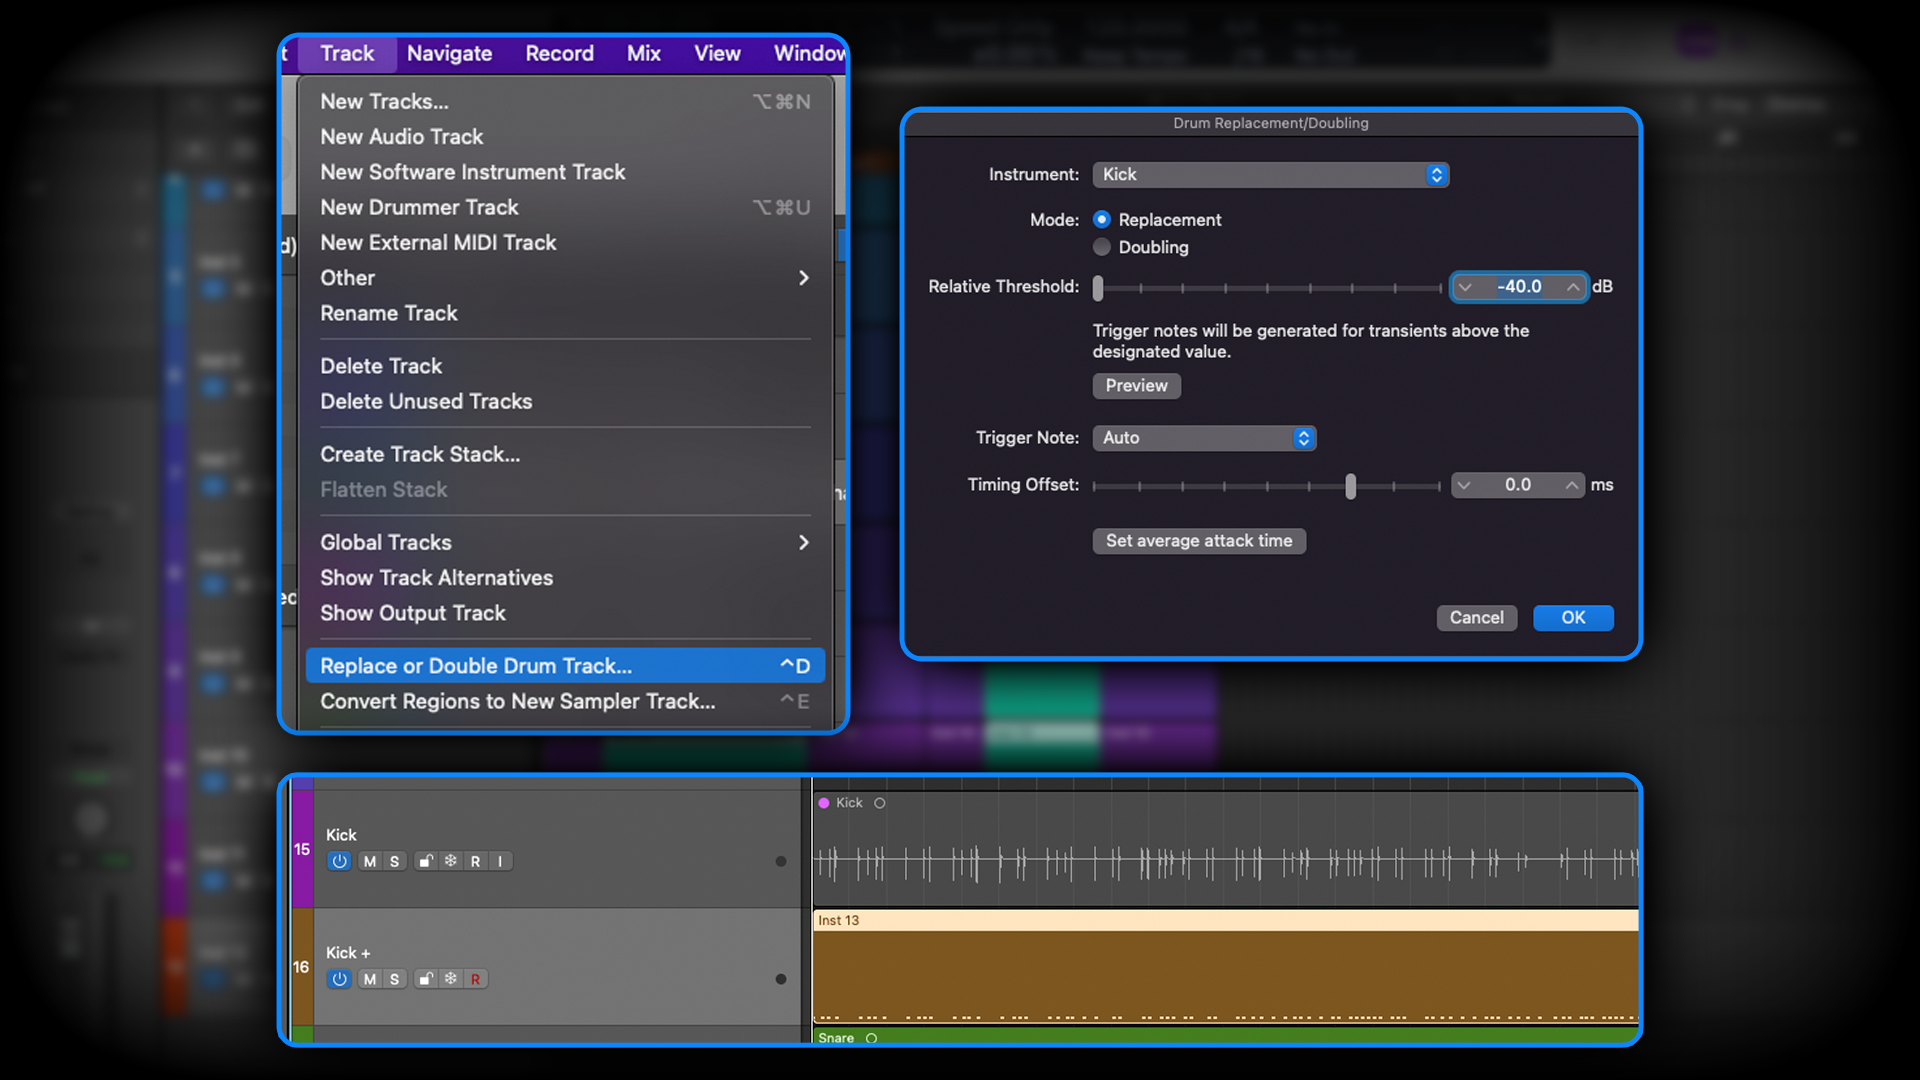
On your track of choice, select Track > Replace or Double Drum Track, and select the desired parameters (what part of the kit it is, what the velocity threshold is, etc). Logic will then map every transient in the audio to a MIDI event, to which you can apply any sample you like.
You can use this to entirely replace the sound of your drums with polished samples, whilst retaining the humanism of the performance. Or you can use it to blend with, and reinforce the tone of your drums, to give them your desired punch and bite.
You could even get very creative and record a drum beat in whatever crude way you have at hand, such as tapping on a table (perhaps via Voice Memo), and convert that to MIDI data. The possibilities are endless.
9. Flex more than just vocals
You’re probably familiar with Flex Pitch and using it to tidy up slightly wayward vocals. However, Flex Pitch is just a pitch-adjusting tool and it doesn’t really care what it’s processing.
With that in mind, you can successfully Flex Pitch any monophonic sound source. This is ideal for things like sample packs that have all the character, phrasing and nuance that you’re looking for, but maybe doesn’t quite melodically deliver what you had in mind.
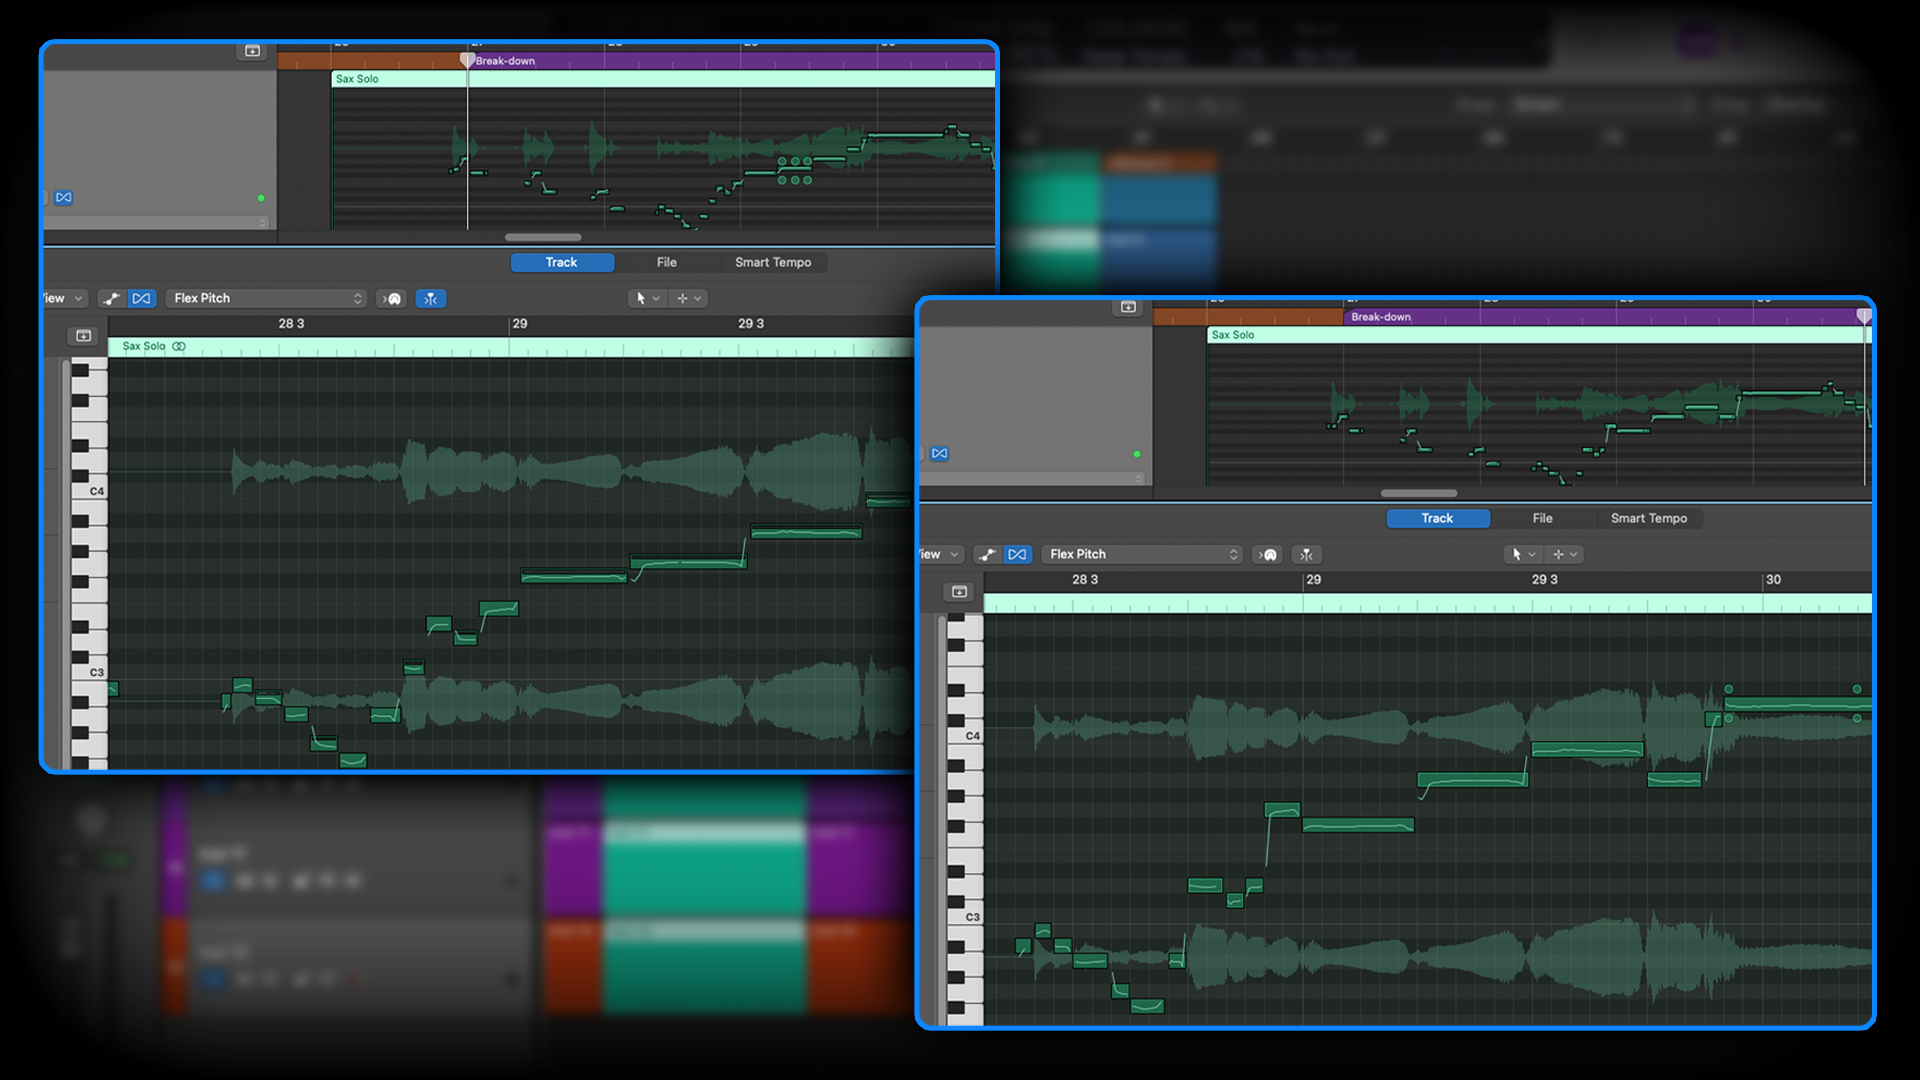
I was recently working on a tune that utilised a selection of saxophone samples from Splice. They sounded great, however I wanted the melody and timing to be slightly different. Flex Pitch gladly took care of things without any problems.
Used with subtlety, Flex Pitch can work wonders. Keep in mind however, that, like any time or pitch adjusting tool, large jumps away from the original note can start to sound dodgy and full of robotic artefacts.
10. Track Alternatives
Have you ever felt undecided about a take, and wanted to quickly switch between two or three different takes, or needed to prepare two or more versions of the same tune with different performances (for example censored/uncensored vocals)?
Your first instinct might be to create duplicate tracks (Cmd+D) and have your alternate takes on the duplicates track, and to simply mute whichever one you don’t want for the Bounce/Export.
However, if the duplicated track in question is running a ton of plugins, and the project’s getting large, another track with another ton of plugins is going to start giving the CPU a hard time! Consider using Track Alternatives instead.
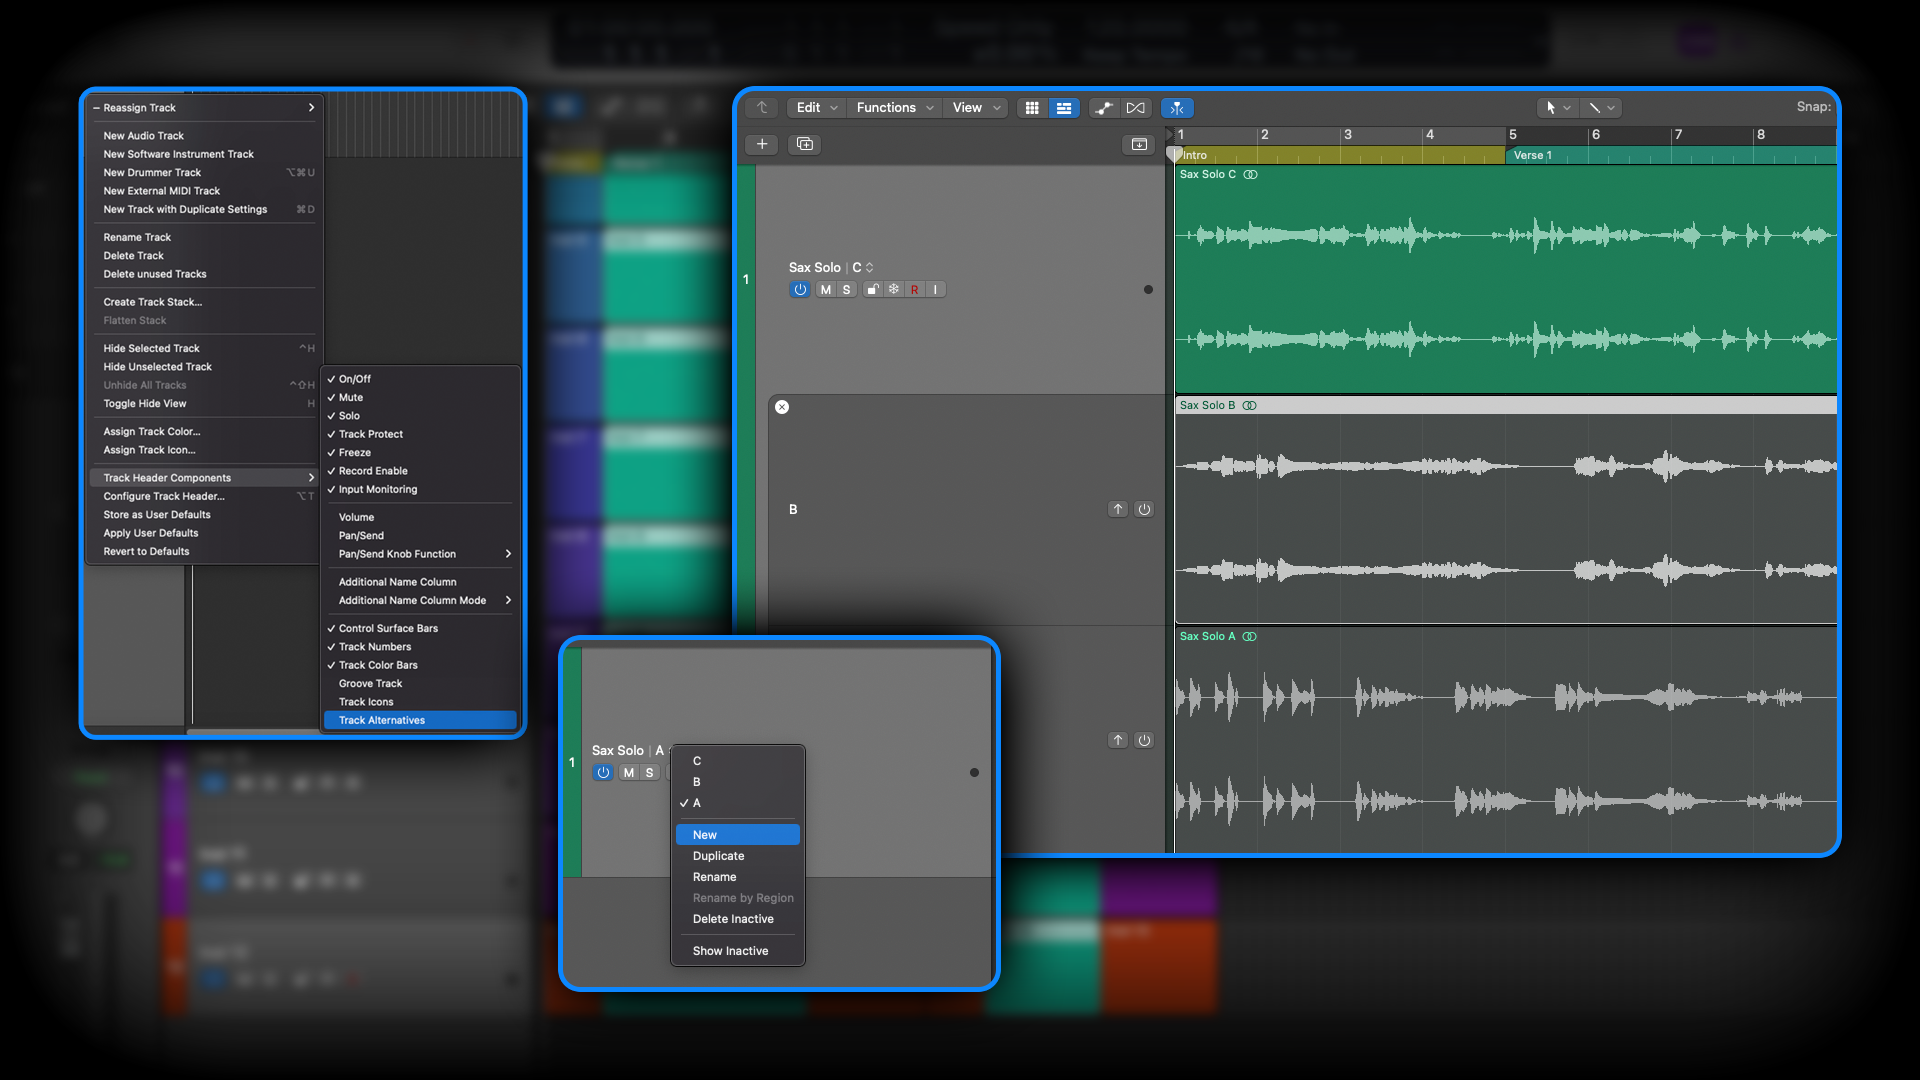
Select Track Alternatives from the Track Header options to show the Alternative Tracks menu. To create an alternative track, select New from the Track Header's drop-down menu and record, import or paste in your new audio.
You can now switch between the two alternative takes with ease, without loading up the CPU with unnecessary additional channels and plugins. If you need more alternatives, simply repeat this process. You can also expand and preview all the track alternatives in a similar vein to a Track Stack.
Honourable mentions
That wraps up our ten things you (probably) didn’t know Logic Pro could do. Hopefully this article has given you some useful tidbits of information that can help speed up your workflow and encourage you to try out new methods and ideas.
Before signing off however, I want to give a few honourable mentions to things that made the short list, but probably don’t require a great deal of explanation.
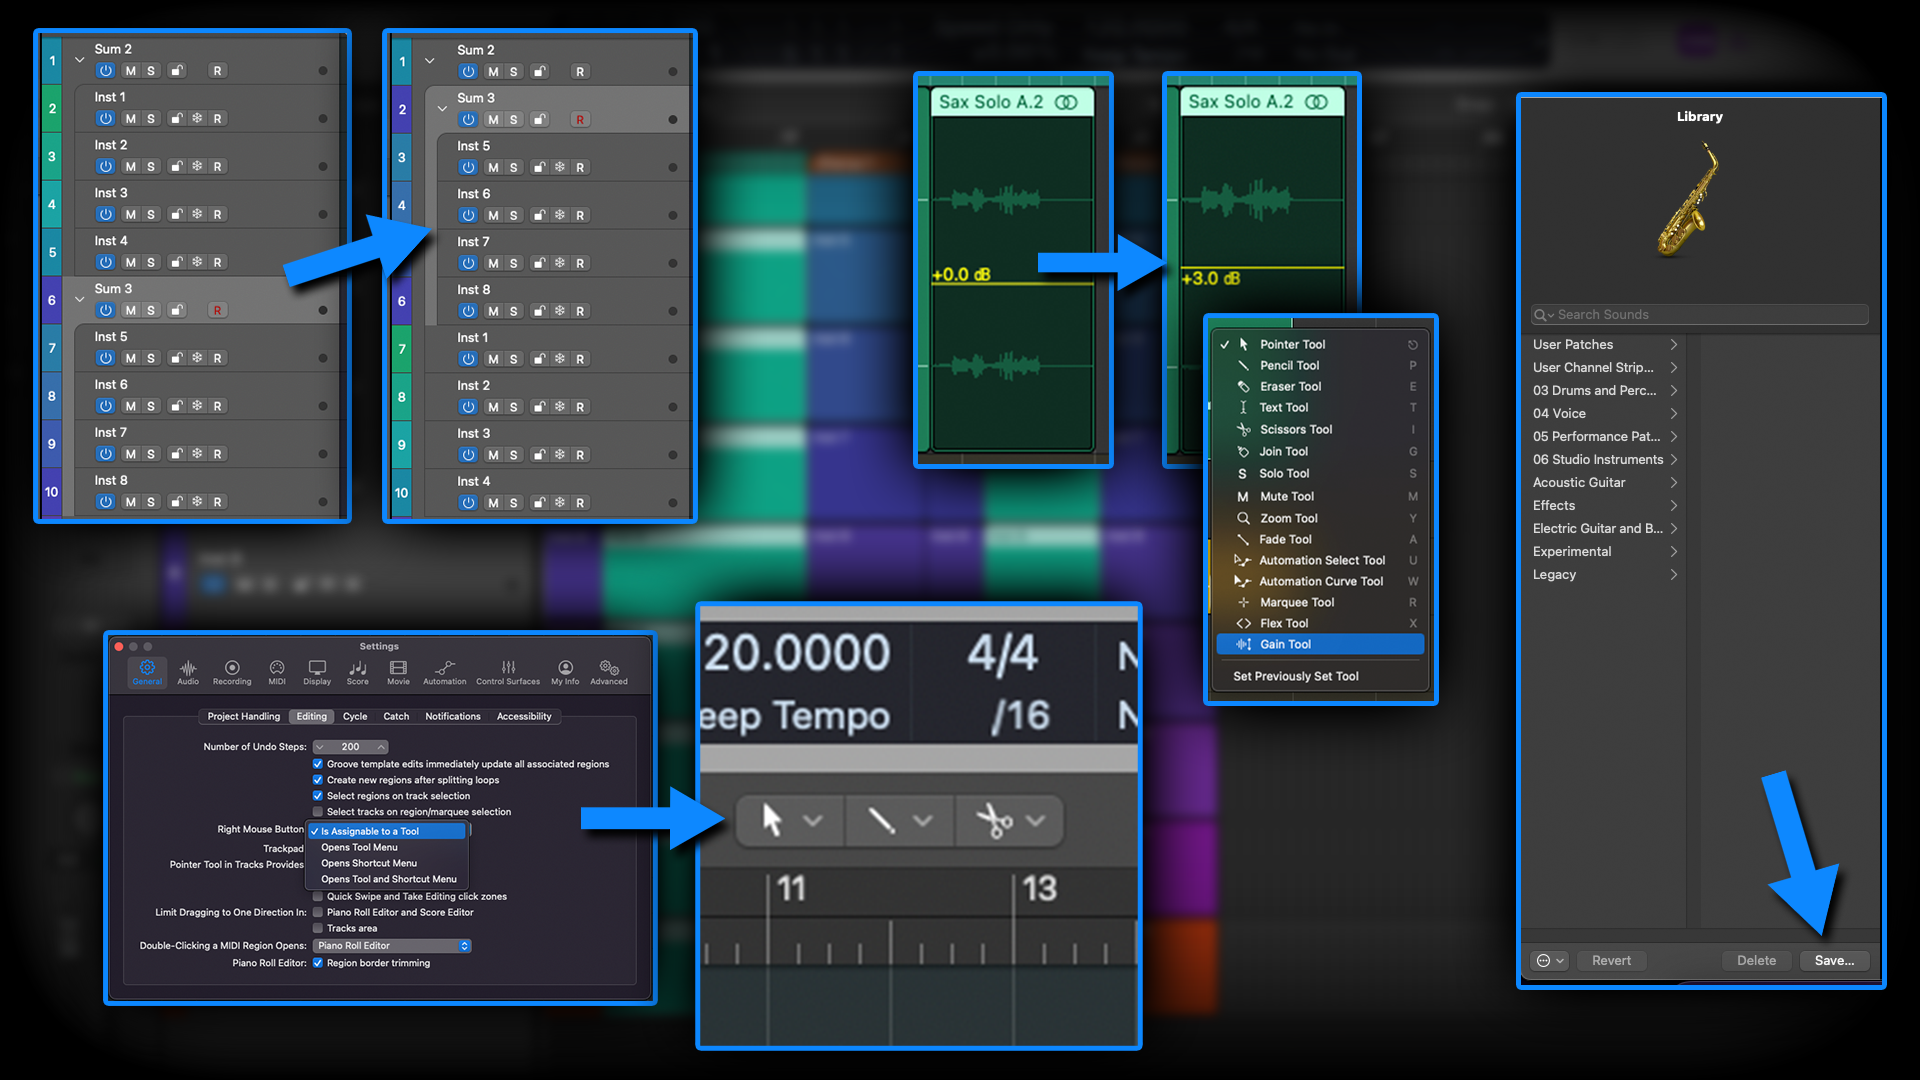
Stacks within Stacks - If you attempt to place a Track Stack inside another Track Stack (via the right click function), Logic is unresponsive; as if it can’t place a Track Stack inside a Track Stack. But it can!
Simply make the Track Stacks separately and drag one into the other in the Track Header section. Everything will work and behave as you would expect it to.
Region Gain - This used to be tucked away rather unintuitively in the Region part of the Inspector pane. Thankfully, it’s now a mouse tool, so if you need to make gain adjustments to individual parts of an audio track, it’s super quick and easy to do so.
Patch Saves - If you find yourself often working with the same people, instruments, synth patches, etc, make use of the Patch Save feature, to save all plugins and other settings on your channel strips and/or Track Stacks.
For example, if you’re recording a bunch of songs with the same vocalist, in the same room, with the same microphone, you might as well save the entire channel strip as a Patch. Whilst every project is different, recalling that patch will likely get you in the ballpark of where the vocals need to be, and save a lot of time.
3rd Mouse Option - Whilst I’m sure many of you will use a MacBook trackpad and/or Magic Mouse, if like me, you roll with an old-school mouse with multiple buttons, you can enable a 3rd click button for further editing options and speedy workflows. Just head to Settings > General > Editing > Right Mouse Button > Is Assignable to a Tool.
Converting Drummer Tracks - Drummer Tracks can be a brilliant aid, but if you use them a lot, they can become somewhat predictable and overly familiar. If you want them to do something a little bit different, right-click on the Drummer Track region and select Convert > Convert to MIDI Region to see the MIDI that lies behind the Drummer Track interface. Now you can edit and manipulate the MIDI to achieve the drum pattern you have in mind.
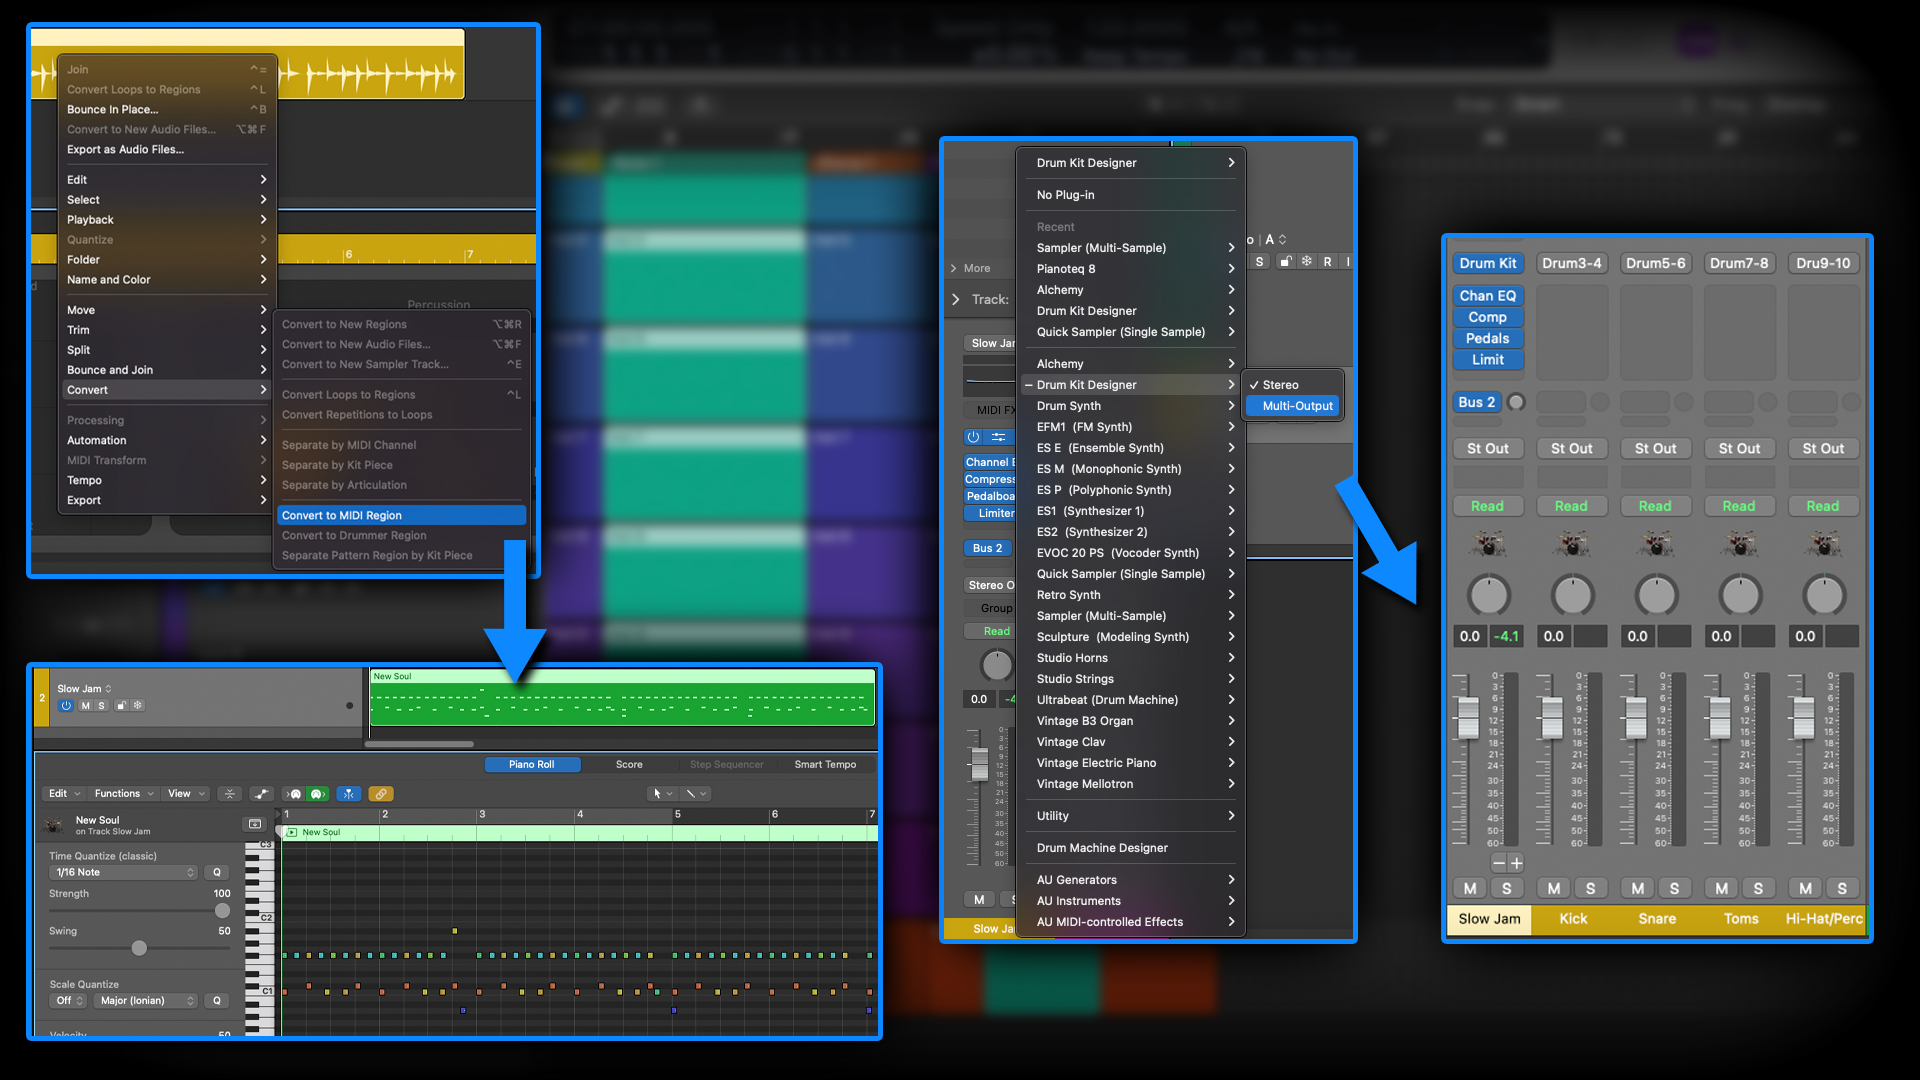
Whilst we’re on the subject of Drummer Tracks, also note that if you change the Drum Kit plugin to the Multi-Output option, you can mix each component of the drum kit individually. You can also add these tracks to the Arrange Page and Stack them for convenience of both workflow and signal processing.
“OSC” Steve is a composer, producer and educator with a background in piano, synthesisers and sound-engineering. He is an established, independent artist in the Synthwave and Retrowave music scenes, and has composed for several independent video-games including Nintendo Switch™ titles.
