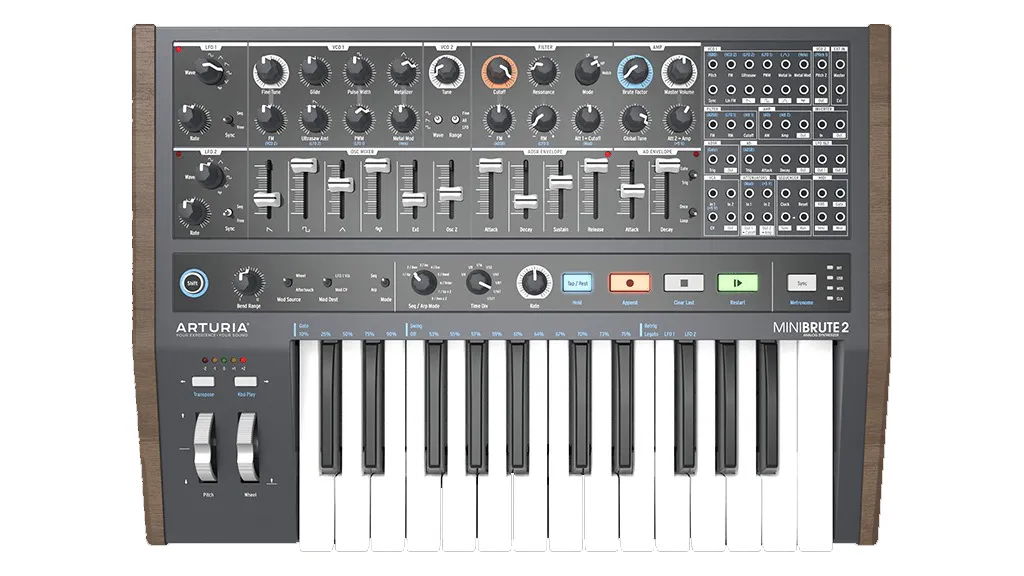
Among the many useful new features Arturia added to the MiniBrute 2 is a 48-point patchbay, which utilises 3.5mm minijacks like the ones used in Eurorack modular systems. The ability to reroute signals easily as well as integrate the MiniBrute 2 into a larger setup, makes this the perfect introductory instrument for musicians who are new to modular synthesis.

This month, we’ll look at some interesting sounds you can create using the MiniBrute 2’s patchbay. But first, we’ll look at ways to overcome a few of the instrument’s idiosyncrasies.
For example, the MiniBrute 2 lacks a dedicated mult/splitter, making it impossible to route certain modulation sources to multiple destinations, a requirement that is a staple of many common sounds, without additional gear. A simple fix is to use a stackable 3.5mm cable, such as the Tiptop Audio Stackcable or the Modular Addict Stacking Eurorack Patch Cable.

Back to the Brute
Despite lacking a few features from the first MiniBrute (such as the sub-oscillator), the MiniBrute 2 has a more advanced set of synthesis tools. Recreating familiar patches from the original model, however, requires an altered approach.
Envelope modulation: pulse wave and Metalizer. The MiniBrute had dedicated knobs for filter-envelope modulation of pulse width and the triangle-wave-based Metalizer, whereas the MiniBrute 2 normals these routings from LFO 1 and velocity, respectively. For fans of the original configuration, plug the filter’s ADSR output into oscillator 1’s PWM or Metalizer input to achieve the same effect, then use their associated knobs to fine-tune the depth.

Additionally, the MiniBrute offered both positive and negative modulation from the envelope. If this is the sound you’re after, plug the ADSR into the MiniBrute 2’s inverter module to change the polarity of the modulation. Finally, the original model allowed simultaneous modulation of both waveforms at individual depths. To replicate this, use a stackable cable to split the signal. The default modulation knobs will continue to work as independent depth controls, despite the change in modulation source.
Keyboard Tracking (MIDI KBD to Mod input). It’s surprising that the MiniBrute 2 doesn’t include a normalled control for adding keyboard tracking to the filter cutoff, as this is a crucial component for using resonance to highlight specific harmonics consistently across the entire keyboard. You can quickly re-create this routing by connecting the KBD output in the MIDI section to the filter cutoff (Att 1) input in the patchbay. From there, setting the associated knob to 100% will closely approximate chromatic tracking, allowing either harmonic emphasis or an additional tone generator when the resonance is self-oscillating (at maximum value).
VCO 2 as sub-oscillator. The MiniBrute’s sub-oscillator (with sine and square wave options) contributed to its impressive low-end. Although the MiniBrute 2’s second VCO doesn’t phase-lock like a sub-oscillator, you can re-create similar subsonic effects by setting its tuning to Fine mode, selecting a sine or square wave, and tuning it one or two octaves below oscillator 1. There will be a touch of pitch drift with this approach, but the sound will be quite similar.
Brute Factor pro tips
As with the original, the MiniBrute 2’s Brute Factor parameter functions as a feedback loop from the main output back into the filter. However, cranking this parameter to maximum can interfere with the chromatic pitch coherence of a sound.
To get the most from your own sound design, you need to understand its overall behavior at varying settings. From 0% to 50% is the sweet spot for adding grunge, while 50% to 75% works well for extremely aggressive sounds. Settings over 75% is where you will often lose tuning coherence; it’s useful for effects and percussion, but not as viable melodically.
The MiniBrute 2’s inclusion of a second oscillator can make the Brute Factor’s behavior more erratic, as even the smallest tuning differential between the two oscillators can yield unpleasant “beating” artifacts. For the most consistent results, stick with oscillator 1 only as the tonal source when designing with this feature. Lastly, when working with oscillator 1’s sawtooth and square waves in conjunction with Brute Factor settings above 70%, you can dramatically improve tuning coherence by mixing in some triangle wave (with the Metalizer set to zero) in conjunction with the saw/square elements.
Iconic patches
Although the MiniBrute 2’s “cookbook” is a fantastic guide to modular-synth basics, the examples don’t delve too deeply into the underlying synthesis principles. Here are four iconic synth sounds with deeper explanations of why they work as they do.
Vintage Hard Sync Leads. Envelope-swept hard sync is the cornerstone of several legendary analogue synth patches, from ’80s new wave to old-school funk. The effect is so important that most programmable two-oscillator synths include a dedicated hard-sync button to activate it. The modular approach requires considerable forethought, as everything is configured by hand. Here are the essential concepts for quickly setting up envelope modulated hard sync on the MiniBrute 2.
1. Sync oscillator 1 by patching the output of VCO 2 (set to Fine-tuning mode) to the sync input of VCO 1. Now, for every complete wave cycle of oscillator 2, oscillator 1’s cycle resets, regardless of its phase and tuning. Thus, oscillator 2 will determine pitch, while the tuning of oscillator 1 will determine the spectral component of the effect.
2. Next, for the definitive hard sync sweep of those hallmark synths, connect the filter ADSR output to the FM input of oscillator 1. If the sync cable wasn’t connected, you’d simply hear a dramatic pitch sweep, but in this case, it’s the trademark squawk of countless hits.

3. With the patchbay configured, the most relevant parameters are VCO 1 tuning (the sync timbre), FM depth (amount of hard sync sweep), and the settings of the ADSR envelope segments, which will govern the behavior of the animation. For the most conventional sounds, leave the filter cutoff at maximum and focus on the sawtooth and square/pulse waveforms in oscillator 1’s mixer.
Supersaw Leads. The MiniBrute’s Ultrasaw is one of its most innovative features, producing an analog version of the ubiquitous supersaw effect. With Ultrasaw’s continued availability on the MiniBrute 2 and the addition of a second oscillator, it’s possible to make even bigger versions of this essential EDM timbre.
1. Start by setting both oscillators to sawtooth with VCO 2 in Fine tuning mode, and VCO 1’s Ultrasaw amount should be set to 0. Raise both sawtooth waves to equal volumes in the mixer and tune them very closely, so that there is just a touch of detuned thickness. Open the filter cutoff to maximum and set the AD envelope to Gated for full sustain.
2. Keeping Ultrasaw off, patch LFO 1 to VCO 1’s FM input and set the LFO waveform to Random Gliding (the last option in the selector) and increase the FM amount knob on the oscillator. At high modulation values and LFO rates, this will add a chaotic pitch variation. For this sound, just a tiny bit of pitch modulation (FM) delivers an animated detuning effect for the dual sawtooth oscillators.
3. Now, adjust the Ultrasaw modulation from LFO 2 for the sawtooth and experiment with LFO 2’s rate and waveform type. To keep the Ultrasaw effect fluid and organic, stick with sine, triangle, and Random Gliding waveforms while adjusting the amount and rate to taste. If you’ve followed the above steps correctly, the result will be an even richer detuning effect to use as a starting point for your designs.
Pro Tip: Because LFO 1 is also normalled to PWM, experiment with adding a touch of PWM modulation while adjusting the base pulse-width and blend a bit of that in for even more textural depth.
Trap and 808 kick. While the “cookbook” includes several useful kick-drum configurations, here is another option that’s tailored to replicating the definitive 808 kick drum.
1. Open the cutoff to maximum, lower all of the mixer faders except VCO 2, then set its waveform to sine and tuning mode to All. Next, set the AD amp envelope to immediate attack, medium decay, and Trig (not Gate) mode. This will serve as the basis for the sound.
Pro Tip: You can make a similar kick that tracks keyboard pitch by patching the ADSR to VCO 1 FM. But since it offers only triangle (not sine) the result will require extensive tinkering with the filter settings.
2. To emulate the 808’s distinctive attack “click,” patch the ADSR output to VCO 2 pitch. Because of the MiniBrute 2’s lack of an integrated mult/splitter, this will disable the keyboard tracking of the VCO (and the stackable cable doesn’t allow for customizing the voltages appropriately). Thus, tuning this kick drum depends on VCO 2’s tuning knob. Here, the 10 o’clock position is a good starting point.
3. With the filter ADSR now modulating VCO 2’s pitch at maximum depth, setting all envelope segments to minimum, then increasing the decay very slightly will impart the trademark 808 “click” transient. For longer trap and hip-hop booms, increase the decay parameter on the AD amp envelope.
Pro Tip: To emulate the sound of a “hot” 808 into a mixer, accentuate the punchiness of this kick by tailoring the Brute Factor parameter in the 0% to 50% range. Go beyond that and the result is less stable.
Starters for experimentation
One of the most common frustrations with modular synthesis is that it is hard to know where to begin. Option fatigue is a very real phenomenon, and without a specific goal for your experiments, it can be difficult to retrace your steps to fully understand why you like or dislike the character of a given patch configuration. Conscientious exploration is the key to mastering the immense range of options that modular synthesis offers, so below is a list of starting points, with brief explanations for their design applications.
Noise Modulation. Modulating synthesis parameters with noise is a fantastic resource for hard, gritty, industrial effects, and experimenting with various destinations and modulation depths can yield wildly different outcomes. It’s also useful for emulating weather sounds, especially in conjunction with noise itself as your original sound source.
To get started, plug a cable into VCO 1’s noise output, then patch it to the filter cutoff (Att 1) or resonance (RM) inputs, as this will yield the most dramatic effects while allowing you to tailor the depth with their associated knobs. Once you familiarize yourself with the overall flavour of this technique, try patching noise as a modulator for the pulse-width or Metalizer inputs and adding just a touch of it, while blending in unmodulated waveforms like a sawtooth from VCO 1 and/or VCO 2. Used subtly, this can impart crispiness to your sounds.

Audio Rate Modulation. Audio rate modulation from VCO 2 is an incredibly powerful resource for generating sideband-oriented effects. With so many possible destinations, here are three experiments to get you started, using the output of VCO 2 as your modulation source.
1. Because ring modulation is closely related to amplitude modulation, and filter resonance generates an increase in amplitude near the cutoff frequency, try this approach: Set VCO 2 to sine wave and tuning mode to Fine, then patch it to the RM modulation input on the filter. Set the cutoff to around 40%, resonance at 0, and the RM depth knob to maximum. With a bit of tweaking, you’ll hear a bell-like tone reminiscent of classic ring mod. From there, adjust the frequency of VCO 2 and the filter cutoff to experiment with timbre.
2. Setting VCO 2’s tuning mode to All and raising the pitch to maximum is a great way to add a high-frequency shimmer to VCO 1’s waveform options, regardless of VCO 2’s waveform. With this as your foundation, patch VCO 2 into PWM or Metalizer, then blend that modulated waveform with one or more of VCO 1’s mixer options. With the lowpass cutoff at maximum, it will impart a slightly gritty character to the highs of your sound, which can be fine-tuned using the modulation depth.
3. Set lowpass cutoff to around 40% (10 o’clock) and resonance to maximum. Then set up VCO 2’s tuning to All mode with a square wave and patch it into the VCA (+5v) attenuator. This will cause the synth to drone, since the VCA will be continuously modulated. Once this is configured, adjusting the cutoff frequency with VCO 2 tuning values above 70% will deliver voice-like, bit-crushed effects due to the square-wave-generated sidebands.
Envelope looping
While some users initially groused about the replacement of the original MiniBrute’s ADSR amp envelope with an AD envelope, Arturia’s implementation is actually far more flexible, thanks to a set of switches that allow this envelope to do a few advanced tricks.
The first thing to understand is that the Decay segment is actually a decay-release. That is, the segment completes even after you lift your finger from a key. In practice, this is largely unnoticeable, because with short decays, the sound will generally reach silence before you end the note event.
Gate vs. Trigger mode. This AD envelope can operate in either Gate or Trigger mode, which covers all but a few specialised ADSR functions (and you can always head to the patchbay if you want to swap or reroute the envelopes). In Gate mode, the envelope sustains at maximum, which is ideal for pads and leads. In Trigger mode, the envelope always decays to minimum, with no sustain.
Once vs. Loop. This is the feature that makes the AD envelope more versatile than standard ADSR modules. In Once mode, the AD envelope behaves traditionally, performing familiar note articulation duties. In Loop mode, it functions like a variable-shape LFO. In this case, adjustments to the attack and decay segments allow both saw up and down shapes, as well as a variety of triangular forms.

Of course, the looping feature also provides an extra modulation tool, in addition to the dual LFOs and VCO 2’s ability to operate in low-frequency mode. Accordingly, you can combine them to create evolving drones with minimal patching. For example, since Ultrasaw and PWM are normalled to LFO 2 and 1, respectively, you can then patch either the AD envelope or VCO 2 to cyclically animate the Metalizer amount for a third harmonic animation effect.
Note that when you use the AD envelope in this manner, the segment times dictate the “LFO rate.” That is, if you want a fast equilateral triangle shape, set both attack and decay to low values. For a slower rhythm, increase these values accordingly. With extremely fast segment times, it’s even possible to push the AD into audio rate modulation and generate sidebands.
Signal processing
With its resonant, multimode Steiner-Parker filter and VCA, the MiniBrute 2 is a powerful resource for processing external signals. Here are three instantly accessible uses for the audio input.
Processing instruments. With tempo-synced LFO options and the ability to trigger the envelopes through MIDI or sequencing, the MiniBrute 2 is an amazingly versatile effect for incorporating electric guitars into dance music in innovative ways.
Insert effect. For the above reasons, it’s also possible to integrate the synth as an insert effect in a hardware rig or via a multi-channel interface and compatible DAW like Ableton Live or Apple Logic. The implementation will vary based on your studio configuration, but the results are worth it if you want to chop and process vocals or other production elements in tandem with your sequences. (Visit emusician.com for my tutorial on “The Integrated Studio” for specifics.)
Paraphonic filtering. If you have an old digital synth collecting dust in a closet, connect it to the MiniBrute 2’s MIDI output. Then, plug the digital instrument’s audio output into the patchbay’s external input. This will allow you to route the digital waveforms and presets (strings and brass are great as starting points) into the filter and amplifier in a paraphonic manner. That is, you can still play chords, but the note articulation will be monophonic, like a vintage string synth. It’s a powerful way to breathe new life into older instruments while adding real-time timbral control with the MiniBrute 2’s knobs and faders.
(Note that the MiniBrute 2’s external input is a 3.5mm jack located on the patchbay. Consequently, if you want to process instruments that have a 1/4" output, you’ll need an adapter.)
Sequencing tricks
While the MiniBrute 2S swaps the keyboard for a set of pads and knobs for advanced step-sequencing functionality, the essential concept for both instruments lies in understanding that the parameter modulation functionality is based on velocity and pressure. That is, if you want to sequence a synthesis parameter on either unit, your modulation tools will be the same; they’re just accessed with a different user interface.
Essentially, the MiniBrute 2 lets you articulate parameters based on your playing style (with some associated editing functionality), whereas the MiniBrute 2S adds the ability to dial in the velocity and pressure with the sequencer knobs, in addition to pad dynamics.
While filter and amp routings are the obvious choices for familiar sounds, here are three alternative destinations that deliver radical spectral complexity.
Pulse-width. Sequencing the pulse width lets you rhythmically accent some notes, while thinning others. When the pulse-width narrows, the sound will get brighter and thinner, so blending VCO 2 an octave lower will help retain fullness. Additionally, this effect is most audible with a high filter-cutoff value.
Hard sync. Refer to the hard sync tutorial above, but in step 2 connect the pressure output to the FM input of oscillator 1. Using pressure will allow you to sequence the timbre shifts in a manner that evokes ’90s-era “big beat” dance music (such as Chemical Brothers and Crystal Method).

Metalizer. While velocity is the default modulator for this tool, its behaviour is always stepped. Switching to Pressure lets you fluidly shift the Metalizer spectra in a more continuous manner in conjunction with real-time sequence recording.
