There’s really no doubt about it: Synapse Audio's Dune 3 is quite simply one of the finest synths that money can buy.
Dune’s Oscillator Stacks enable dense tones to be generated by each oscillator before you even get to the eight-voice Unison section, and with v3’s new modulated Swarm mode, those stacks can sound bigger than ever.
Here we'll walk you through how to use these features to create a rich, textured sound.

Step 1: Select Initialize Patch from the Patch menu, and drop the Filter 1 Cutoff to 80% to take the edge off that naked Ramp Up oscillator.

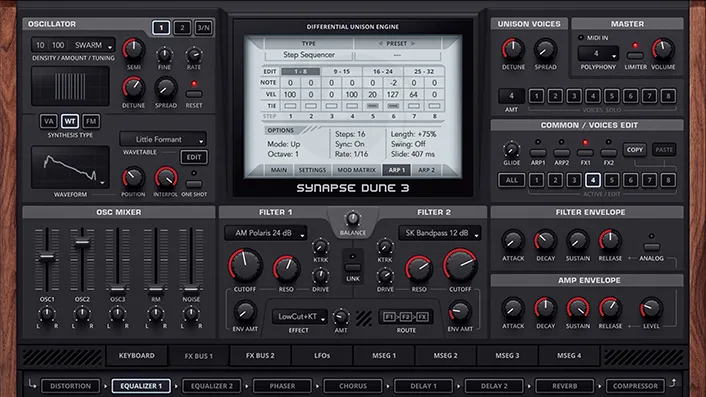
Step 2: The default Oscillator Stack, top right, is Linear, which spaces the oscillators in the stack evenly. Increase the Density from 1 to 8 and set both the Detune and Spread to 70%. There’s your conventional unison stack, with each oscillator detuned around the main frequency and spread across the stereo field, but remaining resolutely static.

Step 3: Now switch the Stack from Linear to Swarm. Immediately, you’ll hear a bit more movement and depth, as the frequencies of the oscillators in the stack are individually modulated. The Rate knob controls the speed of the modulation – lower it from the default 50% for obvious slow sweeping, or raise it for a faster, more ‘phasey’ effect.

Step 4: The most profound change made to Dune’s architecture for version 3 is the upgrade to a dual filter (including loads of new filter modes) with an insert effect slot. Load the Miami Carpark ARK patch from the Chords section of the Dune 3 Factory Soundbank. This uses only Filter 1 and has no insert effect loaded.

Step 5: Let’s bring the second filter in. Click Filter 2’s type menu (currently Off) and select CL Deep Notch to set up a four-pole notch filter, then set the Cutoff knob to 40%. Nothing happens! That’s because the Balance control, which blends the two filters, is currently set to 100% Filter 1. Turn it to 13% F2 to get a mix of both, biased somewhat towards Filter 2.

Step 6: The Filter Effect menu has a range of options, including further filtering, distortion and phasing. Make a choice and dial in the effect with the Amount (AMT) knob. Clicking the Route graphic opens a menu of signal flow options: Filter 1 into Filter 2 with the effect at all three possible positions, and both filters feeding into the effect in parallel.
