Swing (aka ‘shuffle’) is an important factor to consider when programming dance music drums. Styles such as UK garage, ‘wonky’ house/techno and lazy hip-hop all use signature swung grooves to get dancefloors moving.
All DAWs have the ability to ‘shuffle’ a quantised drum track. Employed to inject a bit of human feel into programmed drum parts, swing is applied by targeting particular notes within a straight groove - usually the even-numbered, less important ‘between’ notes - and shifting them all later in time by progressively larger amounts, usually dialled in as a percentage. Most DAWs also have the ability to import ‘groove templates’, which are basically maps that tell the sequencer what time values to shift notes to, in order to replicate the feel of a particular old-school drum machine like the Akai MPC60 or E-mu SP-1200 – both beloved weapons of choice for hip-hop producers.
Once you’ve got to grips with swing and groove templates, try going completely ‘off the grid’ by sliding drum hits around manually in your DAW - no quantise allowed! Be subtle for some human inconsistency, or go all out and give your beats a unique ‘broken’ skittishness.
For more on crafting unique beats, check out the August edition of Computer Music.

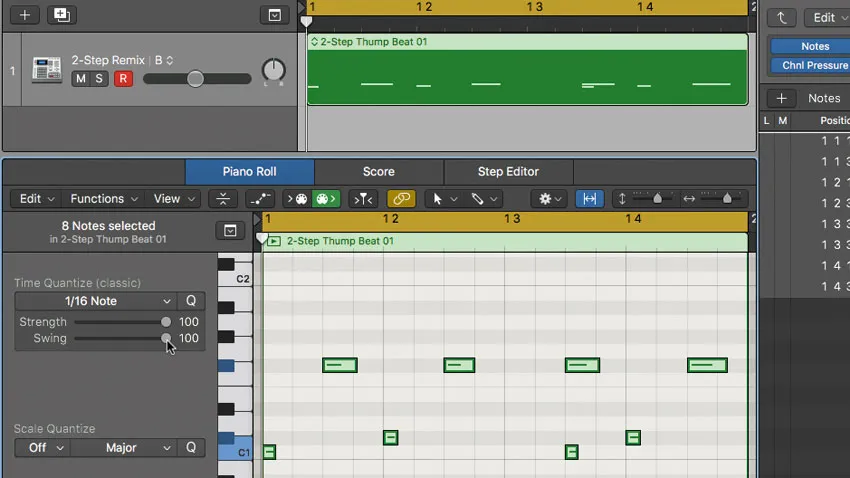
Step 1: Each DAW has its own way of introducing swing to a drum track. Logic, for example, employs a slider found within the Local Inspector pane of the Piano Roll editor, beneath the Quantize field. To see how it works, let’s check out this drum pattern, which contains kick, sidestick and percussion hits - all quantised to straight 16th-notes.

Step 2: Now let’s slide the Swing control up from 0 to its maximum of 100 and hear the difference. Hang on - there is no difference! Why not? Well, it’s because our pattern contains notes that only fall on eighth-note beats. For the swing feature to work, we need to have some notes fall on the bar’s even-numbered 16th notes (the ones between the eighths).

Step 3: So let’s pop in a few extra beats and see where that gets us. With the Swing slider back at 0 for now, we’ve added percussion hits on 16th-notes 2, 8, 10 and 16. This already fills out our beat and gives it a much skippier feel, but the Time Quantize is still straight 16ths with 0 swing.

Step 4: If we increase the Swing control to 100, we can see these extra beats shift to the right - ie, later in relation to the grid. This is confirmed by watching the note position values in the rightmost List editor move as we adjust the Swing slider back and forth. Now we’ve got a skippy, UK garage-style sound.

Step 5: Ableton Live does things slightly differently, in that you have to choose a groove to apply first, then select the degree to which it's applied to the selected clip. Start by clicking the Hot Swap button in the Clip view - this will reveal the Groove Pool, a palette of available groove templates.

Step 6: Find a groove you like the sound of, then double-click it to apply it to the clip. You can then tweak the degree of swing by adjusting the orange Global Amount slider below the Groove Pool window. Unlike Logic, Live doesn’t physically move the notes’ position until you click the Commit button.
