
In 2023, computers, phones, and tablets are readily accessible conduits to the music-production process, and all of them can host some kind of DAW (digital audio workstation) within which all manner of tracks can be crafted.
However, having access to the right software is only the beginning; if you want to end up with a piece of music that might change someone’s life, we need to really focus on building our track’s arrangement. Learning how to bring out the key areas of the song is often what’s needed to imbue our compositions with the maximum, lasting impact that most of us aspire toward.
Ultimately, an effective arrangement takes the listener on a journey, and each section should work together
In this feature, when we refer to arrangement we mean the process of creating a song structure that effectively supports a melody and chord sequence, and assembling a finished piece with a beginning, middle and end. The raw material that you’re working with can be quite diverse – a song with vocals and lyrics or just an instrumental that came from an improvisation. Arranging music, like mixing, combines both a technical mindset with an artistic drive. We should also recognise that rules are sometimes made to be broken (but maybe not all in the same song)!
In times of old, the entire professional music production process was divided between several different roles. The composer would write the melody and lyrics, while the arranger had the job of adding chords, rhythms, and different combinations of instrument parts. Ultimately, they would shape the song to suit their briefed style, making it ready to be tracked or performed.
Today, we’re all fully equipped to take on every aspect ourselves, but we should find time to appreciate the pivotal value of really considering how our arrangement is working, and not just tack it on to the writing or mixing process. Ultimately, an effective arrangement takes the listener on a journey, and each section should work together.
What's your goal?
One of the great thrills of music-making is seizing on those flashes of inspiration, and jotting down a quick sketch demo of something that one day could become a chart-busting masterpiece. Getting round to finishing it however, requires investment of time, careful editing and consideration, as well as detailed listening – pretty much the opposite of the instantaneous buzz of coming up with a killer hook out of thin air.
One of the main culprits to blame for us not being able to finish (or even make further sections) of a track is knowing how to build an effective arrangement. Ableton Live Session View users might have eight tracks of one-bar loops turning on and off, while users of more linear DAWs such as Logic Pro or Cubase might have eight bars of the same verse staring back at them. There might be powerful melodies in there and infectious little hooks, but unless you can organise it all into a structure, it’ll be hard to present it as a serious piece of music. And you can forget about releasing it.
Taking the time to consider the norms that your chosen genre typically adheres to can help you to shape your track in the right way,
You can begin the clean-up process by loading one of these unfinished projects. If you’ve got something with a beat and a melody, then that’s perfect. To successfully create an arrangement you need to set yourself a goal. Often this can be spurred by practical requirements, like somebody has asked you to arrange their tune, or maybe you’re soundtracking a video piece, where you have a certain fixed running time. Then there are the more artistic factors.
More often than not, the practical and the artistic have to exist side-by-side. Even a more freeform arrangement is hit upon by making a conscious decision about (a lack of) structure. The most important thing you can do when it comes to arranging is to listen around your track.
If you decide to work in a certain genre, absorb as many examples of that style as possible, and think objectively about what you’re hearing, by which we mean listen closely without other distractions, and try to unpick how the arrangement is working to emphasise the major hooks, and underscore the core drama of the track.
It pays to consider the typical length of songs that you’d find in your chosen genre, as well. You might be looking at 3-4 minutes for a commercial song with vocals, or 5-10 minutes for ambient and IDM-adjacent pieces. While your motivation for approaching arrangements might differ, taking that time to consider the norms that your chosen genre typically adheres to can help you to shape your track in the right way, and prevent hours of staring at your project in abject terror!
Ways of working
Let’s take a look at a few techniques we can use when thinking about our arrangement. If you’re literate in music theory to the point of reading and writing music, then there’s nothing else that will do a better job of helping you visualise the relationships between instrument parts over time. This goes hand in hand with learning to play an instrument. There’s a serious time investment up front, but time is saved when it comes to the creative process; you don’t need to carefully find each chord every time you try and work out a new section.
Simply copying and pasting blocks can feel uninspired; instead, we need to consider breaking and transitioning between sections
Just as we can write our score with pen and paper, we can also use software, ranging from score editors within DAWs such as Logic Pro X, to standalone applications like Sibelius, and iPad apps such as Notion, which will even let us use an Apple Pencil to draw in notes. There is one drawback though: writing a score doesn’t really cover the range of what is done with electronic music composition, though there are artists who have tried to make their own scoring systems for electronic music.
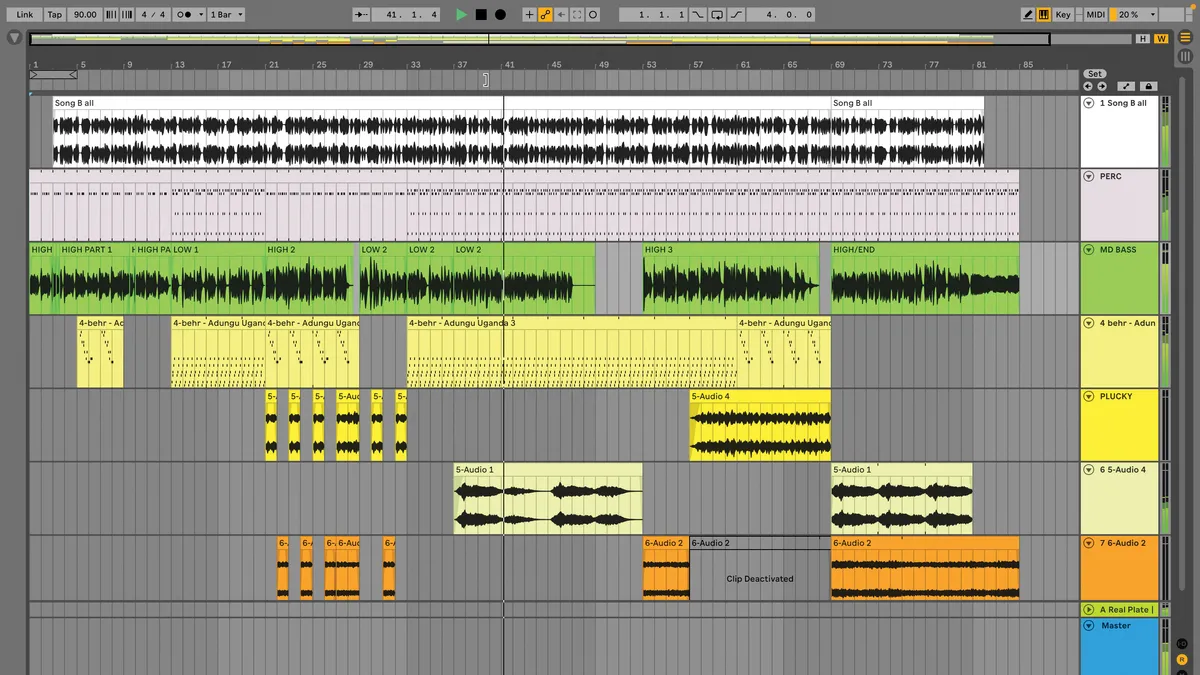
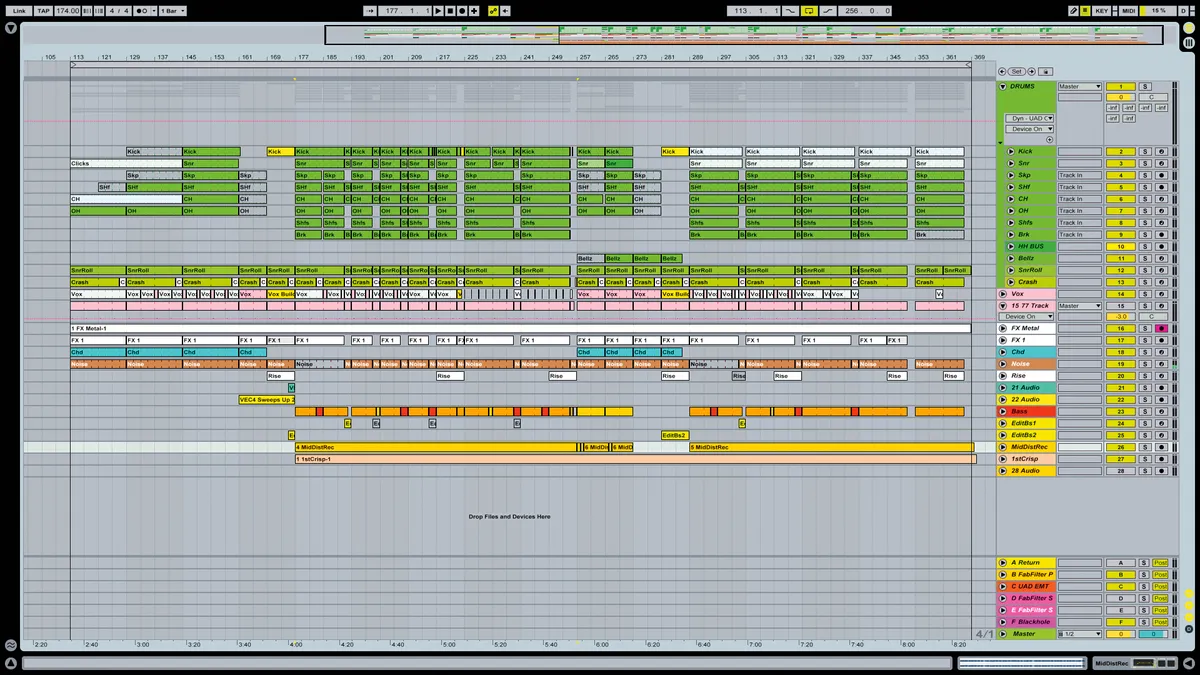
For a lot of us computer-based electronic musicians, we’ll likely sketch a rough framework of an arrangement at the same time as our initial idea. Arrangements are typically displayed in a linear view in our chosen DAW. This a logical way to work, as we can get a clear overview of all of the elements within our music, and take our time evaluating and editing.
We’re not concerned with scoring music, as our work takes place in a world of clips, regions, and automation. However, simply copying and pasting blocks can feel uninspired; instead, we need to consider breaking and transitioning between sections, which makes our track feel like it’s moving organically.
One of the main advantages of being entirely standalone is that today’s music producers can jump between each of the core processes, whether that’s writing, arranging, and mixing, at will, at any stage in the production process. If we encounter a mixing problem, for example, where one instrument just isn’t coming through, or is conversely too dominant, it can be solved by editing the MIDI part, or tweaking the instrument sound. This is a luxury that we just wouldn’t have had in days gone by.
Using a hardware controller such as Ableton’s Push or a Novation Launchpad is a tried and tested route for assembling arrangements on the fly
The ‘hybrid’ option (which is seen most markedly in Ableton Live’s Session View), means that you compose and create using a performance-angled interface. This provides a way of arranging our musical elements in real time. This approach is particularly beneficial if we’re more comfortable performing and getting expressive when forming our music ideas. Using a hardware controller such as Ableton’s Push or a Novation Launchpad is a tried and tested route for assembling arrangements on the fly.

With the aforementioned Session View, once you enter global record mode, Ableton Live will capture your live responses and automatically sequence it into the adjoining Arrangement View. Everything is captured as editable automation, from clip launching to mixer functions, to effect parameters.
You could even set up at home as if you’re playing a gig, and create a feel akin to a live performance atmosphere. This method encompasses the best of both worlds and is a true microcosm of the creative experience – working spontaneously and intuitively first, then reviewing the arrangement more rationally afterward, polishing to a finished result.
With a handful of initial ideas lined up, it’s time to start arranging. But it’s not all about just organising loops…
Elements of a track
So, what is arranging exactly? It’s not just about what elements are in play, but also the relationships between the constituent parts. You could also think of it as being the bridge between composition and mixing. While different genres have different sonic tropes and arrangement norms, there are numerous universal constants that are beneficial to get your head around.
The most common problem that we tend to face comes when we’re so far into the writing or production of a track is that we can’t hear how jarring many of the elements might be upon another listener’s first listen. We’ve heard our mix constantly already, and we’re too comfortable with it. Often we just can’t resist the impulse to add more.
It’s a solid idea to hold off on the arrangement process until after you’ve had your initial writing sessions (something which was standard practice back in the heyday of studio-based recording). Genre dictates many of the arrangement norms, and here are some typical approaches to avoid getting stuck.
Rhythm section
In dance music, the beat is core. In upbeat, club-angled fare, the kick drum should form a central underpinning throb to the arrangement, while the beat should be augmented at various intervals with further rhythmic information that builds energy as the track progresses.
If you’re writing to get people moving as an objective, the tempo and energy of the kit should be the primary section to focus on
If you’re writing to get people moving as an objective, the tempo and energy of the kit should be the primary section to focus on. The low end should work in tandem with this pulse of the kick, and not wander too far off on its own flight of fancy. In contrast, the writing of rock, pop and more melodically-oriented music usually begins with a harmonic or melodic part first, with the rhythm coming later.
Some electronic genres, such as those on the more ambient end of things, like microhouse or glitch-pop, strip away the character of the drum elements and replace them with clicks, glitches or other rhythmically-arranged information that serves the same purpose as a traditional beat, albeit in a wonkier flavour.
These types of decisions can subtly say a great deal to the listener about what type of artist you are, what genre the track is operating in and what the listener can expect as the track progresses.
Harmonic and tonal information
The primary harmonic movement of your song is usually determined by a chord sequence, a shifting sequence of pads, or by the resonant hum of a bass’s root notes, which dictate the structure that other musical elements operate within. Quite often, a simple chord sequence forms the groundwork for the rest of the track’s development, but is regularly removed entirely from the final track. Sometimes, less is more, as they say. That’s a choice that you’ll have to make for yourself of course, based on what the song in question needs.

The chords you choose are also entirely up to you, yet a basic swing between, say, four chords can get quite dull quite quick. Often when used in conjunction with a beat, the bassline (which should be snapped quite rigidly to the kick, particularly in dance music) serves more of a rhythmic function, but can simultaneously carve out the tonal parameters of your song, you’ll frequently find that’s all you need.
However, think about those big choruses from your favourite bangers. What is it that makes them appear big? It’s often not just the hook, or the rhythm, but the sense of release that comes after often quite constricted verses. A nice way of illustrating this is by unleashing those warmer elements during those moments.
Often, it makes sense to hold back the pads, strings, ringing chords and zippy synths until the track’s big moment, panning them across a broad soundstage and using reverb and voice-thickening effects like chorus to give them extra volume and scope.
Melody/hook and the focus element
Typically there should be a focus element that manages the top line of your track. In non-electronic genres, this is usually a lead vocal. The lead vocal is the most conspicuous element in any pop song, delivering both lyrics and the primary melody of the song (ie the part that people whistle).
While vocals are typical in a variety of genres, synth leads, guitar riffs and string parts can absolutely serve the same purpose. Simultaneously, counter-melodies should feed off and support the main melody, and not jostle for position (or interlock to the point of dissonance). Getting the balance of melody and counter-melody is crucially important; you don’t want to leave your listener confused as to which element to devote their attention to.
Borrow a song structure
You can use your DAW’s locators to map out somebody else’s song and borrow their structure. You could do this with any DAW that shows you a timeline. In Logic, you have the option of adding an Arrangement View which allows you to sequence your tracks in a segmented way that corresponds to individually named sections.

In Ableton Live, it’s a little different. Open a new project and load the song into the your timeline. Expand the horizontal and vertical views until you can see the waveform properly. If you know the song tempo, set that as the project BPM, but make sure warping is off, so the file’s timing doesn’t change. With the playhead at the beginning of the song, use the ‘Set’ button to insert a locator. Use Cmd+R to rename this: ‘Intro’ for example.
As you continue through the song, add locators at whatever you think are relevant points in the song structure, it doesn’t have to be every little thing. When you’re done adding and naming locators, delete that original song file, and start building a new piece using that structure as a guide. Try not to recreate the track you’ve used though, but work within its structure.
How to embed drama into your structure
Considering how the different instruments and elements of your track interact with each other is all well and good, but now we need to focus on the cental philosophy that you should take when arranging. It’s not all about finding a position for your instruments within a frequency range (that comes with the mix stage); instead, it’s about how we choose to sit our track elements in service of the drama and impact of the track.
This is where the arrangement process bridges both the writer’s intent and the mix process. How we section and structure our song ultimately determines how successful it is. There’s absolutely no point in writing a killer hook, a kinetic bassline or heart-stopping beat if you’re not placing it into a context. With the arrangement stage, you’re guiding the listener through dynamic peaks and troughs, directing them to those big moments, and generating anticipation by what you do.
Verses (or ‘A’ sections) should lead us toward the chorus/drop (or ‘B’ section). Intros and outros aren’t usually labelled in this way, but are often essential for bringing the listener into the song, and allowing them to find a sense of resolution. These two main sections, the ‘A’ and ‘B’, can be thought of independently but ultimately rely on each other.
To make a drop work, you’re going to need to provoke the listener’s sense of anticipation for that moment of release
The chorus/drop section is the moment when peak attention is sought. But to really make it work, you’re going to need to provoke the listener’s sense of anticipation for that moment of release. In the pre-chorus (or pre-drop) section, you might choose to restrict or tightly filter the elements leading up to the big explosion of colour. Think of your track as constricting almost to breaking point, before expanding bigger than the sun. Limit those bass frequencies if you’re heading for a subby drop, and restrict melodic movement if you’re aiming to land that hook.
Your instrumental choices should be bolstered by your effects and production choices too. Think big chorus, stereo-widening, automated movements across the soundstage and expansive reverb. How long you let your chorus/drop run for is down to you, but a 16-bar section is typical. The listener should know that this is the key section of the track, and it should feel like the result of an earned journey.
Mixing with an arranger's hat
Your mix considerations will naturally feed out of the arrangement process. After all, making your chorus or drop stand out isn’t solely down to how many instruments are in play, but also how you choose to colour and sit each element in the mix.
Automation of volume to increase (slightly) during the big drop/chorus is something that many producers swear by. The jolt in decibel level makes the section appear to leap forward, garnering more attention and crying out for focus. This section is not just about the potency of the hook, but the energy of the instrumentation.
Similarly, you might want to consider EQing out low end (particularly sub-bass frequencies) during the buildup, then automating its return during the drop/chorus; you’re keeping that anticipation building, by presenting the sonic illusion that something is missing, which the drop will ultimately provide. Consider this type of frequency-filtering for other elements, too.
Taking out everything but an element or two of the drum kit, or an isolated vocal, can give a moment of respite, and allow the listener to process the action
This leads us to selective muting; removing instruments entirely from the mix at certain points to contrast moments of extreme vibrancy. Taking out everything but an element or two of the drum kit, or an isolated vocal, can give a moment of respite, and allow the listener to process the action. Not only should you make space for the instrumentation, but also for the parts of the song’s narrative where a breather is needed!
While the A/B section relationship is the most fundamental and basic example of how arrangement works, the principle of sections feeding off of other sections runs through the entire arrangement process. Don’t be constricted by conventional ABAB. Even if you write more off-the-wall arrangements, such as ABC-DAC, you need to make sure that you’re considering the ears of the listener section-to-section.
Again, it’s well worth approaching the arrangement process with a separate hat on to the one you’ve worn while coming up with initial ideas, and not with a distinctly mix-angled perspective. It’s inevitable that these processes bleed together. But the core objective with any good arrangement is to service the listener’s journey, and make a track that delivers on the promise.
6 ways to extend a sketch into a complete arrangement

If you have to stop midway through arranging to design a bread-and-butter sound such as an FX sweep or riser, then you’re not working efficiently. Stock up your favourite banks of go-to effects and incidental sounds that can easily be thrown onto your DAW’s timeline with minimal effort.

Following the previous point, the sooner you can get ‘placeholder’ elements in the track (such as crash cymbals, reverse cymbals, stock white noise sweeps, etc), the better. These make a standard, cyclical loop sound a lot more interesting and polished, even if you end up swapping the sounds out later.

When stock FX sounds won’t cut it, spend 5-10 minutes firing your existing elements into creative effects such as eccentric delay returns or weird reverb algorithms. Render the results and weave them into your track for FX that are sonically similar to the rest of the parts.

Bust out of the loop immediately by duplicating your initial ‘A’ section, then creating a ‘B’ and ‘C’ section that flow into and out of your initial idea. Spend time getting the transitions just right, and you’ll have plenty of inspiration to finish the track.

Once you have a core loop, spend time creating an exciting build-up or edit section that’s designed to flow perfectly into your main loop. This will quickly help turn a monotonous, ever-repeating loop into something that sounds more like an actual song.
Give the tried and tested ‘subtractive arrangement’ technique a go: duplicate your parts out for several minutes, then mute or delete MIDI and audio regions to form the bare bones of the arrangement. Be careful, though: it’s easy to create boring-sounding tracks if you don’t spend enough time on transitions.
