DRUMS WEEK 2025: Here is a detailed, point-by-point checklist for approaching a standard drum kit recording session. First published a few years ago, it has been republished for MusicRadar's Drum Week
1. Skins, sticks and beaters
It’s much easier to get volume, clarity and brightness from a new set of drumheads. If possible, get them on, tuned and ‘played in’ a day or two before the session.
Different types of head give different types of sound: single-ply heads are bright with less sustain (jazz/pop); two-ply heads are deeper and more controlled (rock/metal); coated heads are warmer in tone (disco/'70s). Your choice of sticks or hotrods and felt or wood kick drum beaters will also have a big effect on the sound of the kit. Get close to the sound you want before you think about microphones!
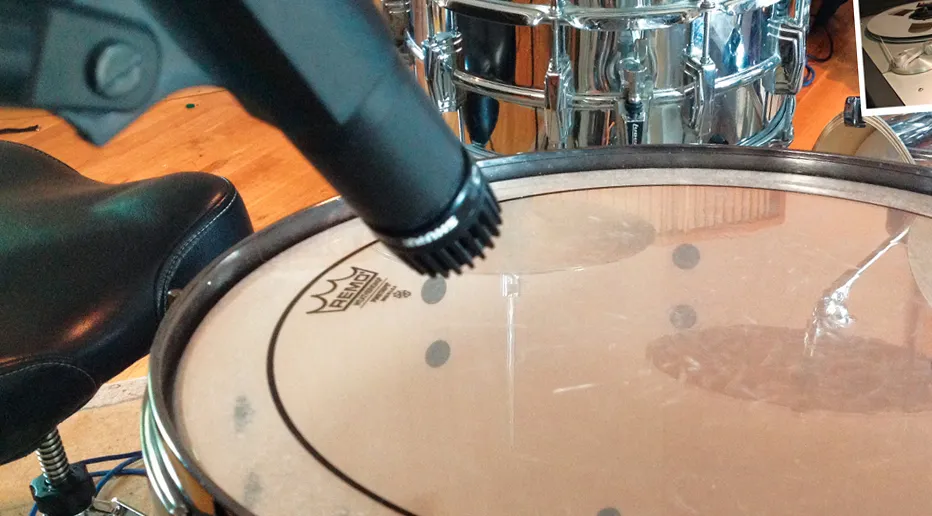
Article continues below2. Tune up
This should be the drummer’s responsibility, yet it’s more often than not the engineer or producer who realises that the drums sound wrong and knows what to do about it.
Here are a few tuning tips and things to check if you’re having problems.
Check that the head diameter is exactly right (fractionally larger than the drum) and that it’s mounted perfectly centrally. Always make tension adjustments in opposite pairs to avoid forcing the head off-centre. Seat the head by applying gentle pressure with your palm to the centre, then tune out any new wrinkles that appear.
3. Bottom heads on toms
Wherever there are two heads, there are three possibilities. If you tune the bottom (resonator) head of a tom to the same pitch as the top (batter) head, you’ll get a purer tone with more sustain – perfect for jazz and its derivatives. If you tune the resonator lower, you get a slight pitch drop-off and less decay – great for rock.
Tuning the resonator higher shortens the decay further, which can be great for close miking. A good starting interval for the difference in pitch between heads is a minor third - ie, three semitones either way.
4. Front head on the kick or not?
The front (resonator) skin on the kick drum is important for creating a good, meaty tone. Jazzers love it, and most rock/poppers have a hole cut in it to allow microphones and dampening material (a small blanket, say) to be placed inside.
For metal styles, where you’re mainly looking for click and thud, you may as well just remove the front head so that you can get a mic right in on the beater point.
5. Tighten the kick drum
It’s possible to create a little kick drum chamber using, blankets, duvets or even a coat. These are draped over the kick drum, and any microphones are placed in and in front of it. Use a couple of small mic stands to hold the blankets up.
The chamber prevents spill from the cymbals and snare getting into the kick drum mics, making it easier to boost the high frequencies at the mix stage and thus enhance the ‘clickiness’ without adding harshness from the cymbals.
6. Playing to a click
If you’re tracking to an existing recording, your drummer will need to be able to play to a click track. The best drummers are able to sit exactly on the click, but tend to flow around it in order to create a better feel.
Recording to a click makes it much easier to edit between drum takes at a later stage. If the whole band is tracking together, it’s best if only the drummer gets the click. Using a little beatbox or percussion groove usually makes a better ‘click’ than an actual click, and will also spill over into the microphones less.
7. Prepare the click for gaps
Prepare for stops and gaps in the song by automating the level of the click in the drummer’s headphones. During the stops, lower the volume so that there’s no click spill into the drum mics from the headphones. If you’re recording the whole band, it’s also a good idea to send a click to the other players at that point, so the drummer doesn’t have to count everyone back in. This will save lots of painful editing and remedial work later on.
8. Get a crappy mic
Tape recorders used to come with built-in condenser or electret microphones. Put one of these old machines into record/pause mode and take the output into your DAW for an exciting, super-crunchy sound.
Sometimes, rubbishy old battery-powered mics can sound good too. Put these types of mic in a place where they can hear the whole kit. The corners of the room can offer interesting results – experiment!

9. Record without cymbals
Recording a kit in a difficult space without ideal equipment can be a fruitful and rewarding experience, but you might still feel that your results sound amateurish.
One of the classic drum sound problems is too much cymbal spill. This happens in the best of studios, and when it does, the pros just record the crashes afterwards. That way you can bring up all the exciting roominess of the drums themselves in the mix, then blend in perfectly recorded cymbals afterwards. As long as they share the same bus compressor no one will ever know (although your drummer will hate playing without cymbals).
10. Essential gubbins for a trouble-free drum session
Moon Gel, for damping; 3-in-1 oil, for squeaky pedals; a drum key, because the drummer will forget theirs; an adjustable spanner, for rattly stands; gaffer tape, for holding stuff; masking tape, for attaching damping materials and the like; empty cigarette packets and J-Cloths, for that '70s sound; blankets; stage weight or sandbag; and Japanese cooking chopsticks - great for tom parts!

You must confirm your public display name before commenting
Please logout and then login again, you will then be prompted to enter your display name.