The humble flam. Surely the most elementary of all drum rudiments, yet also probably the most frequently deployed - and cetainly the most hard-hitting. Nothing more than a pair of hits, the second a little bit louder than the first, so close together as to almost sound like a single stroke, the flam is easy to play, easy to program, and makes an effective tool for accenting and adding emphasis.
Perhaps the most famous example of the flam in a rock drumming context is the intro to Guns N' Roses' Paradise City, in which drummer Steven Adler nails the backbeat to the floor with both hands. At first, the flam is used simply to lay down beats 2 and 4, but they continue to crop up throughout the track within fills - and here we're going to look at just that: how flams can be used to make drum fills more interesting and dynamic.
Flams are mostly played on the snare drum. The key to realistically emulating them is making sure the hits don't sound identical - ie, avoiding the machine gun effect from using a sampled sound source with no 'round-robin' multisampling. If your drum kit ROMpler suffers from this, find a secondary snare sound similar in tone and pitch to the main one, and use that for the first hit of the flam. Beyond that, it's just a matter of getting your positioning and velocities right, and making sure you don't double your flams up with anything else that would require the drummer's hands.
For more drum programming tutorials, check out Computer Music magazine's monthly Dr Beat column.

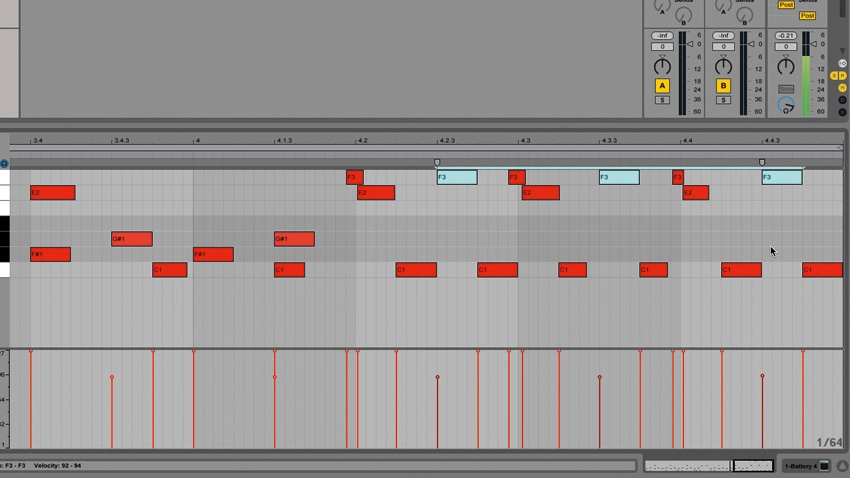
Step 1: Here's a four-bar programmed drum groove triggering Battery 4 (the Session LE Kit, specifically). We're going to use flams as the basis for a simple fill at the end of bar 2, and to greatly increase the impact of the three climactic snare hits at the end of bar 4, which are currently sounding a bit half-hearted.

Step 2: Placing a hit immediately before the last snare hit in bar 2 creates the basic flam. The first stroke of a flam is slightly weaker, so we lower the velocity of the newly added MIDI note a touch. This kit doesn't feature round-robin multisampling, so we use a different (but similar enough) snare sound from another note.

Step 3: The placement of the two hits on the timeline can have a huge effect on the groove, so play around with their spacing and positioning until you get a feel you like. A flam requires both hands, so deleting simultaneous hi-hat hits is essential for realism. Adding a couple of snare hits after the flam finishes off this intermediate fill.

Step 4: The snare hits at the end of the phrase will sound much more powerful as flams. Repeating the process described in steps 2 and 3 for all three hits does the trick, and shifting their timings separately ups the realism. Simultaneously struck hi-hats need to be removed again, although the hats in between can stay.

Step 5: Hitting the kick drum a 16th-note after a flam is always a winner (Nirvana's Smells Like Teen Spirit stands as definitive proof), so we move the kick drums in between the snares around - and add a few more. A final kick at the very end of the bar tops off what is now a muscular, driving fill.
Fill with hats
Fill without hats

Step 6: Flams can sound awesome split between two drums. Moving the first stroke in each flam down to the floor tom and maximising the velocity adds even more weight. Moving all of the hi-hats in that section down to the floor tom replicates the way a drummer might 'ride' the drum in this kind of fill.
