It's extremely difficult - if not impossible - to generate the basslines heard in Noisia, Phace or Mefjus' tunes straight out of a synth without further processing and resampling techniques. That said, creating a great source sound is still crucial to getting an end result that both shakes subs and screws faces up.
With traditional subtractive synthesis, you begin with basic waveforms - square, saw and triangle shapes, for example - before sculpting away harmonics with the synth's filter. This method is great if you're after clean, weighty sounds, but the end result will lack the timbral movement and aggression synonymous with dark-edged DnB.
Instead, a good starting point is to use cutting-edge digital synthesis techniques such as wavetable, FM (Frequency Modulation) or phase distortion synthesis, all of which provide much more scope for creating unusual waveforms and harmonic complexity over time. Ultimately, the aim is to create an intricate, moving spread of mid and high frequencies with a sufficient balance of low-mid and mid-range harmonic movement that can then be 'magnified' and exaggerated with distortion, filtering and processing further down the chain.
In addition to this midrange complexity, bear in mind that your synth sound should also feature a solid, consistent low end to provide the bass's underpinning sub weight and power. This can be achieved either by blending in an additional sine or triangle oscillator with the source synth, or layering a separate sine sub underneath using a different one.
Once you've created a suitable bass tone that features both low end solididy and mid-range interest, it's time to induce movement and motion via modulation. Using an LFO or step sequencer to modulate oscillator harmonics - for example, moving the position of a wavetable oscillator, or the amount of frequency modulation (FM) applied - will quickly give a dense, tearing sound that can then be shaped further with processing. The synth's filter can also add flavour to a source sound, with subtle modulation of a filter's cutoff or resonance (via an LFO or envelope) adding movement and texture to your frequency-rich tone.
For more neurofunk bass production action, check out the full feature in the August edition of Computer Music (CM232).
For all the accompanying content for this tutorial download the zip file.

Step 1: We'll be using Xfer's Serum for this walkthrough but these techniques can also be applied to other wavetable synths, such as NI's Massive. Start by setting your DAW's tempo to 174bpm, then import Backing.wav and Growl.wav. The growl we've imported has been made to fill the gaps in the main bassline, adding variety.
Growl
Backing

Step 2: Add Serum on a fresh instrument or MIDI track, triggered with Bass.mid. This MIDI pattern has shorter notes an octave above the main low notes, and we can use portamento to make Serum glide between those notes instead of playing them together: hit the Mono button in the Voicing tab to disable polyphony, and set the Portamento time to 250ms, giving us the gliding effect we're after.
Add Portamento To Serum Patch

Step 3: Let's choose a suitable wavetable: Basic_Mdc includes a number of waveforms that can be modulated between to add movement - and excite the processing we'll apply in a later walkthrough. Choose it for Oscillator A. Disable Osc 1's RandPhase to make its waveform retrigger consistently, then turn on the Sub Oscillator (top-left) and choose the RoundRect wave to add low weight.
Change Wavetable And Add Sub Oscillator

Step 4: Modulating Oscillator A's wavetable position will add some movement - set its WT Pos dial to 42, and assign LFO1 to modulate it (drag the LFO's handle to the WT parameter) with the Amount up to 55. Next, we'll shape the modulation by clicking LFO1's folder icon and setting the shape to Gunshot, for a more complex shape than a typical sine or sawtooth wave, giving more interesting modulation.
Modulate OSC1 Wavetable Position With LFO

Step 5: We can make the modulation a bit slower by changing the timing to 2 bar - after this, hit LFO1's Trig button to make it retrigger with each note. Now, we'll modulate the Sub's volume using LFO1, to give the whole sound a similar movement: push its Level up to 100%, and assign LFO1 to it at -40. Next, we'll use Serum's oscillator warping to add more interest to our sound.
Modulate Sub Oscillator with LFO

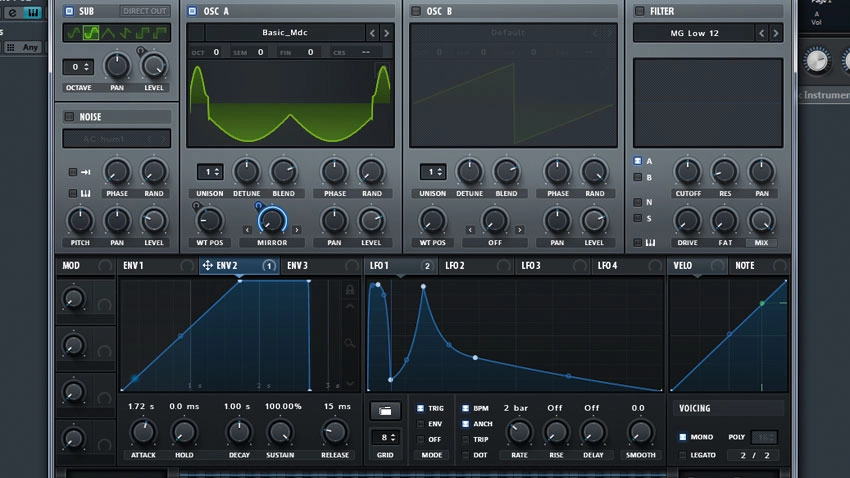
Step 6: Pull down Oscillator A's Warp menu and select Mirror, turning the waveform into a symmetrical image of itself, adding harmonics and extra crunch. Now use an ADSR envelope to modulate the Warp control by assigning Env2 to it at +100. We can slow the modulation by increasing Env2's Attack to 1.7s, adding movement to our sound that'll react well to further processing.
Oscillator Warping with ADSR Envelope
