While watching movies on television, you can't have failed to notice that during commercial breaks the advertisements can be so loud that you have to leap up and grab the remote control to hastily turn down the volume.
Advertisers deliberately try to make their commercial as loud as possible, so that it leaps out compared to the ones that appear either side of it.
The same thing happens in the music world. Many independent musicians will also have listened in despair to their favourite artists' tracks on Myspace, and wondered why their own tracks sound only a fraction as loud.
In this tutorial we will show you how to get your track as loud as possible. We have included quite an in depth introduction here - click here if you just want to skip to the actual tutorial.
Introduction
Compression and limiting basics
The terms compression and limiting are often used interchangeably. However, although both use similar (sometimes identical) technology, they serve different functions, and it's quite common for both techniques to be used simultaneously on the same section of audio.
Compression is the art of controlling volume levels such that the subjectively loudest and quietest parts fall within a desired volume range. Although this is usually done in such a way as to sound natural, compression can also be deliberately abused to create a 'larger than life' sound, such as creating the impression of an elastic-sounding room ambience that responds to the playing of the instrument, like the classic 'big rock drums' sound.
Limiting, on the other hand, is the removal of undesirably loud, transient peaks not considered critical to the overall artistic impression of the music. Such peaks, when untamed, prevent you from recording the final signal at a 'loud' level and, at their worst, can physically damage sensitive equipment such as tweeters.
Glossary
Stuck with some of the technical terms? Check out MusicRadar's hi-tech jargon buster for a comprehensive guide to music technology language.
Although it might seem that both tasks could be performed with an advanced 'multi-knee' software compressor (which allows different points to be graphically placed on a threshold curve), in practice these two techniques usually require very different attack and release times, and unless a compressor has an acceptable in-built limiter function then two separate plug-ins are required.
Compressors can be hard to understand and even harder to master, especially since the results are very much dependant on the type of sound source that you're trying to control. The first walkthrough below is a quick guide to setting a compressor up correctly for a basic 'smoothing out' of overall volume levels, regardless of whether you're working on an entire mix, or just one element of it. The second demonstrates how to use EQ to work with compression rather than against it.
It's worth noting that the settings on any compressor are a matter of personal taste, requiring a great deal of experimentation, and that the precise behaviour of every compressor tends to be different and unique (which is why some people swear by certain plug-ins and dislike others). Remember that the goal of the exercise (in most cases) is to gain a good degree of automatic control over the volume levels without it sounding obvious to the listener that it's being achieved artificially.
The digital dilemma
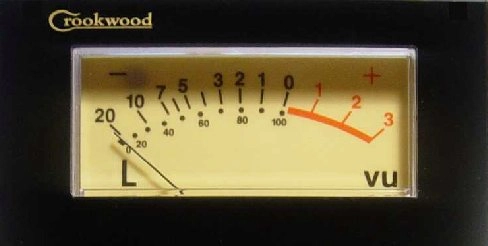
Analogue technology made the technical specification of musical loudness relatively straightforward, with the measuring device of choice being the beautifully designed and easy-to-use VU Meter. The measurement of zero VU (Volume Units) represents a subjectively vague average sound level, which still has a precise electrical and - for tape recording - magnetic power specification. The idea of a maximum level simply didn't apply back then because the maximum limits were arbitrarily enforced by the particular technology or piece of gear being used. It was part of the sound engineer's job to have a good feel, not only for the practical limits of their own equipment, but for the limits of the final playback media, such as vinyl records or magnetic tape cassette.
As digital technology started to work its way through the entire recording and playback chain, the rules suddenly changed. Instead of having the combination of a fixed electrical (or magnetic) 'average' level, and an awareness of somewhat vague 'maximum' levels enforced by the equipment, digital audio technology totally reverses these concepts. The level, which is fixed and unchanging for digital audio equipment, is the maximum level, not the average one. As engineers started to realise that the suggested 'average' levels for digital recordings were merely standardised recommendations (rather than technically justified ones), the trusty old VU meter went straight into the dustbin.
In practical terms, the VU meter had to go, since some parts of a digital multitrack could have the VU meters literally pounding against their end-stops, risking physical damage and providing no usable information. This fundamental shift in recording level practice also meant that making simple one-to-one copies from a digital source to an analogue one could no longer be assumed to be a safe, simple operation, due to the possible level differences.
The loss of a technically-specified 'average' level has also made CDs and music downloads very user-unfriendly. While each carefully mastered album can usually be relied upon to have a consistent level and tone from start to end, the differences in average volume between separate projects can be dramatic; Most music lovers have had the unfortunate experience of having to desperately rustle through their belongings to grasp the volume control on their MP3 player before their ears get torn to shreds.
The reason for this is nothing more than straightforward competition: All record companies want their records to sound louder than everyone else's, particularly if that music is likely to be played on a pub jukebox or the radio. Some mastering engineers have proposed a return to 'standardised' average levels in order to regain some sanity and user-friendliness. In practice, however, the harsh realities of a competitive marketplace mean that this is simply never going to happen.
The age-old rule of competitive battles has always been, 'If you can't beat them, join them', and so you, too, need to know how to get the levels of your final mixes as loud as possible without compromising musical integrity.
Beyond compression
The fundamental tool for all loudness-maximising tasks is still the humble compressor, and most fully-featured models can usually function as limiters as well, as long as both the attack and release times can be set to ultra-short values. However, compression is not the only tool available to you. If you've got a song that has both quiet and loud sections, don't be shy to use automation in your sequencer to push up the master mix volume in the quieter sections. If you place your main mix compressor after this mix-volume fader, then these quieter sections will benefit from the mix compression too.
Bear in mind that the ultimate goal is, more often than not, perceived loudness rather than technical loudness, and perceived loudness is very much an illusion. The careful use of different ambient effects used in contrast to one another can create the illusion of a massive soundscape, provided they're not used for extended periods of time. This is used to great effect on many dance records - listen to tracks by Faithless or Deep Dish for some amazing examples. By contrasting relatively dry verse/rhythm patterns with screamingly bright-sounding lead synth lines in the chorus - normally quite swamped with reverb and delay effects - the entire song will seem to take on an entirely different size in the chorus sections compared to the verses.
Similarly, brightness itself tends to suggest loudness, and while simply boosting the top end of tracks often leads to mixes that sound weak and thin, a subtle, narrow boost at around 3-4kHz can greatly lift a track above the perceived level of those played either side of it. This is an old trick that's been used for many years when releasing a 'radio mix' for broadcast.
After carefully compressing your track, equalising it to sound brighter, and then pushing it as hard into a limiter as it can reasonably go before it starts to sound over-processed, there is one final trick - and that's to use dedicated maximising software, such as Waves' renowned Maxx Bass and L2 Ultramaximizer plug-ins, which use their own secret bag of techniques for the ultimate in extreme levels.
Absolute zero
You'll probably have read about the importance of not overloading digital sound systems - while analogue systems gradually and smoothly distort, digital systems can sound awful when they hit their absolute maximum. However, the latest digital audio converters can be surprisingly forgiving of the occasional peak transgressing the limit, so don't immediately panic if you get the occasional 'red light' during recording or mixdown, provided that it doesn't sound noticeably bad.
It's really not a good idea, though, to rely on this as a means of 'limiting' the peaks of your recordings or mixes. If you're recording live performances (as opposed to rendering predictable MIDI parts), then - provided you've got a good quality soundcard - you should always deliberately set your levels to 'under-record' by about 6dB below your expected peak signal level, just to give yourself a safety margin.
When it comes to mixing, deliberate 'clipping' by pushing your levels up high should almost always be avoided in preference to using a purpose-designed limiter/maximiser plug-in - your DAW may well include a suitable one.
Cubase's Multiband Compressor, for example, has a soft-clipping function that works well, although you should avoid the limiter in both the VST Dynamics and plain Dynamics modules, as it has a bug affecting overall levels. IK Multimedia's T-RackS mastering suite also provides limiting and soft-clipping modules and there are several limiter/ maximiser plug-ins downloadable from the Internet for free, too, so there's really no excuse for not using one.
Maintaining stereo imaging
If you had one loudspeaker set louder than the other, then obviously you'd know that there was something wrong with your equipment setup. However, a surprising number of people - even software plug-in developers - often don't realise that exactly the same holds true for compressors. In a stereo mix, it's clear that there will be moments when instruments in one speaker are louder than the other. Under those circumstances, you'd never want to turn down just that one channel, since the stereo image of the entire mix would immediately shift to the other speaker. Instead, the level of both channels must be turned down by exactly the same amount.
What's worse, there are some multiband plug-in compressors that also process stereo channels independently. This is dreadfully wrong, since it means that the tonal balance between channels becomes inconsistent as well, leading to every element in the mix losing its focus, with parts migrating randomly across the stereo image in highly undesirable ways.
When selecting a compressor plug-in to use on your final mix - whether it be multiband or single-band - it's essential, then, that you make sure it can operate in a so-called 'stereo linked' fashion. If it doesn't offer this basic function, then don't even think about using it on your mix - it'll ruin the stereo imaging completely.
Practice
Ultimately, the quest for maximum loudness seems to be a war without end, and it can often make you feel like throwing in the towel completely - after all, it's certainly true that all of these complicated techniques do compromise the sound to some degree, especially when compared with the simple task of the listener just turning the volume up on their system.
Unfortunately, though, if you try to duck out of doing battle with the big boys, you'll find that your final bounces will sound embarrassingly quiet compared to commercial releases, so these days it's pretty much essential that you adopt some or all of these techniques to some extent. Follow our tips, put in a bit of practice and you'll soon have your mixes banging along with the best of them.
