The tone of an acoustic bass (or kick) drum is dependent on many things, most obviously the construction, the diameter, the tuning of the skin, the type of skin, the damping inside the drum, the nature of the beater and so on.
The kick sound itself can be broken down into the 'front' and the 'tail'. The front is the attack portion of the sound, the initial transient, which gives the 'smack' and cuts through the mix. It's generally bright in tone from the impact of the beater on the skin and only lasts a few milliseconds.
The tail of the sound is the natural low frequency resonance of the shell as the sound decays and gives you the deep pitch of the drum sound. The length of the tail is as important, if not more so, as the pitch, and the decision is dependent on the tempo, the arrangement complexity and the accompanying bass part. A down-tempo track with a sparse bassline can probably afford a long decay, whereas a fast song with a busy arrangement will have little space for a ringing kick and will require a tight, punchy sound with a short decay.
With your acoustic bass drum recorded, making it sound solid in the mix comes down to processing with compression and EQ which is exactly what this tutorial is all about…
Additional audio files are available for download.

Step 1: Microphone spill can become quite audible following compression and other processes, but a noise gate first in the processing chain can get it under control by attenuating the signal when the drum isn't being played. Set a threshold just below that of the quietest kick drum hits, then apply fast attack and medium-to-quick release to shape the decay to fit your mix without cutting off the kick's tail. An alternative to gating is your DAW's 'Strip Silence' function.
Gate

Step 2: Compression is used not only to even the overall average level, but also to impart more attitude and energy. A compressor - set with a slow attack so as not to suffocate the initial hit and a very fast release so the tail of the drum pumps back up just after each hit - gives just that. Saturation can broaden the frequency range of the transient and tie it into the tail. The excellent PSP MixSaturator can also magically add more bottom end to the kick where you think there is none.
Compressor
Compressor & Saturator

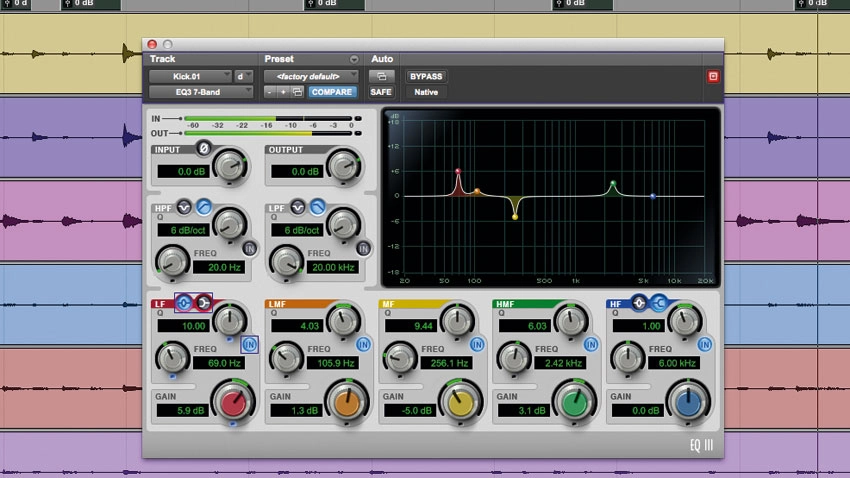
Step 3: Try using high-Q EQ boosts to pick harmonics that resonate with your track and the drum itself, particularly at the low end, where a narrow Q boost around 70Hz can give you the sex factor. Around 100-120Hz will create punch on small speakers. Cutting with a narrow Q at 200-250Hz can aid bottom-end clarity without losing weight. For more click, boost between 2 and 6kHz; if you have too much transient 'front', a shallow low-pass filter with a 1kHz roll-off point can help.
EQ
EQ with all kit
For more kick drum-related techniques and advice, check out the full Kick & Bass Power feature in the July issue of Computer Music (CM231).
