Ring modulation is a kind of 'metallic' sounding effect made famous for its use in the classic TV show Dr Who to create the distinctive voice of the Daleks, but it has far more uses than just creating crazy alien robotic screams.
Ring modulation works by multiplying one waveform (often a sine or triangle wave) with the input signal (which could be any kind of sound). The output of the effect is the sum and difference of the frequencies present at the two inputs. As an example, a simple sine wave at 130Hz (C3) ring modulated with another sine wave at 390Hz, will output a signal with those original frequencies, plus new peaks at 260Hz (390-130) and 520Hz (390+130).
These example frequencies were well-chosen - 130, 260, 390 and 520 are natural harmonics of the note C3. If we'd used, say, 130Hz and 80Hz sines, we'd have ended up with spikes at 50, 80, 130, 210. These less-related frequencies would sound clangorous to our ears. Remember, that using anything other than a sine wave will add more harmonics, each of which will be added and subtracted from those of the other input signal, creating a more complex sound.
With that said, then, let's take a look at ring modulation in action as we program up a bell sound in Camel Audio's now discontinued but still amazing sample-based synth, Alchemy.

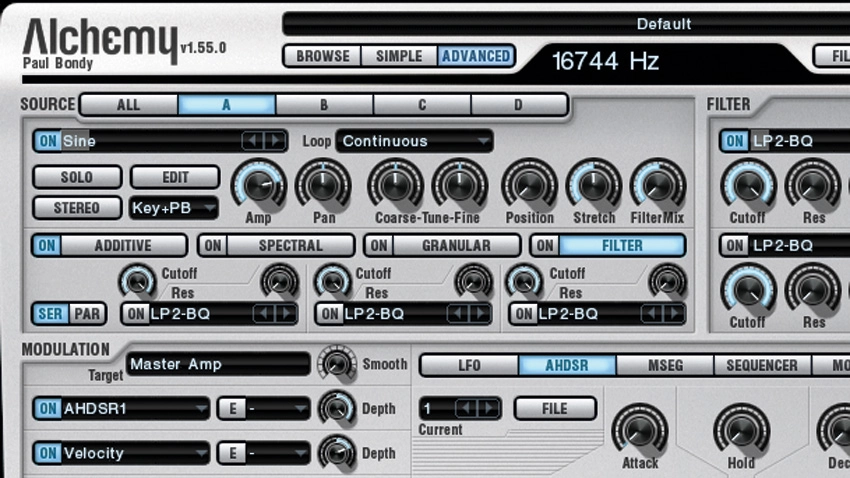
Step 1: Load Alchemy, Switch to Advanced mode and go to Source A. Click on the oscillator name to bring up the selection menu and Load VA>Basic>Sine. Click the oscillator's Filter button to open the oscillator-specific filter module. We'll insert three ring modulators here, set at different frequencies to create a bell-like chime effect.

Step 2: Click Par to change the filter routing to parallel. By doing this, we send the original sine wave oscillator to each ring modulator individually, rather than having the filters feed into each other. This creates a thicker, more interesting sound. Click the first filter's Type menu, change it to RingMod and activate it. Turn the Cutoff knob on the ring mod down to 88Hz.

Step 3: If you play a note on the keyboard, you'll notice that each key sounds out of tune with the next. To fix this, we can use key following. In the modulation section, for our ring modulator select Note Property>Key Follow. Key following means the ring modulator's frequency will move up or down relative to the note that's pressed - ie, following the note.

Step 4: Now activate the other two filters, change their modes to Ring Mod and set each ring modulator to the desired frequency. Adjusting frequency settings will give you different tuning effects. We've gone for 133Hz for the second modulator and 1370Hz for the third. Turn up the AHDSR's Release to give the sound a soft, bell-like release effect.

Step 5: At the bottom of the synth, click the Arpeggiator section, turn the Mode knob to a setting you like, and turn the Octaves knob up to 3 or 4. Adjust the step Duration to taste - we're going with 1/2. Now when you hold down a key or a chord, you'll hear a nice chiming pattern.

Step 6: For the final touch, click the Effects section and select Acoustic Reverb, adjusting the settings of the reverb to taste. Now hold down a chord. Automate the Cutoff for each ring modulator for some really weird, spooky-sounding detuning effects while the pattern is playing.
