While Native Instruments' game-changing Maschine groove production system has developed into a pretty capable all-round 'mini DAW' since its launch over five years ago, its primary raison d'etre is without doubt still the production of beats. Sure, you can load up a synth plug-in, switch to Keyboard mode and capture full-on melodies and harmonies via your Maschine controller's 16 pads, but it's drums and percussion (and, secondary to that, basslines and short musical riffs) that are - and always will be - the headline.
Introduced in version 2.0 of the Maschine software, Drumsynths give Maschine users a powerful set of dedicated drum and percussion synthesisers with which to complement their sample-based sounds - or completely replace them, as we're going to here. They sound absolutely phenomenal, yet are incredibly easy to program, presenting a salient set of parameters for each one (Kick, Snare, HiHat, Tom and Percussion) that make it pretty much impossible go wrong.
In this tutorial, we'll show you how to build and trigger a complete drum kit using Drumsynths. It doesn't matter which Maschine controller you're using, but you will need to be running v2.1 of the software, so if you've not updated yet, now's the time.
For more Maschine tutorial action, get your mitts on the August issue of Future Music (281).

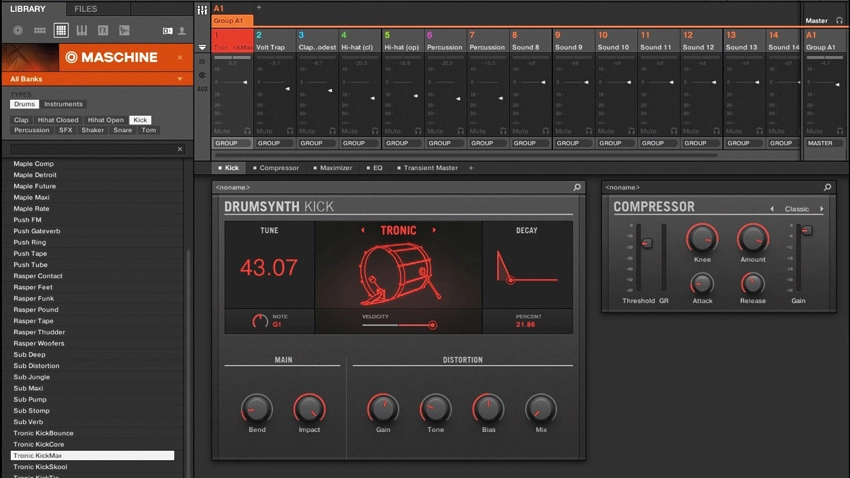
Step 1: We'll start with the kick drum. We switch to Browse mode on our Maschine controller, set the main category to Sounds/Maschine, then filter down to Drums/Kick, and select Tronic KickMax. This is a heavily processed Kick Drumsynth preset that already sounds great, but we raise its pitch a touch and lower the Decay. We set the project tempo to 128bpm, record hits on all four quarter notes of the bar, and press the Quantize button to get them perfectly in time.

Step 2: We extend the pattern to four bars in length by switching to Pattern mode (Button 2 on the Maschine controller) and pressing Double (Button 9) twice. Next, the snare. We strike Pad 2 to select Sound 2 and Browse to the Volt Trap Snare preset, then select Sound 3 and load Clap Modest Snare. We know we only want hits on the backbeat (beats 2 and 4), so we press the Step Mode button, activate Fixed Velocity (Button 8) and step sequence (rather than record) the requisite hits.

Step 3: Our snare/clap stack, although cutting, is a bit top-heavy and short. We select the Snare and adjust its Tune to 65, Decay to 42.74%, and Noise Color to 25%. We also increase the Sustain on the Transient Master at the end of its effects chain to 52.2%. The result is a longer, deeper, slightly phatter snare. For the Clap, we set the Decay to 64.1%, Room to 18% and Tune to 48.6%, before lowering its volume in the mix to -4.4dB.

Step 4: We need separate open and closed hi-hat sounds, so we load Sounds 4 and 5 with a Hi-Hat Drumsynth each. We switch the closed one to the Circuit engine and darken it: Tune 78, Decay 40.17%, Color 4.4kHz, Saturate 56%, Dissonance 90%. Using the Silver engine, we raise the pitch and frequency emphasis of our open hats by setting Tune to 60.6% and Color to 6kHz, amongst other adjustments. We then record and quantise an off-beat pattern.

Step 5: Maschine 2.1 introduced the Shaker engine to the Percussion Drumsynth, complete with Performer Envelope mode, for creating realistic shaker parts. We load it on Sound 6, raise Tune to 70, set up the Envelope as shown, and program a single four-bar-long note to trigger the rhythm. The last part is another Percussion Drumsynth: the Fractal PercToy preset, followed by an envelope-modulated Filter and a Beat Delay, and programmed melodically in Keyboard mode.

Step 6: With the beat built, all that remains is to balance the levels and process the whole thing as a Group. In the audio examples, you can hear four different treatments, all using the same set of Maschine effects - EQ, Compressor and Saturator - but each one tweaked to achieve a different overall sound in terms of compression timing, frequency emphasis and distortion. This whole walkthrough was done without stopping playback once, needless to say.
Example 1
Example 2
Example 3
Example 4
