Today's soft synths are absurdly powerful, capable of the sort of sonic acrobatics that yesteryear's analogue pioneers could only have dreamt of. Nonetheless, they are still very much electronic instruments, with little of the inherent 'soul' and fluctuant expressiveness that comes with a guitar, piano or other acoustic/electric instrument. Indeed, overcoming the inevitable sterility of any synth can be a challenge.
In this tutorial, we'll show you how to use the basic modulation effects included with your DAW to bring gentle, natural-feeling movement to your synth lines. Our goal isn't to radically shape the sound in any sense, but simply to liven it up a touch and make it feel more 'real'. As with so many things in music production, less is invariably more with this kind of technique, so be careful not to over do it - we're after subtle enhancement, not full-on wobble.

Step 1: Modulation effects are great for swooping, swooshing wobbles, but used subtly, they can give your mixdowns dimension, life and texture. Drop Square Riff.wav, Drums.wav and Bass.wav, into a 95bpm project in any DAW. We're using Ableton Live 9 and its stock plugins but you can follow along with any DAW that features generic modulation effects.
Dry riff

Step 2: Subtle LFO-driven volume modulation - called tremolo - is ideal for injecting discrete movement into a synth sound. Live doesn't feature a dedicated tremolo plugin, but its Auto Pan device can act like one. Load one onto the synth riff, then turn Phase to 0.00 degrees to disable the offset between stereo channels, turning it into a basic mono tremolo effect.

Step 3: When you want to apply a subtle modulation effect, it's good to initially turn the 'mix' amount up to judge the rate and other settings. Turn Auto Pan's Amount to the maximum 100%, then set a suitably fast Rate to achieve a 'buzzing' effect. We settle upon 21.6 Hz. Now back off the Amount to around 20% for the very slightest hint of volume movement.
Riff with tremolo

Step 4: This synth riff sits squarely in the middle of the mix, as do the bass and drum parts, but a completely mono mix sounds unnatural - especially on headphones - as it lacks the stereo space and ambience that we experience constantly in real life. We can use Auto Pan - this time in its usual role - to gently move the synth part left and right. Insert a second instance on the synth track.

Step 5: Set Amount to 100% to exaggerate the panning effect while we set the speed. This time, we'll change the LFO Rate Type to Synced by punching the note button below the Rate knob. Set a Rate of 1/4 to rhythmically pan each note of the riff in time with the track, then set the Amount back to 10%. This gentle panning doesn't stand out, but it adds life and motion to the mix nonetheless.
Riff with auto pan

Step 6: Next, we can place the riff in a 'space' using a short reverb. Load Acon Digital's CM Verb - included with Computer Music every month - on a new return track, turn off the Dry signal by deactivating the button under the Dry level slider, then send the synth track to this return by a 0dB amount.

Step 7: The default patch is far too cavernous and obvious for the discrete, natural effect we're seeking, so adjust the settings. Set a short 0.30s Reverb Time, then change the Reverb Program to the
Studio A algorithm. Note how this reverb is almost invisible, but its benefit is obvious when we mute the return.
Riff with reverb

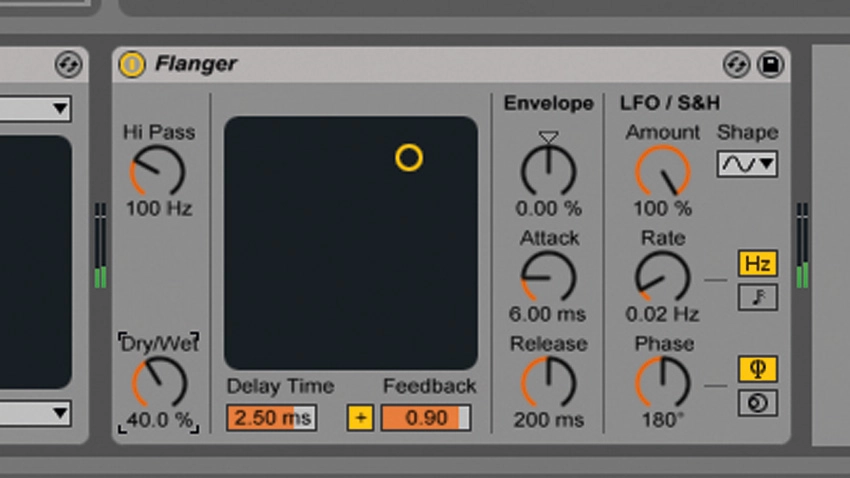
Step 8: Reverb can sound static and unrealistic without modulation, and this can either be added with the reverb's built-in modulation features, if it has them, or by using additional modulation plugins to apply movement 'manually'. Load Live's Flanger plugin after the reverb on the return, and set it to a slow 0.02Hz Rate and a 40% Dry/Wet amount.
Riff with flanged reverb

Step 9: To finish, add a new audio track and copy the square riff clip onto it. We can now A/B between the processed synth and our original starting point to hear the impact of our processing; note how our processes have maintained the riff's original flavour, tone and dynamics while making it sound more 'natural' and organic in the mix.
Dry riff
Processed riff
For more on old-school sampling techniques and humanising your mixes, grab issue 224 of Computer Music, which is on sale now. Includes FREE VST/AU bass amp plugin, Arabian Nights sample pack and more!
