Bass alternatives: how to create bass sounds without using a synth or a bass guitar
Bass doesn’t have to be… well, bass! Pretty much any sound can be pressed into low-end service, including vocals, percussion and found sound
Want all the hottest music and gear news, reviews, deals, features and more, direct to your inbox? Sign up here.
You are now subscribed
Your newsletter sign-up was successful
One of the defining characteristics of modern music is that it has thicker, richer, fatter bass than anything that has gone before.
It’s fair to assume that we, as a species, have always appreciated low frequencies in our tunes, but it’s only in the last couple of decades that we’ve been able to reproduce the kind of ultra-low rumbling depth that used to be reserved for earthquakes and other acts of God.
Dance music, in particular, is driven by its bottom end to such an extent that you can get a dancefloor rocking with nothing more than a basic beat and a massive single-note bass. Some of the most recognisable basslines – Michael Jackson’s Billie Jean, for example – are the driving force behind the track, and often the most instantly recognisable part of it.
Article continues belowBut with so much synth power at our fingertips, is there still room for creativity or has it all become too comfortable and formulaic? Well, in fact, thanks to the incredible power of today’s software samplers and effects plugins, we can now easily capture any sound we like from the ‘non-musical’ world, and pitch and shape it into a musically viable tone.
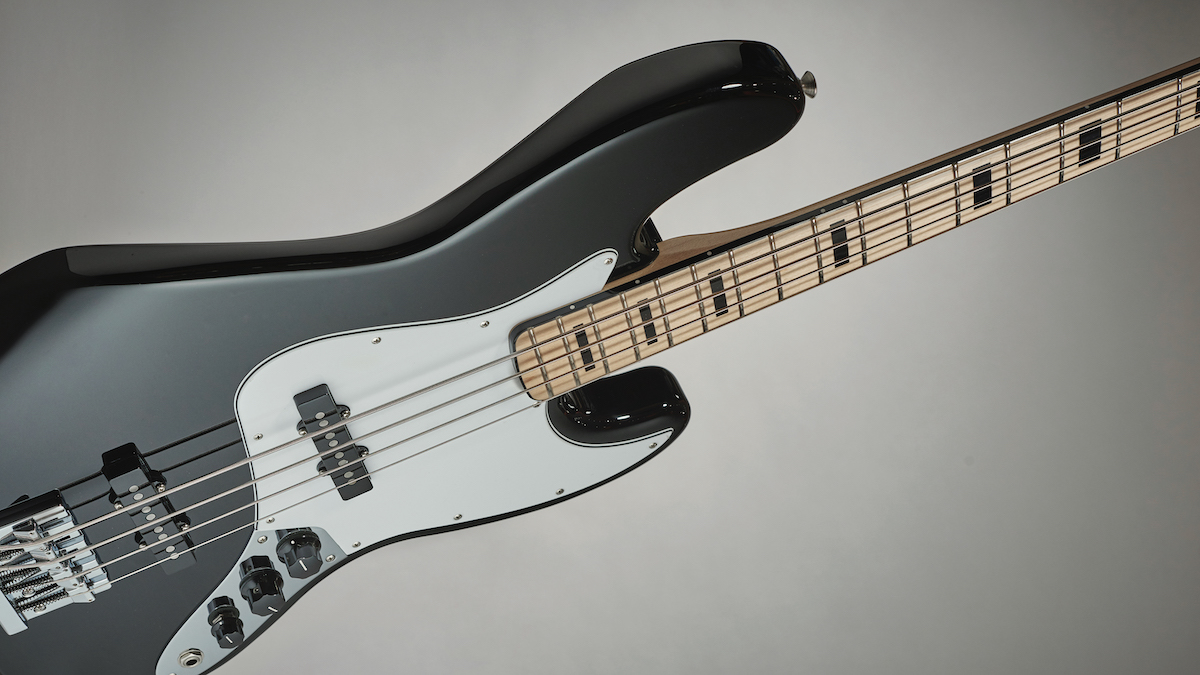
Whether pitching down voices, beefing up beatboxing or recording the sounds of household items, we now have everything we need to be able to turn these sounds into solid bass elements – or, at the very least, to be a rich, sub-sonic part of a modern, digitally produced track.
Over the course of this article, we’re going to build a solid bass-driven groove without an actual bass patch in sight, combining percussion, pads, pianos, everyday household items and just a smidgeon of sub-bass. We should point out that when using any of these kinds of techniques, it’s a good idea to do so right at the start of a project.
Finding an out-there, mangled non-bass bass riff that fits perfectly with an existing track is likely to be a mission in futility. Consequently, such strong and noticeable basslines are, we believe, best handled at the same time as your drums – right at the start – to form a foundation on which to build the rest of the track.
Want all the hottest music and gear news, reviews, deals, features and more, direct to your inbox? Sign up here.
We use Ableton Live in our examples but the principles apply to any DAW.
Somebody say 'bass'
Ever since the advent of the affordable sampler, people have been recording the sound of their own voice and playing musical riffs with it. In fact, we’re willing to bet that after shelling out for a Fairlight CMI (the first sampler, costing around £20,000 in 1979), even the likes of early adopters Herbie Hancock and Stevie Wonder weren’t shy about burping into the mic and playing the result up and down the keyboard.
Fast forward to the mid-80s and early rap hit (Nothing Serious) Just Buggin’ by Whistle took a single syllable of a sampled vocal and played a riff with it, achieving UK chart success in the process. Other global hits doing the same thing included Yello’s Oh Yeah, and while that one actually features a separate bassline in some sections, much of the track consists of nothing but drums and the deep, rich artificial baritone of a sampled vocal.
These days we have much more advanced processing at our disposal and we can add artificially generated sub-harmonics to any sound, including making full-on sub-rattling sampled vocal riffs that can serve as basslines in their own right. But there’s no reason why any of the sounds discussed here have to be the only bass element in your track.
As Yello’s seminal hit proved, sometimes non-bass bass parts are at their best when used for just a few sections of a track while the rest is underpinned by a conventional bassline. The key is to make sure that when you don’t have any other bassline playing, your other elements can stand up alone without a gaping hole in the low end.
Another option is to reinforce your bottom end with a deep, sub-heavy kick or simple sub-bass part, while placing your pitched-down sampled vocal in the essential bass range between sub-bass (60Hz or lower) and low-mids (250-500Hz). In such cases, it’s usually best to cut everything out of the part below 60Hz to leave space for the sub to breathe cleanly.
Whichever approach you choose, though, make sure that what you have sounds awesome. Let’s have a look at how to create, edit and tune vocal samples that work well as basslines.
Download tutorial files (60MB)
Turning a vocal into a bassline
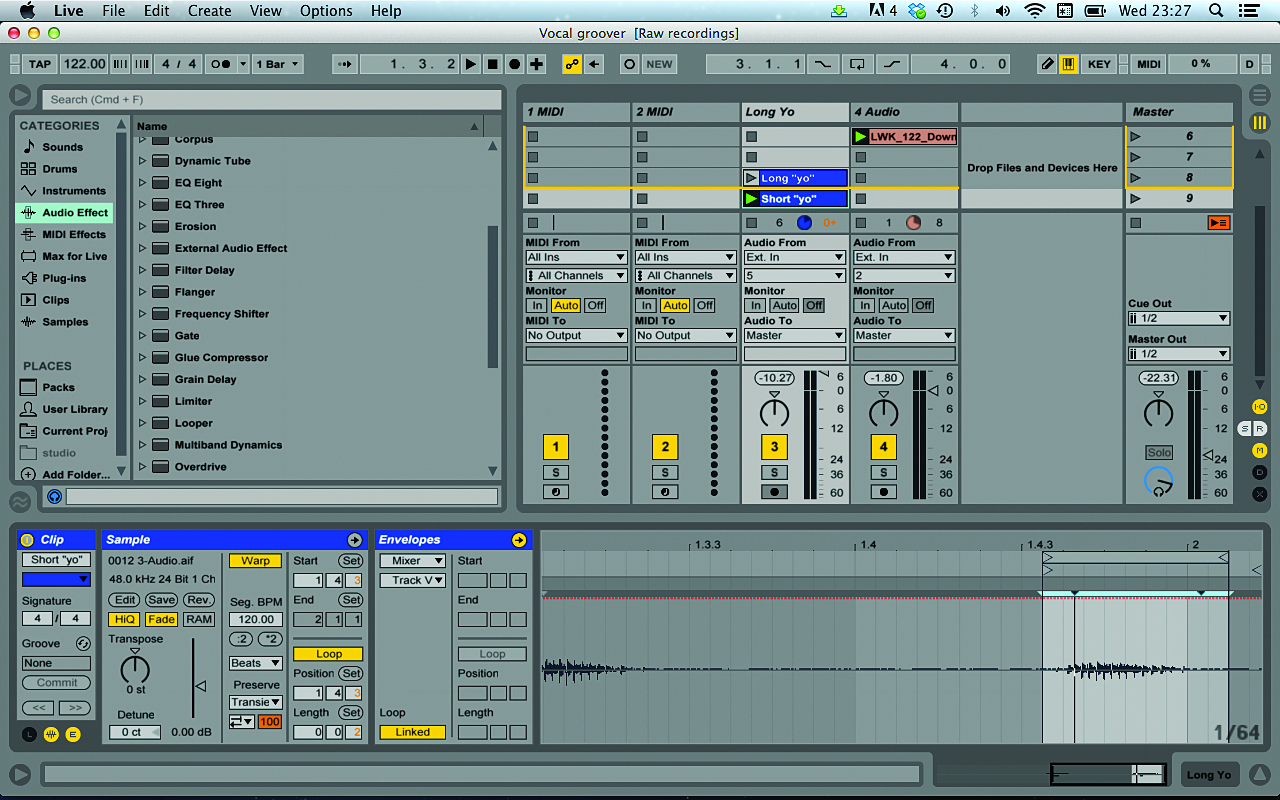
Step 1: We start by recording a few spoken words, as low as we comfortably can, and keep them short and punchy – stick to single syllables – so that they still sound tight when pitched down a little. We employ two versions of the word ‘Yo’, making one slightly longer than the other. We then load the shorter, punchier one into Ableton Live’s Sampler and add the loop LWK_122_Down_Full.wav from the tutorial files we've linked above.
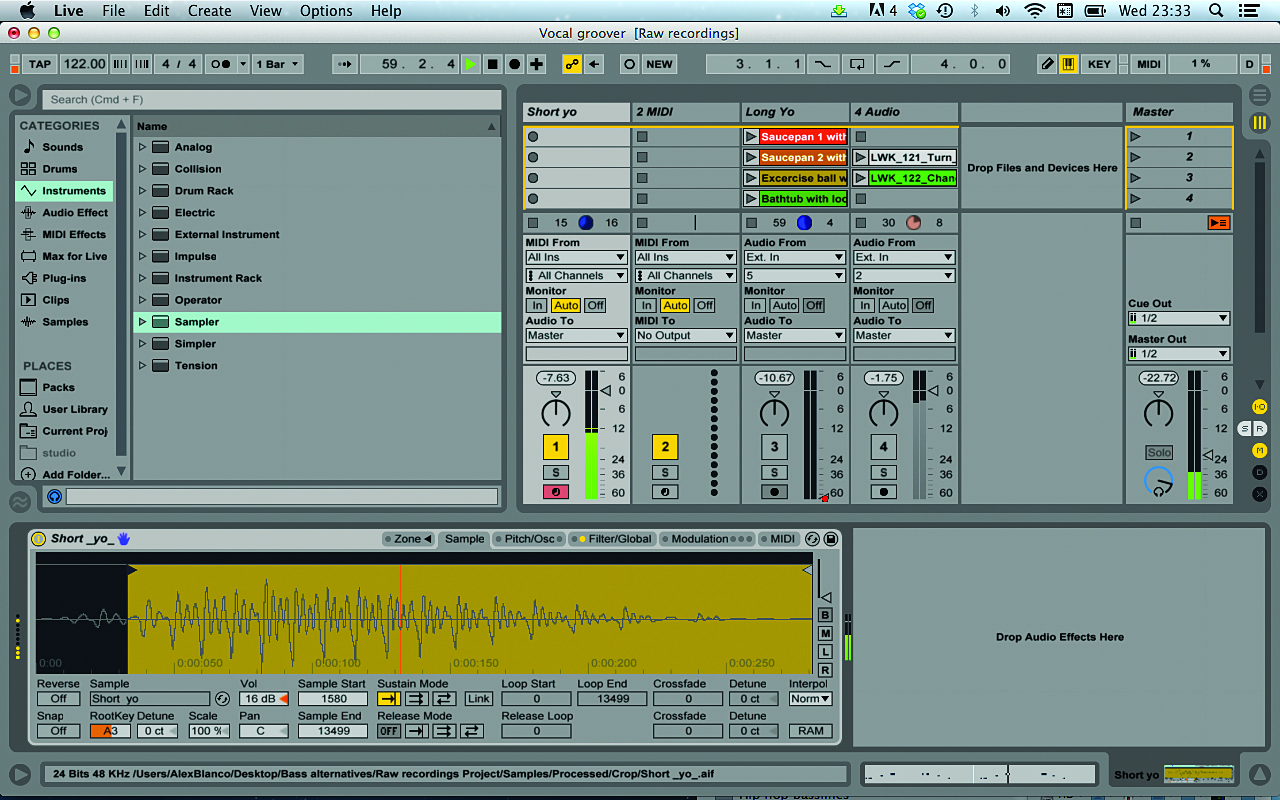
Step 2: Next we edit the start point to make sure we have a crisp, sharp attack, then play a simple riff. We tweak the tuning to taste – deep but not so deep that the sample starts to break up. It’s also important to keep the note lengths to something tight and punchy, and make sure the timing fits the drums nicely.
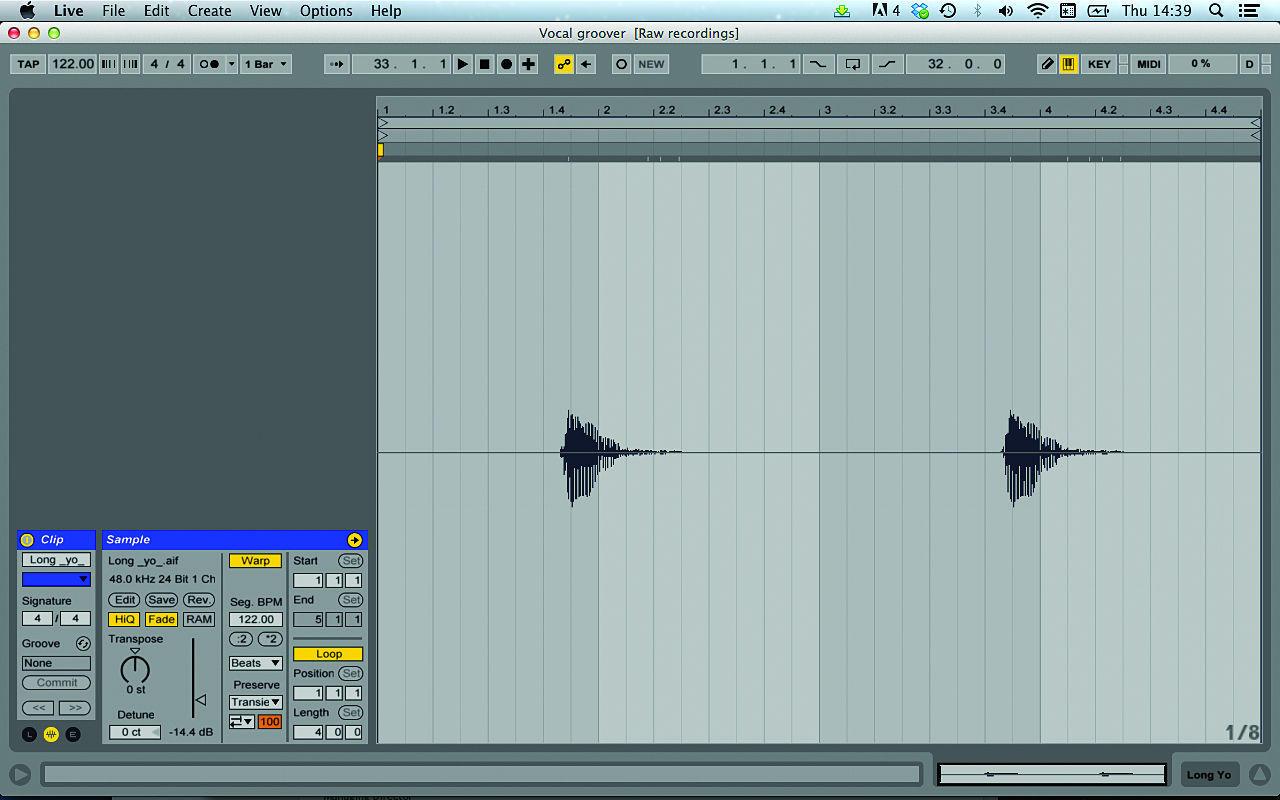
Step 3: Now we add the longer ‘Yo’ every other bar, filling a gap in the groove, and tune it to match the tuning of the main vocal riff. We now have a nice vocal riff comfortably occupying the lower mids and bass range. We add a limiter to it to lend further weight, so that when we turn up the volume we really feel some weight in the vocal.
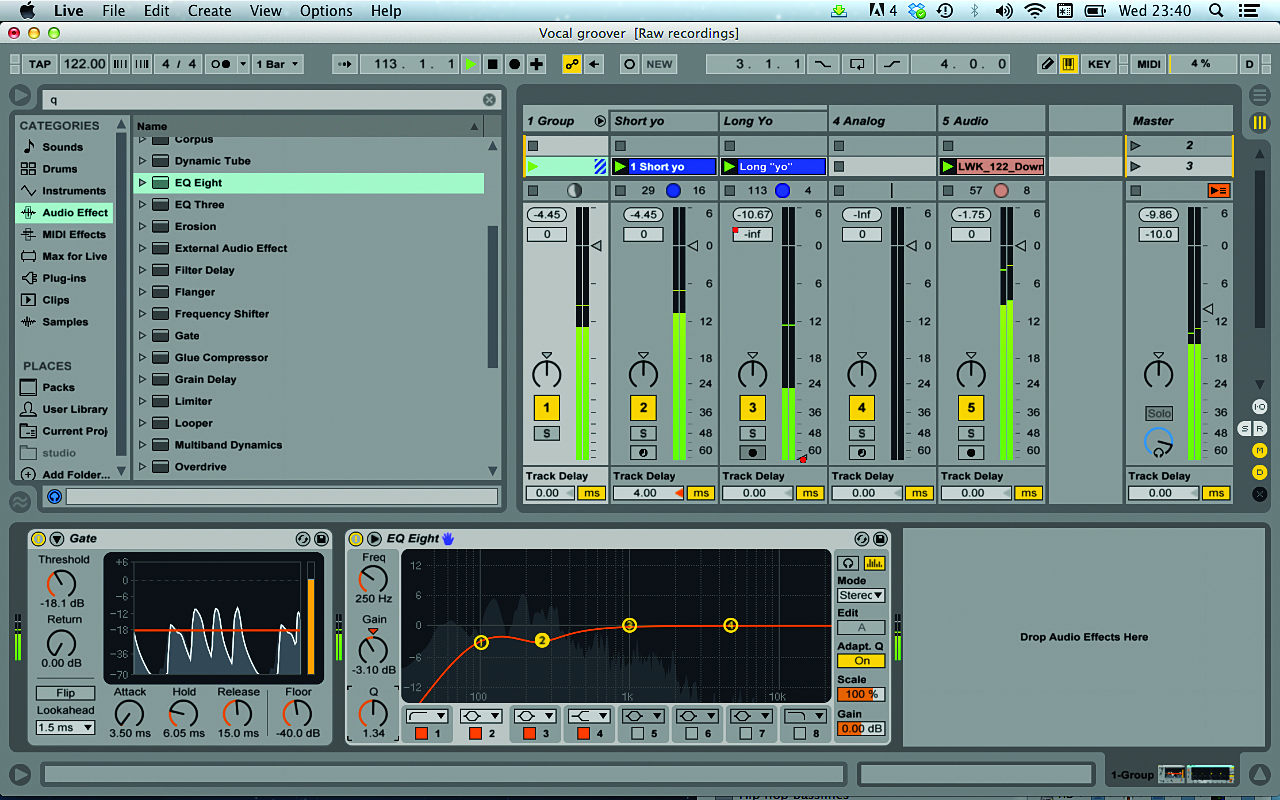
Step 4: We add a gate to tighten up the vocal further (keeping the envelope punchy), followed by an EQ to remove messy subs below around 90Hz. We also EQ out a little notch around the 250Hz area to tame those muddy, boxy frequencies. Finally we add some reverb to fill out the part, giving it a bit of size and space, followed by another gate to ensure that the reverb doesn’t loosen things.
Give us a sine
Before synthesisers came along, the only instruments capable of producing deep bass sounds were thick strings with a suitable resonating medium (cellos, double basses, washtub basses), large orchestral drums, and, in more recent years, amplified electric bass guitars.
With the invention of the synth, it became possible to reinforce less bass-heavy grooves and riffs with long sub-bass notes, or even layer in duplicate parts following the riff but playing a lower sub note. There are a few other things to keep in mind when layering subs with recorded samples – namely, tuning and group processing to pull the real-world bass sounds and the synthesised sub layers together.
It’s also worth noting that the same tricks can be employed with other synth parts, too. For example, many modern musical genres have all but ditched the conventional bassline in favour of big, brash gated lead pad riffs featuring a huge bottom end.
The beginners guide to sub-bass: how to program a basic sound
Producers (and ghost producers) of EDM, pop and hip-hop are using these kinds of sounds reinforced with a sub layer. Many synth patches actually mix in their own onboard sub-oscillator, but you can always reinforce the sound with another, separately processed sub-bass layer, applying much the same techniques as those we’re covering here.
Another advantage to having a separate sub layer becomes apparent when you reach the arrangement stage. Pure sub notes are often quite hard to even notice unless you’re a producer who’s listening for them or an exceptionally sharp-eared customer – a fact that can be used to great effect during breakdowns in club tracks.
Breakdowns can easily sound a little thin and empty in the bottom end, but featuring the sub layer of your bass riff turned down very low in the mix so that it can be felt (just) without really being heard can fill the gap out very nicely. You can also mute the upper bass layer at different points and just allow the sub layer to play.
Reinforcing our vocal bass with a sub layer
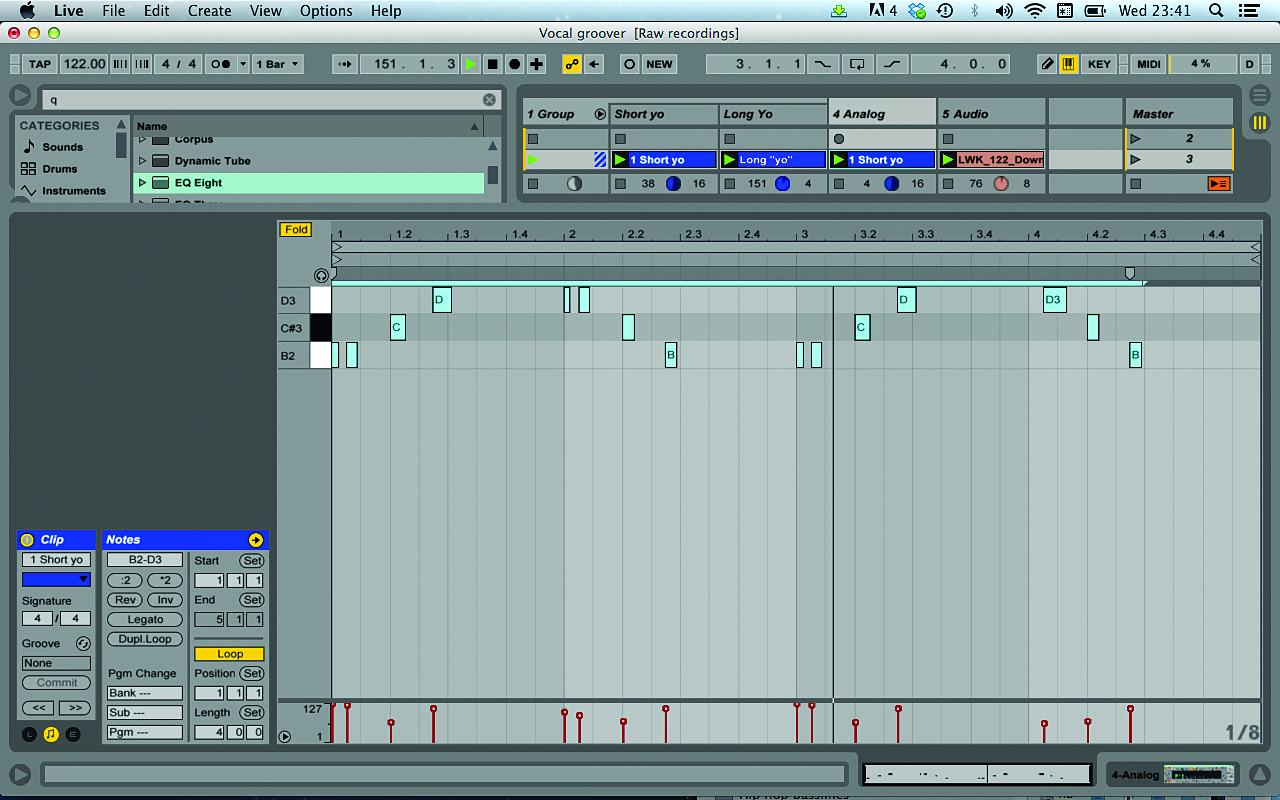
Step 1: Picking up where we left off in the last walkthrough we create a new MIDI track and add an Analog synth in Live. We just want a single sine wave to act as a reinforcing element underneath our Vox Bass, so that’s what we set up. We keep the tuning high to judge the notes, then copy over our Vox Bass MIDI part (the notes themselves will most likely be wrong but the intervals between them will be right).
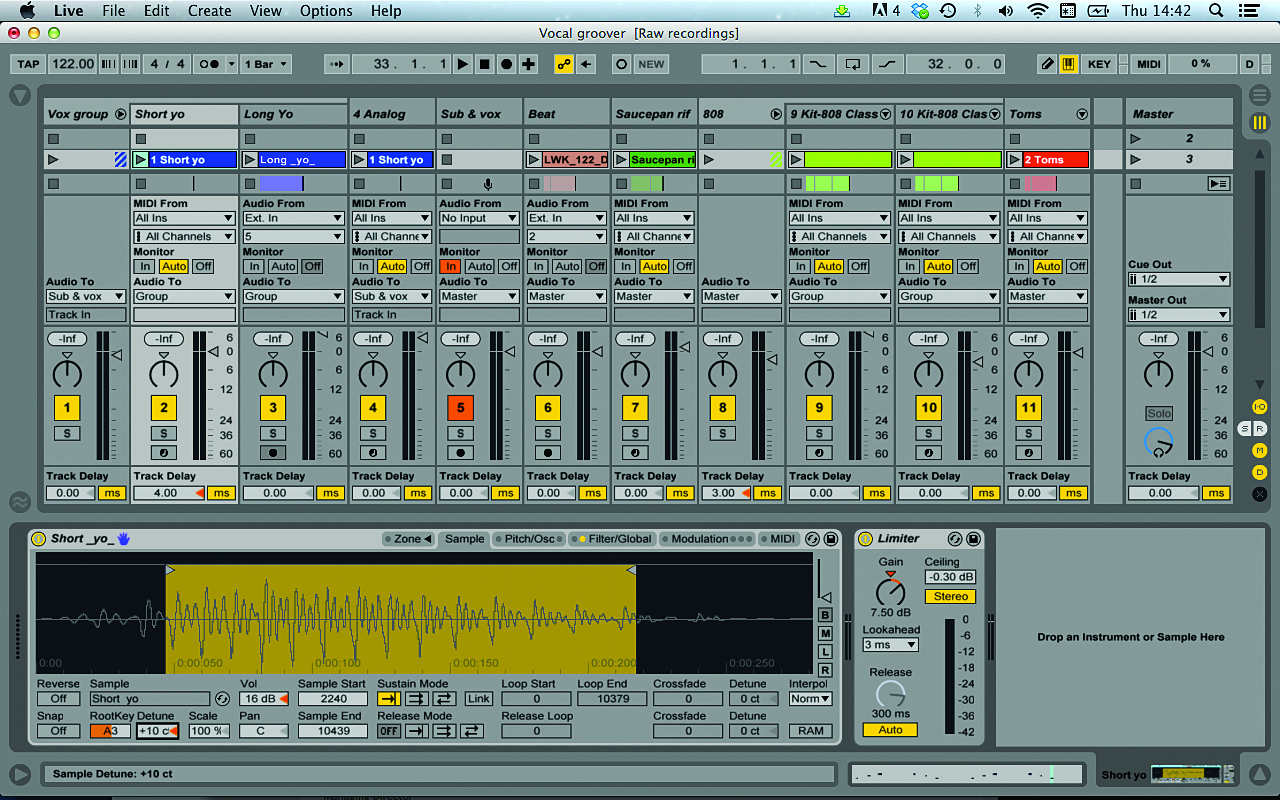
Step 2: We tune the notes so that they match the tuning of the vox riff. Now we can either tweak the fine-tuning of the sine bass or the sample. In general, it makes sense to tune the samples to match the synths, as the latter will be properly tuned to definite notes whereas samples – particularly those you’ve recorded yourself – often won’t be.
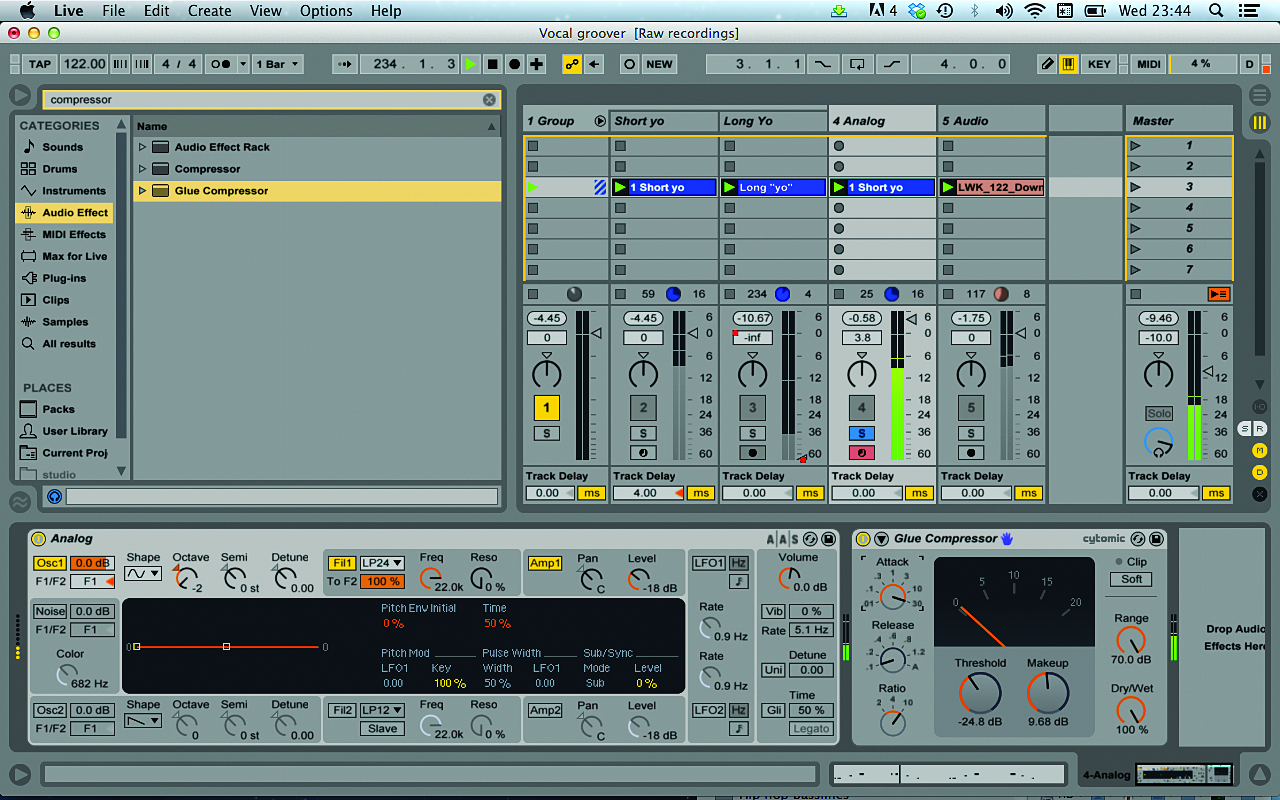
Step 3: It’s important that the sub layer is tightly compressed so that it matches our tight, clipped vocal riff, so we add a compressor, setting a long Attack and short Release to ensure punch. We also tweak the Release time to complement the release of the vocal sample. Too short and it’ll sound unnatural; too long and it’ll cause the whole vox/sub riff to feel loose.
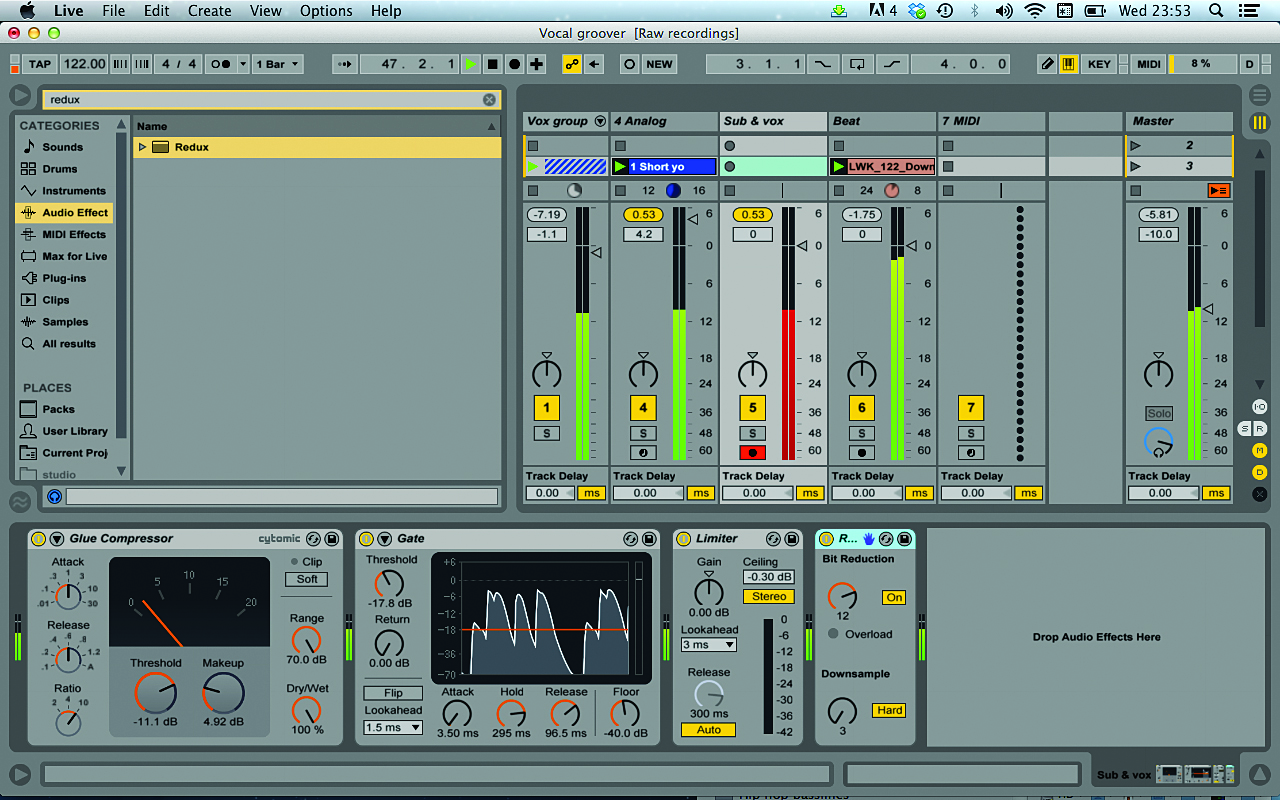
Step 4: The last step is to process the sub and vocal bass layers together to pull them into a tight whole. We route Vox Bass and Sub to a group channel and apply some gluing tube/tape emulation. Next comes compression and gating, making sure the envelopes of both layers are tightly matched. A limiter avoids clipping and, finally, a bitcrusher adds a little edge and further merges the sounds. (Audio: Yo bass sub-layer)
Rattle those pots and pans
Throughout the history of recorded music, an endless array of weird and wonderful objects has been employed in the quest for the perfect bassline. Some of them were chosen based on pure inventive spirit, but others came about through simple pragmatism.
The washtub/broomstick bass, for example, consisted of a piece of string, a metal tub and a broomstick, and was invented because many people didn’t have the money to buy a proper double bass. The result was a classic and characterful instrument. More modern examples include sounds like explosions, footsteps, beatboxing or wooden spoons on pots and pans – all potent sampler fodder in the right hands.
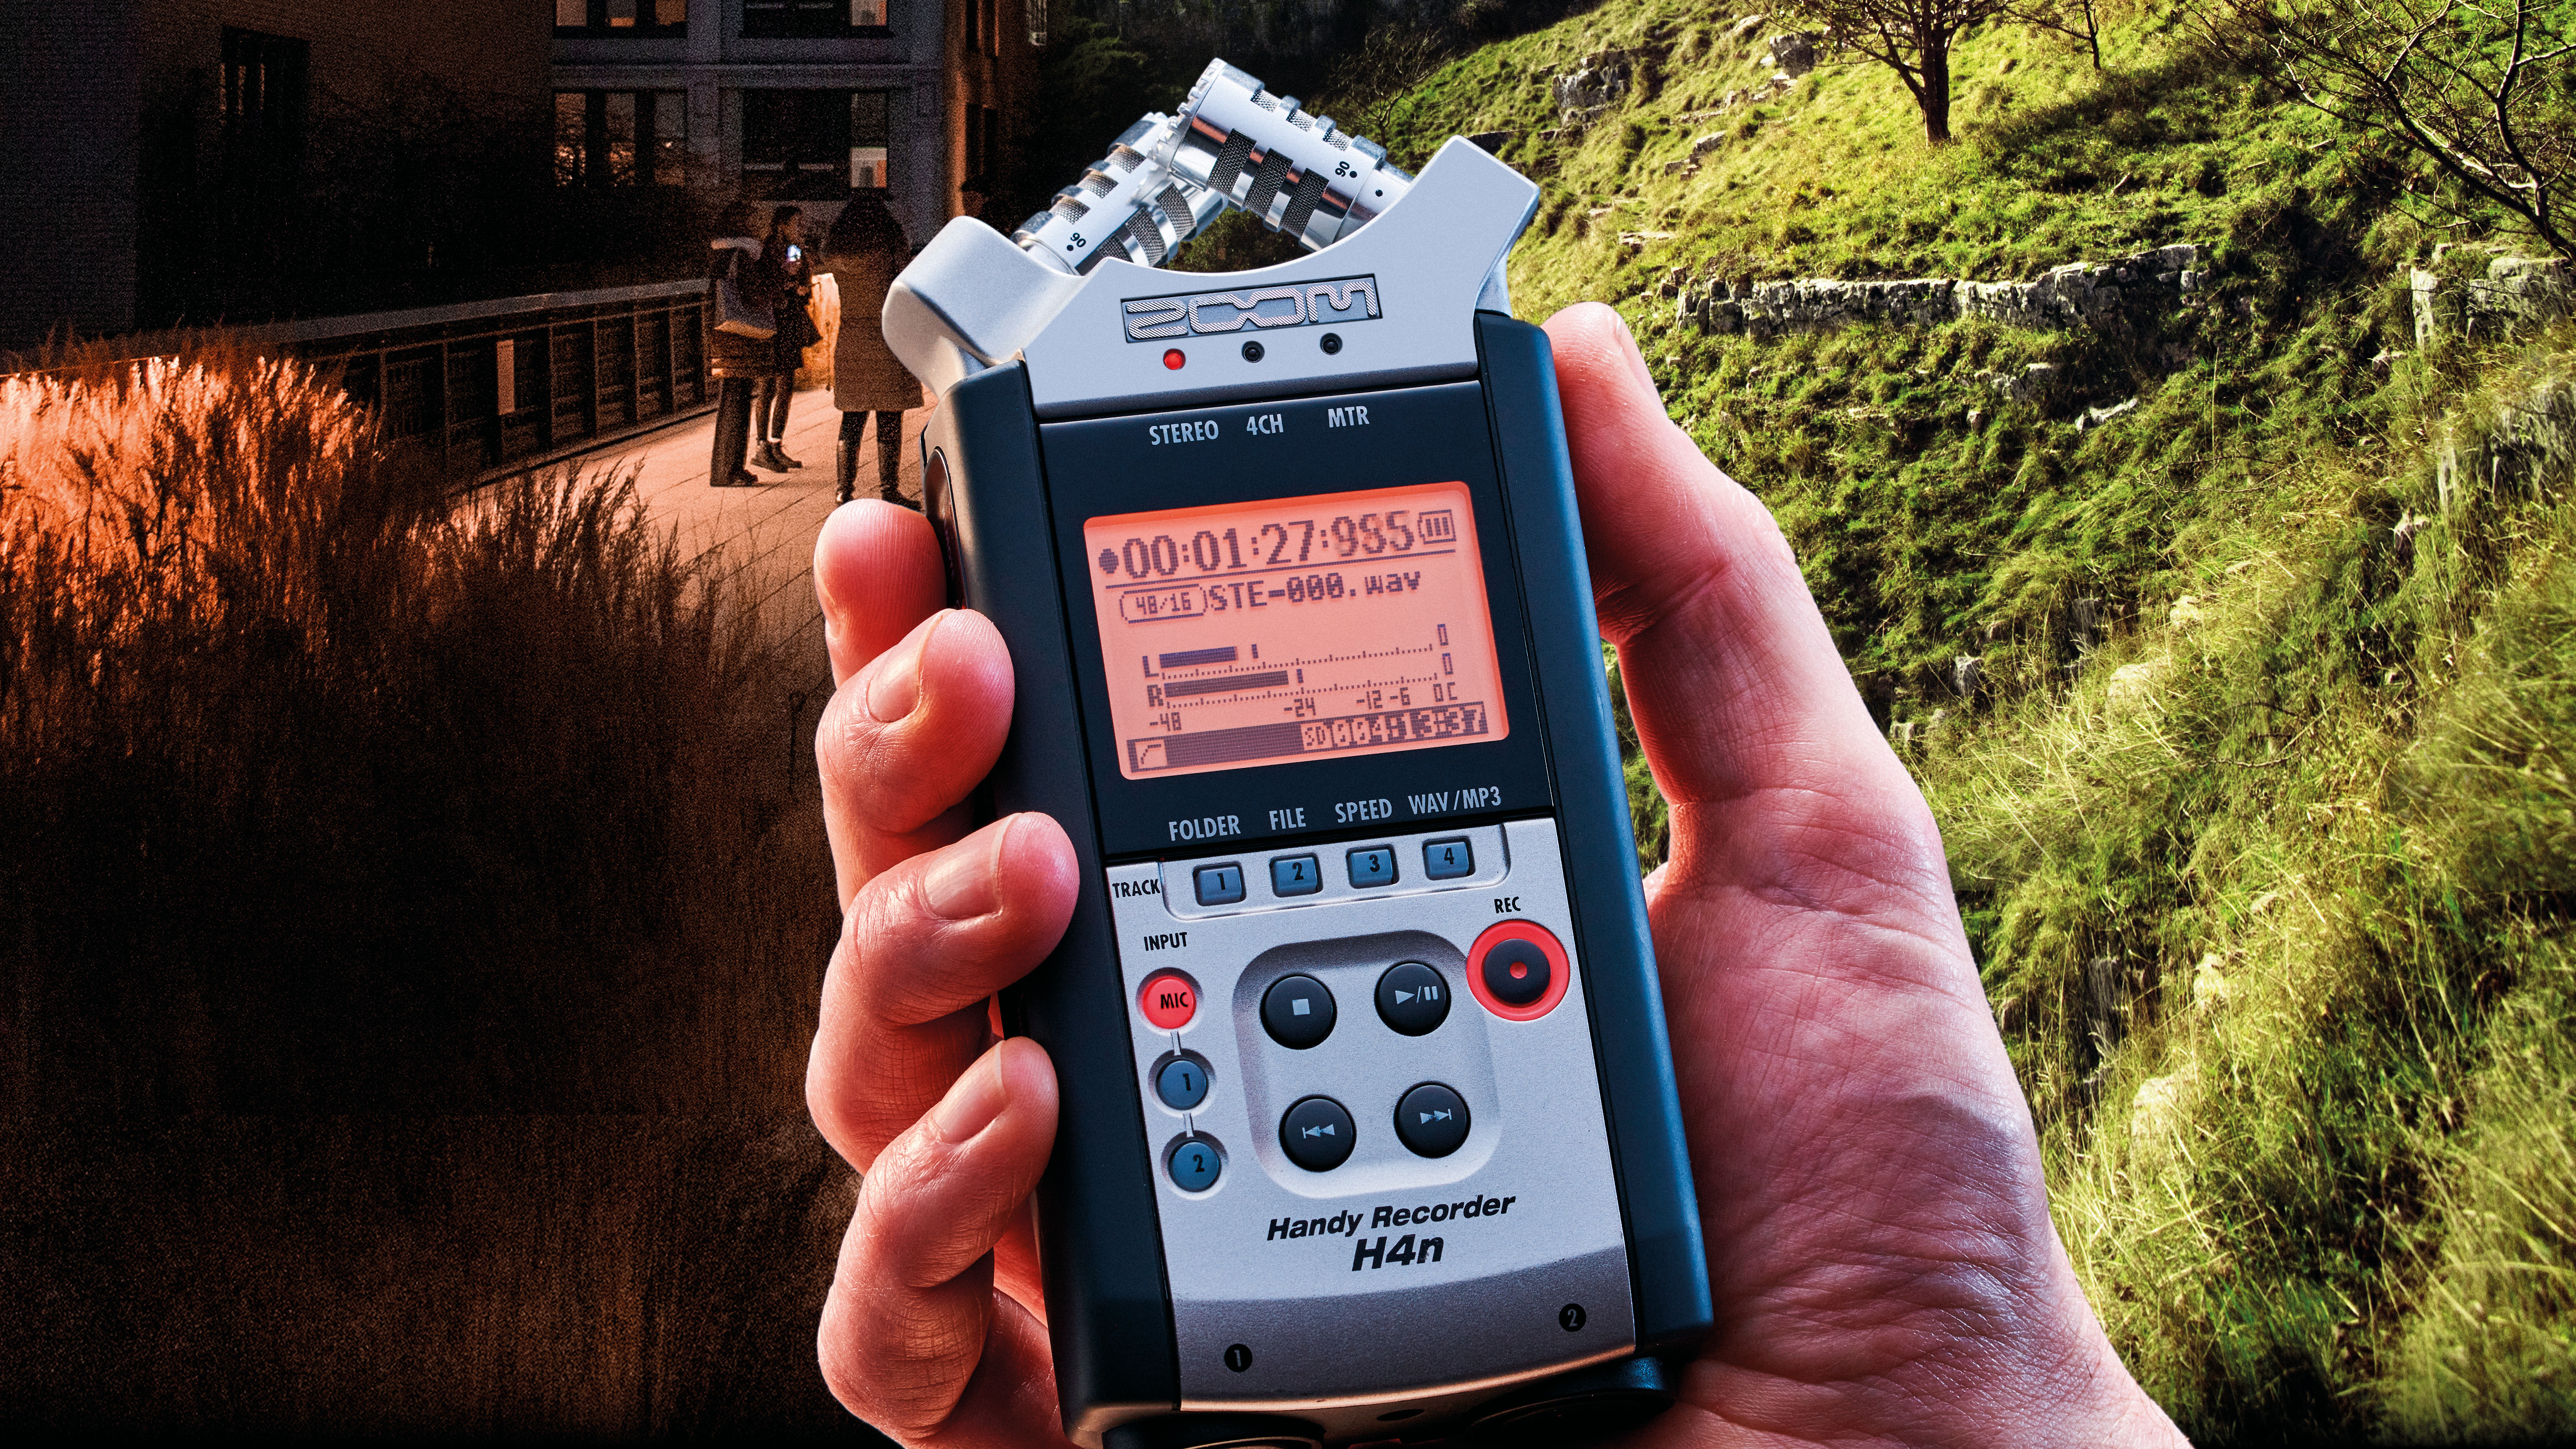
There are three main things to consider when trying to turn everyday (aka ‘found’) sounds into playable, bassy versions of themselves. First is the recording process itself. The type of microphone, the recording environment and the qualities of the sound itself are all important factors.
13 things to do with your 'found sounds' when you get them home
For example, strike too far from the mic and you’ll capture too much ambience, which will become very messy indeed when your samples are pitched down by any significant amount. If you’re sampling something being struck, it should be beaten with optimum speed and force, ensuring a good balance of attack phase and release reverberations when the sample is slowed down.
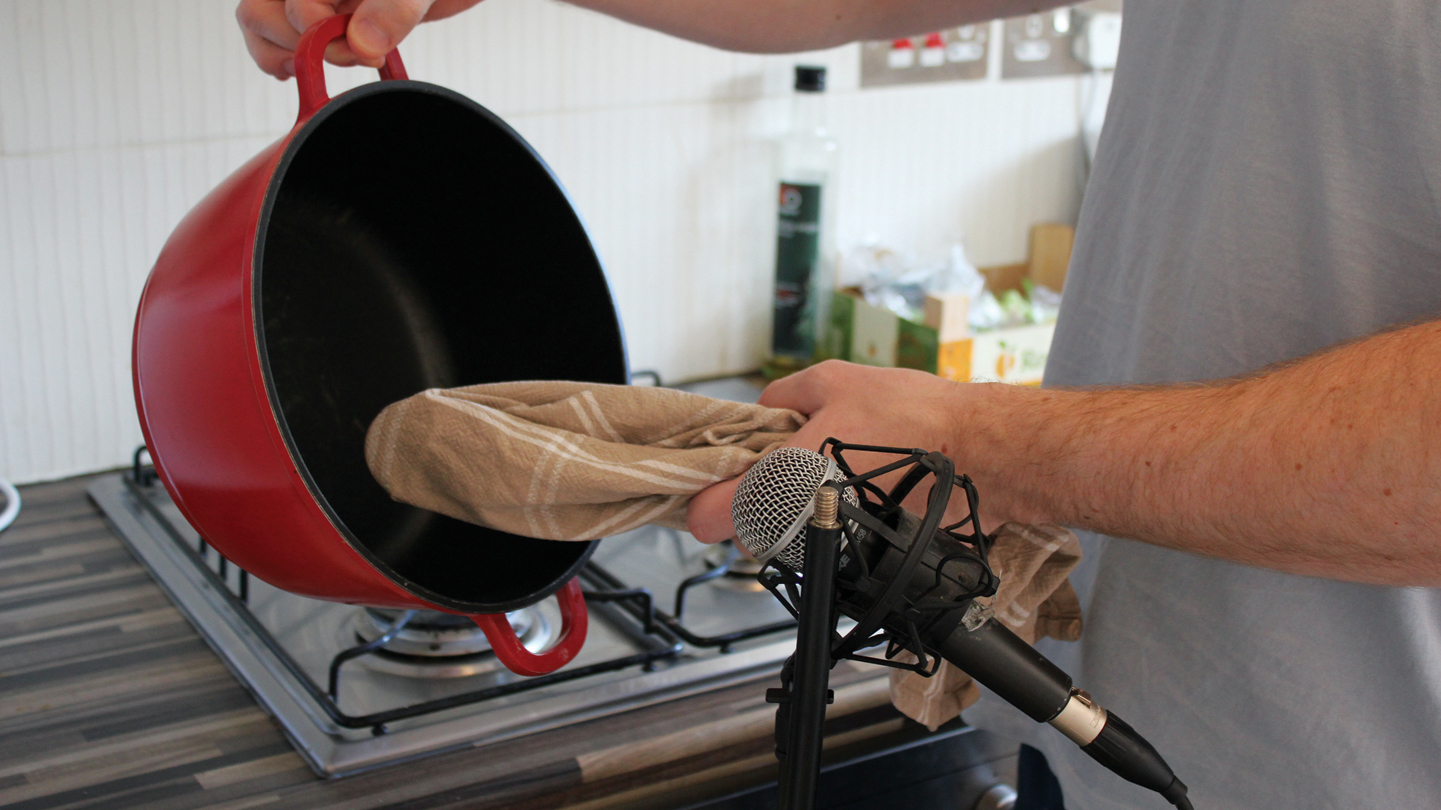
The decision to use a hand or a stick can be an important one, too. If you’re hitting a pillow, for example, the deepest, more bass-heavy sound will be achieved with an open palm; but on a pan or other such hollow, resonant drum substitute, a wooden spoon, perhaps wrapped in a tea-towel to soften the strike while keeping the attack, can work wonders.
The next thing to consider is the envelope of the sound. The best way to achieve bass sounds with found sound samples usually involves pitching them down, but this will always extend their length and soften their transients, making them less punchy and well-defined.
Finally, layering other, lower sounds or a sine wave under your found sounds can help to add more oomph to a given sample.
In the end, the most important thing is to have fun and, crucially, make sure the sound quality is up to scratch. Badly recorded sounds will always sound terrible in a musical context – particularly so-called ‘experimental’ ones. But get yourself a well-chosen, well-recorded and creatively played sound and it will imbue your track with tones and textures that you simply can’t achieve with synthesis, adding real character and depth to the final mix.
Found sound basslines
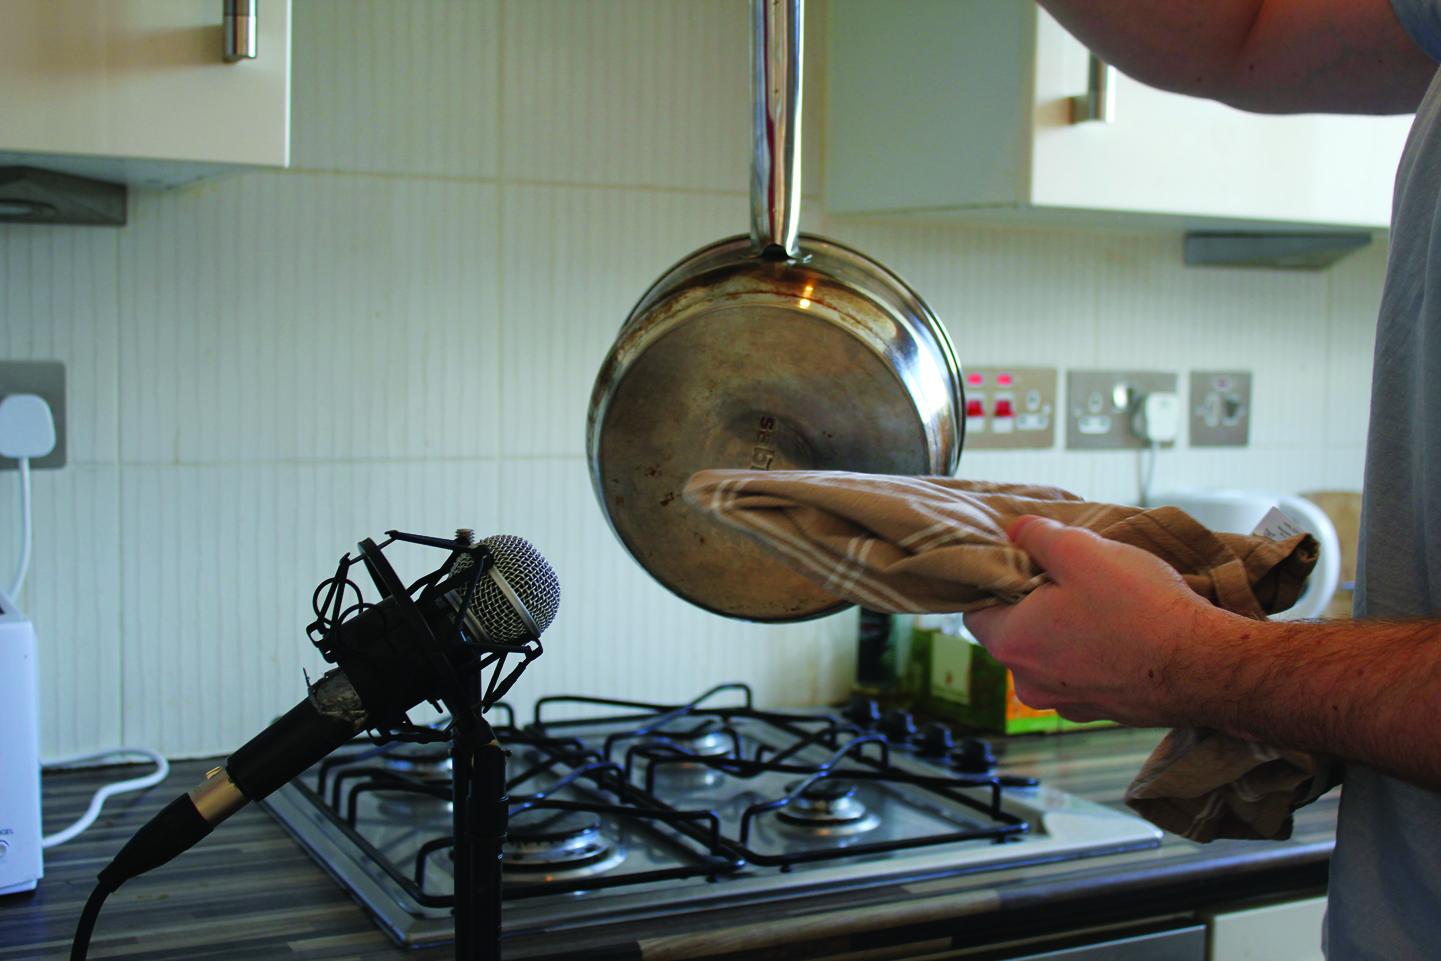
Step 1: We start by selecting a decent microphone that can handle high sound pressure levels. There are plenty of drum mics out there, but as top quality isn’t a priority we select our trusty Shure SM58 dynamic stage mic and send it to an input in our DAW. We locate ourselves in the kitchen for no other reason than that we have a good supply of things to hit and other things to hit them with there.
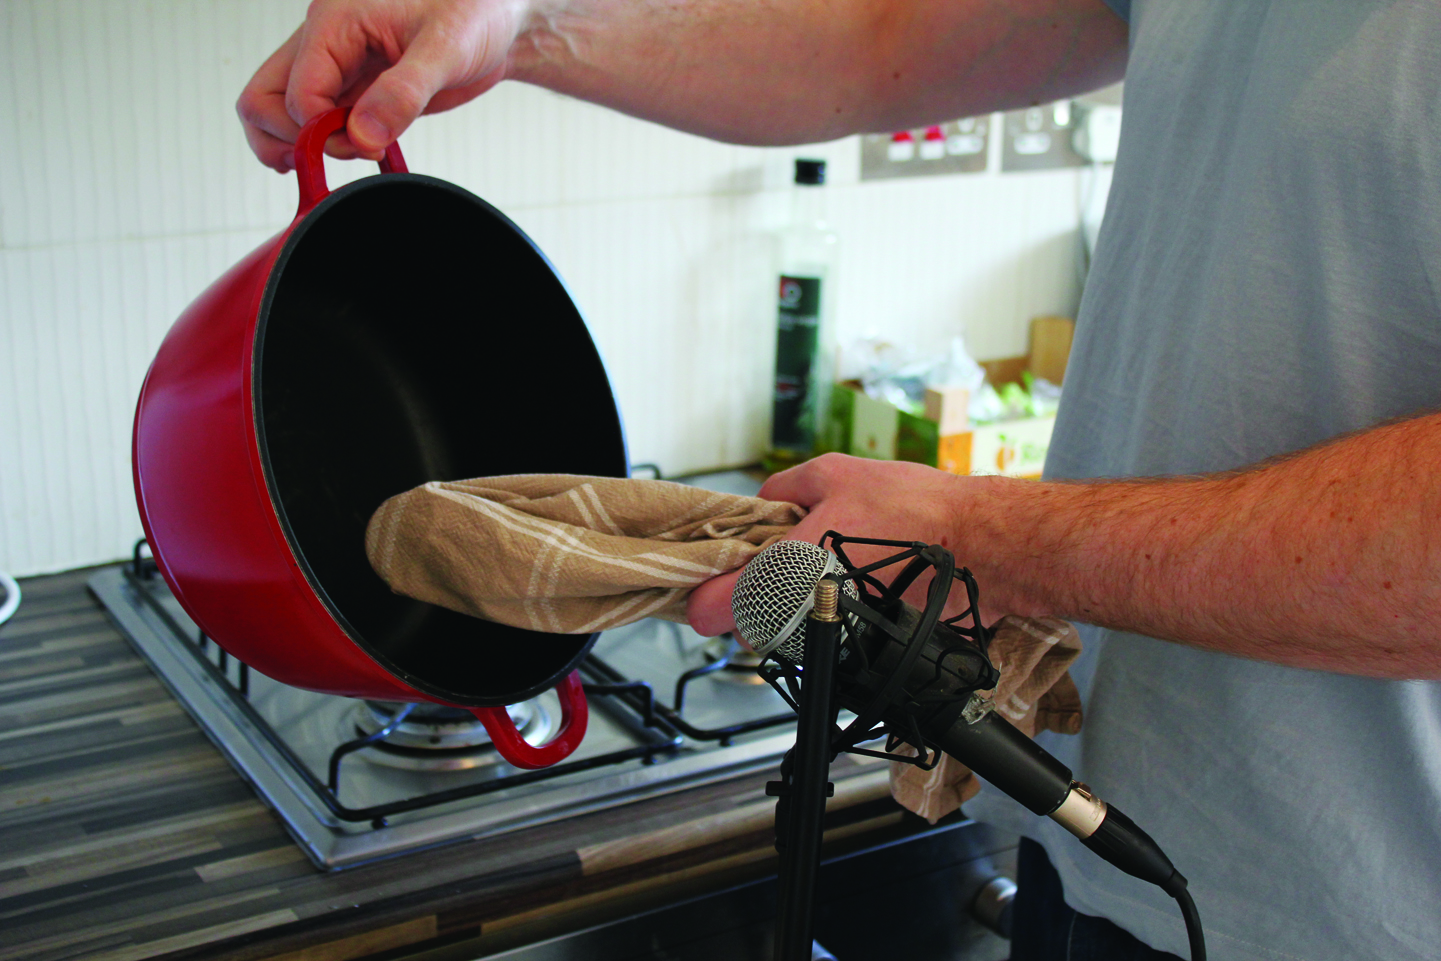
Step 2: We select a wooden spoon and two medium-sized saucepans, and wrap a tea towel tightly around the spoon to ensure that the strike isn’t too harsh but still hard enough to elicit a good strong attack and reverberations. Then we engage record and start hitting the pans. We’re going for clean, reverberating textures, so we strike them in various places (see the Raw Files folder).
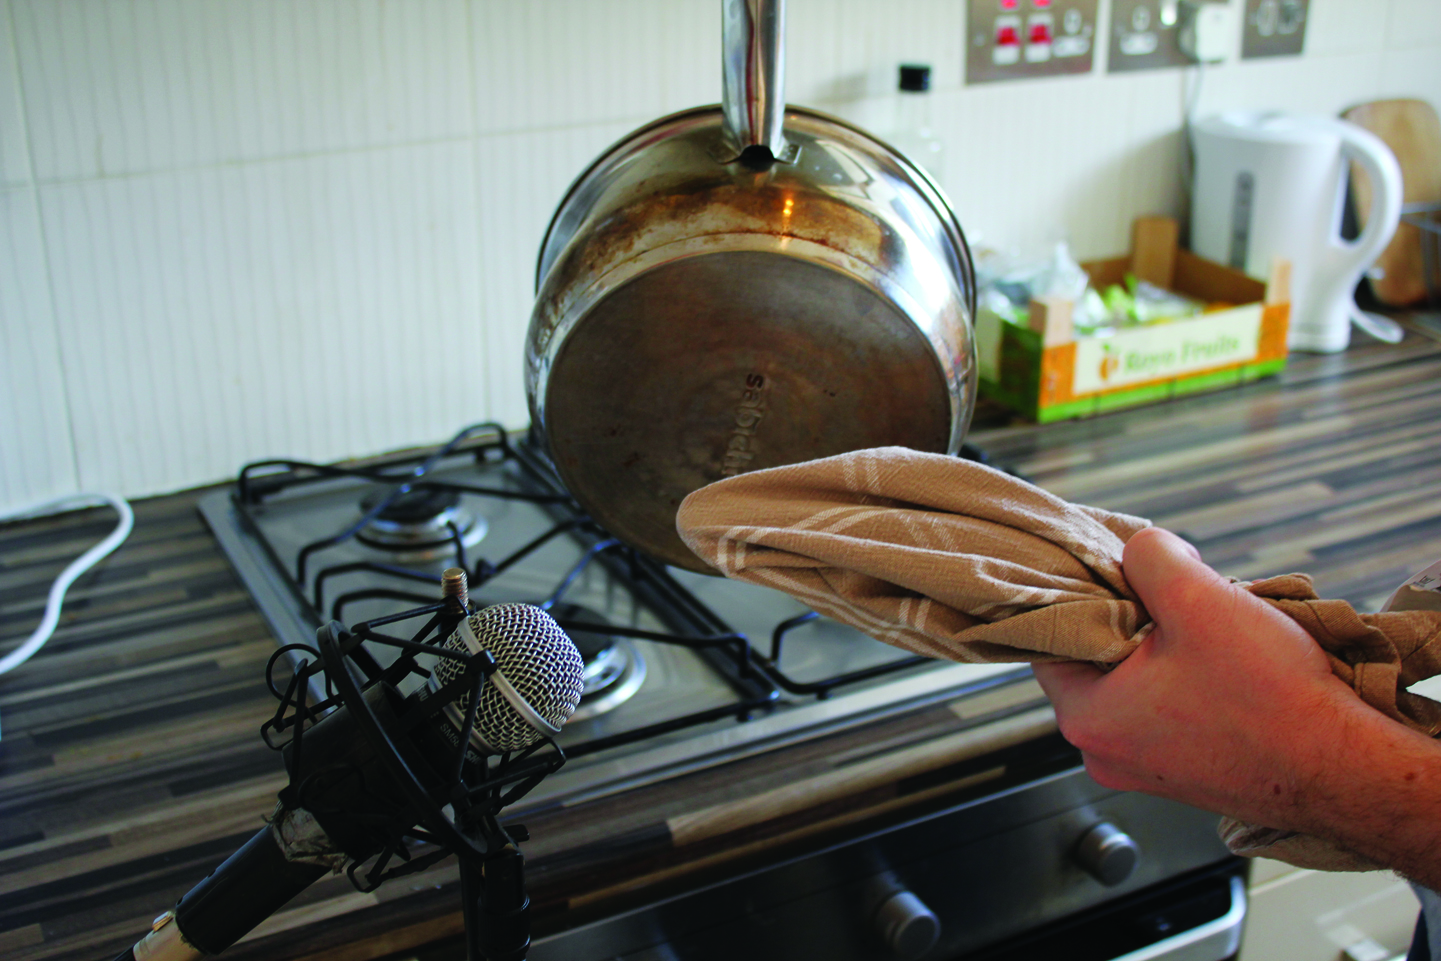
Step 3: For each of the two pans, we record about 10-20 seconds of strikes. You’ll notice that how and where you hold the saucepan will affect the amount of reverberation. For maximum note lengths, try medium-strength hits in a tapping motion with the pan dangled loosely from two fingers (holding the handle). Note: it’s important to start a new recording for each object.
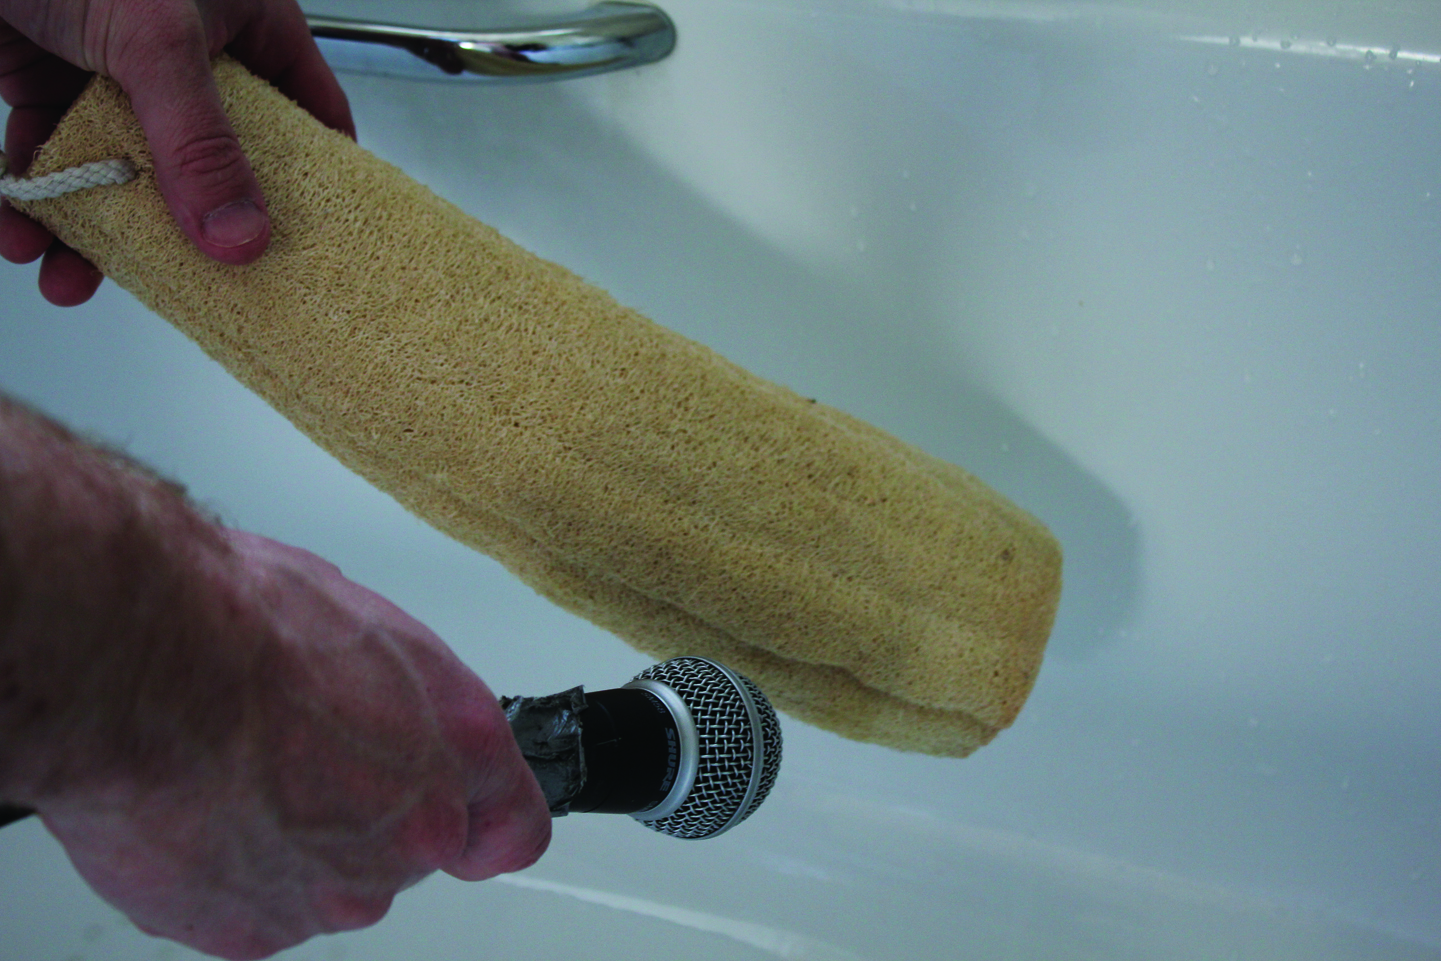
Step 4: Next, we relocate to the bathroom and start bashing various things with a large bath loofah (dry, naturally). We try the bathtub, the towel radiator and the window. It’s always worth experimenting, as you simply won’t know what works until you slow it down. Finally, for good measure, we retrieve our wooden spoon and spank a medium-sized inflatable gym ball (see the Raw Files folder).
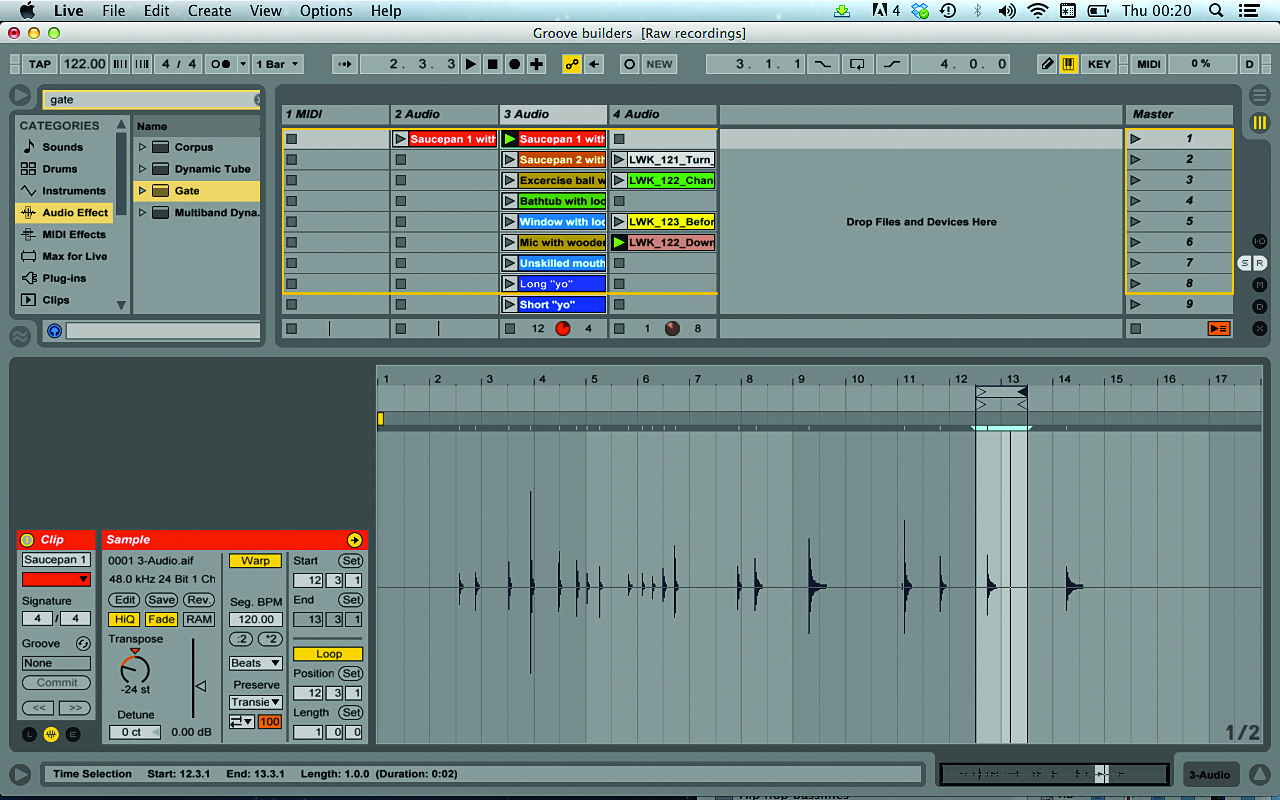
Step 5: With all our recordings in place, we use Live’s Transpose to tune the recordings down until we find the optimum tone for each (this is why it helps to have them in separate recordings). Now we select our favourite strikes and note their ideal pitch settings. Some don’t sound that good, so we simply discard them (this kind of procedure is all about trial and error).
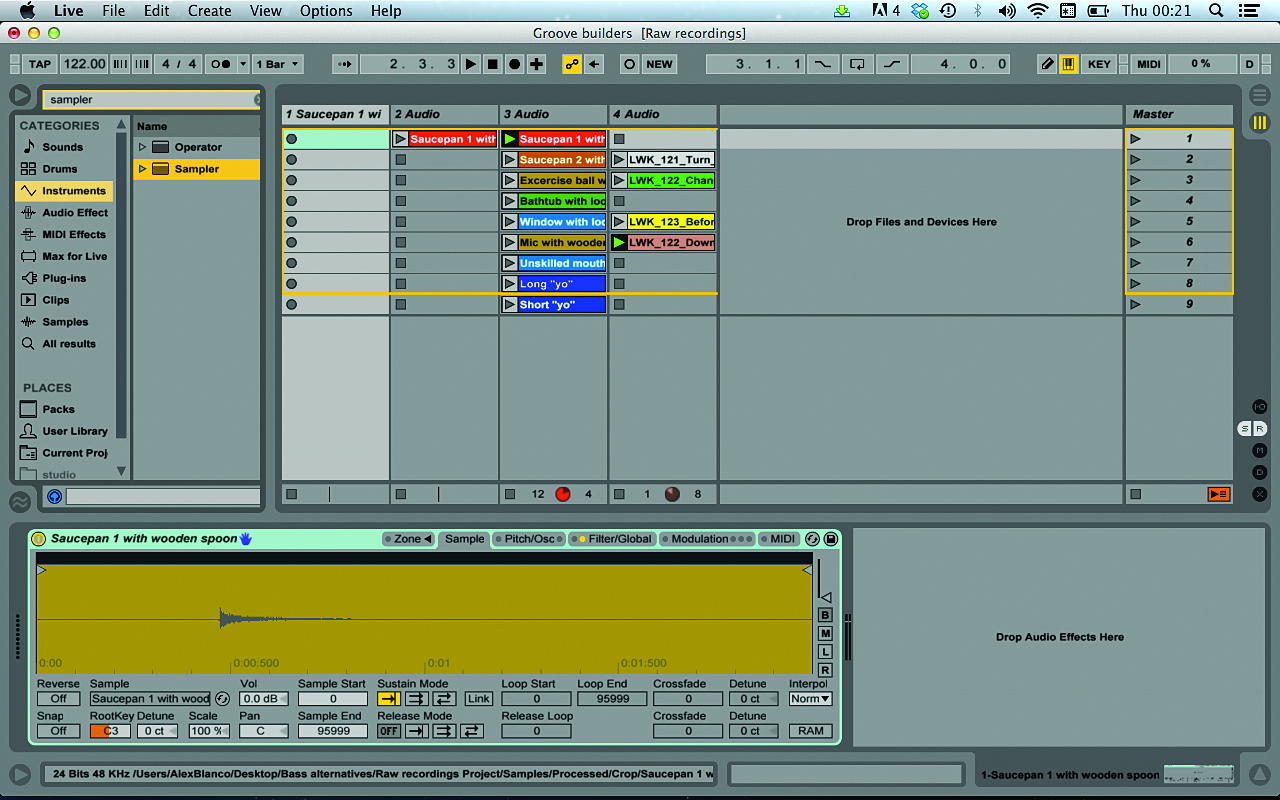
Step 6: Live’s clip pitch control, as good as it is, can sometimes damage the sound quality, but it doesn’t alter the timing and envelopes. We now load our chosen samples into a sampler and tune them there. This potentially alters their length and envelope, so with our optimum tuning set for each sample, we might decide to re-bounce these audio files with the tuning – although in this case, we don’t.
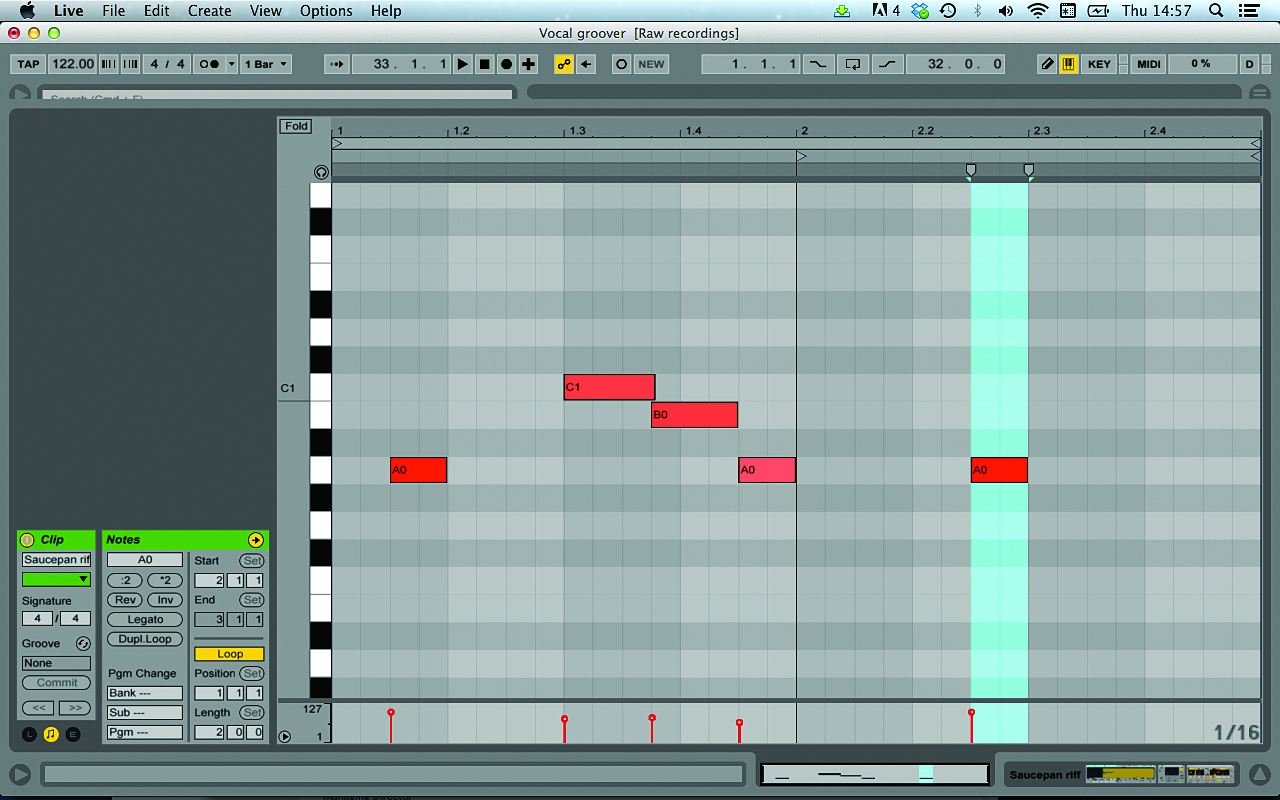
Step 7: Time to play some bass with our chosen samples. Our original bass riff leaves plenty of space, so we can just play some riffs into our existing project. Using a single sampled sound, you won’t be able to play a riff up or down by more than a few semitones before it loses quality and weight, so try to keep things within that range.
Step 8: After experimenting with a few riffs, we select our favourite. Depending on the range of your riff, the sound quality/envelope could start to break down as it reaches the top or bottom of the note range. If that’s the case, you can go back to your original sample and tune it closer to the difficult notes, or create a multisample patch.
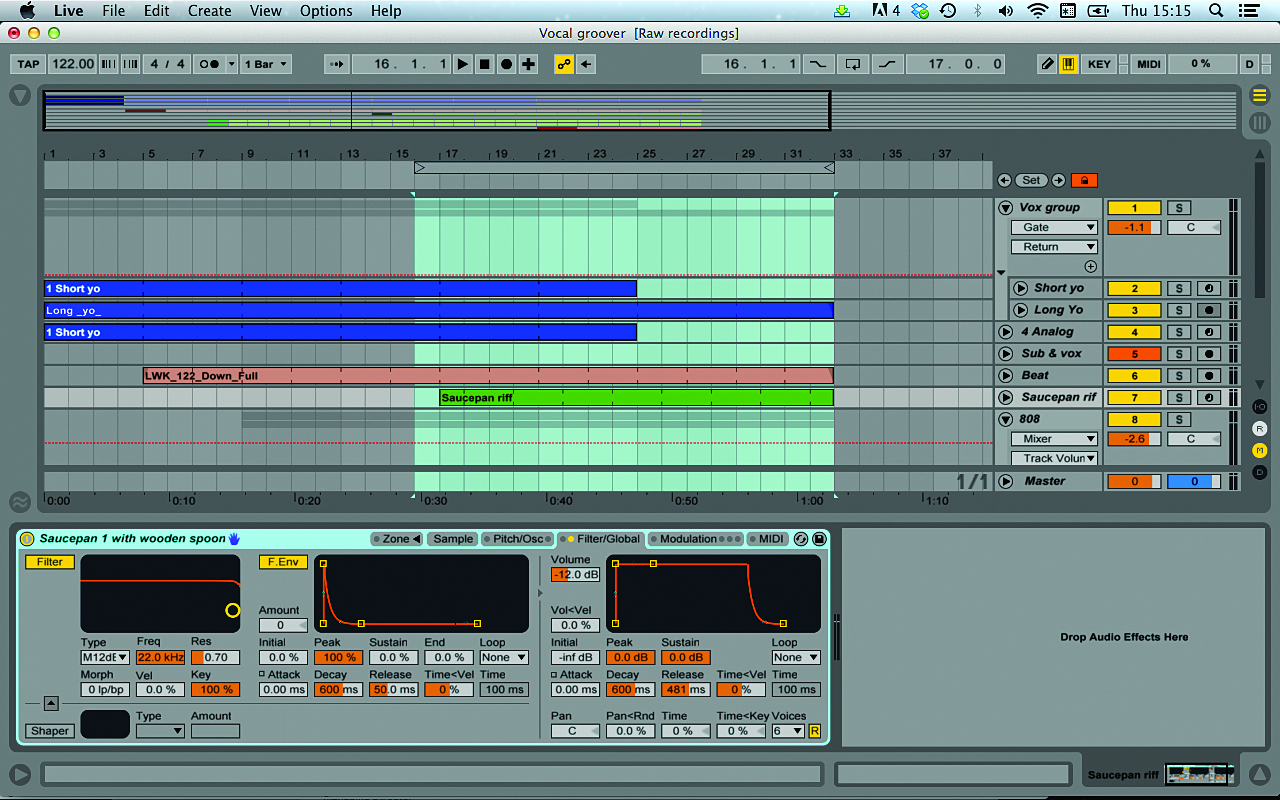
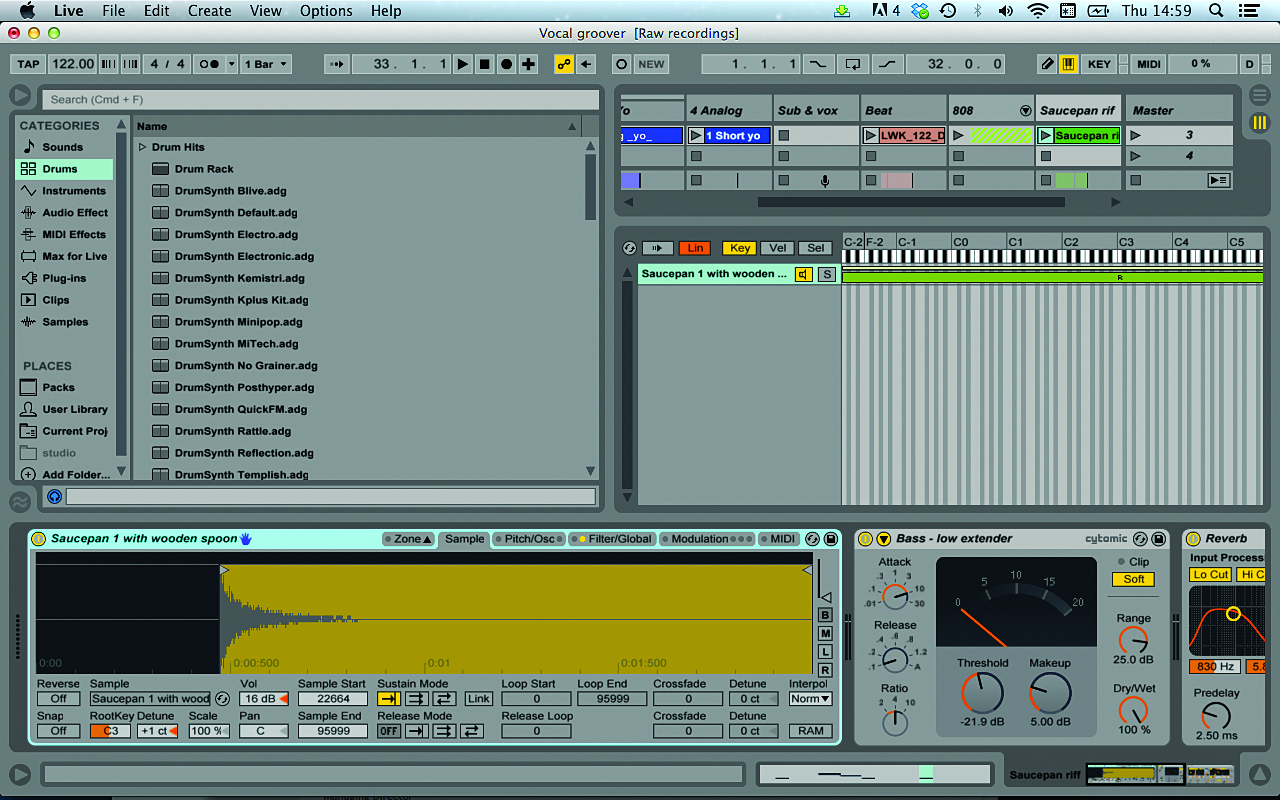
Step 9: With our riff working well, it’s time to add some final tweaks. You may need to tweak the envelope Decay and Sustain a little to maximise punch, and the Release to keep things tight. As we’ve mentioned, sampled notes will increase and decrease in length, making things sound a little loose, so we pull in the Release and tweak the MIDI note lengths.
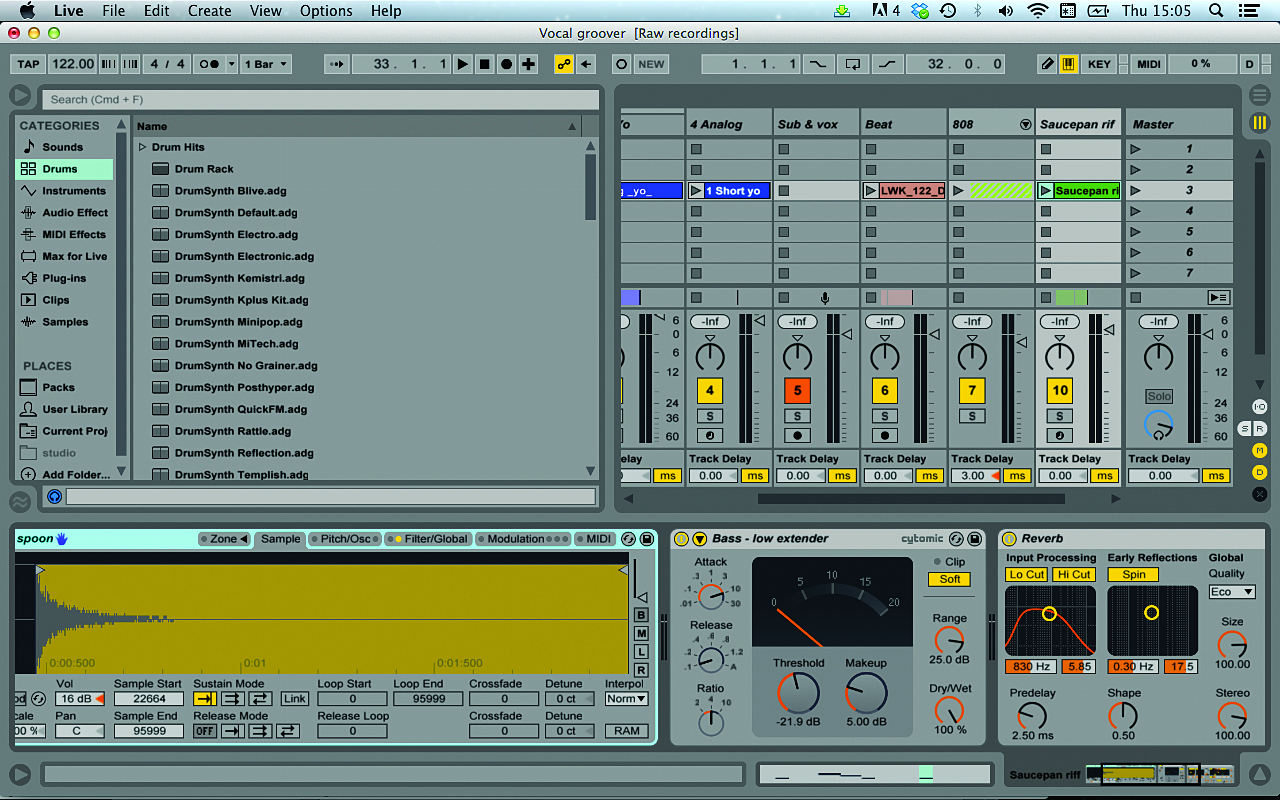
Step 10: The final touch is the application of compression and reverb. We want a fairly long Attack and short Release to make the hits sufficiently punchy. For the reverb (applied as an insert), we keep things fairly dry, so as not to swamp the mix. For the same reason, we apply a low-cut filter to the reverb signal – rolling off the top end ensures that the hits stay defined. (Audio: Pot riff)
Tom tom club
Ever since the early days of electronic music, many tracks have dispensed with proper basslines altogether. After all, bass exists largely to give sonic weight and groove, so bass elements don’t actually have to make a significant musical contribution – at least, not in a conventional melodic way. For that reason, tom toms, both real and electronic, can make an excellent bass substitute. Classic house number Break 4 Love, for example, relies entirely on big, rich, super-tight toms to provide the low end for much of the track.
This type of percussive bass part usually works best if used as a starting point. Toms (as with all drums) should almost always be tuned, but however perfectly pitched they are, it can be quite hard to get them to fit an existing riff or song when they’re used as a bassline substitute.
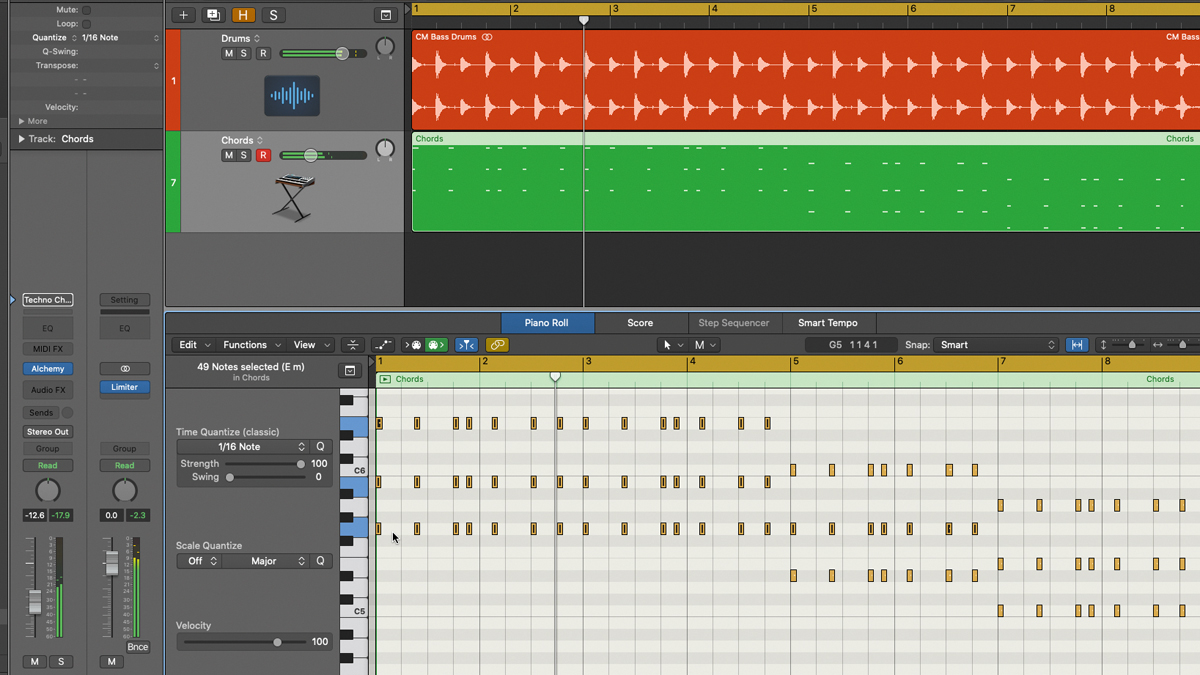
Songwriting basics: How to program the perfect bassline in your DAW
It can work, and with electronic or sampled toms you always have the option of tuning them to fit, but that can be tricky and often involves lots of fiddly, vibe-dampening editing. Quite often you end up with something that sounds like it’s almost there, then waste an hour or two trying to get it right, only to realise the next day that you’ve been trying to push a square peg through a round hole. Having spent so much time on it already, you’ll then probably feel committed and waste the next day doing exactly the same – nothing is more dangerous in the studio than something that almost works!
Instead, we find it best to start out with drums and toms, creating a big, chunky tom-bass pattern upon which to build the rest of the track. This is fairly easy to do, but there are a few things to keep in mind that make the process much more effective.
For this walkthrough we’re using Ableton Live’s sampled drum machine toms, but real ones can work just as well. Their natural harmonics can really enrich an otherwise digital-sounding track, but there’s often something jarringly ‘pure’ about them. A simple way to bridge the sonic gap between acoustic and synthetic is subtle degrading, so try using a bitcrusher to reduce the bit rate to 12-bit.
Turning toms into bass
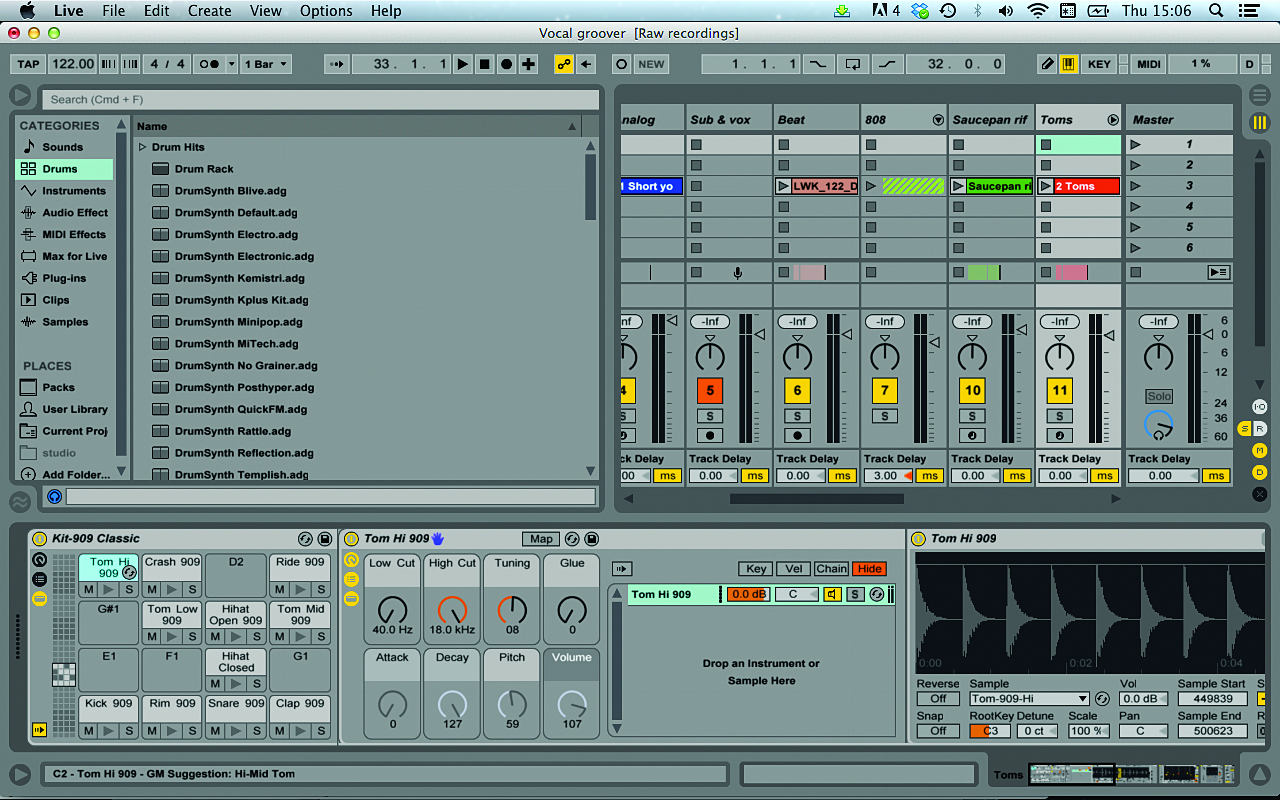
Step 1: We’re ignoring our own advice here, but we aren’t trying to get our toms to fit anything particularly musical – just our saucepan riff from earlier. We mute the vocal and sub-layer group and load Live’s version of the king of synthetic tom devices: the Classic 909 Drum Rack, based on samples of the seminal Roland TR-909 drum machine.
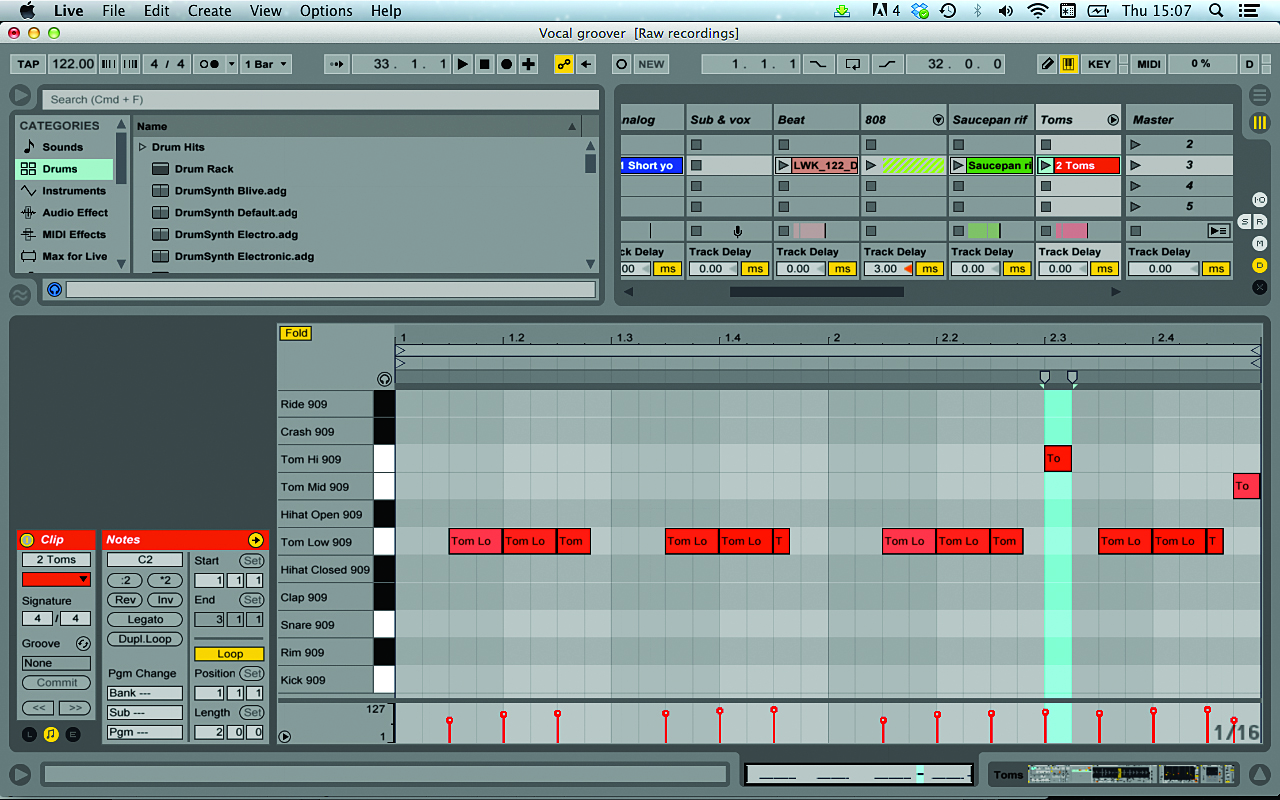
Step 2: We play in a very fast rhythm on the low tom, giving the track a rolling vibe. Miraculously, the tuning is pretty much spot-on for our purposes, so we move on and play in one note each on the high and the mid toms. The high tom requires significant tuning, so we do that next. The mid tom doesn’t play with any other parts, so we can leave it at its default tuning.
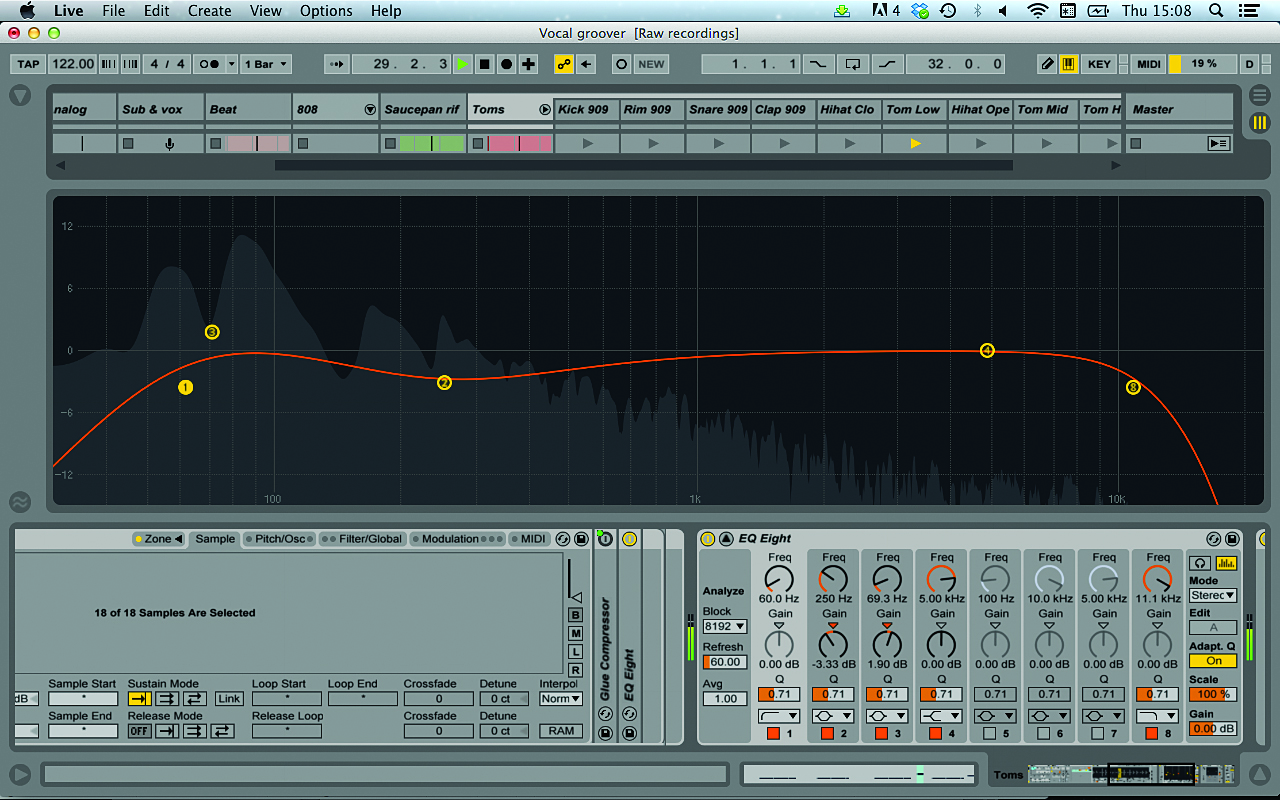
Step 3: It’s important to tame the more troublesome frequencies of any highly harmonic element like electronic toms, so we remove everything below 60Hz, leaving space for our vocal subs. A little gain nudge at that 60Hz mark gives a touch of extra fatness, and we roll some of the top end off to around 12kHz so that the toms don’t sound too shiny – for a brighter, more ‘pop’ sound, don’t bother.
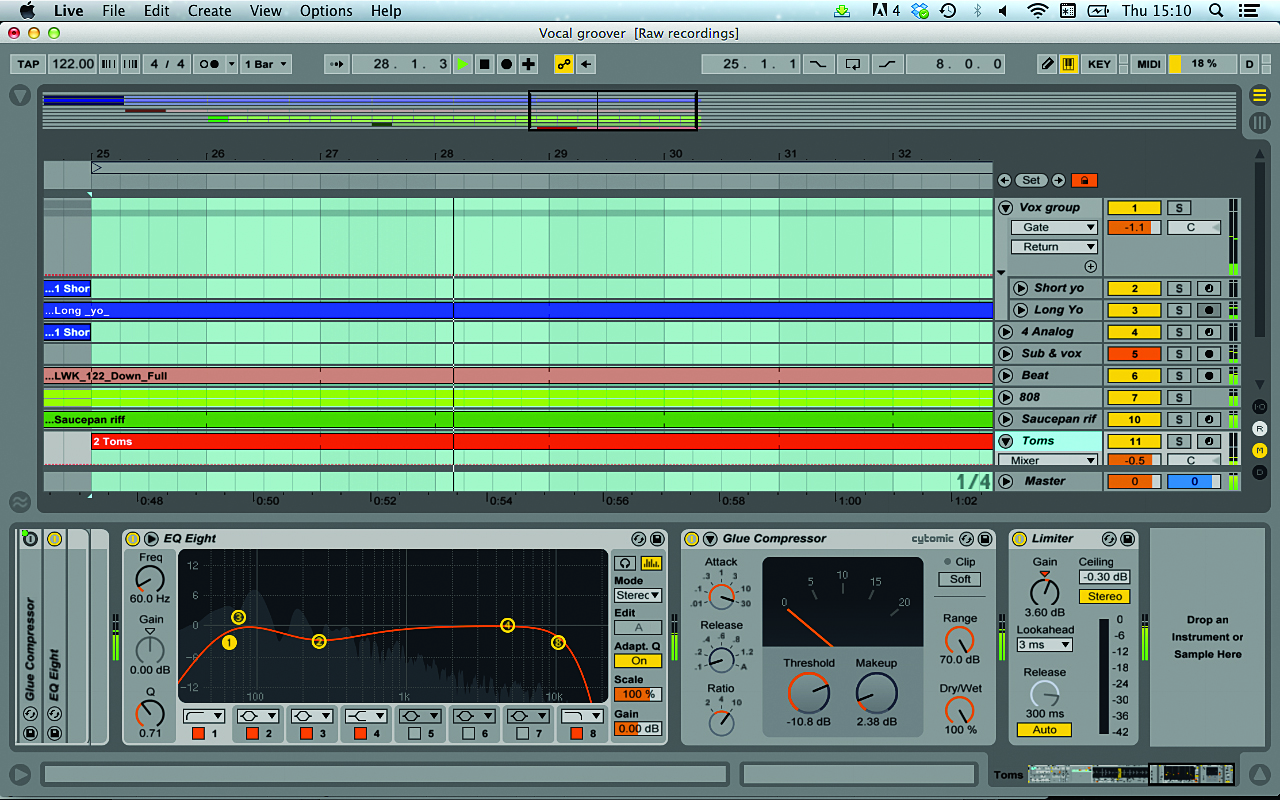
Step 4: Finally, we add a limiter and a little gain, ensuring that the toms have the weight we need to really push things forward. Now it’s just a matter of getting the right placement within the track. The key to getting toms to work well in a busy mix is to make sure they don’t play alongside anything they might clash with, so we reserve ours for when our vox and sub riff isn’t playing. (Audio: Tom riff, Full loop)
In the pit
Recording household objects is great fun, but it’s by no means the only way to create tasty basslines from sources other than synth bass and bass guitars. Orchestral and world music are no strangers to the bottom end. Beethoven, Schubert, Britten… these guys were fully au fait with arse-twitching rumbles, and the only thing they lacked were the tools to channel naturally deep instruments like the tuba into funky, compressed basslines.
Of course they probably didn’t see things that way, but the world keeps spinning, and if they were alive today, no doubt they’d be excited by the possibilities afforded them by modern kit.
In this walkthrough we’re going to show you how to take real instruments (tuba and didgeridoo, to be specific) and tweak their sounds to create funky and playable sampled bass patches.
To follow along, then, you’ll need to get hold of some tuba and didgeridoo samples. Feel free to source your own or, of course, you can download all sorts of free samples from the net. Our very own SampleRadar is one of the internet's biggest resources for free music samples.
There are many other great sites out there for free sounds, including more commercial and professional outfits like Splice and Loopmasters who all offer free demo sample packs.
Other less well known sites include Samplefocus (which has some great tuba samples to use in our walkthrough below) and SampleSwap. You’ll need to register to search and download on most sites.
The other sample we’ve used is taken from freesound.org. It’s free to sign up and we highly recommend you do. Whether you’re after bizarre street recordings, esoteric instrument solos or just some stock Foley, it’s one of the best soundware resources on the net. We’ll be using a didgeridoo sample from the site which you can download here.
Didgeri-tuba-bass!
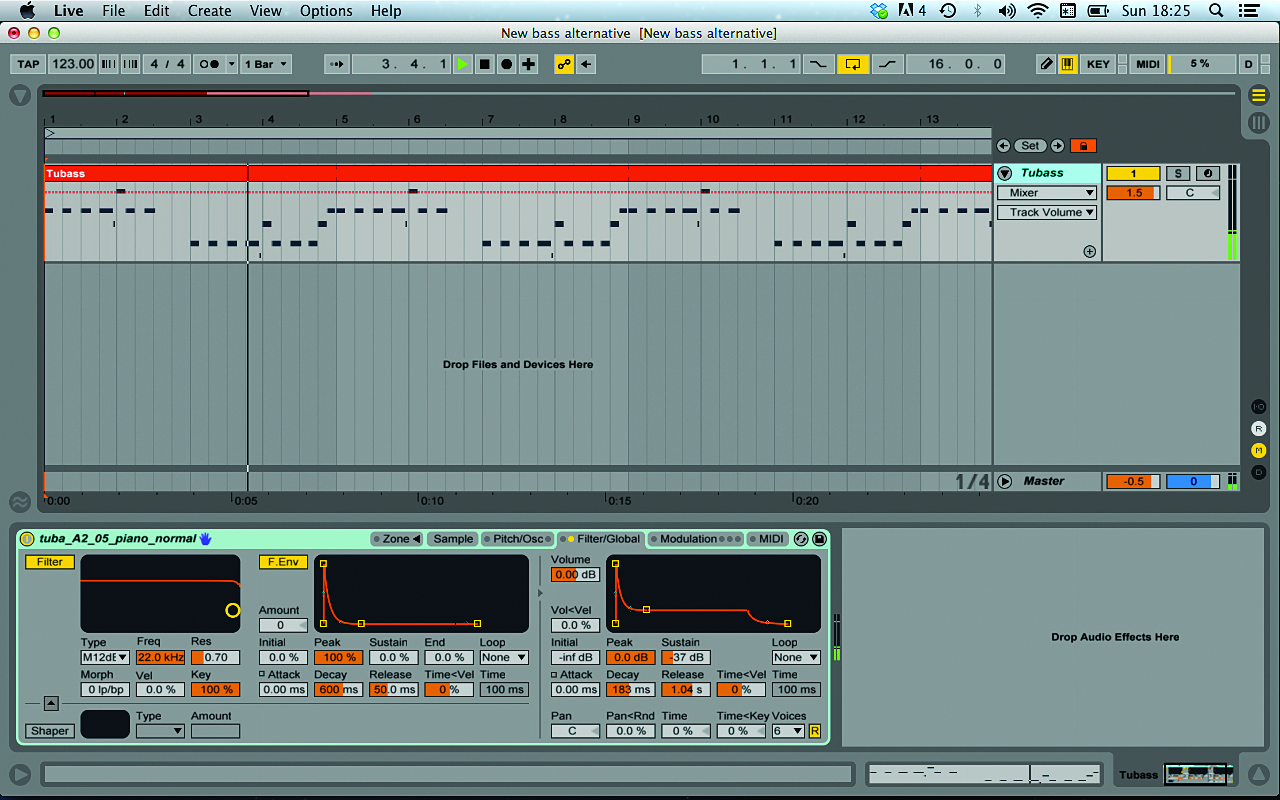
Step 1: Start by loading the sample into your sampler (we’re using Live’s Sampler). It plays the note A2, so set that as the root key on the keyboard. Edit the Start point to remove any silence. The sample is rather quiet, so add some gain. Flipping to the amplitude envelope, we pull the Sustain right down and set the Decay to about 180ms for an almost percussive hit.
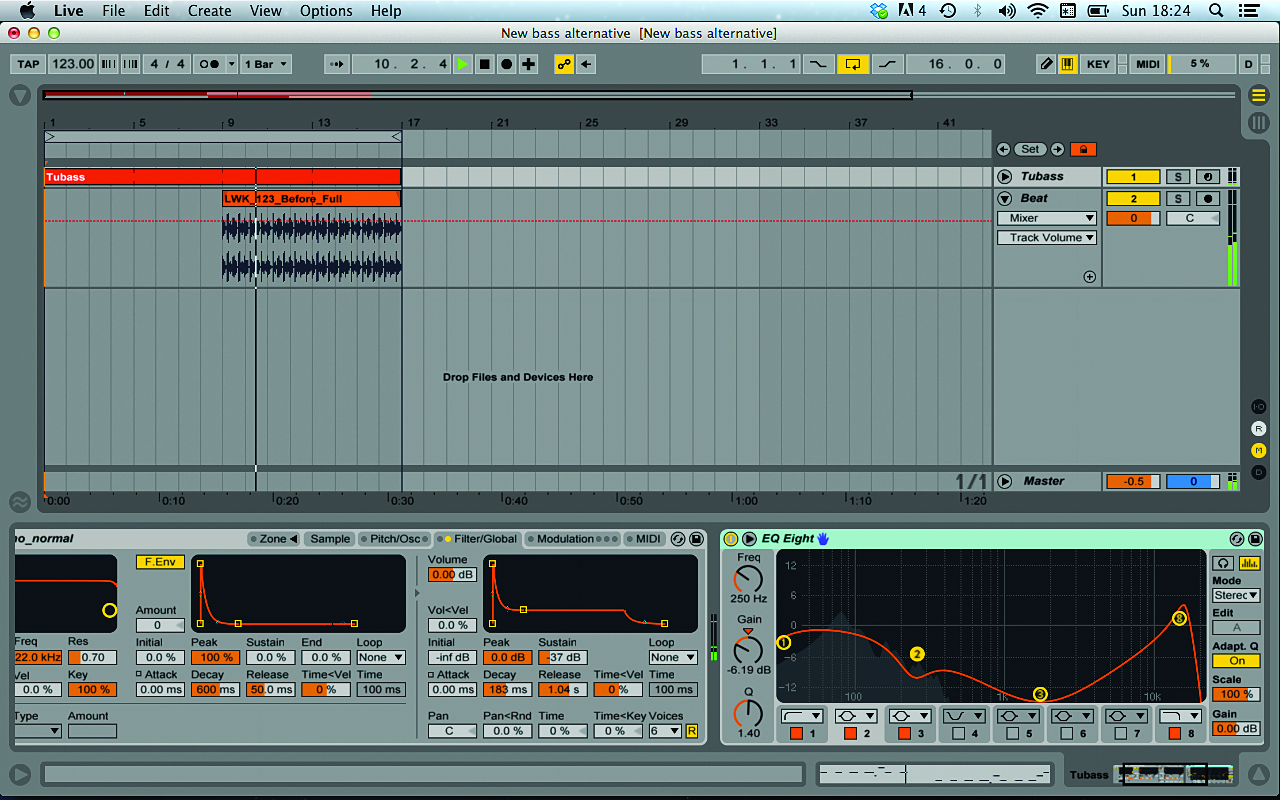
Step 2: Our long, smooth tuba note now sounds much more like a hammering bass monster, so we load the beat LWK_123_Before_Full (courtesy of Loopmasters’ Leftwing & Kody Deep House Tools collection) and play in a grooving bassline. Single sampled notes can include odd harmonics, so we filter them out using EQ Eight and roll off the bass below 30Hz.
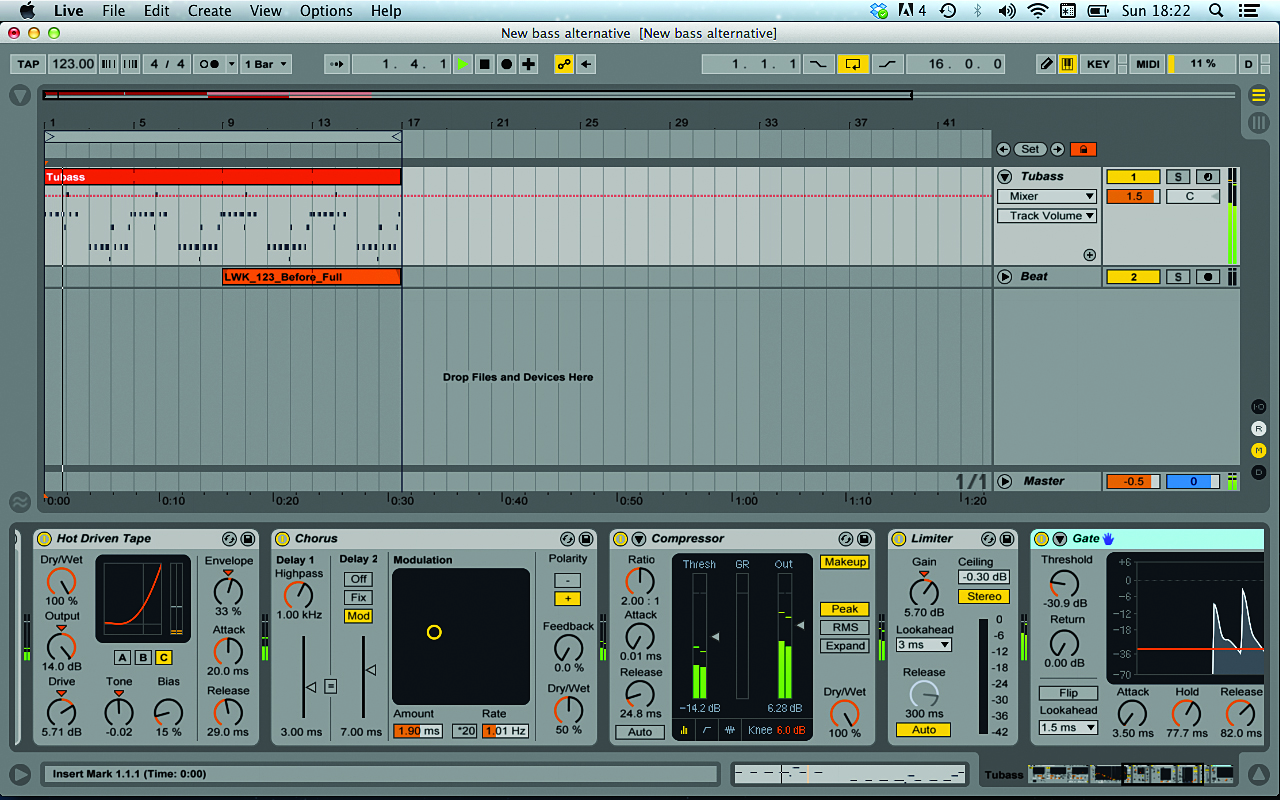
Step 3: The riff still lacks a bit of edge, so we add some subtle chorusing, providing extra body and shape, then top it off with a little tape saturation. We apply strong compression with a slow Attack to let the punch come through, and add a limiter for more weight (the tuba is simply not as fat as a synth bass otherwise). Finally, a gate gives even tighter control of the envelope. (Audio: Tuba bass)
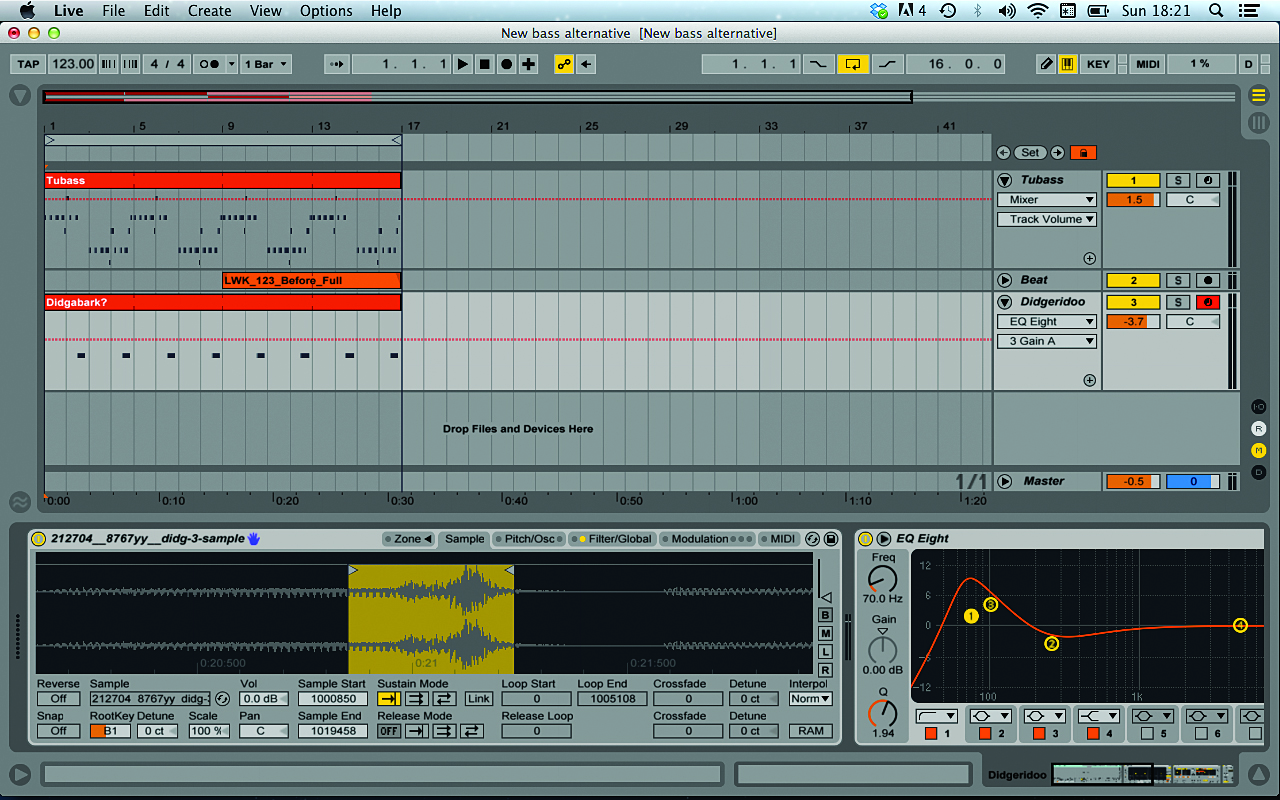
Step 4: Now to add some didgeridoo to fill the gap in our tuba bassline. Load the sample 85780__sandyrb__didgeridoo-05.wav into a sampler and listen for a good snippet. We choose one from around the 21s mark, draw in a MIDI note, then tune the sample so that it fits the bassline. We then tweak the sample start point to get the right timing at this pitch/speed. An EQ boost at 70Hz fills things out, and reverb gives space. (Audio: Didgeri-tuba)
Computer Music magazine is the world’s best selling publication dedicated solely to making great music with your Mac or PC computer. Each issue it brings its lucky readers the best in cutting-edge tutorials, need-to-know, expert software reviews and even all the tools you actually need to make great music today, courtesy of our legendary CM Plugin Suite.
