Whether your latest electronic production demands a thudding ‘knock’ or a full-frequency pulse to underpin the rhythm, the kick drum is one of the most important elements to get right. Find the perfect bass drum to suit your other parts, and everything else will slot into place.
This necessity for perfection is why many producers get bored of browsing through their bloated folder of ready-rolled kick samples, and instead choose to explore the art of kick drum design. Building your own bass drum from individual elements gives a far greater degree of control compared to using pre-made sounds, allowing you to piece each component together to your exact specification. Fine-tune your kick’s pitch, amp/pitch envelope and length, then mix in your desired flavour of ‘click’ to customise the attack to your requirements.
This artisan approach to drum sculpture has myriad benefits. Aside from giving you the ultimate control over a kick’s shape, timbre and character, it’s a great way to refine your own palette of sounds, which will help set you apart from other producers. Another legitimate reason is that you can custom-build specific layers to bolster an existing sample - if a great sampled kick is missing, say, some bottom end, it’s often easier to mix in a bit of synthetic low-end than reach for an EQ or bass booster plugin.
In this tutorial, we’ll show you how to use Sonic Academy’s incredibly powerful Kick 2 plugin to make your own unique kick drum.

Step 1. Let’s use Sonic Academy Kick 2 to synthesise a convincing, customised house kick drum that fits our track perfectly. We start with a 128bpm project, then add Kick 2 to a fresh MIDI track. We create a new MIDI region, then draw in a note on every beat to trigger a 4/4 pattern.

Step 2. The kick sounds too loud compared to the music, so pull the plugin’s Limiter gain down to around -7dB. To synthesise a kick, Kick 2 combines one or more click generators with a sub generator; we’ll look at the click first. Open Click 1’s dropdown menu, then audition some of the different clicks on offer to get a feel for them.

Step 3. We’ve chosen SP Click, as it has a warmer, slightly lo-fi sound that suits the feel of our drum track. Reducing Click 1’s Length to around 20% tightens the kick in the mix, while adjusting the Start time to 4% starts the click from a little bit later into the waveform, slightly shaving off the initial attack.

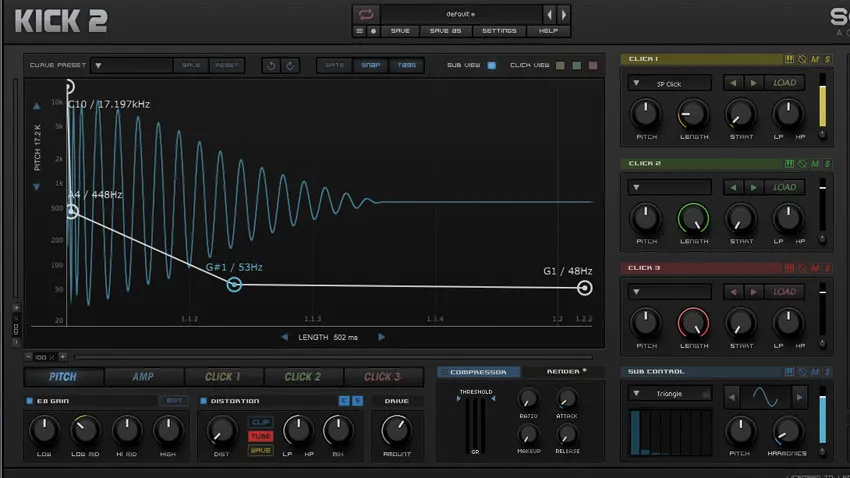
Step 4. Let’s look at the kick’s sub bass content. The preset sub is generated by a sine wave oscillator that we can mix added harmonics into. Set the Sub Control’s Harmonics dial to around 0.1, then use the arrows above to audition the different harmonic waveforms. We go for the Triangle wave, which adds some subtle yet much-needed midrange bite.
Step 5. We tighten the kick up a little by reducing Length to around 500ms. As you reduce the length you’ll hear the bass frequencies of the mix become more focused. A little tube distortion adds warmth to the kick, while around 60% Drive gives a touch more attitude and aggression to the kick as a whole.
