
The dreaded Floyd Rose! When set up correctly, they’re brilliant and do all the high-performance stuff with no problems, but a bad one is nothing but a letdown. Have no fear; we’ll show you around this Meccano kit that’s attached to your guitar, and how to tame it.
Several things could upset a Floyd Rose-style tremolo, such as different tunings, a snapped string, cheap tremolo springs, dull knife-edge points or a new gauge of string.
There are also lots of variants and copies of the Floyd Rose-style tremolo, but most of them have similar designs and parts. We’re whipping an Ibanez Edge III locking tremolo into shape here, but you’ll spot the similarities on your own. This even applies in part to setting a floating Strat tremolo.
Make sure that when you’ve finished you stretch your strings in; this will also test the tightness of all those parts. It is, of course, important to tighten up the parts, but don’t go crazy and end up stripping the threads.
What you need:

- Fresh strings
- String cutters
- String winder
- Tuner
- Patch cable
- Capo
- Feeler gauge
- 3mm Allen wrench
- 4mm Allen wrench
- Engineer’s rule
Step 1

To begin you’ve got check that the truss rod and the nut are set up correctly. Your setup is dependent on these as well as the bridge height. Truss rod: stick a capo on the 1st fret, press down on the 15th fret. The feeler gauge is put over the 8th or 9th fret underneath the string: .007" is the magic clearance.
Step 2

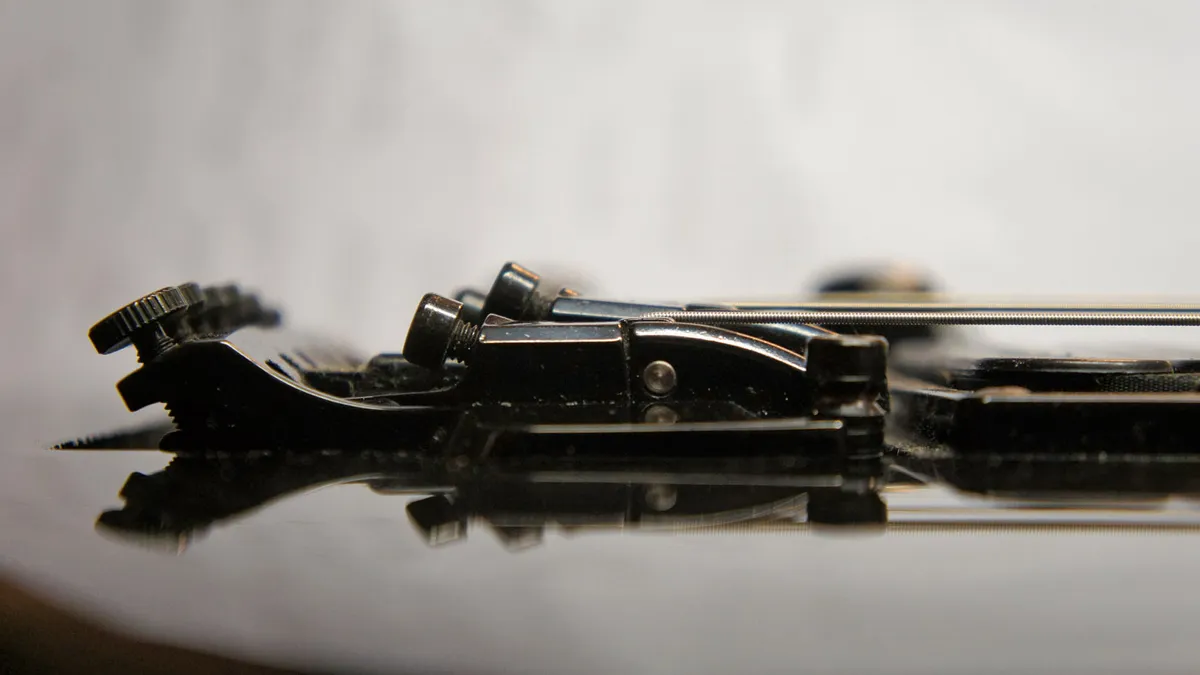
Here are the parts you’re working with: 1: The height posts are responsible for setting the entire tremolo’s height. 2: The string clamp blocks are for the string ends and hold them tight. 3: Fine tuner thumb adjusters. 4: Saddle lock bolts: Undo these to set the intonation. 5: String clamp bolts: loosen these to change a string.
Step 3

Okay, let’s get going... choose a set of strings and fit them. You need to trim off the ball ends with wire cutters and then clamp them in the string clamp. Make sure the string is centralised on the block for best performance. Don’t over-tighten these as you can crush the string to the point where it’s weakened.
Step 4

Tune, tune, tune. This is the curse of floating bridges; you set one string and it is, of course, altered when you tune the next string. The best method we’ve found for tuning up is to over-tune as you’re going. Tuning the sixth string to F#, for example, has to be tuned whilst keeping an eye on…
Step 5

The rear springs. These fellows are hiding under the backplate and are responsible for adjusting the tilt of the tremolo. As you begin to get your guitar in tune, your tremolo may be tilting forward or backward. Between the string’s tension and the spring’s tension you can balance it. The 2 PH2 wood screws let you tweak it.
Step 6

Here are two incorrect tremolo settings: the top one is tilting forward, the bottom is tilting downward. Now your tuning is a fixed pitch; we have to reach pitch so we’ll adjust the springs to balance the tremolo. Be aware that some Floyd Rose-style tremolo sys, like the Low Pro Edge, have a non-parallel top profile.
Step 7
When the strings are in tune this is the lovely flat profile we want. This allows the tremolo to raise the pitch and also dive-bomb properly for all those widdly tricks.
Step 8

Let’s fine-tune this balance malarkey. It’s tricky because each time you have to tune up a thousand times, but stick with it and keep the over-tuning trick in mind. If you’re tuning up to pitch and the tremolo is already tilting upward too much, tighten the springs up! Different tunings or string gauges will upset the balance.
Step 9

Now it’s well-balanced we can set the action. This is the only easy part on floating tremolos! With your Allen key, raise or lower your whole bridge up and down. Be aware that on some Ibanez Prestige models and similar there may be a locking grub screw hiding in the hexagonal hole stopping you dropping the post height.
Step 10

Where to set the bridge’s height though? A good medium setting for all occasions is 1.5mm on the first string and 2mm on the sixth string. That’s from the top of the fret to the bottom of the string at the 12th fret. You can get away with lower if you are of the shreddy persuasion, if you play lightly and have a true fretboard.
Step 11

Last stop intonation: not the easiest job on a Floyd-style tremolo. Locate the saddle lock bolts. We’ll tune only one at a time! Take a tuner reading at the 12th fret and compare it to the harmonic at the 12th fret; these should be precisely the same pitch. If the fretted note is sharp, loosen and move the saddle back.
Step 12

If you find (through a string gauge change or wrong settings) you can’t move the saddle far enough then you have the option to use a secondary threaded bolt hole. Unscrew the lock bolt (watch out for the little washer) and try out the other hole. Clamp these tight. Give the tremolo balance a final check and you’re done!
