We all want a huge space for tracking drums, but in reality, most of us are recording in project studios, garages, spare bedrooms, and other less-than-cavernous spaces. But just because you have a small room, doesn’t mean you have to record a small drum sound.
But first, a few things to keep in mind. Drums, like any instrument, sound different depending on where they are placed in a room. Recording drum kits require you to do a bit of homework, moving the kit to different areas of the room and recording it again to compare how the room reacts to the different placements. Reflected sound from nearby boundaries can cause constructive or destructive interference, particularly in the low frequencies, so placing the kick drum in one area may produce more low end versus placing it somewhere else. No doubt this fine-tuning is far more of a pain in the arse than moving an acoustic guitar player, but the good news is that you’ll probably only need to do this once; then you can nail the drums and stands to the floor. (Okay, maybe you shouldn’t do that.) Keep in mind that drumming is physical and requires elbowroom. You’ll need space to fit mics, stands and cables, and the drummer, so make sure that they can be comfortable.
Most music genres call for close miking individual drums in the kit. Jazz is one exception: Many jazz drummers prefer minimal miking so that they can create their own mix of the kit. For a jazz recording, I’d typically use mics for kick, snare, and a pair of overheads unless the drummer requests otherwise. Recording drums for any other genre usually requires adding a mic per tom, hi-hat, and possibly the room. Generally, each microphone is recorded to its own track.
In case you missed it, you can catch up with part one of this guide.
A hole in the head
Let’s start with the kick drum itself. Life is easier if you either cut a hole in the front head or remove it (the exception being jazz when the front head usually stays on). Back in the day, cutting a hole in the front (“resonant”) kick head was such a pain that drumhead manufacturers eventually got hip and started selling “ported” heads with pre-cut holes. Obviously, the hole facilitates access to the interior of the drum (as will removing the head) but using a ported head also maintains the kick’s bottom end “whump,” which is sometimes lost when the head is removed. It also helps to keep in place the blanket or pillow you’ll need to place inside the drum to prevent it from ringing incessantly (and for those long days when you need a nap on the studio floor). Don’t overstuff the kick drum or you’ll kill the tone. Use a small pillow or blanket, or a towel large enough to damp the heads a bit. You can also try speciality drumheads designed to reduce ringing, such as Remo’s Powerstroke 3, or products specifically designed to dampen a bass drum.
Mic manufacturers have gone to a lot of effort to make it easy to achieve good drum sounds, so take advantage of all of that R&D. Popular candidates for kick drum include the Audix D6, AKG D112, Sennheiser e602, and Shure Beta 52. Flying under the radar is the Beyerdynamic M88 (TG, initially developed for voice) and Electro-Voice RE20.
I like to start with a single dynamic mic placed so that most of the body is outside the drum, and the grille is just inside the resonant head’s hole (see Figure 1). Simply pushing the mic into or pulling it out from the hole can have a profound impact on the timbre, so try a few different positions. Modern kick drum microphones usually have a tailored response, but you may find that some mics require a cut somewhere between 300 and 500 Hz to reduce midrange “boxiness.”

Some engineers like to record kick using two microphones: an “inside” mic and an “outside” mic. A small-diaphragm condenser inside captures the smack of the beater on the head. Add a dynamic just inside the hole or a large-diaphragm condenser mic one to three feet in front of the drum to capture the low end. The Shure SM91/Beta 91 is a popular choice for the high end. It’s a boundary mic intended for use on conference tables and lecterns but works great for getting the kick’s attack. You can lay it on that blanket, or for more reliable placement, check out the Kelly SHU mounting system.
At least one manufacturer, Audio-Technica, produces a single microphone with two capsules. The AT2500AE and ATM250DE both feature dynamic and condenser transducers in the same housing, facilitating placement as well as ensuring that there will not be phase issues between the two capsules. A breakout cable with a 5-pin XLR on one end and two 3-pin XLRs on the other allows you to record each capsule separately.
No snoring on the snare
Experienced recordists will agree that you need to look no further than a Shure SM57 when recording a snare drum. Billions sold, billions digested. Try placing it as shown in Figure 2 and pay attention to the rear end. It’s important to minimize the amount of hi-hat bleeding into the snare mic (and vice versa) so that (a) the level of the snare can be changed independent of the hi-hat and (b) any processing applied to snare (gate, compressor, EQ, reverb) will not affect the ‘hat. Taking advantage of a mic’s polar pattern helps control such leakage. The SM57 is a cardioid mic so if we point the back of the mic, the point of maximum rejection, at the hi-hat, we can reduce leakage. The foam behind the mic further reduces leakage.

Other go-tos for snare miking include the Audix i5, AKG C451 (B), and Neumann KM84. For years the C451 and KM84 were the “standard” condenser microphones, often combined with a Shure 57. If you’re lucky enough to have a C451 or KM84, place it out of harm’s way—a KM84 in good condition fetches about a thousand bucks. Other microphones worth trying on snare include the Sennheiser MD441, Shure SM85, and AKG D330.
Bottoms up
Many a time I have recorded a bottom snare and not used it, but the bottom mic does add a papery sizzle that some people like. I feel that adding too much of the bottom mic makes the drum sound wimpy. There’s an extremely good chance that the bottom microphone will be out of phase with the top mic because they probably face in opposite directions—so be sure to check it using the “REV” or “Ø” button on your preamp. If your preamp lacks this feature, find a DAW plug-in that has it, and use it (e.g. a “trim” plug-in). Try to point the snare bottom mic slightly away from the kick drum to reduce leakage. You can severely cut the low frequencies (400 Hz and below) on the snare bottom mic to remove kick bleed, because you’ll get the low and low-mids from the top mic. The bottom mic should be recorded to its own track.
Toms
The big challenges for miking toms are keeping the mics out of the drummer’s path and preventing cymbals from bleeding into the tom microphones. It’s really not fair to ask drummers to change their setup to accommodate your microphone placement. That said, your job is easier when there is physical separation between toms and cymbals. This is where the condenser-vs.-dynamic mic debate enters. Condenser mics generally produce more detail and a more “hi-fi” sound but those attributes translate into greater leakage. Dynamic microphones may sound a bit dull compared to condensers but they tend to be better at rejecting unwanted sounds, and you can always add a bit of EQ in the mix. You’ll have to listen for yourself.

Figure 3 shows the placement of a microphone on a rack tom. Notice that the mic is not pointing directly at the head. It is pointing across the head from the rim toward the centre of the drum. Pointing the mic directly at the head isolates a small portion of the head, reducing the roundness and emphasizing weird overtones or tuning anomalies. Try to aim the rejection area of the pattern toward what you don’t want leaking into the mic. Don’t be afraid to get close with a tom mic, within an inch or two. Most directional mics produce a fair amount of proximity effect, which can provide some of the low-frequency response that we’d otherwise need to add using EQ. If the toms do not have bottom heads you can try placing the mics inside the drum from underneath. This increases the isolation, but usually, the tone suffers.
The Sennheiser MD421 (II) is a great dynamic tom mic, but its size can sometimes make placement difficult. Other strong candidates for tom mics include the Sennheiser e904 and its descendants the e504 and e604, Audix D2 and D4, and Shure Beta 56 (A). Condenser mic choices for toms typically include the Shure Beta 98, Audio-Technica ATM350, and Beyerdynamic TG D57c. All of these are fairly compact and some can be clipped onto the rim of the drum, reducing the number of microphones stands to clutter your small space. Be sure to listen to each mic “solo” to make sure you’re not capturing noises that might be mechanically transmitted through the mounting hardware.
Overheads
Overhead or cymbal microphones are where the fun really starts. These can be used as cymbal mics, simply providing the “top end” of the kit, or as the foundation of the kit with the close mics added for definition. When these mics are used as cymbal mics, it’s likely that you’ll filter the bottom end out below say, 500 Hz. Do this in the mix, please! When using overheads as the foundation, you really want the total spectrum of the kit even before the close mics are added. A coincident stereo recording technique such as X/Y or Blumlein with the mics centered over the middle of the kick drum is a good starting point (especially if you are worried about phase issues or mono compatibility) but provides a small stereo image. Close snare mic is usually panned center so when it’s mixed with the overheads you may find that the snare “pulls” to one side of the mix. To alleviate this issue, move the overhead mics slightly toward the middle of the snare drum. Make sure that the panning of the close mics matches that of the overheads or the stereo image will weaken.

I usually start with either a spaced or near-coincident pair, as shown in Figure 4. These deliver a wide stereo image but check your mix in mono to reveal phase issues and move the mics accordingly. Try a spaced pair with the mics about six feet high, four to five feet apart and pointing straight down at the floor, or an ORTF pair centred above the middle of the kick drum at the same height. When the room has a low ceiling, mics with a cardioid pattern help reject reflections from the ceiling. If the room has a high ceiling, try figure-eight patterns to allow in more of the room’s “air.”
Condenser mics are the de-facto choice for overheads because they capture the shimmer of cymbals more realistically. The usual suspects include Shure SM81, Audio-Technica AT4050 or AT4033, Neumann KM184, AKG C451 B, Blue Dragonfly, or DPA 2011C. If you’re on a tight budget, the Shure PGA181 (less than $100 street) is an excellent, affordable mic for overheads and hi-hat.
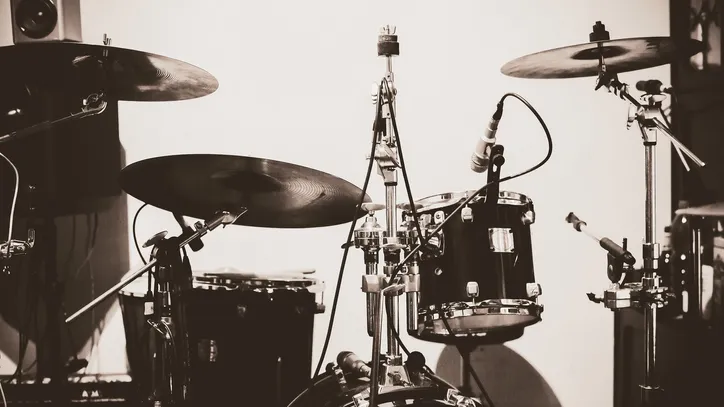
Any mic that you’d choose for overheads is likely a good choice for hi-hat (or spot mic for ride cymbal), though lately, I am having success with a Shure SM7B dynamic. Figure 5 illustrates what at first glance appears to be a weird placement for a hi-hat microphone: It’s pointing away from the kit to reduce leakage but captures plenty of “chick” from the cymbals. Note that the mic is not pointing at the closest wall, which would increase the possibility of capturing reflections. I generally don’t recommend miking a hat from underneath, but I don’t like cherry vanilla ice cream either, so feel free to try it.

Dirty deeds done dirt cheap
We could probably do an entire masterclass on room miking but let’s start by saying that even in a small room, it’s worth putting up a room mic. If you prefer you can think of it as an effect mic so don’t be afraid to compress the daylights out of it. There are two tricks you can use in a small room to provide the illusion of a larger space. One is placing a directional condenser mic (cardioid, hyper-, or super-cardioid) at the end of the room opposite the drums, and then facing the front of the mic toward the wall opposite the drums. The mic will capture the early reflections from that wall with a longer delay time. For a slightly different flavour, try a figure-eight mic about five feet high with the null facing the drums, and the front-facing the ceiling. The figure-eight pattern will reject direct sound from the drums and capture reflections from the floor and ceiling (you can do this with the walls, too). Experiment with distance from the kit until you get the optimum “size,” and compress to taste. A variation of either of these can be set up with a pair of mics; don’t be afraid to back them off ten feet if room size permits. Another technique that works well is a pair of large-diaphragm condensers such as AKG C414s or AT4050s set to cardioid, flanking the kit and pointing toward the snare, five or six feet in front, one to four feet high.
Power trio
Recently, I did a session in which I recorded drums using three mics: kick (Shure Beta 52), snare (Audix i5), and one overhead (Røde Classic II). The good news about recording this way is that the sound has a lot of focus and there’s very little phase cancellation. The bad news is that if you do this with a drummer who doesn’t know how to balance the kit, you’re in big trouble because there’s no safety net—i.e. you can’t fix it in the mix. Lucky for me, I recorded an experienced drummer who knew how to play, tune, and balance the kit. Close-miking each element of the kit definitely allows more control when it comes time to mix, but keep this in mind: No matter the number of components in a drum set, it’s still one instrument. Treat it as such.
The Glyn Johns drum recording technique
Glyn Johns is a world-class recording engineer and producer whose credits read like a page out of classic rock history, including The Beatles, Led Zeppelin, The Stones, The Eagles, and The Clash. Johns developed a very effective, minimal drum recording technique that he reportedly used to record John Bonham. The method uses four microphones: two identical condenser microphones (usually cardioid) plus two dynamic mics. The condenser mics are used for “overhead” while the dynamics are used for kick and snare.

The setup starts with one of the condenser mics placed as if you were recording the kit in mono: directly above the snare, three to four feet from the snare head, and pointing straight down at it. I typically place this mic 40 inches from the snare head. Make a quick test recording and listen for overall balance. If the rack tom is not present enough, you can try pointing the microphone slightly toward it.
The next overhead mic is really not overhead at all. It is placed to the side of the kit four to six inches above the floor tom, pointing toward the snare. It should be (and this is critical) the exact same distance from the centre of the snare as the first overhead mic. This greatly increases the phase coherency of the recording. These two mics are panned hard, the first overhead hard right and the floor tom overhead hard left (audience perspective). If you are recording a left-handed drummer, these will be reversed.
Next, we add two close mics, one for the kick and another for the snare. You can place the kick microphone in the traditional location, either inside the drum or just inside the hole in the front head. Last, add a snare mic placed an inch or two above the rim of the snare pointing toward the centre of the head.
When mixing these mics, start with the two overheads then add the close kick and snare mics as “fill” mics. (The snare and kick should be panned centre) As far as microphone choices, try large-diaphragm condensers for the overheads, such as Audio-Technica AT4050s or AKG C414s set to cardioid. A Shure SM81s also work well for this application. Do not use a mic’s low-frequency roll-off here, you want a full-frequency recording from the overhead mics. You can also experiment a bit with the distance of the close snare mic, which can change the overall tone.
