Vengeance Sound’s VPS Glitch Bitch plugin enables you to sequence everything from crazy stuttering edits to smooth filter sweeps in just a few clicks. Use four independent envelopes to control its numerous effects, including filtering, sample rate adjustment, pitchbending, volume, panning and reversing.
Glitch Bitch lets you program patterns that suit your style of music - perfect for those situations where you wish you had ten pairs of hands. The effect can be triggered by clicking the massive Glitch button, but you can also sequence this from the built-in sequencer or via your DAW’s automation.
Here, we'll show you how to use Glitch Bitch to make instant and awesome breakdowns.
For more on getting creative with Vengeance Sound’s range of plugins, check out the August edition of Computer Music.

Step 1: Need to break up repetitive arrangements? Then create instant breakdowns with the mighty Glitch Bitch! In a 128bpm session, import Techno.wav and drop in a fresh Glitch Bitch. We need a reasonably long effect, so change the pattern Length to 8 bars. Click Sync Start to lock the effect’s activation to your host’s playback.

Step 2: The Buffersize field sets the default loop time for each step of the sequence. We’ll change this to 1/4 to loop one beat of audio, but we can sequence the loop time in the pattern editor by dragging the yellow dots. Move the eighth dot down to 1/8, so we end up looping eighth-notes for the very last eighth-note of the sequence.

Step 3: We can use Glitch Bitch’s extra envelopes to control the other effects, so click on Misc 1 to begin editing a new envelope. The dials under the envelope dictate which effect(s) it controls. We’ll start by making the high-pass filter lift as the effect progresses - turn the HP dial to +55%. We’ll also roll off the high frequencies a bit by turning the LP dial to -20%.

Step 4: Subtle panning will add a bit of stereo movement, so turn the Pan knob up to +50%. Now double-click the R icon in the centre panel to activate the reverse line. Once the envelope has dropped below this line, the audio will be reversed. Drag the R icon down to about 25%. This means that only the final stages of the pattern will be reversed.
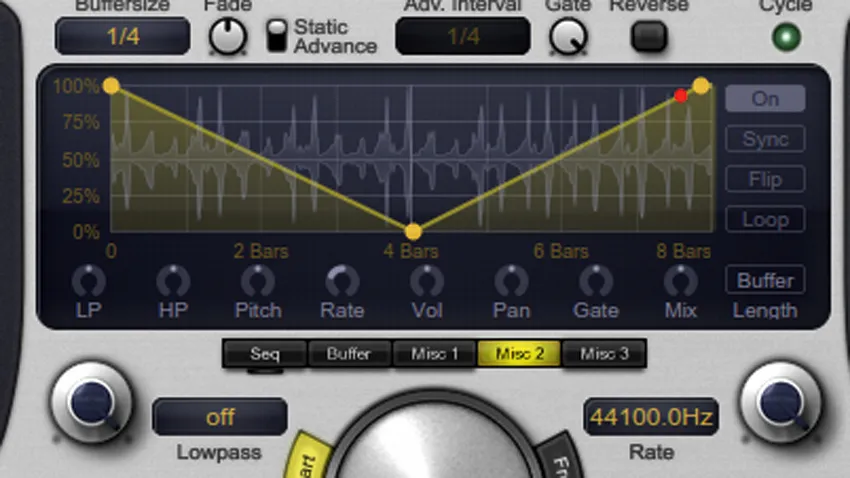
Step 5: Click Misc 2 to edit a new envelope. You can create custom shapes by entering multiple points. Double-click the middle of the yellow line to insert a new point at the halfway mark, drag it to the bottom, then drag the envelope point on the far right to the very top. Now assign this to the sample rate reducer by turning the Rate dial to -45%.
Step 6: A great trick to smooth the exit of the effect is to automate the Mix control. Click Misc 3 to edit a new envelope. You can bend the envelope curve by dragging the yellow line – click it and drag it up to 100%. Next, drag the envelope point on the far right up to about 48%. Finally, send it to the wet/dry level by pulling the Mix dial down to -100%.
