Multiband compression makes for a much more detailed alternative to regular 'broadband' compression, but when exactly should you use it? As with all matters relating to production, the answer lies primarily with your ears… but understanding some mixing theory will help you make better choices.
Take the example of multiband compression across a track’s master channel. Hard-hitting bass elements contain more energy than the rest of the mix does, so these huge lows will trigger a single-band compressor’s gain reduction first. When the lows are in charge of the whole mix, high-frequency content is the first victim. Sure, this ‘pumping’ or ‘ducking’ effect can be a useful thing, adding flavour to a dance track, but it’s often undesirable.
With a multiband compressor, on the other hand, the dynamic processes applied to the top end of a mix can be applied independent of a band affecting the bass, and as a result, the pumping side effects can be avoided.
Band management
How many bands you need will vary from one situation to another. For example, if you’re compressing a drums submix, it might be advantageous to use two or three bands, each compressing different areas by slightly different amounts. On the other hand, a vocal featuring excessively sibilant high-mid frequencies may only require a single band of high-mid compression (using, say, a de-esser), which will leave the signal’s other frequencies untouched.
Our advice? Don’t make life difficult for yourself by using more bands than necessary! A single stereo compressor is hard enough to set up for optimum results, so dialling in multiple bands can become exponentially more difficult. Although there are cases where you may need to pull out all the stops with multiband compression, we’d recommend you revisit the source sound if you’re activating lots and lots of separate bands. Whenever possible, set up both a stereo processor and its multiband equivalent to compare the performance of each processor side by side, to see if the multiband variant is giving you the result you want.
Now, let's put some of this into action as we sort out an overly bass-heavy mix using multiband compression (audio examples are at the bottom of the page). For your full Multiband Masterclass, pick up the February edition of Computer Music.

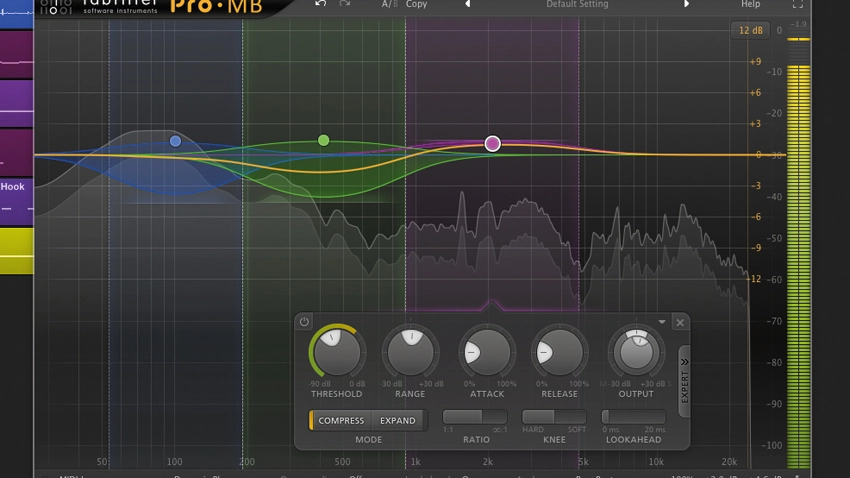
Step 1: This track has a nice, dark flavour, but the bass threatens to suck all the energy downwards. We want to enhance crackle and presence at the top while still preserving energy in the bottom end. Here’s a single band in FabFilter Pro-MB, operating between 53Hz and 190Hz. The Threshold is set low enough to level out the entire band, and Ratio is set at 3.9:1. We attenuate by 6dB using the Range dial, then boost the band output by 1.37dB.

Step 2: The low-mid range contains plenty of content. It has bass and low arp ‘bite’, but it also features plenty of the melancholy synth lead - so we need to be careful. We set a fairly low Threshold, Ratio at 4.2:1, then a Range of -6dB to attenuate by that amount. To bring the volume up to the desired level, we increase this band’s Output to 1.5dB.

Step 3: Next, we’re focusing on upper frequency bands. We create an upper mid-range band with a boundary threshold at 4.74kHz. The (pink) upper midrange is sitting nicely; we don’t want an over-abundance of energy here, as the track is intentionally quite dark, so we set a Ratio of 4:1, and Threshold to catch only the loudest peaks. We don’t need to add much Output here; around 0.5dB works well.

Step 4: We create a fourth treble band (purple). We want plenty of sizzle at the top of the mix, and this band contains the hi-hats and the upper harmonics of the ‘ticking’ loops. We drop Threshold to catch most of the content here, and use a Ratio of 3.63:1. We set Range at 1.5dB and boost this band’s Output level by the same amount.

Step 5: Next, we match our Pro-MB frequency bands and crossover values in iZotope’s Ozone 7 Imager, which we’re going to use to increase stereo width. We narrow the bass band to make the bottom end mono-compatible, and keep the low-mids at their default setting. For upper width, the upper midrange and treble bands are widened to settings of 36.7 and 50.6 respectively.

Step 6: To complete our master processing, we call up FabFilter’s Pro-L limiter. We’re capping the Output level at -0.1dB, but we’re driving the Limiter quite hard by adding a little over 5dB of extra input Gain. Limiting can change a track’s dynamics a lot, so you might need to make multiband compression tweaks after setting up your output limiter.
