How to start Travis picking with your guitar chords
In this guest lesson from GuitarTricks.com's Abram Poliakoff, learn how to get to grips with the famed fingerstyle technique

Want all the hottest music and gear news, reviews, deals, features and more, direct to your inbox? Sign up here.
You are now subscribed
Your newsletter sign-up was successful
Have you ever watched your favourite country or folk guitarists and noticed that they are fingerpicking so fast that you can’t follow? It comes so naturally to them but doesn’t sound right when you try to imitate them.
Often times these players are using a style known as Travis Picking. The style allows for a lot of cool variability, but there is actually a very logical form that every player follows underneath.
In this lesson, we are going to learn how to play a few of the most basic Travis Picking patterns, as well as how we can use these patterns as a template to understand and master all of the variability we find in our songs.
Abram is a writer for Guitartricks.com and a singing instructor for 30Daysinger.com.
He is a singer, guitarist, pianist, teacher, conductor, and composer. He received a Bachelors of Music in Vocal Arts from USC’s Thornton School of Music and has been teaching music for over eight years.
Two-finger technique
Travis picking in its simplest form is a two-finger picking style where the thumb switches between two different bass notes. This is usually, but not always, the root or the 5th of the chord you are playing. The remaining finger plays the higher treble strings once on the first beat of a measure and then often remains on the offbeat for the rest of the measure.
This style gets its name from the famous Kentucky blues guitarist Merle Travis. The sound imitates that of a banjo, mandolin, or other plucked folk instrument. If you haven’t heard the style before, then Merle Travis or Chet Atkins is a great place to start.
Want all the hottest music and gear news, reviews, deals, features and more, direct to your inbox? Sign up here.
Three-finger technique
You may notice that the two-finger style is actually quite tricky to play. Our fingers quickly jump between two or more strings and the tempo is usually really fast. This is why I find that this two-finger technique is not the best way to start learning Travis Picking.
Instead, I find that a three-finger picking style is easier because, aside from the thumb, the other two fingers don’t move from their designated string. Listen to John Fahey playing Red Pony, Jackson Browne’s These Days or John Denver’s Take Me Home, Country Roads.
There are many songs that you can use three-fingers instead of two like Kathy’s Song played by Paul Simon or Landslide by Fleetwood Mac. Also, it’s important to note that there are many songs where the original guitarist doesn’t necessarily use Travis Picking, but the style can still be adapted for the song if you like how it sounds.
How to learn it
When people first try playing this style, they can get stuck if they don’t slow down and break the pattern down into smaller parts to practice. Divide this pattern into four equal parts that are each a quarter note in length. It’s really important to make sure each string is plucked with the right fingers.
Start with the four middle strings of your guitar and a C or an A chord. As a general rule, the upper two base strings are done with the thumb. The other fingers should pluck only one of the other strings and generally don’t move from their position. Don’t let these fingers lift up too much after each pluck!
Part 1 is pinching the two outside strings for a full quarter note with the thumb and middle finger.
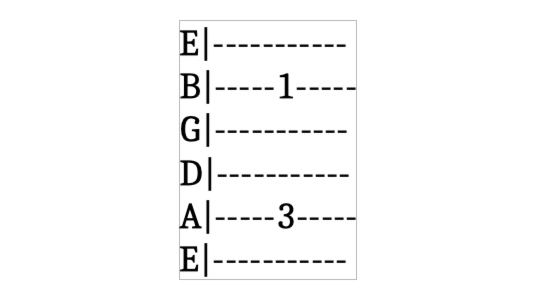
Part 2 is plucking the two middle strings from the higher to the lower as eighth notes with the thumb and then the pointer finger.
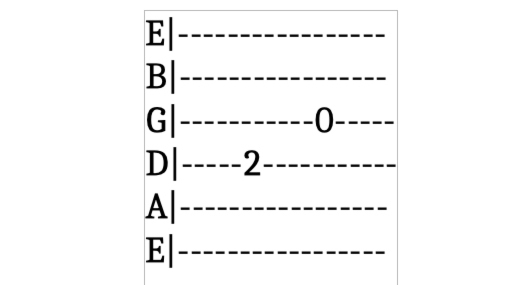
Part 3, the outside strings are plucked: first the top, then the bottom also as eighth notes with the thumb and then the middle finger.
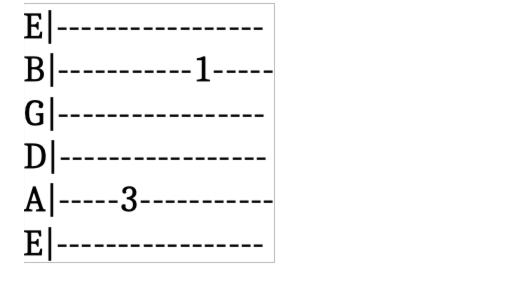
In Part 4, the middle strings are plucked in the same way as you did before in Part 2.
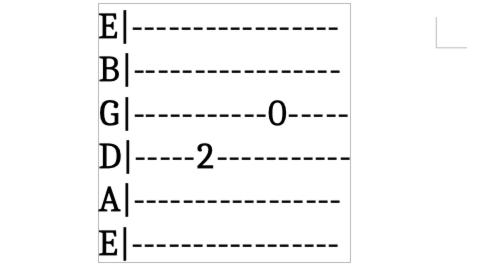
Learn the patterns
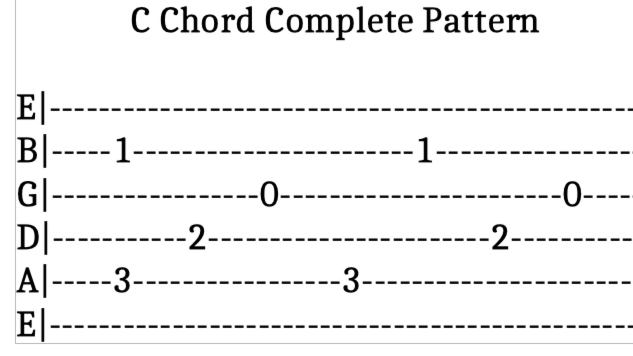
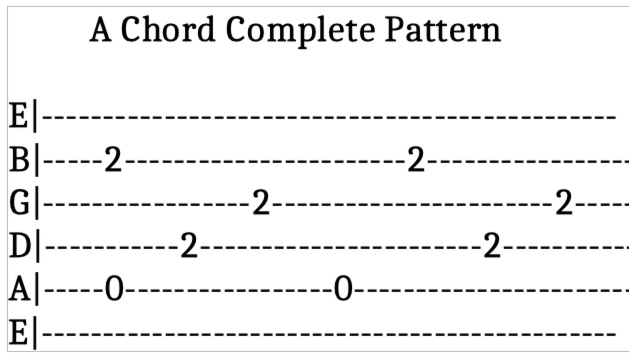
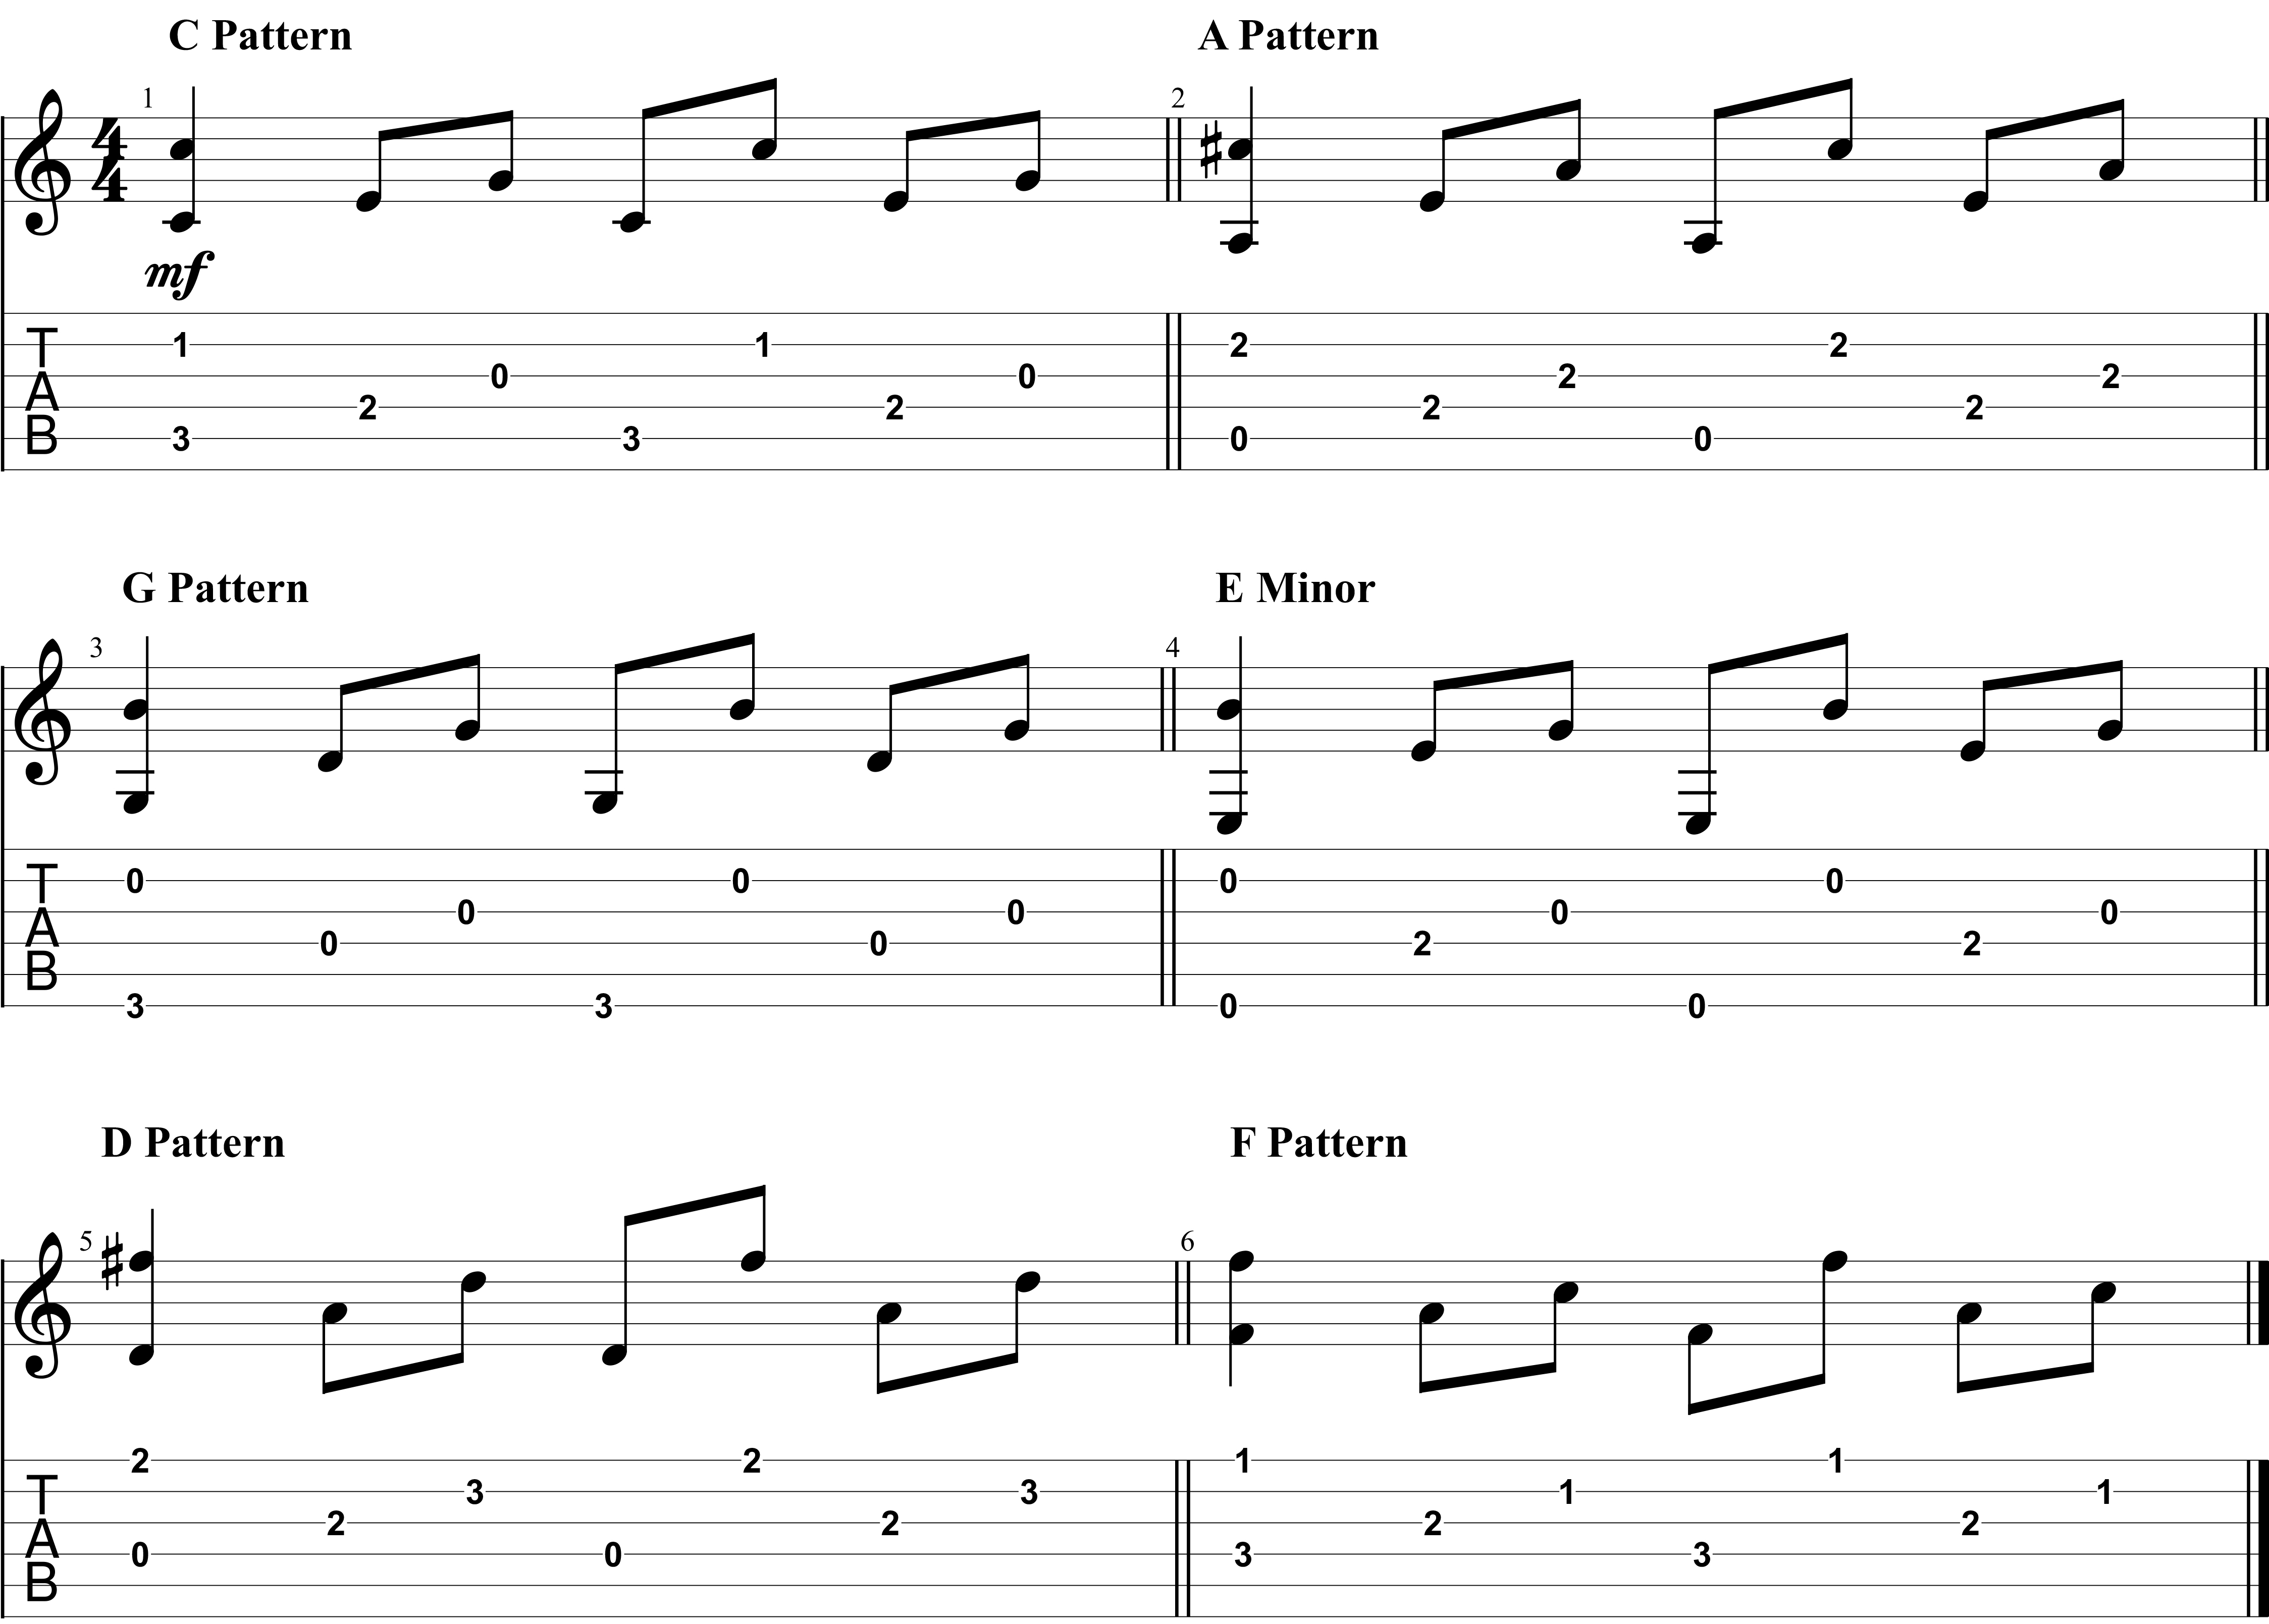
Travis Picking exercise (click on top right of tab to enlarge)
It’s really important to start slow and understand each part clearly. First off, this teaches your muscle memory correctly so the pattern doesn’t take too much thought and effort later on when you try and speed it up. Once you get this all sorted out, play the pattern over and over again. Do you notice the thumb hopping up and down from the top two strings of the pattern?
Knowing each part clearly also helps you add variability. Sometimes the first or last two parts of the pattern are doubled in a measure. Sometimes the pattern stays the same, but the chords change halfway through the pattern. If you aren’t super clear on what each finger is doing, then this will become impossible to follow in a more complicated song!
Which Bass Note to Pluck?
Another problem is how you know which bass notes to play on other chords besides A and C. These are played with the middle four strings like we practiced. Now any D or F half chords will be played with the bottom four strings, so shift everything down one in your pattern.
Lastly anything with a root on the Low E string like G or E based chords are going to feel the trickiest. This is because there are options here. The most common way to play these types of chords is with the top E string and the D string as your roots that you pluck with your thumb. This will mean you are skipping the A string with your thumb.
Adding Style
The last details to include in your playing are hammer-ons, pull-offs, bends or any other stylistic move while Travis Picking. This is also much easier when you are more certain of the order of plucking. It will help you time your stylistic move better with the corresponding finger on the other hand!
Hopefully this gives you a strategy for tackling the Travis Picking style. Patience goes a long way here as you don’t want to waste a lot of time trying to play this style with only two fingers right away or the thumb plucking only one string in the pattern.
Once you get everything lined up correctly in this simple three-finger pattern, then you can gradually make the pattern faster or more variable.
Final tip: lightness = speed
One final tip is to not pluck too hard when you are trying to speed up your playing. The most emphasis should be on the first beat so you can keep track of the measures. We tend to lock our muscles when we are trying to push them to the limit in speed and this will make our plucking heavy and ultimately slow us down.
Try finding this style in the music you hear and if you are unsure of the particulars, look up the tabs. See if you can notice patterns like half measures of the pattern or other variations like reversing the order of the bass thumb plucks. Once you have that established the feeling, the rest is just lots of practice. Best of luck!
