Control and sequence: how to combine software and hardware in your studio
Changing the way you interact with your gear might help you to make better music

Want all the hottest music and gear news, reviews, deals, features and more, direct to your inbox? Sign up here.
You are now subscribed
Your newsletter sign-up was successful
We spend a lot of time discussing the specific technology behind how we create sounds, whether that’s the capabilities of certain synth engines, the applications of assorted effect processors or the way we can shape samples or recorded material. But as much as these techniques are important, the way we physically interact with our technology is equally as influential in shaping how we create music.
Try, for example, making beats with an XOX-style step sequencer, MPC-style bank of playable pads and using a laptop’s mouse and keyboard. Even if you use the same source sounds and aim for similar stylistic results, chances are the ideas you come up with are likely to vary somewhat.
While each of these techniques can, in theory, create broadly the same results, the expressiveness of finger-drumming on the MPC’s pads is likely to result in an altogether looser-feeling groove compared to the mechanised rhythms created by the step sequencer or precise edits shaped with a mouse and keyboard.
Even if we’re not always conscious of it, the manner in which we interact with our electronic instruments plays a major role in determining the type of sounds we create. Altering, subverting and advancing these techniques can be a great way to inspire fresh ideas.
CV, MIDI and much more
In the early days of electronic music making, there were effectively only two methods of controlling electronic instruments: via their inbuilt controls – usually an assortment of keyboards, pads, rotaries and sliders – or via an external control signal. With those earliest instruments, control signals would take the form of control voltage and gate signals. These electronic signals use voltage values to transmit pitch and parameter information as well as on/off gate triggers, which could be used to trigger envelopes, sync internal clocks and more.
While it was possible to do a surprising amount with these simple control signals, the system had its limitations. For one thing, there’s an inherent slight unpredictability to control voltages, which meant timings and note pitches could go slightly astray at times. There was a lack of consistency across different brands’ instruments too – Moog and others used a system of one volt per octave to control pitch, whilst Korg and Yamaha gear used a ‘Hertz per Volt’ system.
In the early ’80s, MIDI (musical instrument digital interface) was developed by several major synth designers including Dave Smith, Bob Moog and Roland’s Ikutaro Kakehashi. MIDI had advantages over classic control voltage; it was an agreed standard that could be used by all manufacturers, but it was also capable of sending a more complex array of messages through a single cable, including note on, pitch, velocity, clock rate and position and program change messages.
Want all the hottest music and gear news, reviews, deals, features and more, direct to your inbox? Sign up here.
While MIDI has evolved and been expanded during the course of its lifetime, the core framework has remained pretty much the same – in fact, it’s only this year, after over 35 years, that an official MIDI 2.0 update has been announced. This forthcoming new generation protocol promises to increase the capabilities of MIDI devices, with tighter integration for DAWs and browsers, more expression and tighter timing.
One significant development that’s emerged in the meantime has been the rise of MPE – originally short for Multidimensional Polyphonic Expression, but now officially rebranded MIDI Polyphonic Expression.
Spearheaded by Roli, as well as Haken Audio, Roger Linn and Keith McMillen, this is a form of MIDI protocol that uses individual channels for each note played, allowing for expanded expression on a per-note basis. Whereas, for example, a traditional MIDI instrument will adjust pitchbend for every note in a chord simultaneously, MPE devices can adjust pitch modulation for each individual note.
Right now MPE is only supported by certain plugins, such as FXpansion’s Strobe 2 and Cypher 2, and DAWs, including Bitwig Studio, Logic and GarageBand, but the list is growing.
Another interesting development has been the resurgence of CV and analogue sync connections. This can be tied to the boom in both Eurorack modular and affordable analogue synths. The appeal is down to the inherent patchability of analogue connection too though; sure, MIDI can send multiple types of control messages via a single cable, but it lacks the creative satisfaction of individually patching modulators, clocks sources and triggers using an analogue patchbay or modular rig.
What’s new, however, is the ability to merge the worlds of digital connectivity and analogue patching. Software systems such as Reaktor Blocks, Bitwig’s The Grid and Ableton’s CV Tools allow for seamless connectivity between virtual and real world gear, while devices like Arturia’s Beatstep Pro make it easier than ever to sync between USB and CV.
Combining software and hardware
Traditionally, MIDI controllers and hardware sequencers tended to play different roles within the studio environment. The former was used to achieve hands-on control over virtual DAW or plugin parameters, whilst the latter could sync and trigger hardware synths and drum machines. However, recent years have seen an increased appetite for devices that can span both of these worlds.
If you’re looking to build a studio ‘hub’ to run both real and virtual instruments from a single controller, there are two ways to go about it. The first is to use a straightforward MIDI controller with a software environment capable of sync’ing with multiple hardware units. The best solution for this will depend on your needs. If you’re mostly working with MIDI equipped hardware, most DAWs will offer a solution. Native Instruments’ Maschine and Komplete Kontrol systems are good here, with preset NKS setups available for controlling many hardware instruments using plugin-style macros (see below).
For CV-focused or modular gear, there are now lots of applications capable of routing CV out of a computer using a DC coupled audio interface. The likes of CV Tools (included in Ableton Suite), Bitwig Studio’s The Grid and Reaktor Blocks all offer specific tools for sending digital sequence and modulation signals out of the box to analogue gear.
A second approach is to use a controller or sequencer equipped with both digital and analogue outputs. The likes of Novation’s SL Mk3 keyboards, Arturia’s BeatStep or KeyStep controllers or Pioneer’s Toraiz Squid all offer a mix of USB, MIDI and analogue connectivity. This can simplify sync and timing issues – using multiple MIDI connections from a single computer can lead to long sessions spent trying to balance latency or clock delay times, whereas running everything from a single hardware hub tends to result in a more solid timing foundation.
Incorporating hardware into a Maschine Mk3 setup
Native Instruments’ Maschine ecosystem has traditionally been fairly self-contained – whilst it’s been able to host third-party plugins for some time, as well as run as a plugin itself, for a long time it wasn’t really suited to working with anything ‘out of the box’. The introduction of Maschine Mk3 changed things somewhat though; by including both MIDI and audio I/O within the controller itself, it was a Maschine far better suited to controlling and sampling external instruments. In fact, NI themselves created a bundle of hardware control presets for precisely this purpose, which allows Maschine to sequence and manipulate a host of popular MIDI-equipped synths and drum machines. The addition of audio loop recording makes things more interesting too.

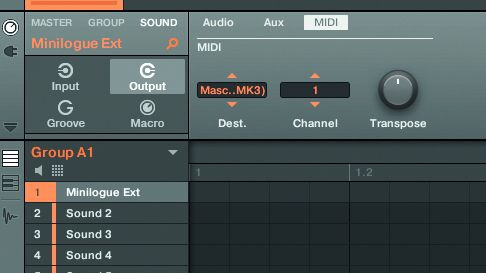
Step 1: Download NI’s hardware presets from bit.ly/NIhardware and add to the Maschine library. Run Maschine standalone to easily route MIDI out/audio in. Load the Korg Minilogue preset as a sound, connect the MIDI out to Minilogue and the synth’s out to Maschine’s input.

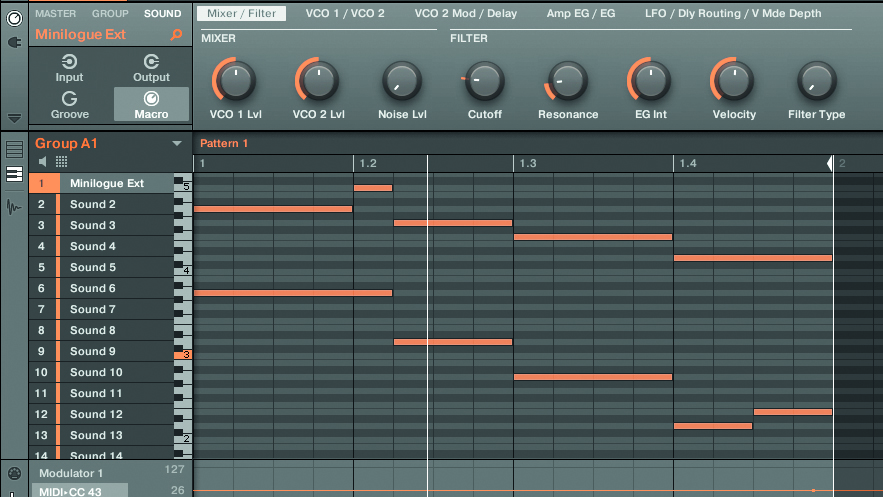
Step 2: We can now program a melodic pattern using Maschine’s piano roll, as we would with any internal/plugin instrument. The preset gives control over a variety of synth parameters using Maschine’s eight rotaries. Hit record and create some live filter automation!

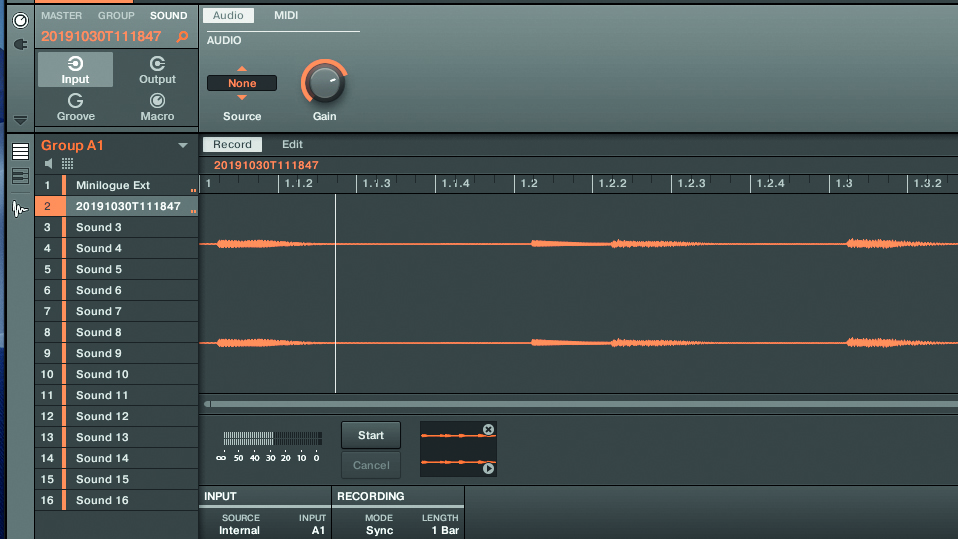
Step 3: On a new Sound track in Maschine, we add an audio looper and route our audio input here. This allows us to capture loops from the Minilogue, either to play back as clips or manipulate. Try using the gate mode to chop the loop or experiment with pitch and timing!
Quick tips
Tip 1: Most modern MIDI controllers generally come pre-mapped to one or more software applications, but don’t be afraid to break away from these plug-and-play mappings. There are plenty of tools out there that make it easy to build your own custom MIDI setups. Ableton Live, for instance, offers a simple touch-and-assign MIDI system. Bitwig Studio goes even further with a fully flexible custom controller API. Novation’s controllers, on the other hand, make use of their excellent Components system, which makes it easy to create custom assignments to control plugins or hardware.
Tip 2: Don’t be afraid to combine controllers! For example, Ableton Push and NI Maschine might seem like alternative takes on the same style of controller, but we’ve found they make surprisingly good bedfellows. Running Maschine 2.0 as a plugin in Live lets us use Maschine as an MPC-style beatmaker whilst using Push to sequence synths and tweak effects in Live.
Future Music is the number one magazine for today's producers. Packed with technique and technology we'll help you make great new music. All-access artist interviews, in-depth gear reviews, essential production tutorials and much more. Every marvellous monthly edition features reliable reviews of the latest and greatest hardware and software technology and techniques, unparalleled advice, in-depth interviews, sensational free samples and so much more to improve the experience and outcome of your music-making.
