Whether you’re recording live instruments for a rock production or stacking synths and samples to create electronic music, modern productions are often complex and comprised of many channels. As track counts soar, projects become messy and unmanageable. Thankfully, all digital audio workstations allow you to consolidate your signals down to submixes, to aid workflow and help you keep hundreds of separate channels under control.
But mixer grouping and routing aren’t just functional considerations - they also open doors to creative signal processing and sonic exploration. Intricate routing tricks, send/return effects and parallel adventures can turn fairly basic productions into something far more experimental and creative.
Here, we've put together six handy template-related tips guaranteed to tighten up your grouping. For much more on the subject, pick up the March 2018 edition of Future Music.

1: A standard approach when creating DAW templates is to set up commonly-used subgroups - drums, vocals, bass, and so on. Expand upon this by creating more focused groups that channel into those main buses: for example, ‘kick’, ‘snare’, hi-hat’ and ‘perc’ buses that then feed into your master ‘drums’ group.

2: Depending upon how you work, you might want to group a track’s signals by frequency content. So your hi-hats and sparkly FX might be better routed to a ready-to-go ‘treble’ group, while your kick and sub bass go to a ‘low frequency’ group. This way, you can refine the tonal balance of the mix per group.

3: Instead of grouping by frequency, you may wish to funnel sounds together that sit in a similar range of dynamics. For example, plucky hi-hats and transient-heavy elements go to a ‘sharp’ bus, but washy pads and squashed ride layers may go to a ‘flat’ group. This helps keep more of a handle on dynamics.

4: In many DAWs, parallel processing can be a pain to set up on the fly. Bypass the hassle by building this routing into your DAW template. Set up a ‘parallel compression’ group channel, then send this signal to an auxiliary housing your favourite compressor.

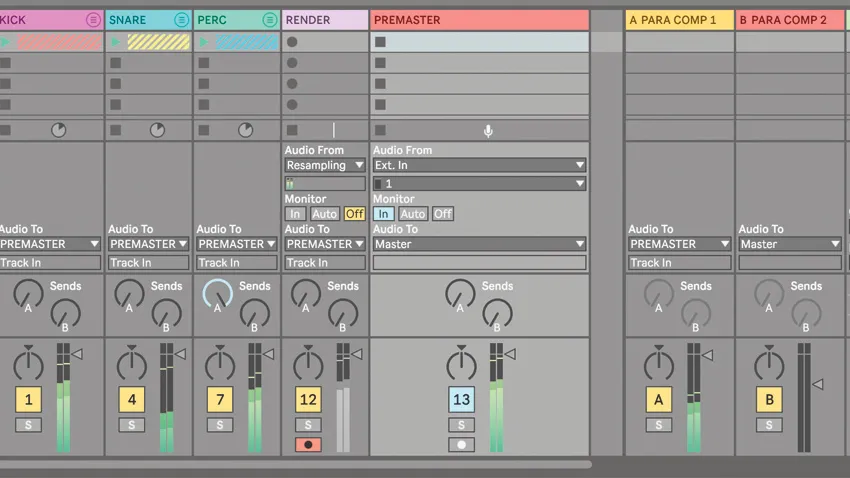
5: Another great trick is to set up a ‘Render’ group bus, with its output routed to a spare audio channel. Then, when you want to bounce a combo of signals to audio, you only need to route them to your ‘Render’ track and record onto the audio track. Easy!
6: Finally, it can be a good idea to pre-route all track signals to a final ‘Premaster’ group channel. This way, you can apply master processing to the entire track, but leave your master bus free, so that any reference tracks in the project can be routed straight to the master out, avoiding your master processes.
