5 guitar tricks you can learn from Gary Moore
A look at the style of a master blues improviser

Want all the hottest music and gear news, reviews, deals, features and more, direct to your inbox? Sign up here.
You are now subscribed
Your newsletter sign-up was successful
In this lesson, I look at some ideas and concepts that were often used by Gary Moore. Specifically, the task I have set is to see how you might go about creating a typical ballad intro section and how you might play rhythm and lead guitar ideas against it.
Gary was a fiery and passionate improviser. He was totally committed and he meant every single note. At the end of my video demo, I play what is hopefully a typical improvisation over the changes.
In this, all I really did was to take a few more liberties both rhythmically and melodically in order to achieve a freer soloing vibe. It’s important to realise that although everything here is busier and more intense, the underlying principals of hitting target notes combined with the occasional arpeggio still remains intact. And, with any luck, the result is the solo still maintains an appropriate melodic shape and integrity.
In closing, I would like to mention that as someone who knew Gary personally, I have found writing this feature to be been surprisingly cathartic. I just hope I went some small way to doing his legacy justice.
Finally, it is also worth mentioning that Gary’s brother Cliff Moore and his son Jack Moore are both fine guitar players and, in my opinion, well worth checking out. So, without further ado… let’s get stuck in!
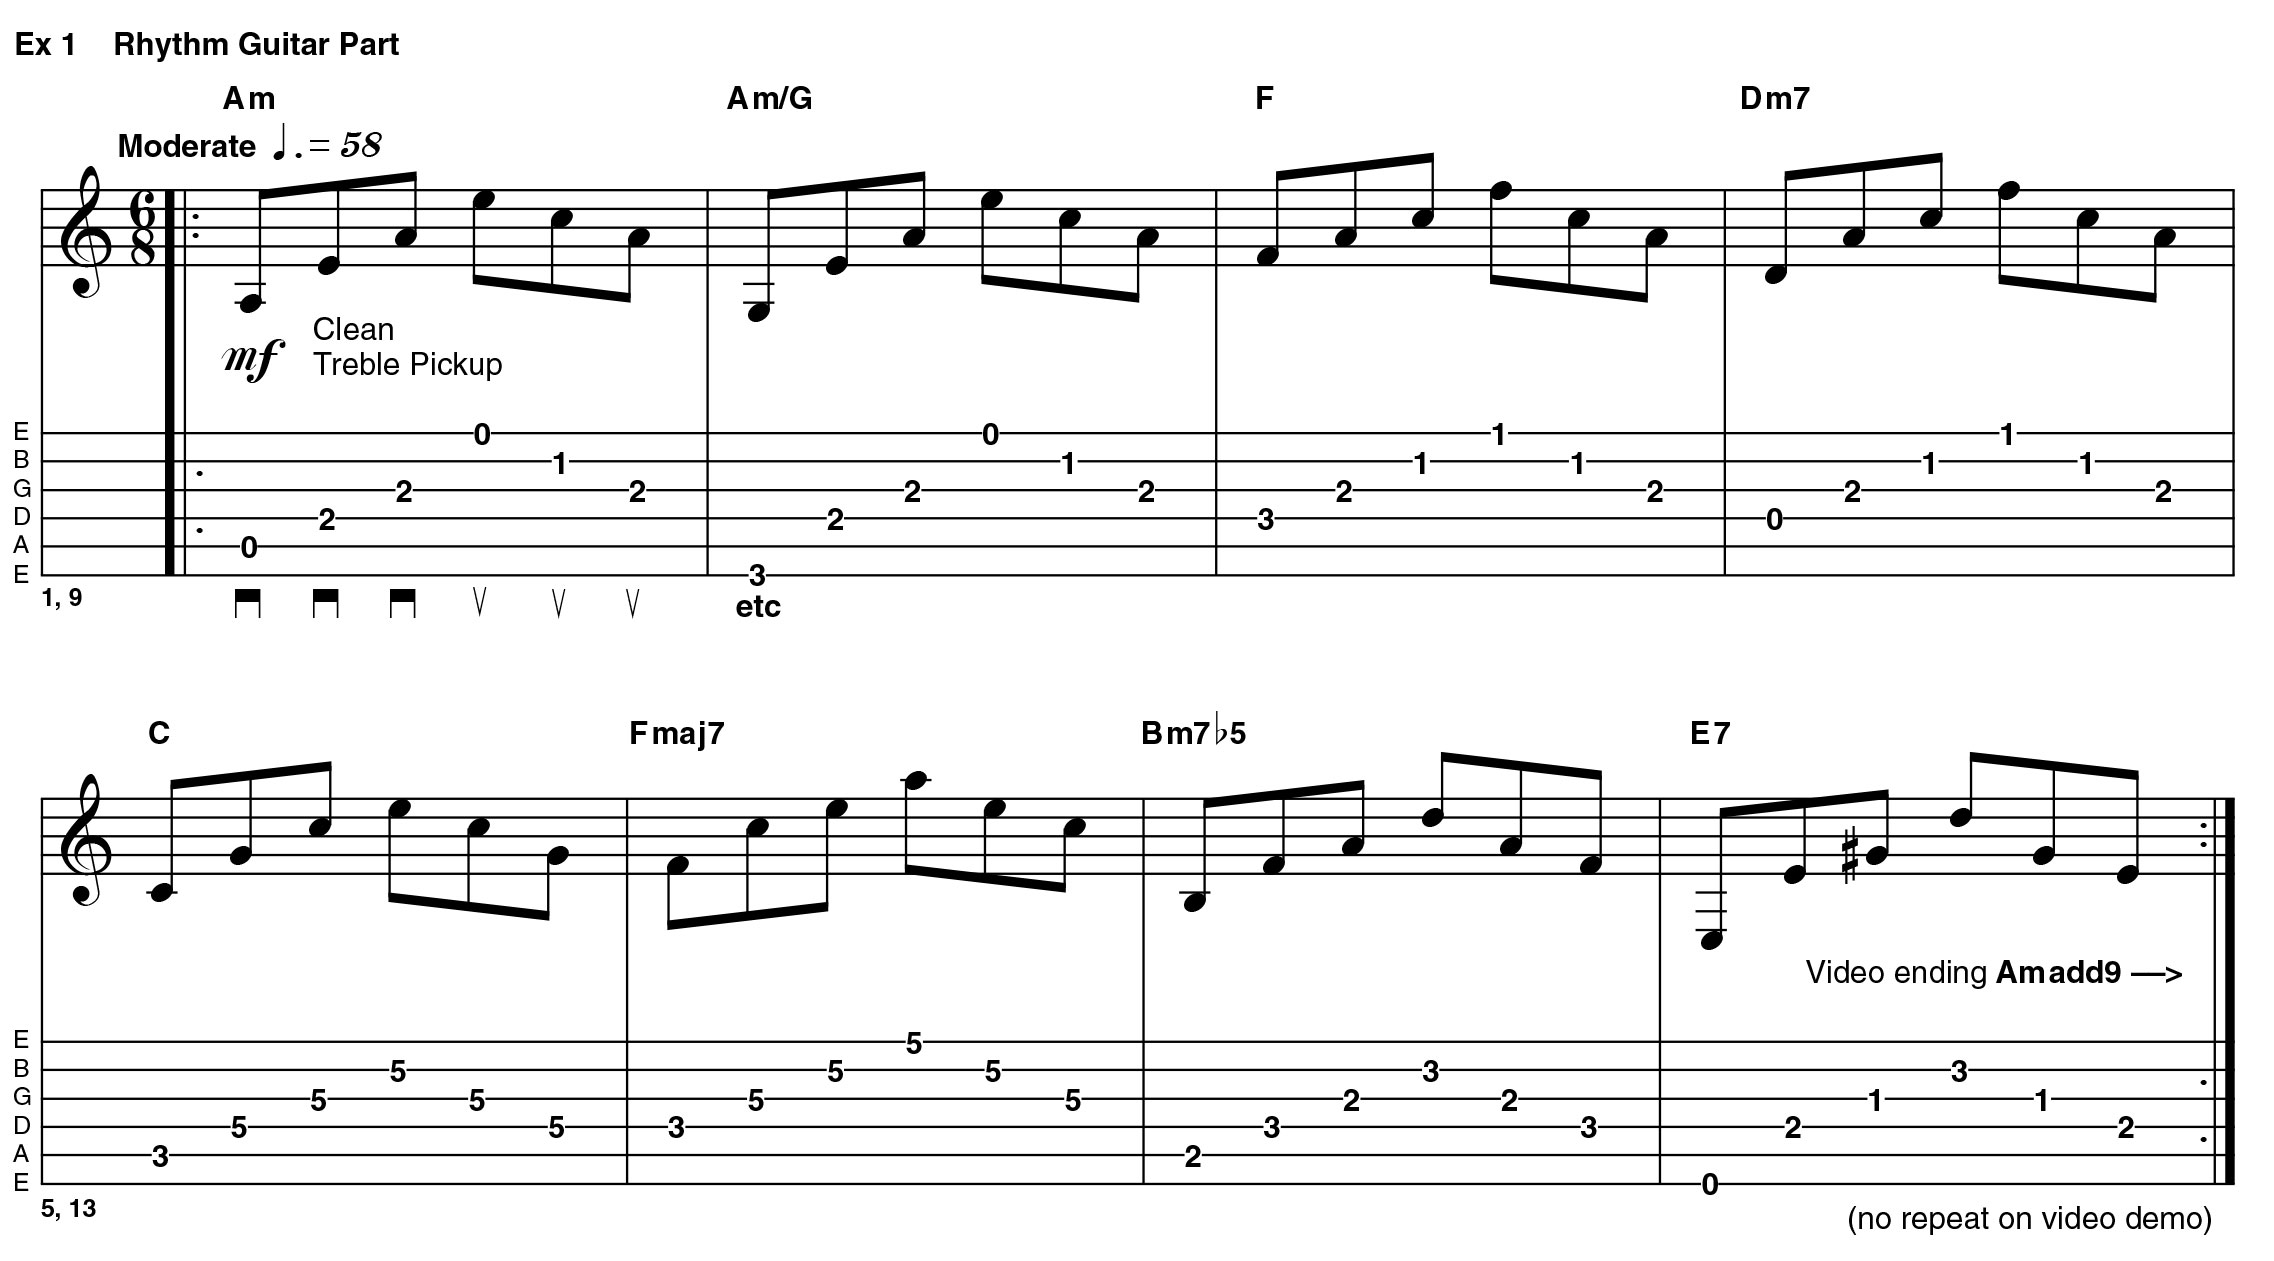
Example 1: Chord Progression/Clean Arpeggio Rhythm Parts
The progression kicks off with a descending bass Am, Am7/G, F followed by a typical diatonic ‘cycle of fourths’ progression, which as the name implies, sees each successive chord being played a fourth interval apart - here as C, F Maj7, Bm7b5, E7. Note how the final three chords form a ii, V, I of A (Harmonic) minor. Progressions very similar to this can be found in Blue Bossa, Fly Me To The Moon, I Will Survive and Parisienne Walkways, to name just a few.
Technically, the example contains a clean arpeggiated rhythm guitar part that involves picking in an alternating three-note ascending/descending pattern. Although this might appear easy, it’s quite difficult to perform accurately. Especially as you are required to play each note perfectly in time with constant even dynamics and with no notes accidently muted throughout.
Want all the hottest music and gear news, reviews, deals, features and more, direct to your inbox? Sign up here.
As far as your picking hand goes you have a choice of fingerstyle, a pick/finger combination or as I have done - a repeating all down, followed by all up picking scheme. Alternate picking is another option and can give you better definition. Try the above methods and use whichever you prefer. Gary usually added chorus to this sort of idea, but nothing too drastic. You can hear this kind of rhythm part in many of his tunes, such as Parisienne Walkways and Still Got The Blues.
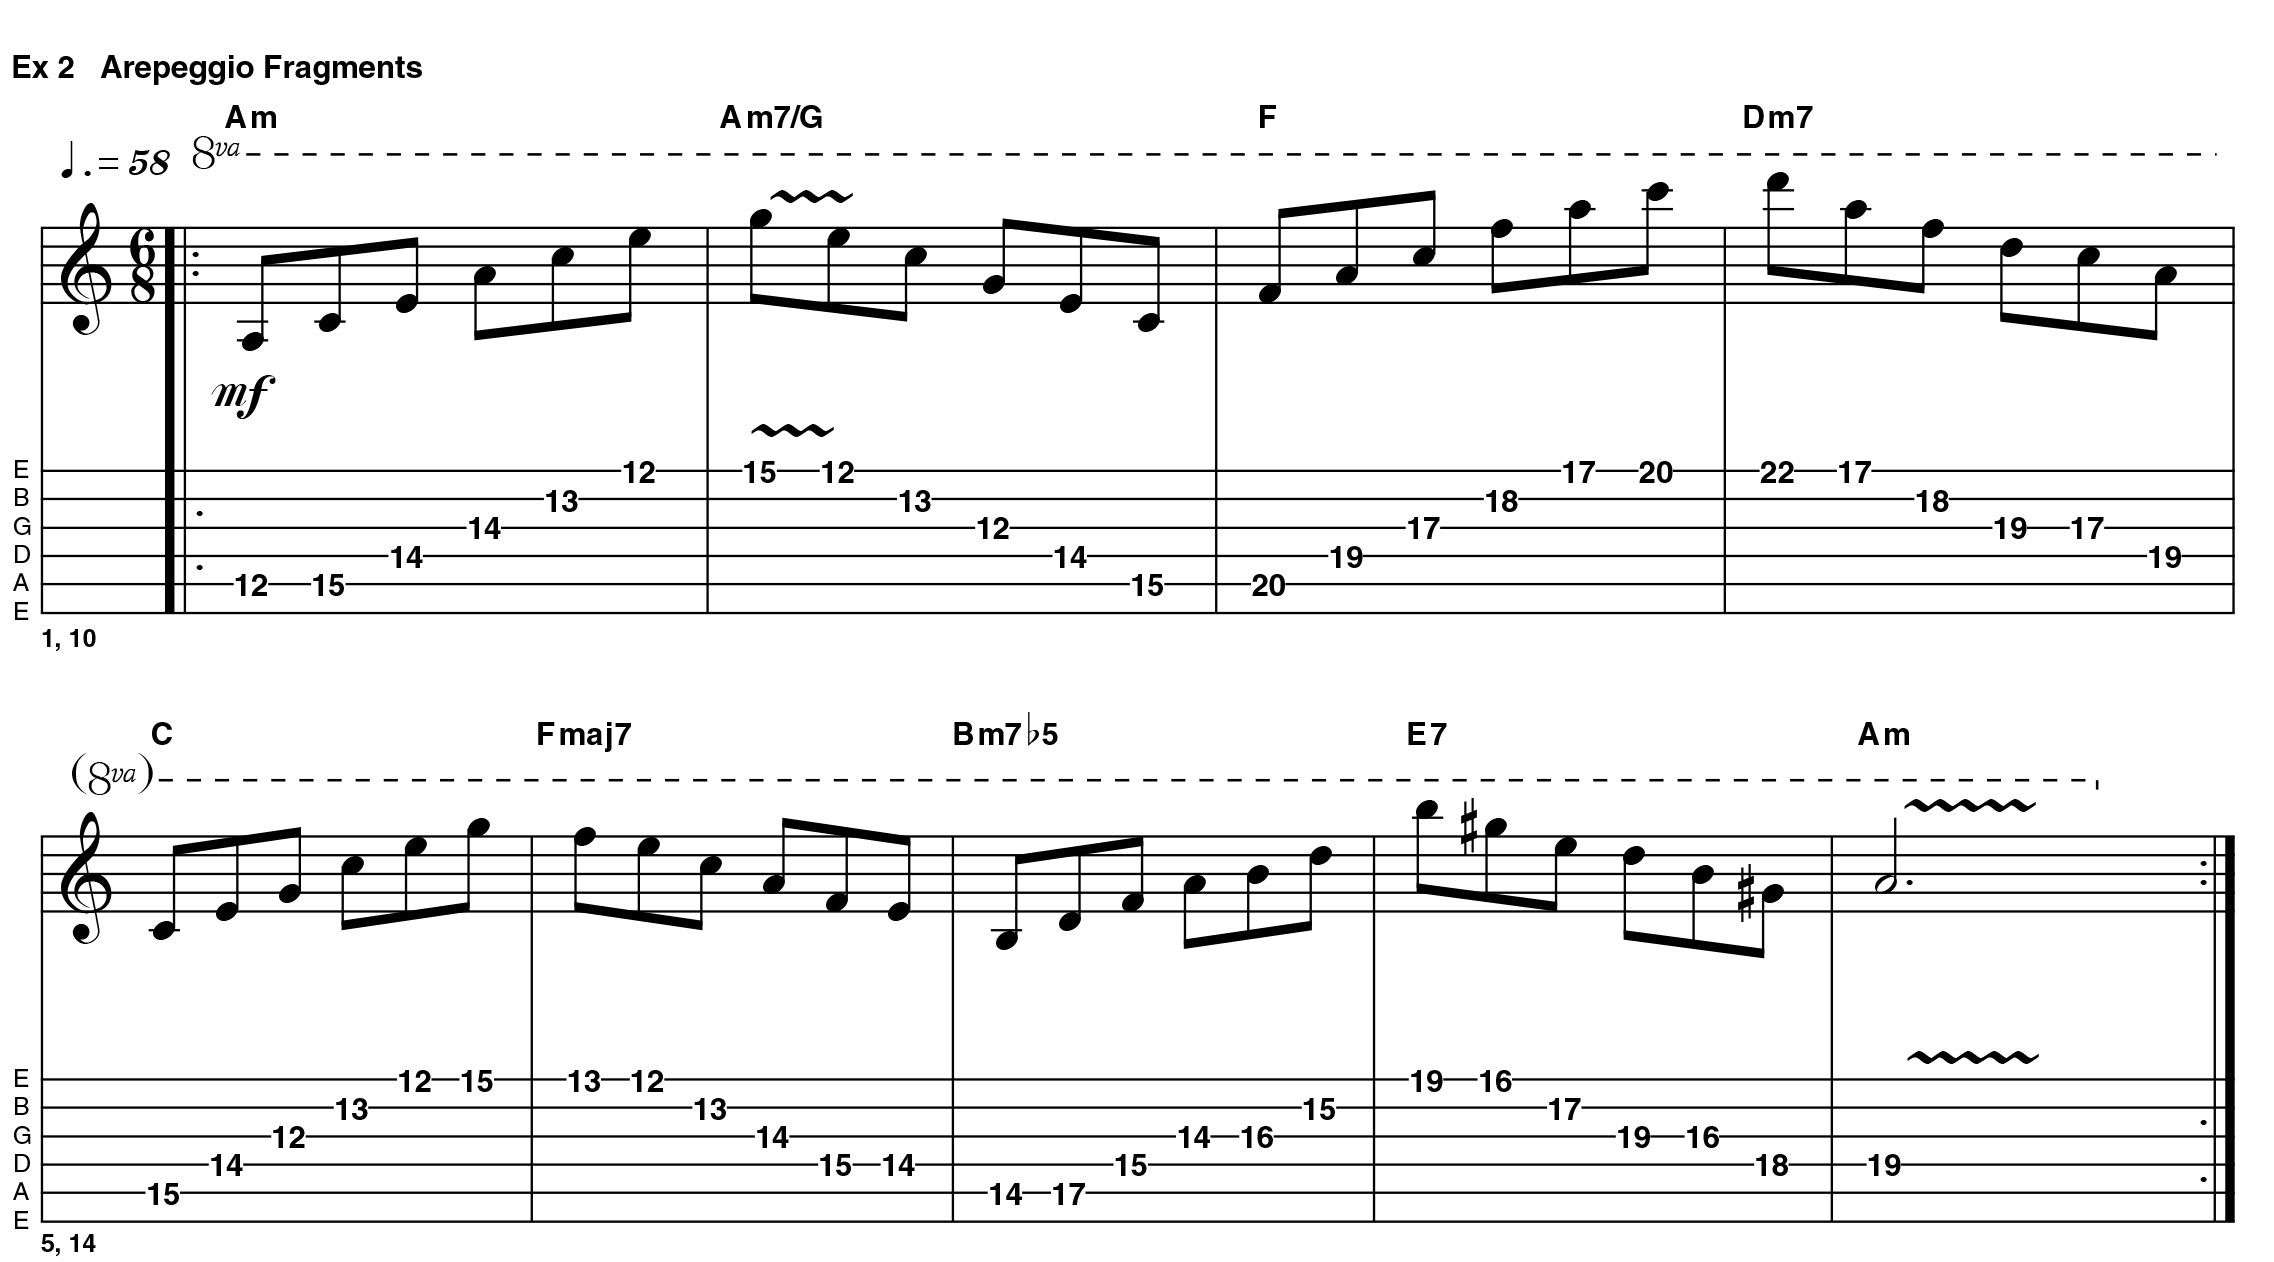
Example 2: Arpeggio Fragments Outlining The Changes
Once you have mastered example 1 the next thing is to come up with a lead part. An obvious way to get a melody is to sing one and find and play the notes on the guitar. Even if melody inspiration doesn’t strike as you’d like, you still want to navigate the chords melodically.
In this case, I suggest you familiarise yourself with every note in the chord progression and, in particular, how they connect between each chord change. Two ways of doing this are to play the chord progression in as many places on the guitar as you can and then do the same thing using linear arpeggio ‘fragment’ fingerings. In this example I’ve shown one way of navigating the chord changes using arpeggios. After mastering it try to find other fingerings and work them up over the changes for yourself.
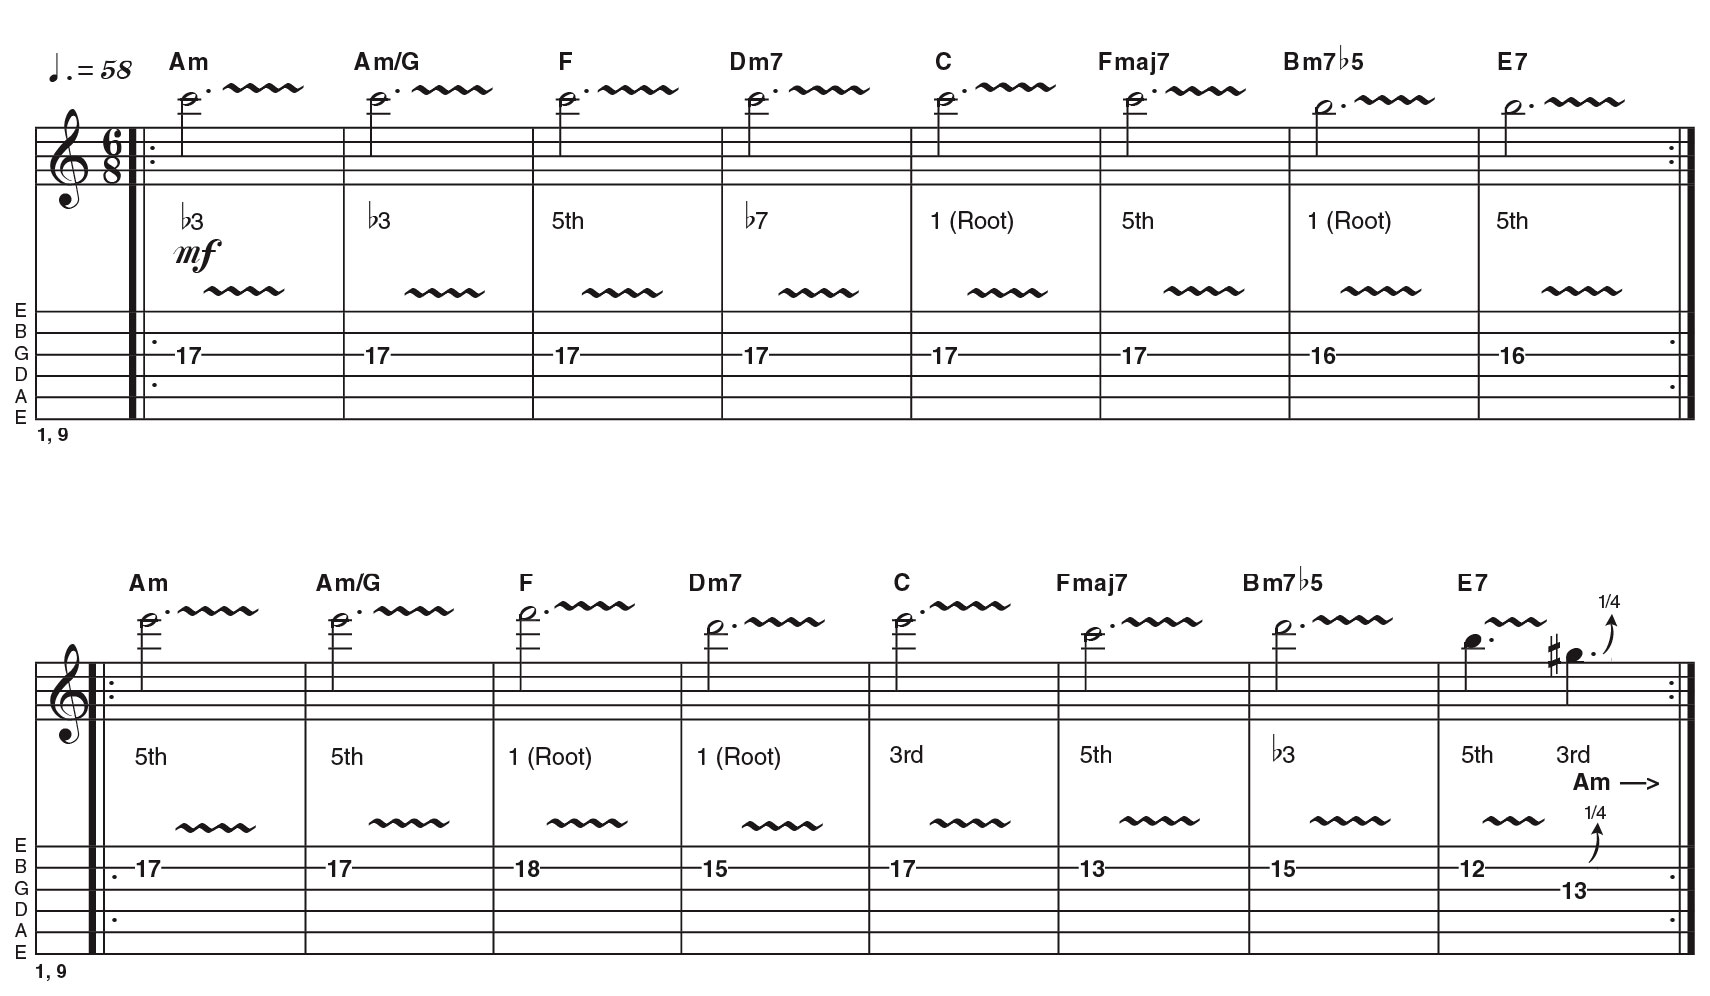
Example 3 Melodic ‘Guide Tones’
Now that you hopefully know all the notes in the progression you need to string them together to form coherent melodic lines. At this point I like to strip things back and try and find a few simple lines that I like, preferably using the minimum amount of notes. These lines can be viewed, as collections of safe musical ‘target’ or ‘guide’ tones that you know will work consistently over the chords.
In Ex 3 you will see how I’ve gone through the eight-bar progression twice and during the first eight bars there are only two different notes used. Knowing which notes can remain static while others move around is a powerful tool - you can often say a lot melodically without moving anywhere!
The second eight bars have a little more movement. Notice from the F chord onwards how the notes descend in thirds - first a b3 from F-D then a Major 3rd from E-C then a b3 from D-B. Being aware of this kind of movement is melodically powerful and great for thematic development, which by its nature often demands repetition. There are many ways of playing guide tones through these changes - find more on your own.
At this stage it’s a good idea to play these sustained notes with a vibrato that is in time with the music and is as wide or as narrow as appropriate. If you can’t make one sustained note sound great how will things improve when you add in more?
Also, be aware of how the chord tones connect with each other and how they relate to the underlying chord progression. I’ve written the intervals above the notation to help get you thinking in this way.
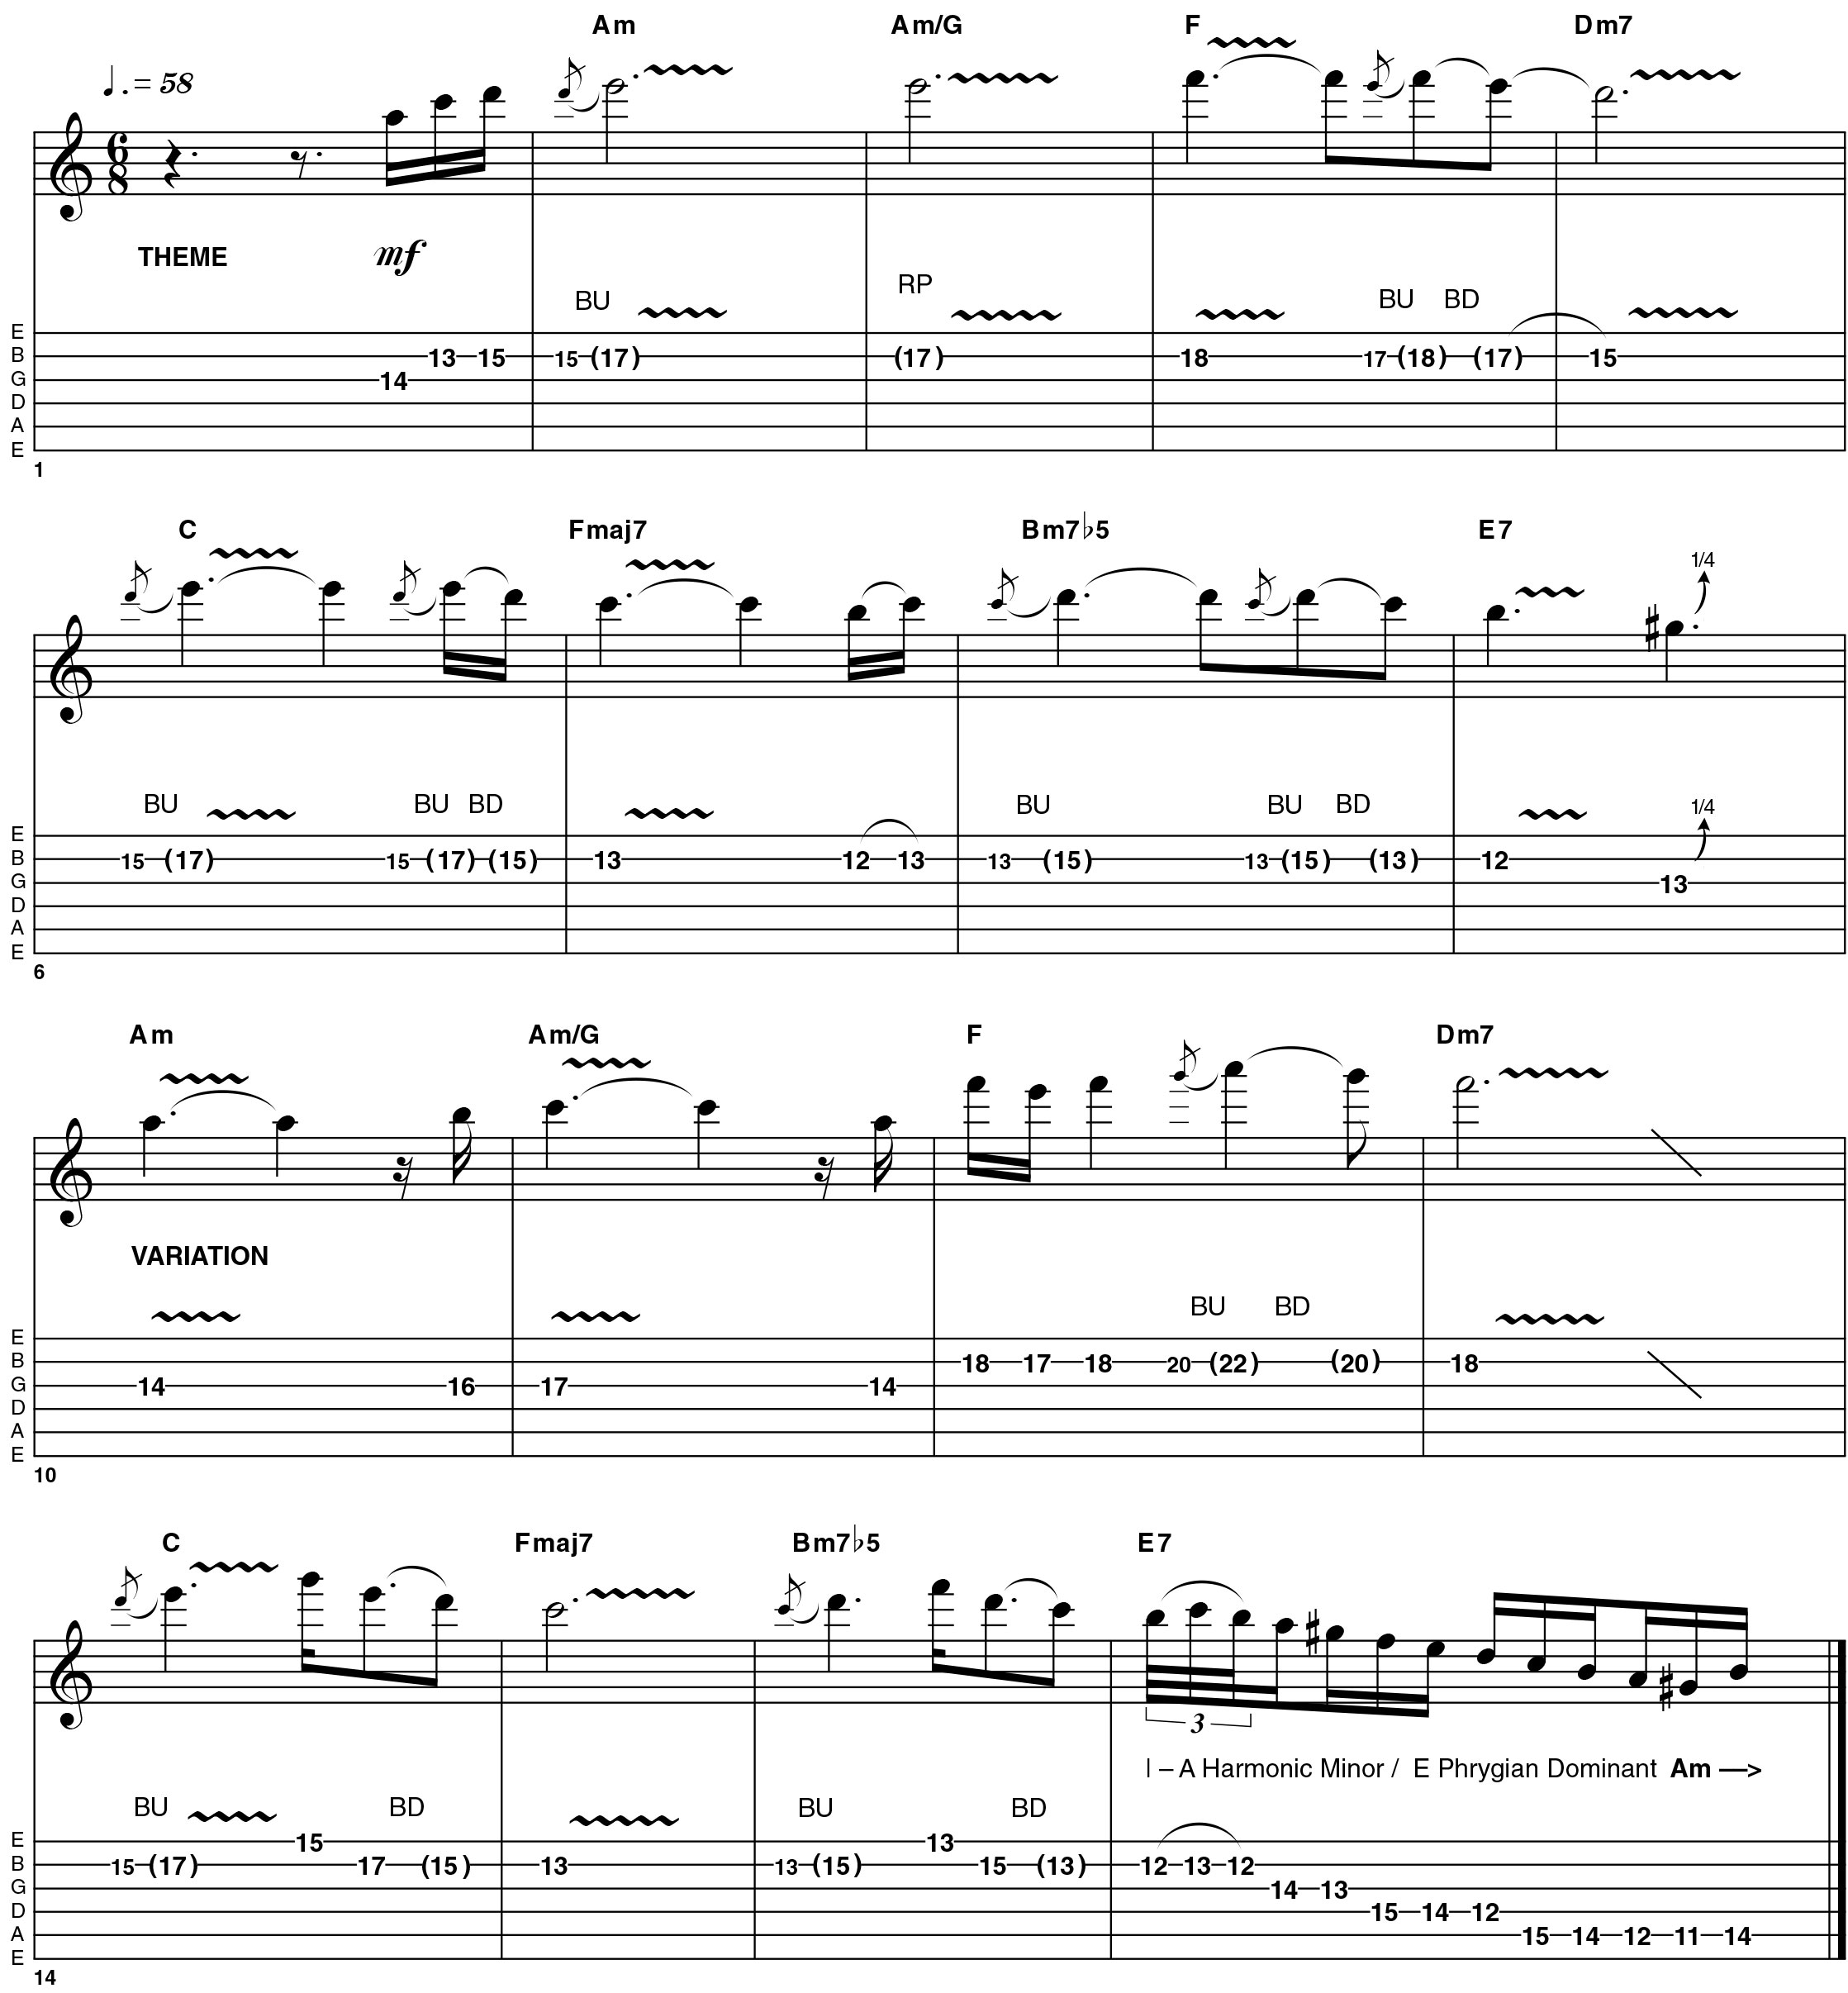
Example 4 Lead Guitar Tips
We can now put together all we’ve learned from the arpeggios and guide tones and come up with an effective and musical guitar part. Try the following:
1. Use a scale or arpeggio entry that starts before the ‘one’ - often on ‘& 4 &’ or ‘4&’ etc and end on a target note - this adds drama;
2. Throughout the melody keep guide tones in mind and treat them as places you will always be safe landing on;
3. Embellish the approaches and connections of the guide tones with a mixture of slides, bends or legato;
4. Use rhythmic repetition to establish a memorable theme;
5. Use string bends at emotive points;
6. Don’t overdo vibrato on the bends - Gary generally applied more vibrato to fretted notes than bends;
7. Don’t bend notes sharp - slightly flat you can get away with, but sharp is horrible. This also applies to vibrato;
8. Do play the same note more than once;
9. Space between ideas can be effective;
10. Start slow and end with a flourish;
11. Let notes, particularly bends, breathe a little sometimes by not adding vibrato immediately. Delay the vibrato by adding it after the note has been at the correct pitch for a short while.
Notice how I end the improvisation with an Am pentatonic idea over the Bm7b5-E7-Am and how I play the G note against the E7 for a more bluesy effect as opposed to the A harmonic/E Phrygian Dominant idea that I had played previously.


