Just as with programming beats, emulating a real drummer playing a fill via MIDI isn't as easy as it might at first appear. All the same humanising nuances in timing and dynamics are required, so notes need to be moved off the quantise grid and velocities will want tweaking at an almost per-note level. And in fact, positioning notes and selecting sounds for a fill is actually trickier than for a beat. While a beat usually comprises the holy trinity of kick/snare/hats playing a backbeat groove, with a fill, the toms and cymbals are thrown fully into the mix, and the programming template becomes far less standardised.
So, if all that sounds like far too much hassle, get your software to do the hard work for you. There are loads of automatic beat-generation and manipulation plugins available to the computer musician, and all of them can 'do' fills as well as grooves. Let's check some of them out…
For more on drum fill programming, check out the full cm Guide to Drum Fills in the July edition of Computer Music (CM231).

Step 1: If you're approaching the programming of a drum fill without any particular pattern in mind, you might actually be better off using a prefab clip or automatic 'fill generator' of some sort. Let's start with the simplest option: the MIDI clips included with many drum kit instruments. Here's Toontrack EZdrummer running off its own sequencer rather than that of the host DAW.

Step 2: As well as their core grooves, many EZdrummer 2 clip libraries also include a range of fills, captured as MIDI from real performances by real drummers. Let's build a fill in EZdrummer 2, then export it as a MIDI file. To start, simply drag a fill from EZdrummer's Browser into the sequencer at the appropriate point in the groove. Drag the left or right edge to shorten it.

Step 3: Selecting a fill in the sequencer and clicking its 'up' arrow opens the Edit Play Style window, wherein you can switch the 'lead' element (taking the emphasis of the fill from the snare to the floor tom, say) by moving the Power Hand tag, and select an Opening Hit to start the fill off. The dropdown menus on each give access to all articulations for the selected drum or cymbal.

Step 4: Right-clicking any element in the fill enables you to Cut, Copy and Paste notes triggering one drum to another, and adjust Articulation and Quantize options for that element. At the bottom of the Edit Play Style window, the Amount knob adjusts the number of hits played on the currently selected element, while Velocity raises and lowers the dynamic range of the triggering notes. Drag the fill into your DAW to export it as a regular MIDI clip.

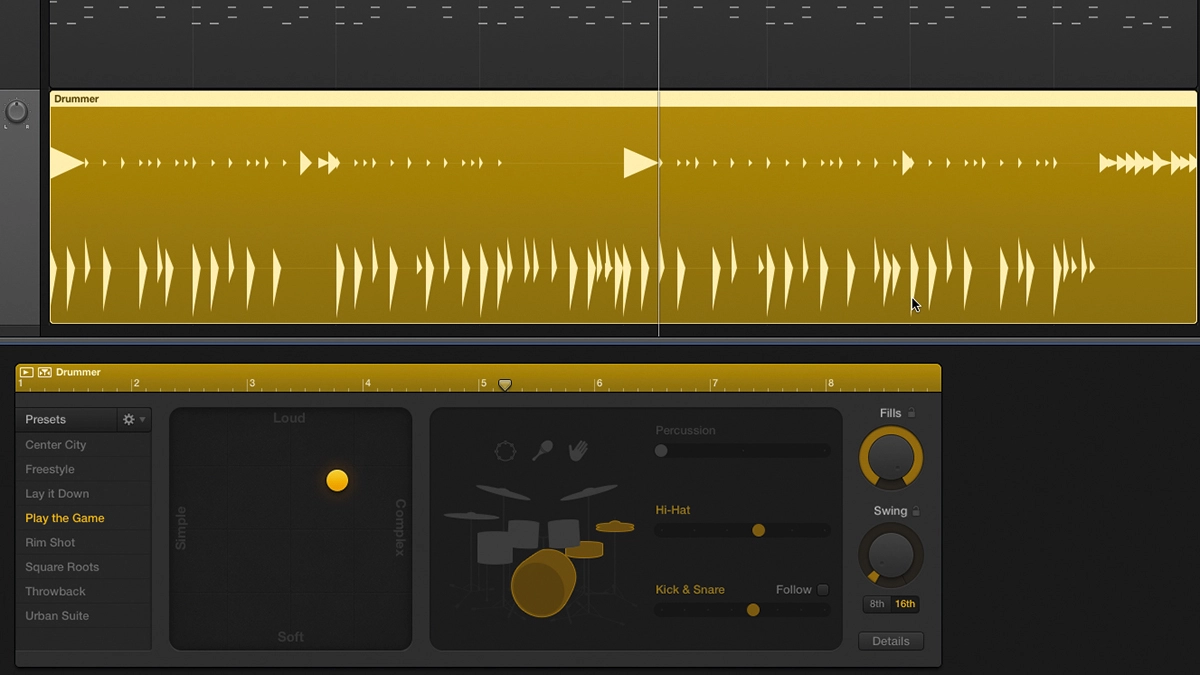
Step 5: Logic Pro X's Drummer is another great source of effortless drum fills that can also be nabbed as MIDI clips. Load it into a project and two eight-bar regions are created, from which you can extract a fill. Choose a drummer and preset befitting your track. Turning the Fills dial up or down increases the number of fills worked into the current region, and their length. Crank it all the way up and the Drummer gets very busy indeed.

Step 6: All of Drummer's other parameters affect its fills just as they do the main groove, so move the complexity/dynamics puck around to radically change the sound and feel. If none of the fills you're hearing are doing it for you, turn the Fills dial down and up again to generate some new ones.

Step 7: When you have the fill of your dreams, converting it from a Drummer region to a regular MIDI region is easy: either drag the clip onto a MIDI track, or right-click it and select Convert » Convert To MIDI Region. Now you can shorten the clip to encompass just the fill, and use it to trigger an alternative drum kit in Logic, or export it to another DAW altogether.

Step 8: Automatic generation of drum fills doesn't have to be done at the MIDI level - there are numerous 'glitching' plugins available that can be pressed into service to do it via audio slicing and repeating. Live's Beat Repeat is one such effect, and while the sounds it makes are never going to be mistaken for those of a real drummer, for hyper-real weirdness, it's awesome.

Step 9: Set your clip or Arrangement automation up so that Beat Repeat only activates when a fill is required, and bear in mind that, obviously, it can only repeat kit elements that are already present rather than generate them itself. So, if you're automating it to create a fill every 16 bars and you want toms in there, you'll need to place a tom or two in every 16th bar of the groove.
