It's very easy to get lost in a world of making pad sounds, as they're relatively easy and super-satisfying to produce. A good pad can add a ton of atmosphere and warmth to your music and change or direct the tone and feel of your composition. So finding out how to create your own pad patches instead of relying on presets will give your tracks a signature sound that's unique to you.
Here, we'll be using Cakewalk's highly flexible Z3TA+ 2, the super-powered sequel to the classic Z3TA+ synth used by many top-tier electronic music composers over the years. Z3TA+ 2 offers up to six oscillators, providing you with a large number of waveform choices, so it's the perfect tool for huge, multilayered pads. We're going to use up all six of those oscillators for this patch, set to various key and waveform types, arriving at a cool one-finger chord that will immediately inspire you to lay down interesting progressions, even if you aren't a seasoned keyboard player. It's an easy patch to customise to your own needs, too, so do give it your own twist!
A good pad sound slowly changes and evolves over time to keep it interesting, and to make ours stand out from the crowd, we'll be using Z3TA+ 2's flexible dual filters and envelopes to control an LFO for some ice-cool top-end shimmer.
To watch the video that accompanies this tutorial, get your mitts on Computer Music 216, which is on sale now.

Step 1: Load up Z3TA+ 2 and Initialise it by selecting Program>Initialize. We'll use all six of its oscillators, each one set to a different waveform with a pitch variation, eventually forming a sort of minor 11th chord. Because we only need the patch to respond to one note a time, set the Polyphony to 1 in the Master section.

Step 2: Set Osc 1 to Triangle>Vintage Triangle, and change its mode to Multi Sync, creating eight 'duplicates' of the same oscillator. Adjust the Spread knob to around 50% to detune these against each other for a fatter but less harsh sound. Set Osc 2 to Vintage Saw 3 and the Transpose to +10, but leave its other settings as they are.

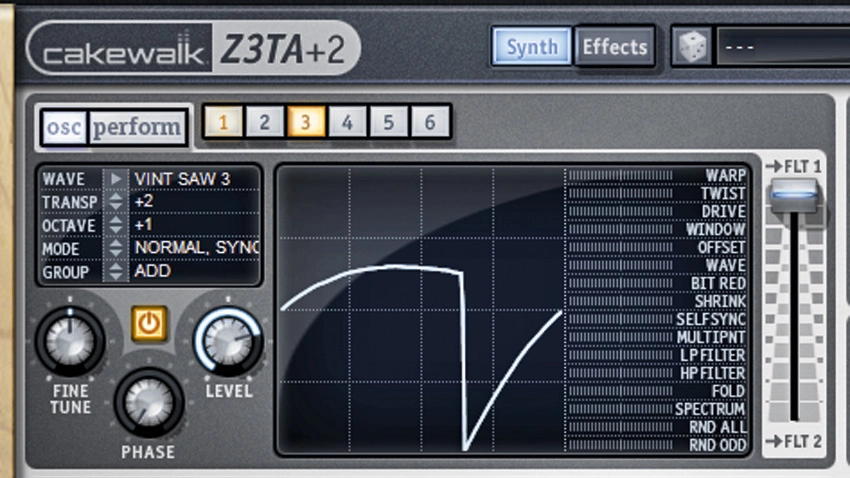
Step 3: Now, pitch up the remaining oscillators by an octave by changing the Octave setting to +1 for each one, which will make the sound brighter and more full. Set Oscillator 3 to Vintage Saw 3, change its Octave to +1 and set Transpose to +2. Set the filter slider all the way up to Flt 1 to send the oscillator's signal through filter 1.

Step 4: Set Oscillator 4's Wave to Vintage Square 3; Transpose to +3, and boost it up +1 Octave again, before sending it fully to Flt 1. For Oscillator 5, choose the Additive 2 waveform, Transposed to +5, at +1 Octave. Send it to Flt 2. Finally, set Oscillator 6 to Vintage Square 2, with a Transpose value of +7, and an Octave setting of +1, send to Flt 2.

Step 5: Set the filter to Dual mode, sending filter 1's output directly into filter 2 - putting them in series rather than parallel. Some of the oscillators are sent to single filters, and others go to both at the same time. Change Filter 1's Type to a 12dB/oct LPF (low-pass) and set the Cutoff to 16Hz.

Step 6: Let's create an envelope to slowly open up Filter 1, making the sound get brighter over the course of each note. In the mod matrix, send Env Gen>EG1 to Filter1 Cutoff. Change the curve type to Bilinear, and crank the range up to 100%. In the EG panel, select envelope 1, move the Amount slider to 100% and set the Attack dial to around 2.4s.

Step 7: For Filter 2, choose a 12dB/oct BRF filter. This will create an adjustable notch in the EQ spectrum, which sounds really pleasing to the ear in these kind of pad sounds. If you move the Cutoff, you can hear the effect. Set the Cutoff to around 1300Hz when you're done - we'll automate it with an LFO to create a sort of shimmering effect.

Step 8: Lets create that shimmering effect with an LFO that gets slower over time, assigned to multiple parameters at once. Create a new line in the mod matrix, sending LFO>LFO 1 to Filter2 Cutoff with a Bilinear filter type and a Range of 100%. Now set LFO 1's Wave 1 type to Sine, and crank the Speed all the way up to 20Hz.

Step 9: In order to make the LFO speed decrease over time, we need to assign an envelope to LFO 1's Speed parameter. Turn back to the mod matrix, and send Env Gen>EG 2 to LFO 1 Speed, with a curve type Fast and a range of 100%. Now in the EG panel, select envelope 2 and turn its Amount slider to 100% to activate the envelope.

Step 10: Set the Decay Time to 1.6s, the Decay Level to 19%, and the Sustain Time to 10s. The Sustain Level will determine the speed of the LFO once the envelope cycle has completed - set it to 0 and the LFO effect will slow down before eventually disappearing completely.

Step 11: Now we have our LFO set up, let's assign it to a few more things: in the Effects section, turn on the Equaliser/Simulator. Set the Simulator Mode to Off and create a rising ladder curve EQ setting, as shown, with the graphic EQ, removing all the low frequencies and boosting the highs to make it thinner and brighter.

Step 12: Go back to the mod matrix section and create two more assignments for LFO 1, sending it to EQ>Band 3 (EQ3 - the mid range) and EQ>Band 6 (EQ6 - the high frequencies). Set the Range to around 50%, so it doesn't completely overtake the sound. This adds a bit of movement in the lower mid range and some top end to our shimmer effect.
