With so many different techniques for shaping amplitude envelopes on the cards, it’s easy to forget that the audio editing and automation tools that come included with any modern DAW can be used for manual envelope adjustment.
To manually adjust the amplitude envelope of an audio part, simply edit the sample directly using a wave editor. To increase punch, for example, just turn up the volume of the whole audio part, then carefully draw volume automation in to decrease the volume again after the initial attack. This basically achieves the same result as using a compressor to reduce the volume of a sound after a
short attack time, before applying makeup gain – but can be controlled much more precisely.
Using audio fades on the arrange page is another way to quickly tweak the volume envelope of a sound. Snare sounding too flabby? Apply a steep fade out to the end of the sample, then shorten it until it tightens up! This can be done with a gate plugin, of course, but editing the audio directly will typically give a smoother, more immediate sound on a per-hit basis.
As well as using audio editing to make those fine amplitude envelope adjustments, we can also use some clever processing. Let’s run through some killer manual moves using the superb modulation plugin that is Xfer Records’ LFOTool.

Step 1: We can add some dynamics back into an overly compressed kick drum using Xfer Records’ excellent LFOTool (demo available from xferrecords.com). This is much quicker than editing the audio itself, making this an ideal technique to use when working with audio stems. To follow, set your DAW’s BPM to 128, then import Backing.wav and Kick.wav (click here to download) onto new tracks.
Step 2: Load LFOTool onto the Kick channel, then turn on Note Retrig (in Env mode) in the MIDI section. We can now use a MIDI note to trigger LFOTool’s built-in LFO envelope: add a blank MIDI track into the project, place a C3 note on every beat of the bar, then route the MIDI channel’s output back into LFOTool. Consult your DAW’s manual to find out how to route MIDI in your chosen DAW.

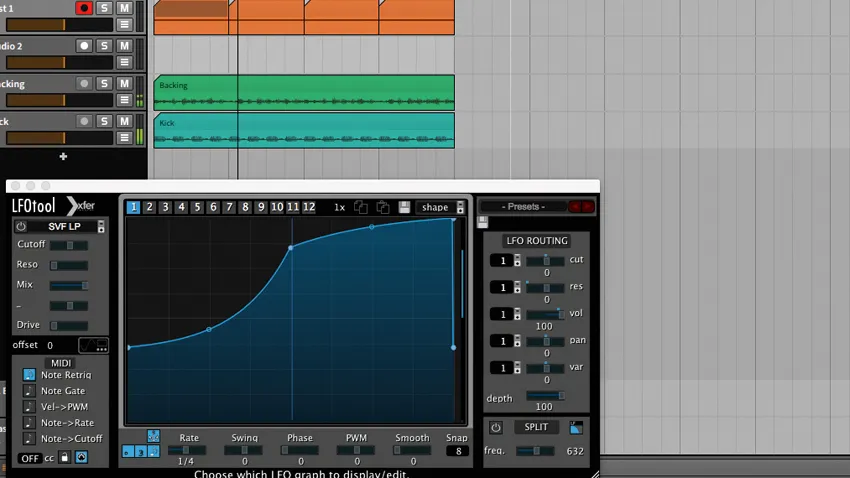
Step 3: Let’s start shaping the volume envelope of each kick with LFOTool. Pull down the Shape menu (top right-hand side) and select the eminently tweakable Flat 50 preset. Click the volume envelope’s left-hand point and pull it to the top left of the graph, before adding another point and moving it to the bottom-right. Drag the curve until the shape suits your source material.

Step 4: Our volume envelope now has a better shape for the job, but the kick still sounds a bit crunchy. To fix this, we’ll apply some fine adjustment to the envelope. Pull the central point down and left until the kick has a shorter, sharper sound. We can make the volume envelope curve a little ‘rounder’, giving the kick more body without it sounding too bloated.

Step 5: Adding another point to the volume envelope enables us to increase the perception of attack without making the entire kick overly punchy. We’ve got quite a tight volume envelope on the kick - turning LFOTool on and off a few times shows the difference our processing has made. Observe how the distorted midrange is being reined in.

Step 6: To finish, we’ll use LFOTool’s excellent filter module to shape the sound even more. Set the LFO Routing’s Cut control to -100 so the envelope modulates the filter, then load the Add Bass filter type. Set the Cutoff and Drive to around 20%, then turn the filter on and off - you’ll hear extra weight being added to the kick.
