We're always looking for new ways to imbue our sounds with life and movement; for example, on the macro level, we might add live instruments to otherwise tightly programmed pieces, bringing back that 'human element'. And on the micro level, we often turn to less predictable, non-linear analogue emulation plugins to warm up 'cold', 'digital' sounds.
Such techniques and tools can make our music sound alive and organic as opposed to artificial and robotic, but we can also harness unpredictability to break away from the inherent compositional tendencies that subconsciously guide us all, to generate unique ideas and sounds from scratch.
Using the elements of chance and randomisation, we can get our computers to do the creative legwork for us within a specified range of variables and rules.
Ableton Live 9, used in conjunction with Max For Live's prefab devices, constitutes a powerful set of tools for MIDI programming, and includes some specialist utilities for randomising parameters within Live.
Although similar results can be achieved in some other DAWs, Live offers chaos-minded MIDI effects devices such as Random and MIDI LFO alongside 'micro' Random parameters on some of Live devices (Impulse and Collision, for example). It's fair to say that Live has more onboard, readily usable randomisation functions than any other DAW.
Below we show you how you can take advantage of Operator's functionality, along with Live's MIDI effects, to create generative, ambient drones.
• For many more Ableton Live guides go to our massive learning hub: Learn Ableton Live and Ableton Push: music production tips and tutorials

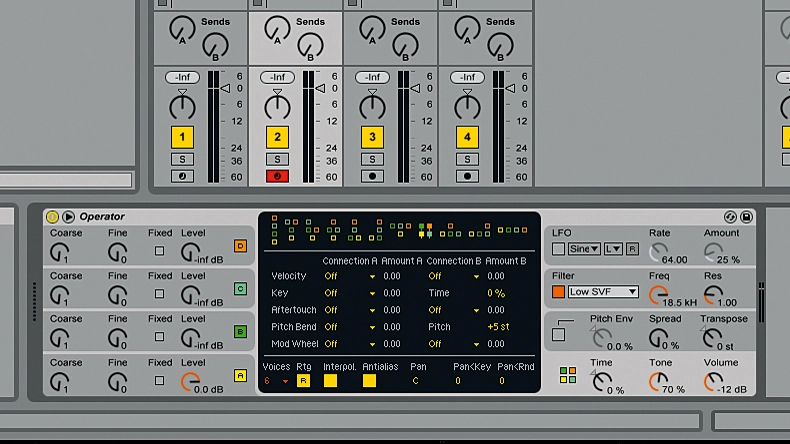
Step 1: Load an Operator synth into a new MIDI track in Live. Change the routing algorithm to two oscillators and two modulators by selecting the fourth algorithm (block diagram) from the right. In this mode, Oscillator B modulates Oscillator A, and Oscillator D modulates Oscillator C, giving us a good starting point for ambient drones. While you're at it, change the Voices parameter to 20.

Step 2: Select Oscillator A, and set its Envelope Attack to 5s and Release to 60s. Sine waves are a good bet for drone sounds using an FM synth like Operator, so set Oscillator A's Wave to Sine. Do the same for Oscillator C, then set its Attack and Release to similar settings to those of Oscillator A, its Coarse tuning to 5 and Level to -15.

Step 3: Now we have two Sine wave generators - one in the low frequency range and one higher up. Let's now program a generative note cluster. Create a one-bar MIDI clip and draw a short C2 note at the beginning of it.

Step 4: Let's shift this C2 note to a random pitch. Insert a Random MIDI plugin before Operator - it generates a random MIDI note pitch whenever it receives input. Raise the Chance parameter to 70% and Choices to 24. Now, 70% of the time, a random note up to 24 semitones higher than the input note will be generated.

Step 5: This is quite cool, but the random notes don't belong to any particular scale. To quantise the incoming notes to a scale, insert the Scale MIDI Effect between Random MIDI and Operator and load a preset - we've gone for Pentatonic in Black. Now when you play the clip, the result will be much more musical.

Step 6: Now we have our 'generative engine', but we need to stack the notes up over time to make an ambient drone. To do this, insert a Note Length plugin between the Random and Scale plugins and set the Length to 10s. This will hold the incoming notes for ten seconds. At this point, you might want to turn the track's level down to avoid clipping the master buss.

Step 7: For a more evocative sound, insert a Reverb after the Operator, set its Decay Time to 10s and Dry/Wet to 80%. In the Input Processing section, turn on the Lo Cut filter to prevent low frequency rumble. Now we have a suitably spacious base sound for our drone - let's randomly modulate it!

Step 8: So far we've not used Operator oscillators B and D, which are our FM modulators. Select Oscillator B and set its Wave to Square4. Insert an LFO MIDI device before the Operator, and set its Offset to -0.20, Rate to 3.00Hz, Depth to 5.00% and Smooth at 9 o'clock. Set the Type to Random and Map it to Oscillator B's Level parameter.

Step 9: Now we use the same technique for Oscillator D. Insert another LFO MIDI before the Operator. Set the Type to Random, Depth to 44.8%, Rate to 1.00Hz and Smooth halfway up. Map it to Oscillator D's Level. Play back the MIDI clip and enjoy some evolving ambient sounds!
