Hands-on with Ableton Live 9: MIDI editing and automation
We look at the changes to Live's automation options and Session View

We continue our week-long journey through the new features of Ableton Live 9 with a look at the DAW's latest automation tweaks.
Computer Music sat down with the public beta version of Live 9 earlier this year, and what you read here are the things they learned from several days of exploring every nook and cranny of this major update.
MIDI editing and automation
Certain DAWs (we're specifically thinking of Cubase and Logic) have long boasted huge and deeply powerful MIDI feature sets, largely because they evolved from MIDI-only sequencers that had to offer the most MIDI editing bang-for-buck to compete.
Newer, more audio-centric DAWs don't feature quite the same level of sophistication, but Live has had MIDI for nearly a decade now, so we do have relatively high expectations of it in this area. Live 9 sees the introduction of some long-overdue MIDI features, along with some typically Ableton twists and inventions.

One of these is the Duplicate Loop function. No longer do you have to drag and copy a bar of MIDI drums or synth riffery over and over again in a small, unforgiving edit window. Simply hit a button and Live will automatically duplicate the notes and extend the loop. And it doesn't stop there: double and half-time are now available - so you can play a riff in slowly, then simply double it, rather than slowing the whole track down then speeding it up again.
Then there's the new Transpose function. Rather than dragging a whole section of MIDI notation up and down the screen, you can use a dialog to specify the destination for the top or bottom notes, upon which the whole lot (or just the selected section) will shift accordingly. Or you can drag the value in the same dialog.
The Legato mode automatically extends (or shortens) all notes to meet the next note. There's also the endlessly fun reverse (and drag to extend or reverse) MIDI note editing function - actually, it works on envelope automation too.
Want all the hottest music and gear news, reviews, deals, features and more, direct to your inbox? Sign up here.
The Invert Notes function switches your played notes around the horizontal axis in the piano roll, so that the intervals are kept but the top and bottom note values, for example, are swapped.
There's more to Live 9's MIDI overhaul than just that lot, but we've got quite a bit to get through here, so let's move on.
Automation curves
If there's one thing that's been on our 'please, please, please' list for a long time now, it's automation curves.
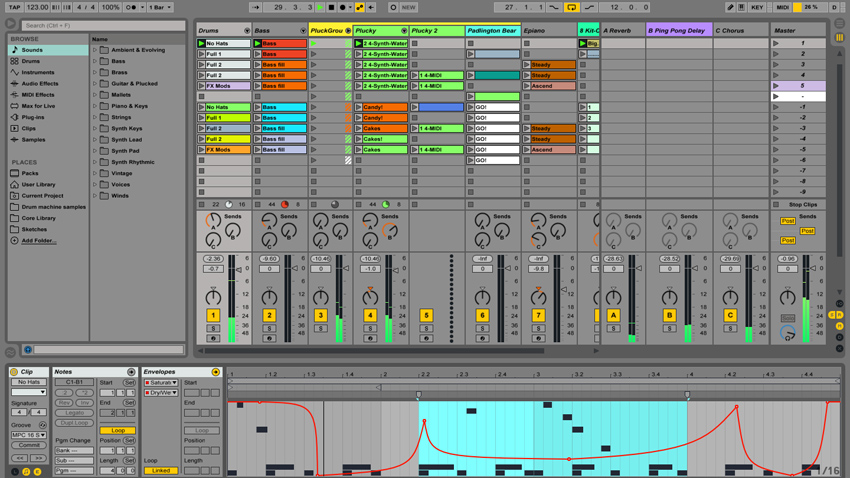
Being able to draw in curved envelopes is much more effective and natural than the previous 'straight line' system. Automation editing has been further streamlined by the introduction of one-click automation edit point creation.
We've saved the best automation news for last, however: you can now draw automation (not just modulation) clip envelopes in Session View! Appearing as it does in the Arrange window (and transferable in either direction), you can now apply complex automation control to any Session clip, which brings a huge amount of power and flexibility to Live as a live performance system, and paves the way for much more creativity in the Session view prior to committing to the arrangement in the Arrange view.

It also brings with it a huge improvement to Session-Arrange view relations. Suffice to say, this is a long overdue killer feature.
Session View
One of the best things about Live has always been the way you can use it as either a live performance tool or a standard arrangement-based DAW. The fact that you can use the Session view to compose and record affords you the best of both worlds, enabling you to create arrangements on the fly, which are recorded in their entirety - automation and all - into the Arrange window.
To date, though, it's been a one-way street: Having created a great arrangement on the fly, then edited it to perfection in the Arrange window, you couldn't then easily port it back into the Session view for live performance. Until now.
With one simple command, you can now highlight an entire section of arrangement in the Arrange view and turn it into a fully playable scene in the Session view (complete with automation), making it far, far easier to take your studio masterpiece out on the road for a live show.
And even the strictly studio-bound producer can now lay out vocal sections in the Arrange view (far easier to do there), then take the comped performance back into the Session view to create a live arrangement. The best of both worlds just got a little better.
Tomorrow: Push... And the rest!
We round-up more of Ableton's new additions
Computer Music magazine is the world’s best selling publication dedicated solely to making great music with your Mac or PC computer. Each issue it brings its lucky readers the best in cutting-edge tutorials, need-to-know, expert software reviews and even all the tools you actually need to make great music today, courtesy of our legendary CM Plugin Suite.
