
Countless electronic musicians suffer from getting stuck in a loop – endlessly starting ideas but never seeing them through. Today, we’re here to help you break free of writer’s block and finish more projects than ever before.
For all of their flexibility and power, our modern, computer-centred studio environments can often work to hinder productivity as much as drive it. The sheer scope and choice can be overwhelming.
We have access to millions of potential sounds, software recreations of practically any piece of gear you can think of, an unlimited well of samples and sources of inspiration – all of which can be endlessly edited, saved in multiple reworked versions, recalled instantly. It’s easy to get overloaded with choices and information; and that’s before we even consider the distracting peril that comes from constantly being connected to the internet and social media.
Some musicians are lucky enough to only experience these struggles on occasion, whereas for others it becomes an endless cycle, preventing them from completing anything musically worthwhile
These are just some of the factors that can result in the infamous ‘writer’s block’. It’s not a condition that exclusively affects music makers, but it can hinder us – particularly solo producers – in some specific and unique ways. Symptoms include overworking a simple musical idea into an overblown mess, abandoning projects that are 80-90% finished to start something new, or cold sweats and sleepless nights at the mere prospect of turning an eight-bar loop into a six-minute record.
Some musicians are lucky enough to only experience these struggles on occasion, whereas for others it becomes an endless cycle, preventing them from completing anything musically worthwhile. How can we train ourselves to break out of this loop and become the sort of artist that naturally develops unfinished sketches into full-blown releases? How can we develop a workflow that lets us naturally turn our basic ideas into satisfying arrangements?
In this article, we’re going to take a look at some of the problems preventing you from finishing music and discuss strategies to help overcome them.

Why is it so hard to finish a track?
There are certain conditions specific to electronic music-making that can make writer’s block a particular problem. To understand why, it’s important to consider that the act of making music has changed dramatically over recent decades.
Back in the earlier days of recorded music – and still commonplace throughout a lot of rock and pop – multiple professionals would be involved in the creative process, each focusing on a specific role.

The artist(s) themselves would channel all of their efforts into writing the song, a studio engineer would be responsible for tracking, someone else might mix the separate tracks together, and a final person would master the record and deliver the finished product. Potentially all overseen by one or more ‘executive’ producers. Each individual could fully concentrate on their assigned task without deviation, whether it be creative or technical.
For a lot of modern music-makers, these separate roles have now merged into one. Solitary individuals try to tackle each part of the music-making process within the same studio session, working on every element of a track from writing through to sound design, mixing, arrangements, mastering and even the artwork and logistics of a release.
This jack-of-all-trades approach can mean that we’re constantly interrupting the creative side of our brain by letting the logical side of our consciousness to take over
There’s an undeniable freedom to all of this, and it certainly allows many creative artists to shine in a way that could well be throttled out of them by the traditional world of major studios and record labels, but this jack-of-all-trades approach can mean that we’re constantly interrupting the creative side of our brain (responsible for generating ideas, composing, jamming and arranging) by allowing the logical/technical side of our consciousness to take over.
To overcome this conflict, be aware of your own habits and divide sessions into focused ‘jobs’: for example, if you’re creatively jamming and composing, don’t try to EQ and compress each sound there and then. Likewise, set aside a dedicated mix session once creative tasks are complete. Compartmentalise sessions and you’ll be able to reach the frame of mind needed for that task.
Arrangement 101: How to escape the 4-bar loop and turn ideas into complete tracks
The challenge of solo creativity comes down to more than simply getting distracted, though. A creative process that involves multiple people also allows us to respond to ideas in a way that’s hard to do by yourself. It’s far easier to bounce ideas between two or more people than it is to endlessly work on them by yourself. That’s why, aside from the tactics we’ll examine below, collaboration with other creatives remains a great way to boost your musical output.
A certain amount of discipline is key too. Set yourself a target of a set number of hours in the studio, then do everything you can to finish a track in that time; focus upon speed and the ‘big picture’ broad strokes; switch off from any technical aspect (mixing, synth design etc) and keep the momentum going as you race towards the finishing line. The goal is to reach a zen-like state of mind where the track pretty much writes itself – something that only comes through practice and discipline.
5 rules to help you finish more tracks
Regularly finishing creative projects takes self-discipline. Try following these workflow rules to help motivate yourself.
1. Don't abandon anything
If you reach an impasse with a project and can’t get it over the finish line, don’t simply delete your work. Make sure to save your in-progress projects – and label them clearly – so you can return to them later.
It’s amazing how returning to something a few days, weeks or even months later can allow you to see it from a fresh angle. Better still, bounce out individual elements from the project, such as beat loops, chords or riffs, so that they can be used as later ammo.
2. Don't hoard half-finished ideas
Perhaps contrary to that last tip, don’t get into the habit of simply filing away every project and ending up with a hard drive stuffed with an ever-growing stack of half-finished tracks. Enforce a hard limit on how many projects you allow yourself to have on the go at any one time.
For example, set a maximum of ten projects you’re allowed to keep, and when you reach this limit, force yourself to adapt or finish an existing idea before you’re allowed to start anything new.

3. Set deadlines
Most of us find we work quicker and more efficiently if working towards a deadline. This can make it much easier to finish a track when working towards, say, a delivery date set out by a record label.
Even if you’re working independently though, try enforcing deadlines on yourself. Create tracks specifically for a gig or DJ booking, or aim to finish a track every week or month. Be realistic though; deadlines can be great, but equally can have a negative effect on your outlook if you repeatedly miss them.
4. Remix yourself
Starting from an existing finished project and rearranging it is often a lot easier than creating something new. Try starting with a track you’ve previously finished and using it as a basis for your next track.
Somewhat counterintuitively, this can actually be a great way to prevent yourself repeating ideas. The rule you need to set here is that your new track must be completely different from your starting project, thereby forcing you to up-end your previous sounds and track elements.
5. Stick to the plan
It can be easy to get distracted by a new idea halfway through making a track and end up completely changing the feel of your original idea. This could create something great, but also result in losing something good just because it no longer feels fresh.
Avoid this by devising a plan of what you want your track to be before you start, for example ‘130bpm percussive techno tool’, ‘beatless synth jam’, ‘peak time DnB’. Stick to this original aim, filing any new ideas that arise along the way to one side for a later date.
3 strategies for creating finished arrangements
Learning how to flesh out tracks is key to becoming the sort of musician who finishes every idea. Most electronic musicians have experienced getting ‘stuck in the loop’; creating simple 16- or 32-bar phrases, but then losing motivation when it comes to turning these into full length arrangements.
Working quickly is crucial. Rather than listening to one looped section for hours, getting even just a rough arrangement down can help overcome one of the major hurdles in the track finishing process
1. Start arranging early
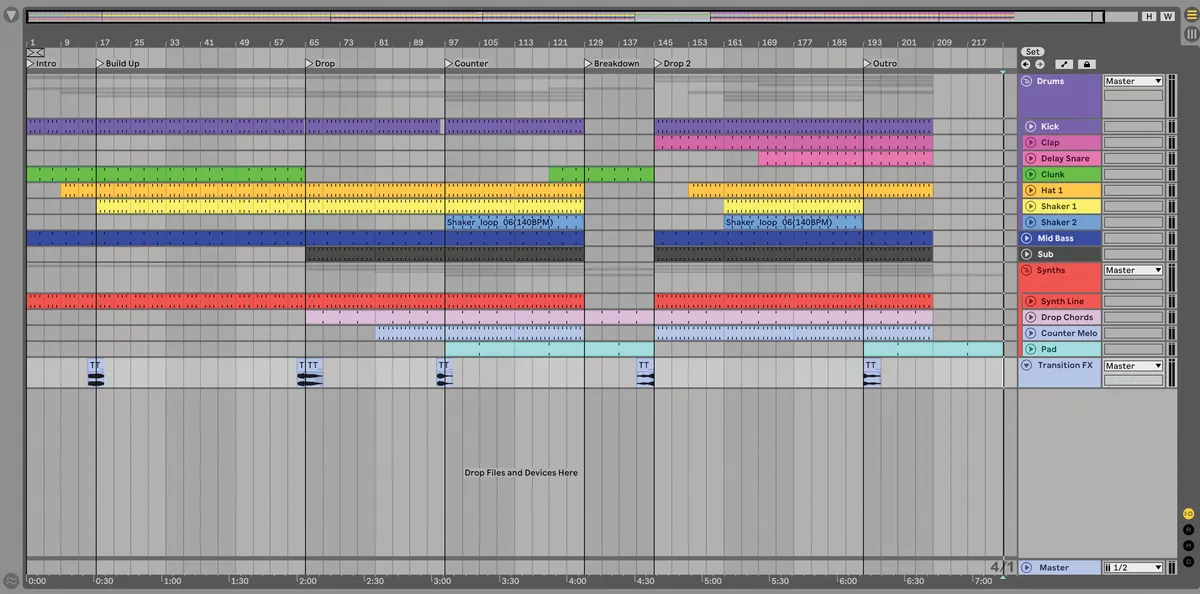
Make a habit of sketching out an arrangement early on in your creative process. As soon as you have a few fundamental building blocks – for example, a chord progression and basic beat – duplicate these across your timeline to create the foundations of a full track. Delete elements as necessary to designate an intro, outro and breakdowns. Break your arrangement up into 8-bar sections and colour code or label these for easy delineation.
Your aim now is to change the energy of your track in some way each time you reach a new section. As a rule of thumb, there are three ways to do this: add an element, remove an element or change an existing sound – for example, changing the instrument used to play your lead melody, or moving part of your bassline up or down an octave.
Knowing when to add and when to take something away is a matter of personal preference. The classic method, in dance music at least, is to build energy by adding new elements up to the breakdown. However, there’s no reason not to try inverting expectations or making multiple changes at once.
2. Finding the hook
One important step when it comes to developing a track lies in establishing what element provides the focal point, aka the hook, of your track.
This should be the most distinctive element of your composition. In a pop or rock song this would usually be the lead vocal, but when it comes to electronic or instrument music, the hook could be any number of things, from a lead synth riff to a bassline or even, at the more percussive or experimental ends of dance music, a particular percussion sound or rhythmic pattern.
Whatever genre you’re working in, however, you should be able to identify a specific focal point for your track (even the most ambient music is likely to put a specific sound or texture to the fore above others).

The reason it’s important to identify this focal element is it will inform a lot of your decisions when it comes to arranging. For instance, your hook will likely be something you want to build up to, meaning you may choose to remove it from your track’s intro and breakdowns.
It will also provide the basis from which to create elements like counter melodies. For example, if you have a descending synth riff as your lead hook, try creating a counter melody that ascends through the same scale, with a rhythm that works around, rather than on top of, your lead line. Introducing this in the background after two or four repetitions of your lead will help add depth and keep your lead hook fresh.
3. Transitions and automation

Following the steps above will allow you to turn your ideas into a basic arrangement, but the result will likely sound rather static and abrupt – like a collection of loops strung together, as opposed to a finished composition. The key to changing this lies in creating dynamic movement both within and between sections.
The easiest way to do this is by using transition FX. These are things like white noise sweeps, pitched risers, crashes or reversed cymbals – elements that can be placed at the start or end of a loop in order to create a pull-in or release to signify the change in your track.
Try using a dedicated studio session to create your own pack of custom transitions, or simply reach for one of the countless ready-made sample packs available
When it comes to sketching out arrangements, it can be handy to have a stock of these ready to go; creating FX from scratch can be a fiddly process that will slow you down when you’re trying to get your track laid out.
Even if you’re just using placeholder FX that you plan to replace when it comes to applying finishing touches, having some sort of transition in place will go a long way towards giving your arrangement the correct ‘feel’, and could help inspire what elements need to be added or removed for the next section.
Try using a dedicated studio session to create your own pack of custom transitions, or simply reach for one of the countless ready-made sample packs available, like this one from SampleRadar.
An equally essential technique for introducing movement to an arrangement is through automation of sound parameters and effects. The most obvious example of this is by automating the cutoff point of a low-pass filter to make a lead, bassline or chord progression brighter as a track builds.
Realistically though, there’s an endless list of parameters that can be adjusted to change the tone of a track and build dynamic tension, such as a synth’s pulse width, or the decay time of a reverb or rate of an LFO. Even subtle sonic changes through simple modulation will do a lot to keep listeners hooked.
For quick arranging, try setting up a few effect returns with some extreme effects that can help create builds, breakdowns and transitions. In-your-face reverbs or delays are great for this, as are multi-effect tools like Cableguys ShaperBox or SugarBytes Effectrix.
4 quick tips
1. Commit early
Commit early: bounce plugins or external instruments down as audio as soon as you’re happy, to avoid endless tinkering and reworking. If you need to make changes later, get creative with effects or editing.
2. Get hands-on
Get hands-on with the automation process by mapping key parameters to your favourite MIDI controller and performing changes in real time.
3. Use reference tracks
Use reference tracks for creating arrangements. Load a release you’re a fan of into your DAW and make a note of where builds, breakdowns and significant changes occur.
4. Small changes add up
Instead of transition FX, signify changes in your tracks with edits to the current pattern. Try cutting out the kick drum for a bar before the change, or creating snare rolls that ramp up in pitch and/or timing.
6 tips for completing mixdowns
Once creative hurdles have been overcome and you’ve conquered the arrangement, it’s time to turn those sketched out ideas into a finished track. But the process of mixing a track and fine-tuning sounds can often be as daunting as creating the track itself. Reduce the pain and effort required to mix your next track with these time-saving tips...
1. Don't be afraid to outsource

Before we get into the practical mixing tips, let’s get one basic point out of the way first: if you’re really struggling to mix a track, there’s no shame in getting someone else to do it for you. There’s a longstanding and misguided stigma within electronic music that in order to be a ‘real’ producer you need to handle every part of your track creation from end-to-end.
A lot of talented and successful electronic musicians make use of a third party for mixing and mastering their tracks
The truth, however, is that even amongst professionals, not every musician’s skillset includes both the creative and technical sides of making music. A lot of talented and successful electronic musicians make use of a third party for mixing and mastering their tracks. Rather than being a concession, there are actually a lot of benefits to having a second set of ears working on your creation. Often somebody coming to your track ‘fresh’ will be able to pick out issues or suggest ideas that you’ve missed through overfamiliarity with it.
Obviously, getting a professional to mix your tracks comes with a cost, which is a factor that could understandably put many independent musicians off the idea. There are potential ways around this though; try connecting with other, similarly minded musicians and organising a ‘track swap’ where you each offer mixing advice and support.
2. Reference!

One of the quickest and most effective ways to make mixing decisions is to reference your work against well-produced commercial releases that you like. It’s one of the best ways to understand how pros achieve sonic consistency, and set yourself a benchmark to work towards when writing and mixing club music.
Gather a pool of reference tracks, load them into your latest mix project, then flick between your mix and the reference tracks, comparing as you go.
As referencing is such an accepted technique nowadays, you may want to make the process more convenient by investing in a dedicated ‘mix comparison’ plugin such as Sample Magic’s Magic AB, Mastering The Mix’s Reference or iZotope's Tonal Balance Control 2. Once loaded on your master bus, these plugins allow you to load in multiple songs, set up loop points, then A/B between your DAW audio and said tracks with the click of a button.
3. Set up preset chains

Most DAWs let the user combine and save effect patches in some form, as with Live’s Effect Racks or Logic’s Channel Strip presets. Use these to create and save combinations of effects that you can apply to any use cases that crop up regularly in your tracks, such as drum busses, auxiliary effects or master processing.
If you’re not sure where to start, there are plenty of preset chains that can be downloaded online, both for free and commercially; and your DAW itself likely has some decent presets too. Be aware that these sorts of effects are very context dependent, so don’t expect a single ‘one-size-fits-all’ solution right off the shelf.
4. Three-reverb technique

It can often be a struggle to balance multiple spatial effects in a mix, often leading to the whole thing feeling washed out or muddy. An efficient way to balance reverbs, favoured by some pro engineers, is to use a combination of just three reverb types set up as return effects, each aimed at different-sized spaces or reverb styles.
The classic approach is to use short, medium and long reverbs, typically with decay times of around <1s, 1-2s and >2s respectively. It works well to mix up reverb types too; algorithmic room reverbs work well for short verbs, plates are great for mid-sized sounds, and hall reverbs for the longer effects. Send each element of the mix to these by differing amounts to create space.
5. EQ is your friend

There’s a minefield of potential EQ mistakes that can really affect the sound of your overall mix. One common one is overzealous use of high/low-pass filtering on individual channels within a mix. Typically, it’s desirable to use high/low-pass filters for removing unwanted frequencies, freeing up headroom within the mix and increasing clarity of individual elements.
There’s a minefield of potential EQ mistakes that can really affect the sound of your overall mix
This can be a great technique if applied carefully using gentle filters; however, many digital EQ plugins offer much steeper filter types which can potentially make the individual elements of the mix sound too separate. A good rule of thumb would be to use 12dB/oct or 18dB/oct filters for high/low-pass work as this setting will offer you the best compromise between removing unwanted frequencies and retaining a cohesive, musical sound.
Paying careful attention to what frequency the filters are applied at is also crucial – filtering out too many low frequencies from individual elements can lead to a thin-sounding mix for example, while overdoing the low-pass filtering can remove too much air resulting in an overly dull sound.
A great tip is to solo the channel you’re filtering and listen carefully to how the filters affect the sound before seeing how the filtered channel sounds in the context of the whole mix. If the overall sound is subsequently affected more than you’d like, try backing off the filters a touch.
Try using our frequency map, pictured above, to get a sense of where each element should sit on the frequency spectrum.
6. Visualise it

If you’re not blessed with monitoring that accurately reproduces low sub bass or shimmering high frequencies, a frequency analyser such as Voxengo’s excellent (and free!) SPAN will allow you to cross-reference the sound coming from the speakers with a visual indication of what your low/high-pass filters are doing.
