10 steps to scorching '70s synth sounds

Synthtastic '70s
SYNTH WEEK: From roller skates and panel vans to bellbottom jeans and polyester leisure suits, the 1970s were nothing if not colourful.
The Summer of Love had given way to grittier, edgier, acid-etched hard rock, dirty denim and shaggy beards. Amidst Death Wish and Dirty Harry, pop culture managed to carve a bright - if plastic - path through the grit and gloom. It was the age of technology; the space race roared on and all in glorious televised colour; kids cheered as The Six Million Dollar Man thwarted baddies and Evel Knievel soared over cars, canyons and, yes, even sharks. And it all occurred against a backdrop of synthesised sound.
The synthesizer may have been born in the '60s, but it came of age in the '70s. Emerson Lake and Palmer’s Lucky Man kicked off the decade with one of the very first synthesizer solos in a rock song. Improvised in a single take - almost a throwaway - it’s instantly recognisable for its sweeping glide and its deep, resonant sound. It was the solo heard around the world, and keyboardists scrambled to catch up.
Fortunately, companies like Moog and ARP gave musos plenty of opportunities to do so over the decade, churning out one classic synth after another. From Moog’s Minimoog and ARP’s Odyssey to Sequential Circuits’ polyphonic Prophet-5, the synth sounds of the '70s have become indelibly imprinted onto our collective cultural consciousness.
It wasn’t just the rockers who were responsible. Funk and soul musicians embraced the electronic sound, and the radio rang with synthesized bubblegum pop. The democratisation of synthesizer technology allowed solo musicians to create fully orchestrated arrangements on their own, most obviously demonstrated by synth heroes Jean Michel Jarre and Isao Tomita.
The popularity of these new synthesized sounds went far beyond novelty. They were powerful, pointed and even at times profound. Here, we’re going to show you how you can recreate those super synth sounds of the '70s. Sizzling solos, burping brass, and space-age laser zaps - you’ll find all the smash hits here.
Synth Week is brought to you in association with Novation. For more tutorials, tips and features, check out the Synth Week hub page.

Analogue oscillators
If you could travel back in time to the 1970s and ask an electronic musician about the synthesizer, he or she would likely rant about the instability of the instrument’s oscillators.
Analogue oscillators were anything but dependable - even those on the best synths drifted in and out of tune as internal and external temperatures changed, making the quest for precision a fool’s errand. Yet as technology advanced and rock-solid digital alternatives were introduced, musicians were astonished to find that it was their very lack of precision that helped to make those ancient analogue instruments sound so thick, warm and powerful.
Fortunately for us, the oscillators on most virtual analogue synths provide fine-tuning parameters that can be modulated by slow LFOs - ideally with a random element - introducing some amount of unpredictable instability. At the very least, you will likely find a ‘detune’ function that can be used to fatten up the sound as those oscillators beat against one another. A little detuning can go a long, long way.

Distortion and overdrive
A ‘hidden’ feature of the Minimoog was the ability to feed its output back through the filter section via jacks on the rear panel, giving an overdriven effect. Some synthesists even ran their signal through guitar overdrive pedals.
Create a similarly hot tone by running a virtual synth through distortion effects, whether they be super-flexible modern types, simple guitar stompbox recreations, or gnarly virtual amps.

Sweeping solos
One of the most enticing features of the synthesizer was its ability to bend notes. Moog’s pitchbend and portamento functions provided keyboardists with new tools for artistic expression, and '70s synth players took full advantage. Here's how to get the effect...
Step 1: For the classic portamento lead heard on so many solos, start by loading up AlphaCM (available with Computer Music magazine every month) in your host of choice - we’re using MuLab, but you can use what you like. We’ll start by loading up the DetunedOscs preset found in the Tutorial Files folder.
Step 2: A characteristic pitchbent sound is the calling card of the sound we’re after, and it’s made using portamento - aka glide - a feature found on many analogue synths. Activate AlphaCM’s Glide function by clicking the Glide button twice, then nudge the Time knob ever so slightly.
Step 3: We can give the sound a little more bite by increasing the filter Cutoff a bit and nudging the Resonance. Throw on an echo effect and you’ll have a simple, expressive solo sound that you can turn to again and again. Do us a favour and forget about the cape, though, would ya?

Catchy Clavs
The Hohner Clavinet was a staple of the funk and soul music of the 1970s. Heard on countless hits by the likes of Stevie Wonder and Billy Preston, and even taken up by rockers like Rick(s) Wakeman and Wright, the Clav was more often than not run through a wah pedal for a juicy, filtered sound.
Needless to say, synthesists were emulating the Clavinet from day one, and the sound was a fixture among the preset banks when programmable synths like Sequential Circuits’ Prophet-5 were introduced during the last half of the decade.
It’s easy to see why, too. Creating a synthetic Clavinet sound is as close to a no-brainer as it gets, demanding only a rudimentary knowledge of envelope generators. To make one of your own, you’ll need to start with a couple of saw waveforms about an octave apart. Much of the sound is created with the envelopes. Set the amplitude envelope for an abrupt attack and a very short release, no sustain or decay. Wah can be simulated by using a filter envelope to modulate the filter’s cutoff frequency. A decent amount of resonance should be added in for that characteristic squelch.

Brass tactics
Synthesists were limited to monophonic play for much of the 1970s. When polyphony came around in synths such as the Prophet-5 (above), musicians were quick to exploit it for synthetic brass timbres.
Run a couple of detuned sawtooth waveforms through a filter and set the envelope attacks to ‘open up’ the filter over a second or so. The release should be short, and the sustain ought to be a bit lower than full volume, allowing for that initial burst of sound.

The resonant sweep
The 1970s were full of laser zaps and blaster fire, thanks partly to the popularity of Star Wars.
Musicians were exploiting their synths for such sounds even before that seminal sci-i blockbuster hit the cinemas. Kraftwerk were quite fond of percussive zaps, often making them an integral part of their rhythm tracks.
The sound is created by cranking up the resonance and using a very short envelope to sweep the cutoff frequency down rapidly, resulting in the familiar squelching hit. The amplitude envelope should likewise be very short. Neither envelope should have any sustain at all, and the decay should be just long enough to provide the “zap” as the filter clamps down.
As for which waveforms to use, it hardly matters, partly because much of the sound is defined by the filter resonance itself, but also because it’s over so very quickly.

Think sync!
An immediately recognisable lead sound can be created by syncing one oscillator to another - a technique heard in The Cars’ Let’s Go.
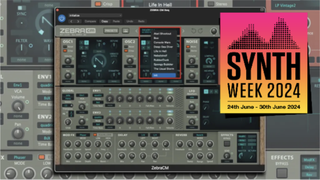
Step 1: Fire up u-he’s ZebraCM (available with Computer Music magazine every month) and call up the UH Initialize preset. Click the Sync button on Oscillator 2. Turn the knob just below the Sync button (Sync Tune) to 12.00. Right-click the knob below it and select Env2 from the list - Env2 will now control the sync.
Step 2: We’ve just replaced Envelope 1 with Envelope 2 as the mod source for the sync function. Let’s tweak it a bit more to drive it home. Go to the Filter section and reduce the Env 2 amount to 0. Change the filter mode to LP Vintage.
Step 3: Turn the Cutoff up to 110 or so, and the Resonance to around 25. Now increase Envelope 1’s Sustain to around 71, and nudge Envelope 2’s Attack up to about 17. You can continue to adjust the sound to taste. Try playing in monophonic mode with some portamento!

Sample & hold
In the '70s, sample & hold features such as those on the ARP 2600 (above) were responsible for everything from chattering computers to calculating androids. This rapid-fire stream of random bleeps and bloops is created using a function called ‘sample & hold’, a technique wherein the chaotic and unpredictable output of a noise generator is ‘sampled’ at regular, rhythmic intervals.
You can also achieve it using the random waveform from an LFO (essentially the same thing) or a step sequencer set to random values. Set it up to modulate both oscillator pitch and filter frequency - the satellites are singing!

Roll off the highs
'70s-style sounds can sound even more vintage when you apply familiar engineering techniques and effects. Consider how those original sounds were recorded and reproduced - it’s easy to forget that engineers back then didn’t have access to the pristine (some say clinical) equipment of today. Every step in the recording chain coloured the sound, but in your DAW’s mixer, the signal is preserved perfectly every step of the way.
Simply rolling off the highs using a shelving or low-cut EQ can help mimic the softer treble associated with vintage recordings.

Tape tone
It cannot be denied that the once ubiquitous tape deck played a significant role in shaping the sound of the '70s. It was the era of huge, multitrack reel-to-reels with 16 and 24 tracks squeezed onto one or two inches of magnetic tape.
The process of tape recording itself altered the sound of the signal. A quality machine would subtly compress and distort the signal in a complementary fashion, while a poorly maintained deck would kill the highs and add lots of tape hiss.
If you’ve got a dedicated tape plugin, then give it a try, but if not, you can achieve usefully similar results by adding slight limiting and even a bit of distortion. Also try introducing a tiny bit of noise, either from the synth’s noise oscillator, or by routing both the synth and an audio track of quiet hiss to a buss, mixing them together and processing them further.