Parameter automation is one of the keys to an interesting and engaging mix, and it refers to the process of recording, adjusting and playing back the movements of knobs, faders and switches. The automation systems found on current DAWs are incredibly sophisticated, giving producers access to levels of creative control that would once have been unattainable.
Today's computer systems give us two principal ways to input and work with automation data: the traditional method of recording fader moves, either by mouse or hardware controller, and a system of plotting points on a graphical control curve, programming the moves exactly where you want them on the timeline.
Without automation, getting the dynamic and exciting mixes that you hear on today's tracks would be impossible, as every movement of every knob, fader and control within the mix would have to be performed live, by hand. Automation lets you store every movement with pinpoint accuracy and consistency, time after time, as the information is saved and recalled as part of your project.
So how do we get automation information into the computer? In the average DAW, probably the most straightforward method is to open the automation 'lanes' for the track you want to work on, select the required parameter for that lane and then use your DAW's automation tools to draw lines and control points by hand on the automation curve itself.
However, rather than 'drawing' the curve in the lane like this, you may want to record parameter movements live by hand using your mouse or trackpad. This involves four modes: Read, Write, Touch and Latch.
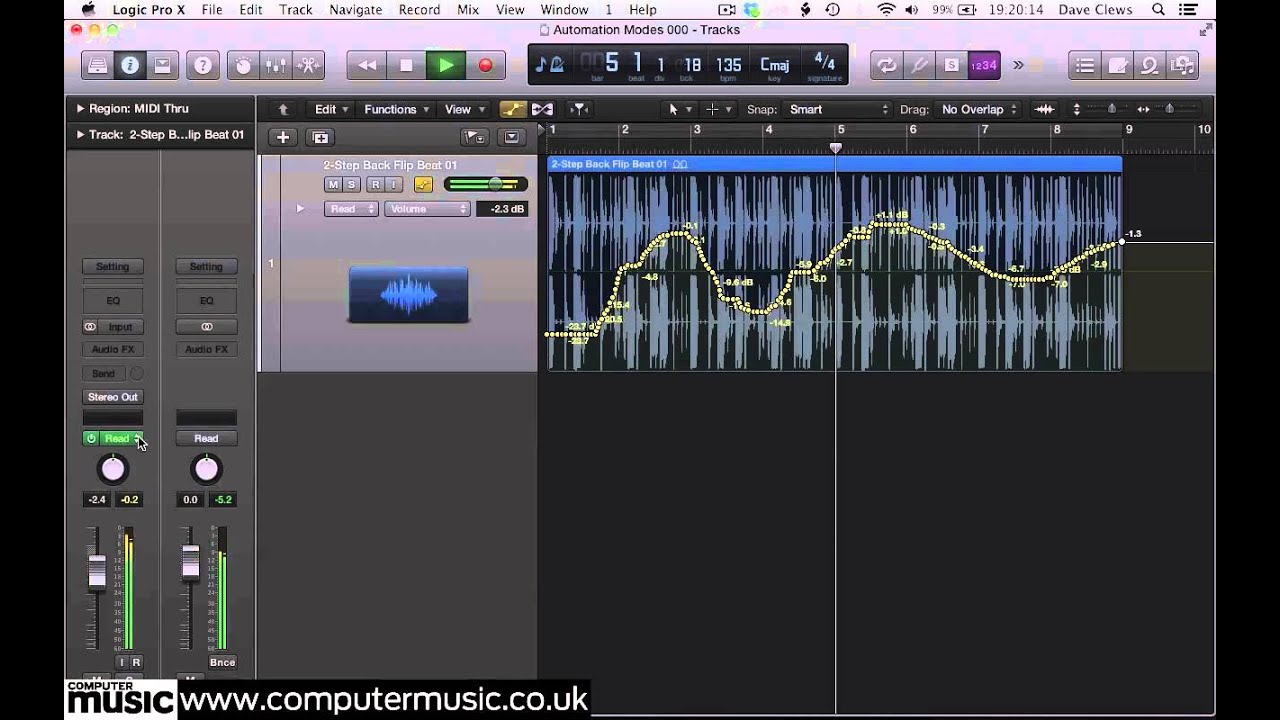
Read is the standard state, in which any automation is read and played back, but you can't record any new ones. Switch to Write mode, and any existing moves are erased as the playhead/cursor passes over them, replaced by any new moves that you make.
Touch mode plays back automation in the same way as Read mode: the automation plays back as normal until you start moving a control, at which point the movements are recorded over the existing ones. After the control is let go, the parameter 'snaps back' to follow existing automation data on the track.
Finally, Latch mode works like Touch mode, but after the control is released, the new parameter value replaces existing automation on the track. For loads more on automation, grab the December issue of Computer Music (CM 198).

Step 1. We've imported Drumloop.wav (right click and save to download), whose volume we're going to fade in and out with automation using the various modes/methods described above. First we enable the automation view - all DAWs have different ways of doing this, but in Logic, you either click the Automation button or press the A key to displaythe lanes.

Step 2. By default, our automation lane controls the Volume parameter, which is what we want in this case. Click on the line at the beginning of the region to place a control point. Place a second point towards the end of the region. The vertical height of these control points - or 'nodes' - represents the volume of the track at that point. Set them to 0dB.

Step 3. Drag the first node down vertically towards the bottom of the lane - you can see the attached volume value change as you do so, ending up at -24dB. The end node stays where it is, resulting in a sloping straight line between the two points. Play back the audio now and you'll hear it start off quiet and gradually fade up to normal level towards the end.

Step 4. On the channel fader, switch to Write mode. Play back the part and move the channel fader up and down with your mouse. You can see the level change being written into the automation curve as the track plays. Stop the track, switch back to Read mode and hit play again to watch your movements being played back.

Step 5. Switch the track to Touch mode. Hit play and - whenever you like - grab the fader with the mouse to make a change. Here, we're reducing the level of the loop just in bars 3 and 4. Notice that as we release the fader, it snaps back to the existing curve - it 'overdubbed' just the part where we were moving the fader, replacing what was previously there.

Step 6. Now we switch to Latch mode to perform a manual fadeout. Set the loop to 16 bars, disable cycle mode and play the track from the beginning. Grab the fader eight bars from the end and fade it down to silence over four or five bars. When you release the fader at its lowest point, it stays where it is and this value is written for as long as the track plays.


