After looking at the physical benefits of the Alexander Technique, we're continuing the ergonomics theme, paying particular attention to the mechanical principles of the lower body and foot.
It is recommended that you wear sensible footwear for the remainder of this article.
Physical technique and movement
When talking about foot techniques in drumming, we generally refer to 'heel up' and 'heel down' techniques, which relate to the anatomical position and movement of the foot when playing strokes on the bass drum or hi-hat pedals.
Some drummers play exclusively heel-up or heel-down, while others prefer to use a combination of both techniques - we'll be looking at all variations.
However, to ease you in gently, it's important to examine some natural movements of the feet, beginning with a few simple exercises. Are you sitting comfortably? (preferably on your drum stool). Then let's begin.
Heels down

With the feet flat on the floor, simply raise the feet upwards, from the ankle, keeping the heels on the floor. In physiological terms this is known as dorsiflexion and can be seen in the image above.
Now, push the feet back down to the floor - this is known as plantar flexion - and rest. Try moving the feet continuously upwards and downwards, slowly at first, through means of dorsiflexion and plantar flexion, focusing your attention on the ankle joints, and keeping the heels on the floor. To make this exercise even more exciting, place your hands on your shins, and you'll feel the muscles of the shins contracting naturally.
Also, try placing your hands on your thighs, and then knees. Are the thigh muscles contracting? Do the knees feel tight and locked? If so, you are too tense. So relax…
Heels up

Next, and again starting with the feet flat on the floor, raise the heels upwards, off the floor, from the ankle, keeping the balls of the feet, and the toes, on the floor. The above image shows an exaggeration of this position, and could begin by maintaining more contact with the balls of the feet on the floor. The main consideration is that the heels are raised.
In physiological terms, this requires flexion of the hip, and plantar flexion of the foot. Now drop the heels back on to the floor. Repeat this movement continuously, and if you can contain your euphoria, place your hands on your calves to feel the muscles of the calves contracting naturally.
"If executed with physical efficiency, you will feel tension-free in all the joints and in the thigh and abductor muscle"
Again, try placing your hands on your thighs, then knees, to feel if there is any tension there. There shouldn't be. Next, try this exercise.
Starting with the feet flat on the floor, press your fingers (not too firmly) into the muscle at the very top of your thigh, close to the hip joint, and lift the foot on that leg completely off the floor. You will feel that muscle (known as an abductor muscle) contract, as a result of the hip flexion, which basically lifts up the leg. Relax. Now, keeping your hand in this position, try the basic heel up exercise again.
How does this feel? Is the abductor muscle contracting too much? Does it feel uncomfortable? If so, then you are too tense and you need to concentrate on pushing up from the floor, using the ankles, with knees and hips unlocked.
If executed with physical efficiency, you will feel tension-free in all the joints and in the thigh and abductor muscle. This will be a very important physical consideration, particularly in relation to the various heel-up techniques that are used in drumming.
Next page: designer footwear, pedal positions and tap dancing!
Designer footwear
These exercises are very important, not least to show you the latest in designer drumming footwear (imported from Denmark, details on request) but, more specifically, to demonstrate a range of typical physical movements used in 'heel-down' and 'heel up' foot techniques on the drumset.
You should always allow the body to move in the most natural way possible, without physical restriction. It's important, therefore, to generate an awareness and understanding of the natural, efficient, tension-free movements of the feet, incorporating ankles, knees, and hips (particularly in heel up actions).
Also, when doing these exercises, you should avoid 'curling' or 'crunching' of the toes, which is surprisingly common. So, remember to keep your toes straight - after all, playing drums should not be a toe-curling experience.

Finally, imagine yourself as a tap dancer, using all those wonderful, natural, free flowing movements of the feet. Better still, sign up for some tap dancing lessons! Don't knock it 'till you've tried it - it didn't do Buddy Rich or Steve Gadd any harm.
Pedal positions and mechanical considerations
The position of the foot, together with an understanding of the basic mechanics of the pedals, is a key ergonomic consideration. Basically, regardless of the techniques used the foot should be positioned, and should move, in a way that allows the pedal to function most efficiently - without physical or mechanical restrictions.
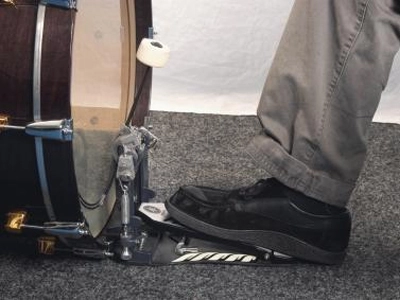
As a general mechanical rule, we should be aware that there will be a natural pivot point on the footplate of the pedals, which is sometimes referred to as the 'sweet spot'. The sweet spot is similar, in principle, to the fulcrum position on the drum stick.

The above and below images show a typical 'pivot point' or sweet spot on the bass drum and hi-hat pedals, respectively, with the ball of the foot in a resting position, placed approximately two thirds of the way up the pedal footplate.

Placing the foot in this position will generally (subject to good physical technique) allow the mechanisms of the pedal to function freely. On the other hand, placing the foot too much further up, or further down, the footplate, from the 'pivot point' can prove to be physically and mechanically restrictive, in that the weight distribution of the foot may counteract the 'depression' and 'release' principles of the pedals.

The above and below images show the foot in a resting position, placed further up the footplate…

…while the two images below show the foot in a resting position, placed further down along the pedal footplate.


Of course, it's difficult to lay down any hard and fast rules on this, as there are many physical, mechanical and musical variables to consider. Different drummers will use different foot techniques - perhaps not the most ergonomic techniques - and still achieve the desired results.
Nevertheless, it pays to have an awareness and understanding of key ergonomic principles - after all, is it not best to go Au Naturel?
Liked this? Then try:
How to improve posture with the Alexander Technique: part 1
How to improve posture with the Alexander Technique: part 2
17 seriously useful drum tuning tips
Sign up for our free weekly newsletter
The free MusicRadar newsletter serves up the week's biggest artist and product news stories alongside exclusive tuition and gear reviews. Sign up here!
Follow MusicRadar on Twitter
Get instant updates and bonus content plus chat with the team. Start here!